remote control TOYOTA xB 2009 Accessories, Audio & Navigation (in English)
[x] Cancel search | Manufacturer: TOYOTA, Model Year: 2009, Model line: xB, Model: TOYOTA xB 2009Pages: 32, PDF Size: 0.33 MB
Page 3 of 32
128-7907A
3 of 32
- I I -
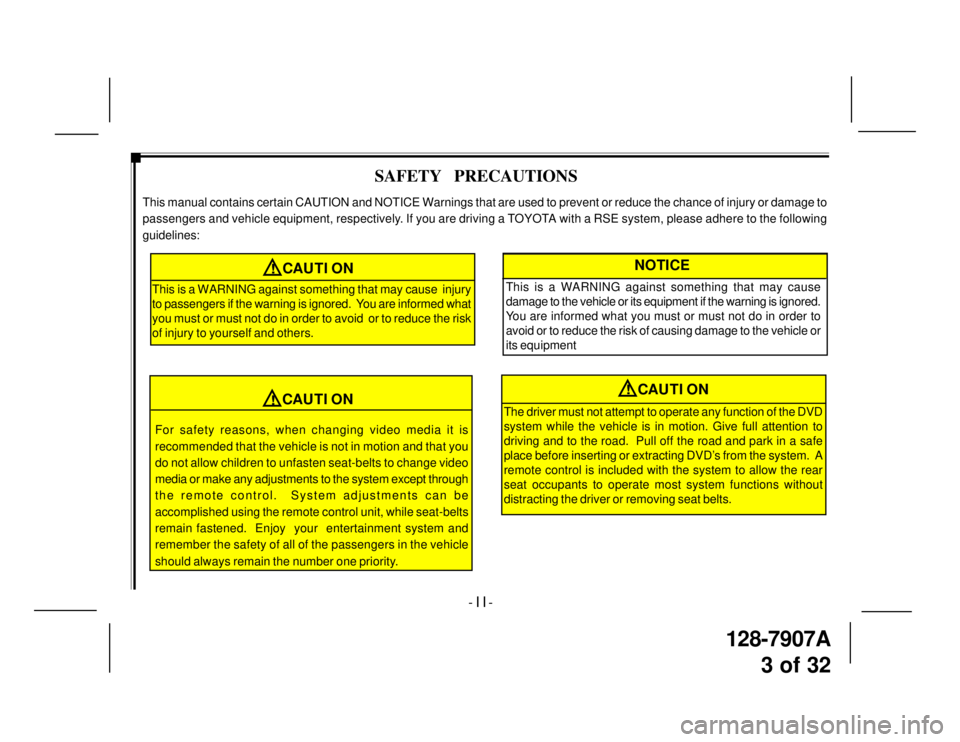
SAFETY PRECAUTIONS
This manual contains certain CAUTION and NOTICE Warnings that are used to prevent or reduce the chance of injury or damage to
passengers and vehicle equipment, respectively. If you are driving a TOYOTA with a RSE system, please adhere to the following
guidelines:
!CAUTION
This is a WARNING against something that may cause injury
to passengers if the warning is ignored. You are informed what
you must or must not do in order to avoid or to reduce the risk
of injury to yourself and others.
For safety reasons, when changing video media it is
recommended that the vehicle is not in motion and that you
do not allow children to unfasten seat-belts to change video
media or make any adjustments to the system except through
the remote control. System adjustments can be
accomplished using the remote control unit, while seat-belts
remain fastened. Enjoy your entertainment system and
remember the safety of all of the passengers in the vehicle
should always remain the number one priority.
!CAUTION
NOTICE
This is a WARNING against something that may cause
damage to the vehicle or its equipment if the warning is ignored.
You are informed what you must or must not do in order to
avoid or to reduce the risk of causing damage to the vehicle or
its equipment
The driver must not attempt to operate any function of the DVD
system while the vehicle is in motion. Give full attention to
driving and to the road. Pull off the road and park in a safe
place before inserting or extracting DVD’s from the system. A
remote control is included with the system to allow the rear
seat occupants to operate most system functions without
distracting the driver or removing seat belts.
!CAUTION
Page 7 of 32

128-7907A
7 of 32
-VI-
TABLE OF CONTENTS
INTRODUCTION................................................................. I
Federal Communication Commission (FCC) Compliance I
SAFETY PRECAUTIONS................................................ II-V
QUICK START GUIDE........................................................ 1
Operating the DVD System ............................................ 1
CONTROLS AND INDICATOR DIAGRAM.......................... 2
Control Function Descriptions for M1 and M2 Monitor..... 2
M1 / M2 Panel Control ................................................... 2
DVD HEADREST SYSTEM OVERVIEW............................. 3
REMOTE CONTROL OPERATION...................................... 4
Battery Installation......................................................... 4
Remote Control Functional Description....................... 5-9
WIRELESS HEADPHONES OPERATION.......................... 10
Wireless Headphones Special Features........................ 10
Wireless Headphone Battery Installation....................... 10
OPERATION INSTRUCTIONS........................................... 11
Control Button Functions (M1 / M2 Unit) ....................... 11
DVD Basics.................................................................. 12
Region Coding............................................................... 12
Types of Discs Your System Will Play .......................... 12
Disc Compatibility......................................................... 12
Loading and Playing Discs ........................................12
To Load and Play a Disc ........................................... 12
Source Selection...................................................... 12Settings and Adjustments...........................................13
Using the Setup Menu ............................................... 13
Exiting the Setup Menu ............................................. 13
Language Setup..........................................................13
Language for On-Screen Display............................... 13
Subtitle Setup............................................................ 14
Audio Setup.............................................................. 14
Video Setup.................................................................15
TV Display................................................................. 15
TV Type ..................................................................... 15
Rating Setup................................................................16
Rating........................................................................ 16
Misc Setup..................................................................... 16
Factory Defaults...........................................................16
Screen Saver.................................................................. 17
Playing Audio CDs .......................................................17
Playing MP3 Discs.......................................................18
Selecting a Play Mode .............................................. 18
Skipping Songs......................................................... 18
Selecting Folders and Songs ..................................... 18
Program Play............................................................ 19
Deleting the Play List ................................................ 19
TROUBLESHOOTING........................................................ 20
FUSE REPLACEMENT....................................................... 21
SPECIFICATIONS.............................................................. 22
OWNER’S NOTES..........................................................23-24
Page 8 of 32

128-7907A
8 of 32
QUICK START GUIDE
9. Tilt the screen to a comfortable viewing position (the
headrest itself can be tilted forward to help achieve a
comfortable viewing position).
10. Select AV1 using the source button on the front panel
or remote control to view program material on M1 or
select from the other available sources DVD, or AUX
for M2 Monitor.
*NOTE:To operate the M1 screen, press M1 on the
remote control. To operate the M2 screen,
press M2 on the remote control.
Operating The DVD System:
1. Turn on the M1 Monitor (passenger side) using the
Power button on the front of the screen or the *Remote
Control. Tilt the screen forward using the center tab
at the top of the screen.
2. Insert a DVD, CD or MP3 disc into the slot (disc label
toward driver).
3. The disc will start playing.
4. Tilt the monitor to a comfortable viewing position (the
headrest itself can be tilted forward to help achieve a
comfortable viewing position).
5. When the DVD menu appears, select the menu item
using the cursor keys and press the Enter or Play
button.
6. Each wireless headphone has a CH A/CH B switch.
When sitting in front of the M1 monitor, use the CH A
switch setting. When sitting in front of the M2 monitor,
use the CH B switch setting. Set the headphone to
the proper channel and press the PowerOn/Off
switch. The power indicator will light up red. Turn the
volume down to its lowest setting beforeputting
them on your head.
7. If audio playback through the vehicle radio is preferred,
set the radio to AUX mode. Verify that nothing is
connected to the vehicle radio’s AUX jack.
NOTE:If there is a plug in the vehicle radio’s AUX jack; it
will override the DVD audio.
8. Turn on the M2 Monitor (driver’s side) using the power
button on the front of the screen or remote control.
-1-
Page 10 of 32
128-7907A
10 of 32
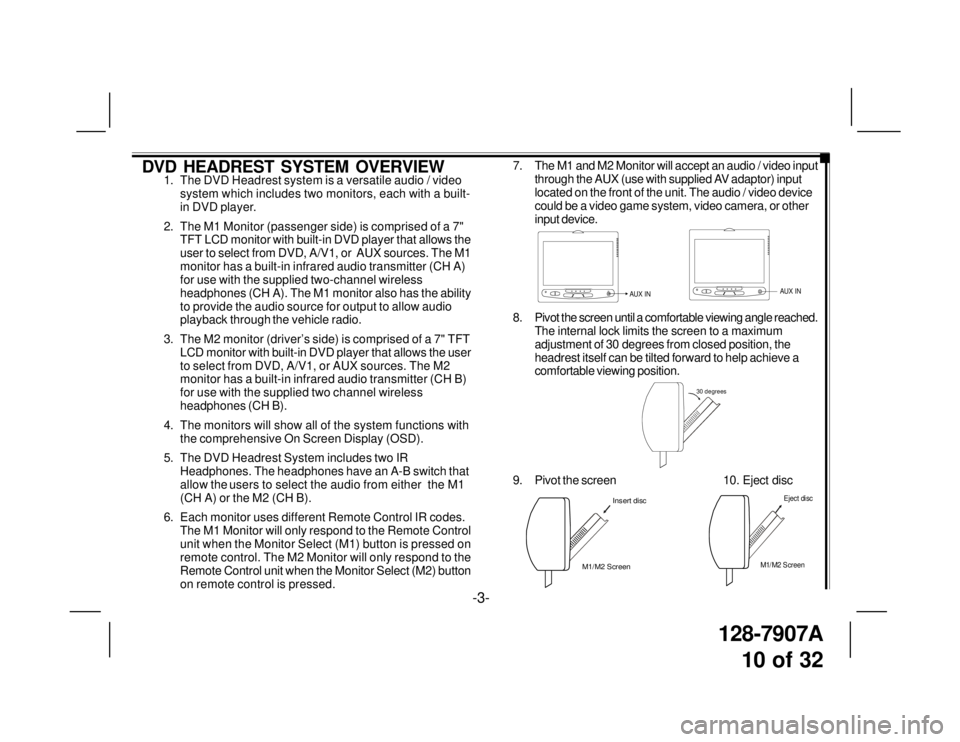
DVD HEADREST SYSTEM OVERVIEW1. The DVD Headrest system is a versatile audio / video
system which includes two monitors, each with a built-
in DVD player.
2. The M1 Monitor (passenger side) is comprised of a 7"
TFT LCD monitor with built-in DVD player that allows the
user to select from DVD, A/V1, or AUX sources. The M1
monitor has a built-in infrared audio transmitter (CH A)
for use with the supplied two-channel wireless
headphones (CH A). The M1 monitor also has the ability
to provide the audio source for output to allow audio
playback through the vehicle radio.
3. The M2 monitor (driver’s side) is comprised of a 7" TFT
LCD monitor with built-in DVD player that allows the user
to select from DVD, A/V1, or AUX sources. The M2
monitor has a built-in infrared audio transmitter (CH B)
for use with the supplied two channel wireless
headphones (CH B).
4. The monitors will show all of the system functions with
the comprehensive On Screen Display (OSD).
5. The DVD Headrest System includes two IR
Headphones. The headphones have an A-B switch that
allow the users to select the audio from either the M1
(CH A) or the M2 (CH B).
6. Each monitor uses different Remote Control IR codes.
The M1 Monitor will only respond to the Remote Control
unit when the Monitor Select (M1) button is pressed on
remote control. The M2 Monitor will only respond to the
Remote Control unit when the Monitor Select (M2) button
on remote control is pressed.7. The M1 and M2 Monitor will accept an audio / video input
through the AUX (use with supplied AV adaptor) input
located on the front of the unit. The audio / video device
could be a video game system, video camera, or other
input device.
8. Pivot the screen until a comfortable viewing angle reached.
The internal lock limits the screen to a maximum
adjustment of 30 degrees from closed position, the
headrest itself can be tilted forward to help achieve a
comfortable viewing position.
AUX INAUX IN
30 degrees
9. Pivot the screen 10. Eject disc
M1/M2 ScreenInsert disc
-3-
M1/M2 Screen
Eject disc
Page 11 of 32

128-7907A
11 of 32
-4-
REMOTE CONTROL OPERATION
Battery Cover
Lift for battery
installation
Battery Installation:
Before attempting to operate your remote control, install the
batteries as described below.
1. Turn the remote control face down. Using a fingernail, lift
the battery cover off.
2. Install two “AAA” batteries. Make sure that proper polarity
(+/-) is observed.
3. Align the cover tabs with the remote control and press
down until the cover clicks.
Page 12 of 32
128-7907A
12 of 32
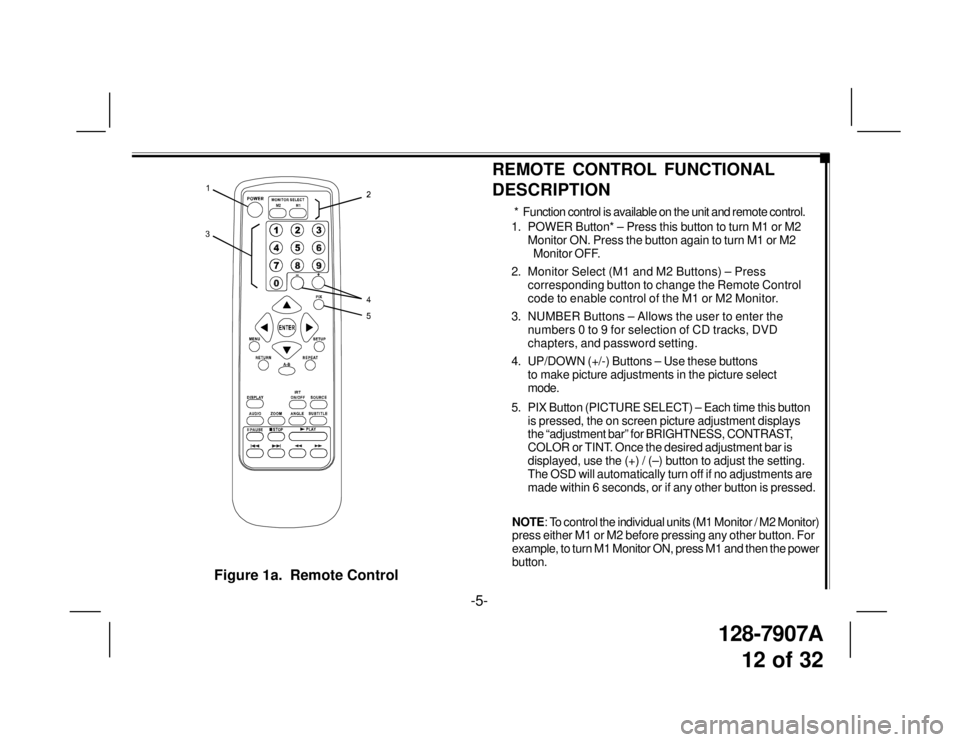
Figure 1a. Remote Control
-5-
1. POWER Button* – Press this button to turn M1 or M2
Monitor ON. Press the button again to turn M1 or M2
Monitor OFF.
2. Monitor Select (M1 and M2 Buttons) – Press
corresponding button to change the Remote Control
code to enable control of the M1 or M2 Monitor.
3. NUMBER Buttons – Allows the user to enter the
numbers 0 to 9 for selection of CD tracks, DVD
chapters, and password setting.
4. UP/DOWN (+/-) Buttons – Use these buttons
to make picture adjustments in the picture select
mode.
5. PIX Button (PICTURE SELECT) – Each time this button
is pressed, the on screen picture adjustment displays
the “adjustment bar” for BRIGHTNESS, CONTRAST,
COLOR or TINT. Once the desired adjustment bar is
displayed, use the (+) / (–) button to adjust the setting.
The OSD will automatically turn off if no adjustments are
made within 6 seconds, or if any other button is pressed.
REMOTE CONTROL FUNCTIONAL
DESCRIPTION
* Function control is available on the unit and remote control.
NOTE: To control the individual units (M1 Monitor / M2 Monitor)
press either M1 or M2 before pressing any other button. For
example, to turn M1 Monitor ON, press M1 and then the power
button.
Page 13 of 32
128-7907A
13 of 32
7
109 8 6A
11
M1 M2
+–6B
6C
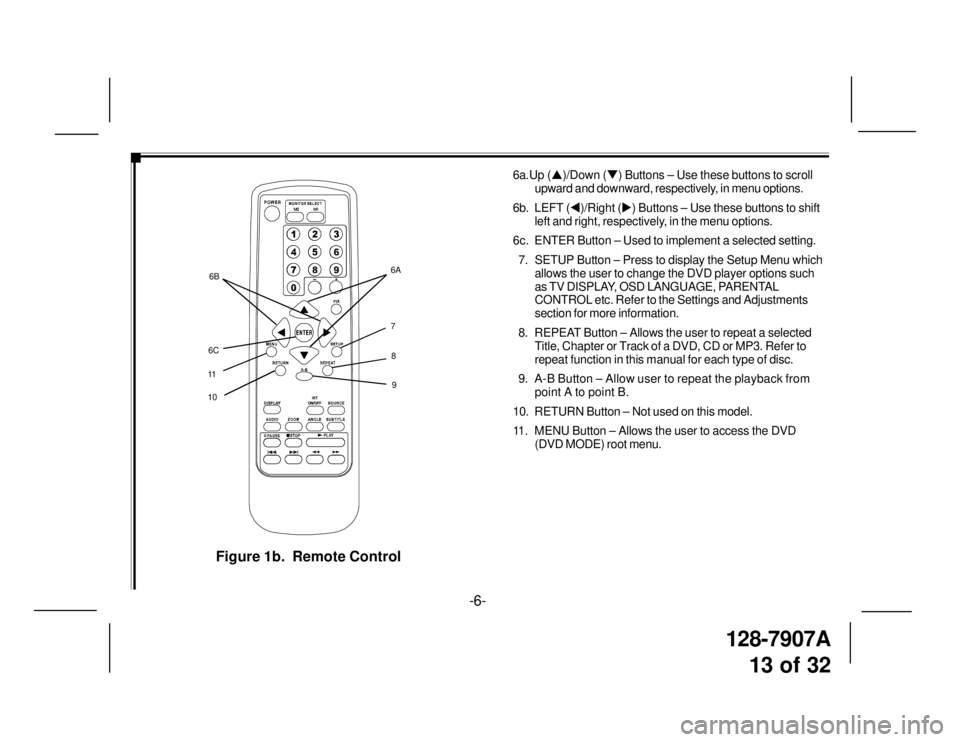
Figure 1b. Remote Control
6a.Up (�S)/Down (�T) Buttons – Use these buttons to scroll
upward and downward, respectively, in menu options.
6b. LEFT (�W)/Right (�X) Buttons – Use these buttons to shift
left and right, respectively, in the menu options.
6c. ENTER Button – Used to implement a selected setting.
7. SETUP Button – Press to display the Setup Menu which
allows the user to change the DVD player options such
as TV DISPLAY, OSD LANGUAGE, PARENTAL
CONTROL etc. Refer to the Settings and Adjustments
section for more information.
8. REPEAT Button – Allows the user to repeat a selected
Title, Chapter or Track of a DVD, CD or MP3. Refer to
repeat function in this manual for each type of disc.
9. A-B Button – Allow user to repeat the playback from
point A to point B.
10. RETURN Button – Not used on this model.
11. MENU Button – Allows the user to access the DVD
(DVD MODE) root menu.
-6-
Page 14 of 32
128-7907A
14 of 32
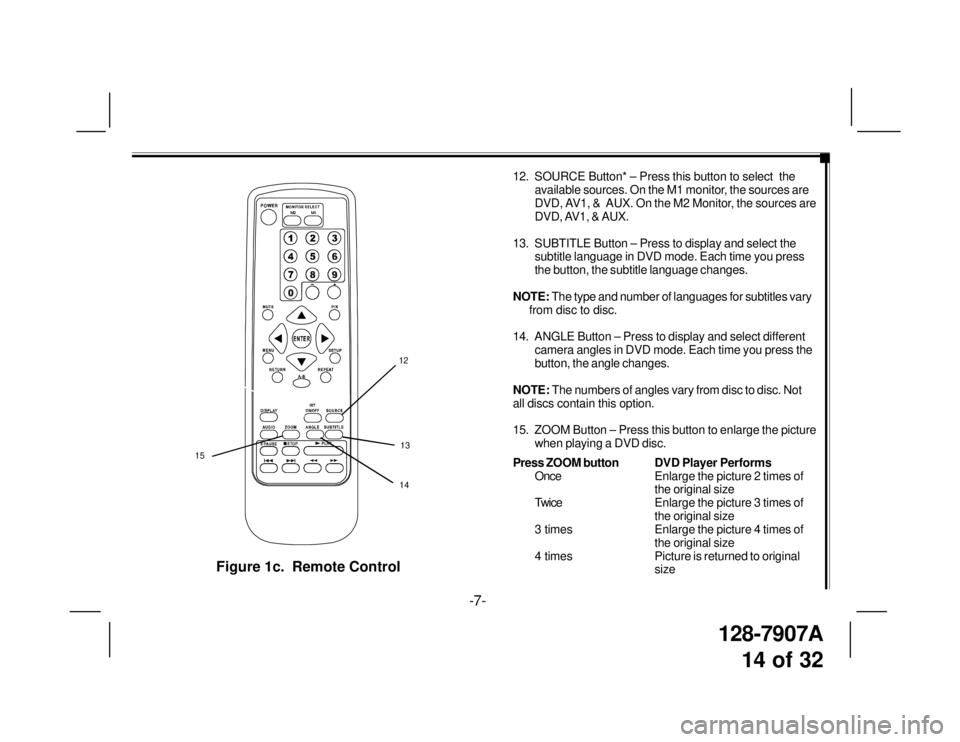
Figure 1c. Remote Control
12. SOURCE Button* – Press this button to select the
available sources. On the M1 monitor, the sources are
DVD, AV1, & AUX. On the M2 Monitor, the sources are
DVD, AV1, & AUX.
13. SUBTITLE Button – Press to display and select the
subtitle language in DVD mode. Each time you press
the button, the subtitle language changes.
NOTE: The type and number of languages for subtitles vary
from disc to disc.
14. ANGLE Button – Press to display and select different
camera angles in DVD mode. Each time you press the
button, the angle changes.
NOTE: The numbers of angles vary from disc to disc. Not
all discs contain this option.
15. ZOOM Button – Press this button to enlarge the picture
when playing a DVD disc.
Press ZOOM buttonDVD Player Performs
OnceEnlarge the picture 2 times of
the original size
TwiceEnlarge the picture 3 times of
the original size
3 times Enlarge the picture 4 times of
the original size
4 times Picture is returned to original
size
-7-
12
13
15
M1 M2
+–
14
Page 15 of 32
128-7907A
15 of 32
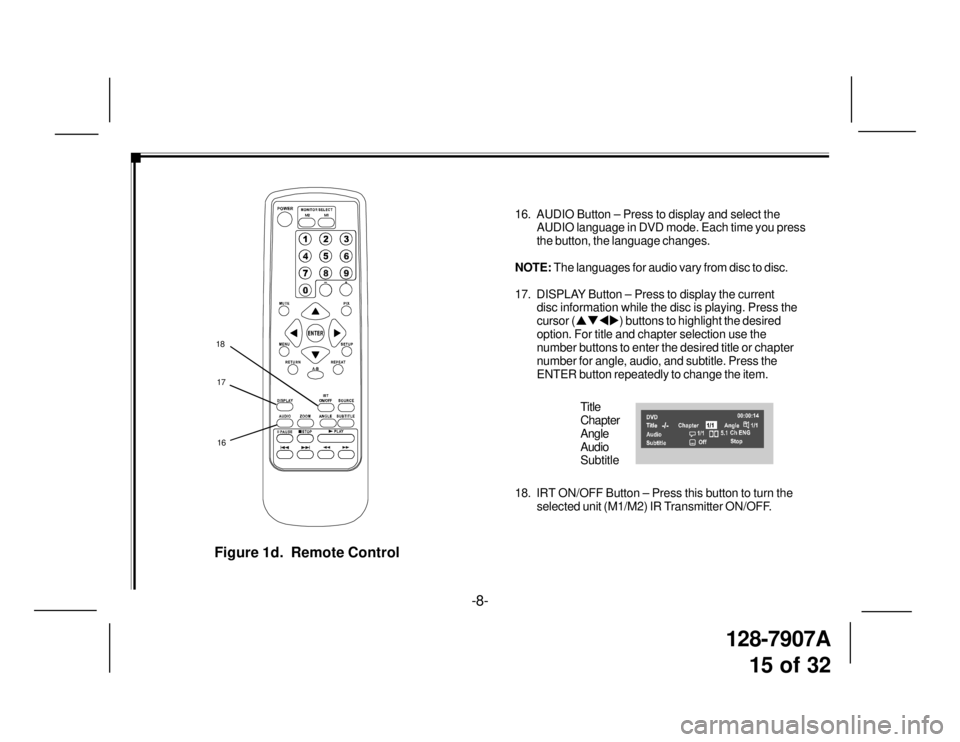
Figure 1d. Remote Control
16. AUDIO Button – Press to display and select the
AUDIO language in DVD mode. Each time you press
the button, the language changes.
NOTE: The languages for audio vary from disc to disc.
17. DISPLAY Button – Press to display the current
disc information while the disc is playing. Press the
cursor (�S�T�W�X) buttons to highlight the desired
option. For title and chapter selection use the
number buttons to enter the desired title or chapter
number for angle, audio, and subtitle. Press the
ENTER button repeatedly to change the item.
Title
Chapter
Angle
Audio
Subtitle
18. IRT ON/OFF Button – Press this button to turn the
selected unit (M1/M2) IR Transmitter ON/OFF.
17 18
M1 M2
+–
16
-8-
Page 16 of 32
128-7907A
16 of 32
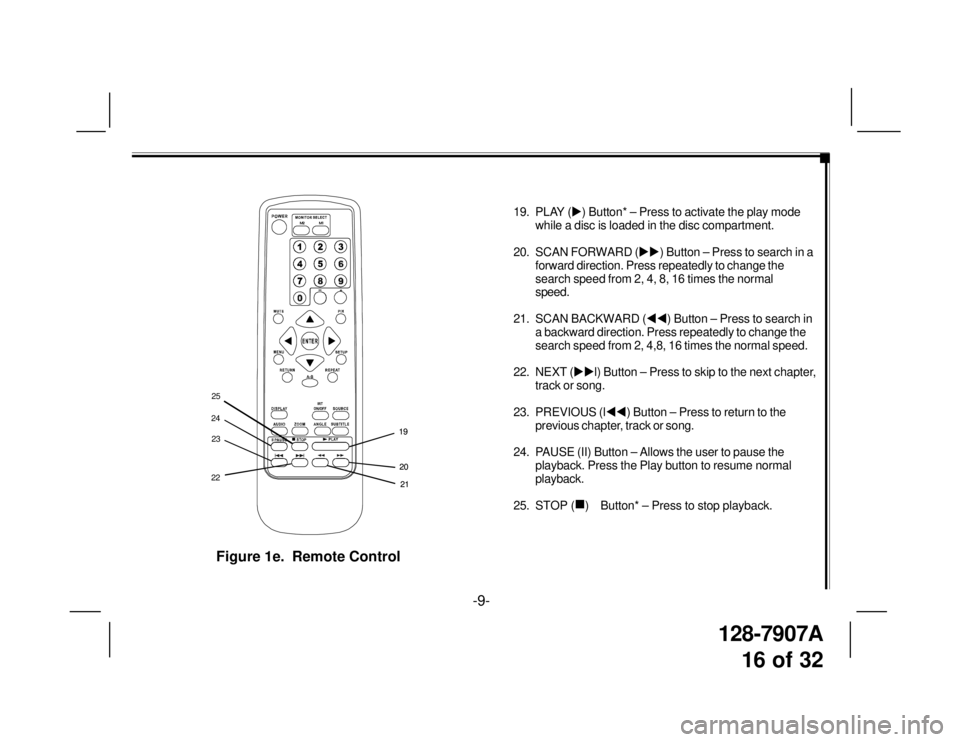
Figure 1e. Remote Control
19. PLAY (�X) Button* – Press to activate the play mode
while a disc is loaded in the disc compartment.
20. SCAN FORWARD (�X�X) Button – Press to search in a
forward direction. Press repeatedly to change the
search speed from 2, 4, 8, 16 times the normal
speed.
21. SCAN BACKWARD (�W�W) Button – Press to search in
a backward direction. Press repeatedly to change the
search speed from 2, 4,8, 16 times the normal speed.
22. NEXT (�X�Xl) Button – Press to skip to the next chapter,
track or song.
23. PREVIOUS (l�W�W) Button – Press to return to the
previous chapter, track or song.
24. PAUSE (II) Button – Allows the user to pause the
playback. Press the Play button to resume normal
playback.
25. STOP (
�„) Button* – Press to stop playback.
-9-
20 19
M1 M2
+–
21 20 19
212223 2425