brake TOYOTA xB 2010 Accessories, Audio & Navigation (in English)
[x] Cancel search | Manufacturer: TOYOTA, Model Year: 2010, Model line: xB, Model: TOYOTA xB 2010Pages: 52, PDF Size: 1.43 MB
Page 26 of 52

26
ALPINE MFTY802A 68-14470Z28-C (EN)
CAUTION
• We accept no responsibility for lost data on the iPod even if that data
is lost while using this unit.
• Do not allow direct sunlight to fall on the iPod when it is not being
used. Extended exposure to direct
sunlight can result in iPod malfunc-
tion due to the resulting high tem-
peratures.
• Do not leave the iPod in high tem- peratures or direct sunlight.
• Fix the iPod securely when using with this unit. Do not let the iPod
fall onto the floor, where it may be-
come jammed under the brake or
accelerator pedal. * Or place in
glove box.
For details, refer to your iPod
Owner’s Manual.Handling the iPod
(Optional)
About iPod settings
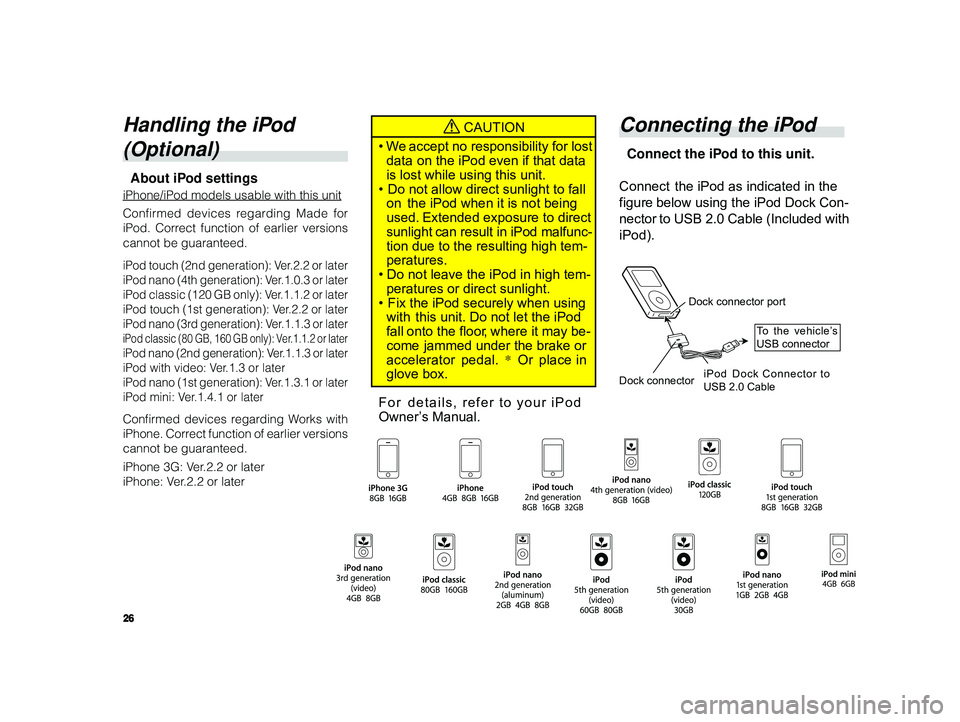
iPhone/iPod models usable with this unit
Confirmed devices regarding Made for
iPod. Correct function of earlier versions
cannot be guaranteed.
iPod touch (2nd generation): Ver.2.2 or later
iPod nano (4th generation): Ver.1.0.3 or later
iPod classic (120 GB only): Ver.1.1.2 or later
iPod touch (1st generation): Ver.2.2 or later
iPod nano (3rd generation): Ver.1.1.3 or later
iPod classic (80 GB, 160 GB only): Ver.1.1.2 or later
iPod nano (2nd generation): Ver.1.1.3 or later
iPod with video: Ver.1.3 or later
iPod nano (1st generation): Ver.1.3.1 or later
iPod mini: Ver.1.4.1 or later
Confirmed devices regarding Works with
iPhone. Correct function of earlier versions
cannot be guaranteed.
iPhone 3G: Ver.2.2 or later
iPhone: Ver.2.2 or later
Connecting the iPod
Connect the iPod to this unit.
Connect the iPod as indicated in the
figure below using the iPod Dock Con-
nector to USB 2.0 Cable (Included with
iPod).
Dock connector port
Dock connector iPod Dock Connector to
USB 2.0 CableTo
the vehicle’s
USB connector
Page 40 of 52

40
ALPINE MFTY802A 68-14470Z28-C (EN)
Using the Video input
(Optional) cable kit required
With this optional video cable kit you
can input video and audio to the radio
through composite video inputs (RCA
type).
Simply take your composite video out-
put cables from your device and con-
nect to the optional video kit’ s input
cables.
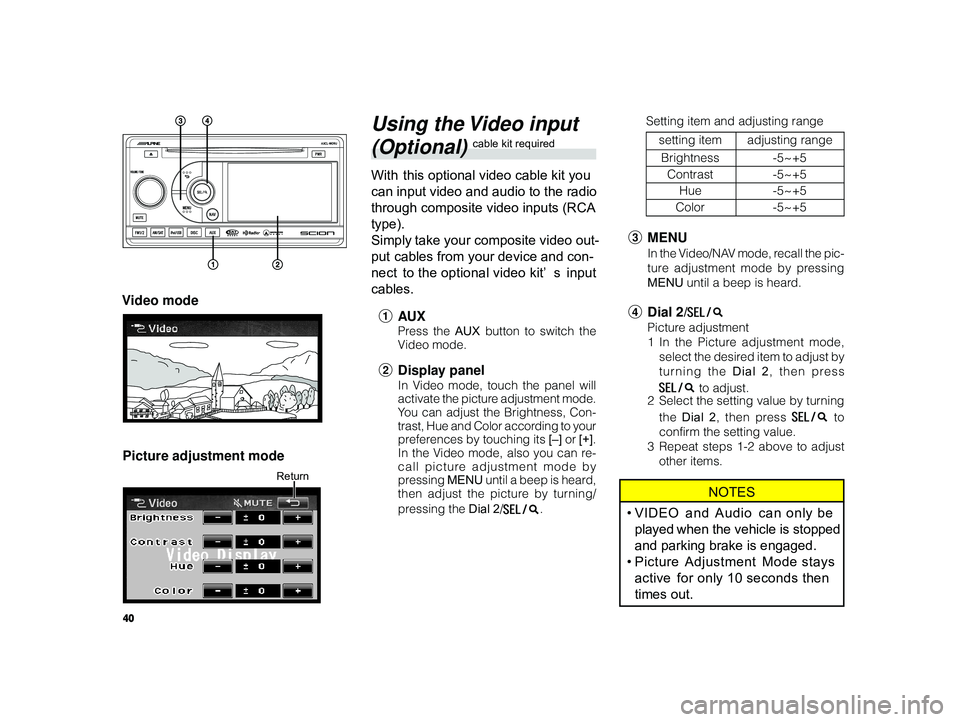
1 AU X
Press the AUX button to switch the
V ideo mode.
2 Display panel
In Video mode, touch the panel will
activate the picture adjustment mode.
You can adjust the Brightness, Con-
trast, Hue and Color according to your
preferences by touching its [–] or [+].
In the Video mode, also you can re-
call picture adjustment mode by
pressing MENU until a beep is heard,
then adjust the picture by turning/
pressing the Dial 2/
.
Video mode
Picture adjustment mode
Return
3 MENU
In the Video/NAV mode, recall the pic-
ture adjustment mode by pressing
MENU until a beep is heard.
4Dial 2/
Picture adjustment
1In the Picture adjustment mode,
select the desired item to adjust by
turning the Dial 2 , then press
to adjust.
2 Select the setting value by turning
the Dial 2 , then press
to
confirm the setting value.
3 Repeat steps 1-2 above to adjust
other items.
NOTES
•VIDEO and Audio can only be
played when the vehicle is stopped
and parking brake is engaged.
• Picture Adjustment Mode stays
active for only 10 seconds then
times out.
Setting item and adjusting range
setting item adjusting range
Brightness -5~+5
Contrast -5~+5
Hue -5~+5
Color -5~+5