air condition TOYOTA xB 2015 (in English) Owner's Manual
[x] Cancel search | Manufacturer: TOYOTA, Model Year: 2015, Model line: xB, Model: TOYOTA xB 2015Pages: 392, PDF Size: 10.09 MB
Page 245 of 392
245
4-3. Do-it-yourself maintenance
4
Maintenance and care
Scion_xB_OM_OM12F03U_(U)
NOTICE
■Repairing or replacing tires, wheels, tire pressure warning valves,
transmitters and tire valve caps
●When removing or fitting the wheels, tires or the tire pressure warning
valves and transmitters, contact your
Scion dealer as the tire pressure
warning valves and transmitters may be damaged if not handled cor-
rectly.
●When replacing tire valve caps, do not use tire valve caps other than
those specified. The cap may become stuck.
■To avoid damage to the tire pressure warning valves and transmit-
ters
When a tire is repaired with liquid sealants, the tire pressure warning
valve and transmitter may not operate properly. If a liquid sealant is
used, contact your Scion dealer or other qualified service shop as soon
as possible. Make sure to replace the tire pressure warning valve and
transmitter when replacing the tire. ( P. 239)
■Driving on rough roads
Take particular care when driving on roads with loose surfaces or pot-
holes.
These conditions may cause losses in tire inflation pressure, reducing
the cushioning ability of the tires. In addition, driving on rough roads may
cause damage to the tires themselves, as well as the vehicle’s wheels
and body.
■If tire inflation pressure of each tire becomes low while driving
Do not continue driving, or your tires and/or wheels may be ruined.
Page 249 of 392
249
4-3. Do-it-yourself maintenance
4
Maintenance and care
Scion_xB_OM_OM12F03U_(U)
CAUTION
■Proper inflation is critical
to save tire performance
Keep your tires properly inflated.
If the tires are not properly inflated , the following conditions may occur
which could lead to an accident resulting in death or serious injury:
●Excessive wear
●Uneven wear
●Poor handling
●Possibility of blowouts resu lting from overheated tires
●Air leaking from between tire and wheel
●Wheel deformation and/or tire damage
●Greater possibility of tire damage wh ile driving (due to road hazards,
expansion joints, sharp edges in the road, etc.)
NOTICE
■When inspecting and adjusting tire inflation pressure
Be sure to put the tire valve caps back on.
If a valve cap is not installed, dirt or moisture may get into the valve and
cause an air leak, resulting in decreased tire inflation pressure.
Page 253 of 392
253
4-3. Do-it-yourself maintenance
4
Maintenance and care
Scion_xB_OM_OM12F03U_(U)
Air conditioning filter
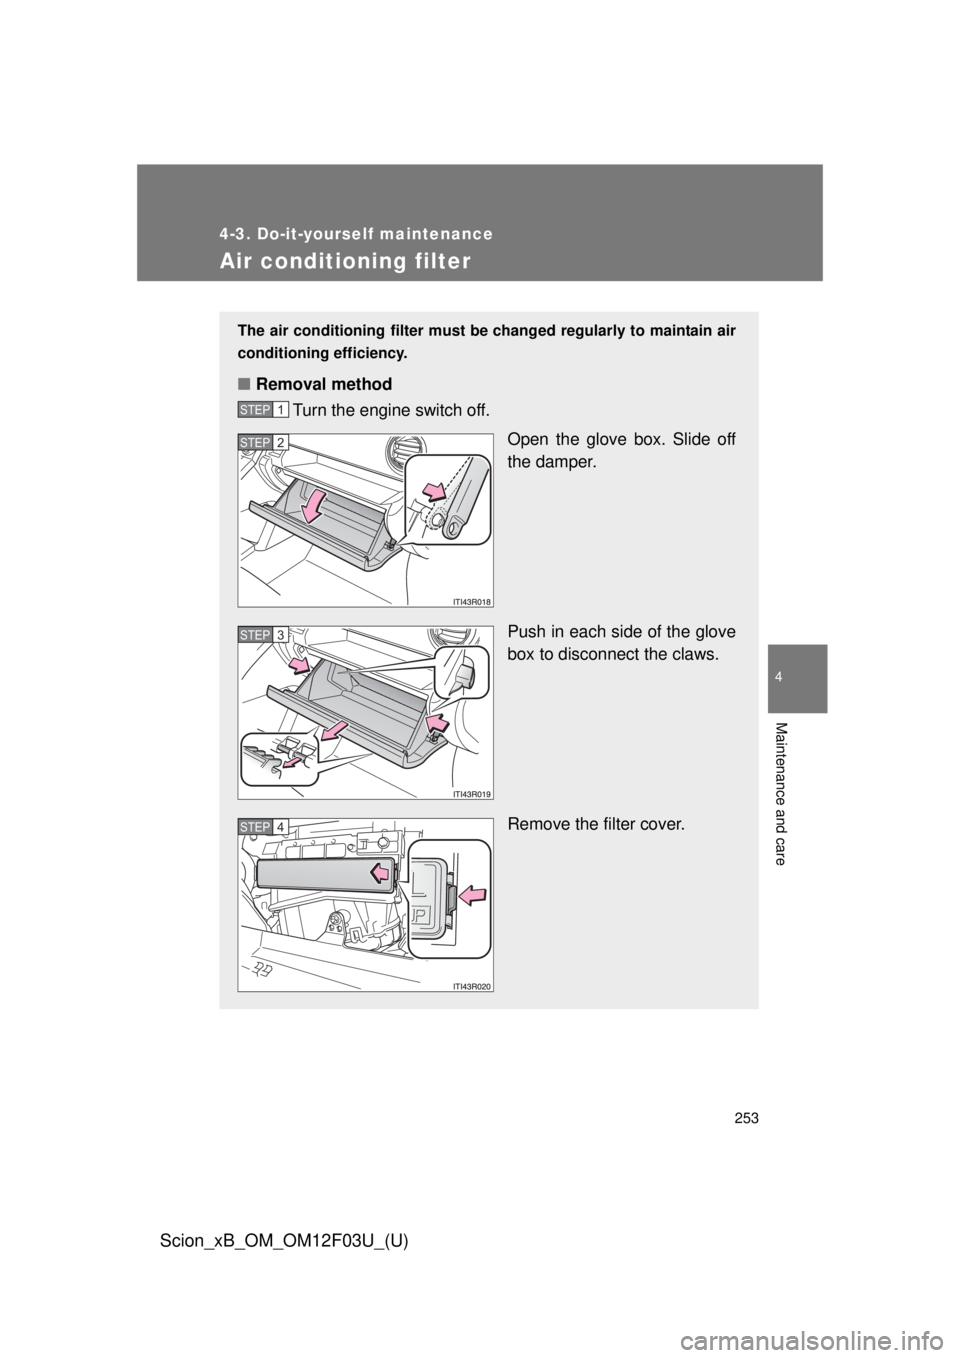
The air conditioning filter must be changed regularly to maintain air
conditioning efficiency.
■ Removal method
Turn the engine switch off.
Open the glove box. Slide off
the damper.
Push in each side of the glove
box to disconnect the claws.
Remove the filter cover.
STEP 1
STEP 2
STEP 3
STEP 4
Page 254 of 392
254 4-3. Do-it-yourself maintenance
Scion_xB_OM_OM12F03U_(U)
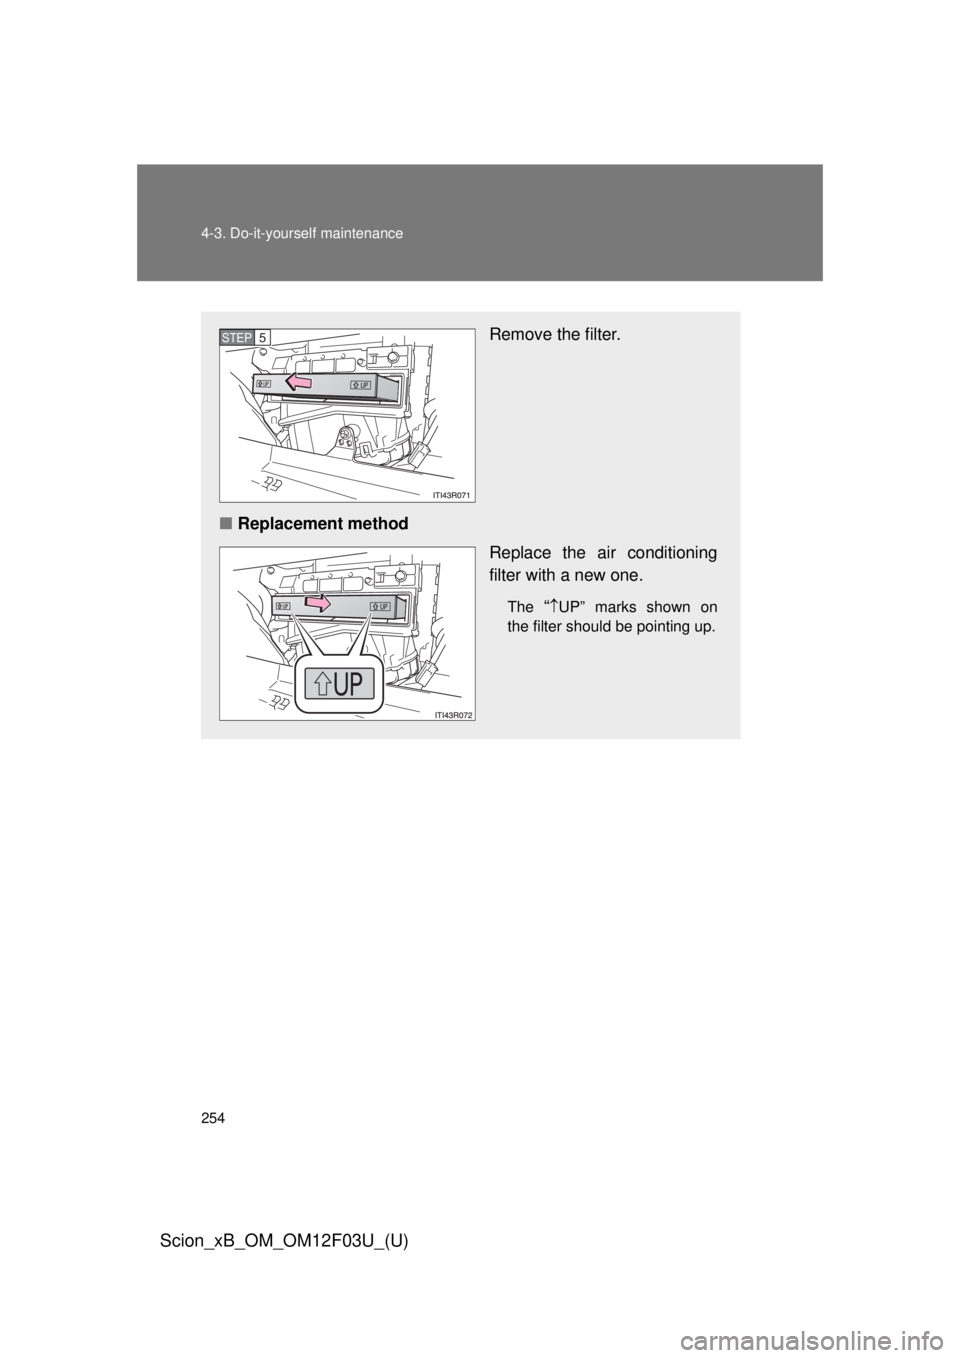
Remove the filter.
■ Replacement method
Replace the air conditioning
filter with a new one.
The “UP” marks shown on
the filter should be pointing up.
STEP 5
Page 255 of 392
255
4-3. Do-it-yourself maintenance
4
Maintenance and care
Scion_xB_OM_OM12F03U_(U)
■
Checking interval
Inspect and replace the air conditioning filter according to the maintenance
schedule. In dusty areas or areas with heavy traffic flow, early replacement
may be required. (For scheduled maintenance information, please refer to
the “Scheduled Maintenance Guide” or “Owner’s Manual Supplement”.)
■ If air flow from the vents decreases dramatically
The filter may be clogged. Check the filter and replace if necessary.
NOTICE
■When using the air conditioning system
Make sure that a filter is always installed.
Using the air conditioning system without a filter may cause damage to the
system.
Page 261 of 392
261
4-3. Do-it-yourself maintenance
4
Maintenance and care
Scion_xB_OM_OM12F03U_(U)
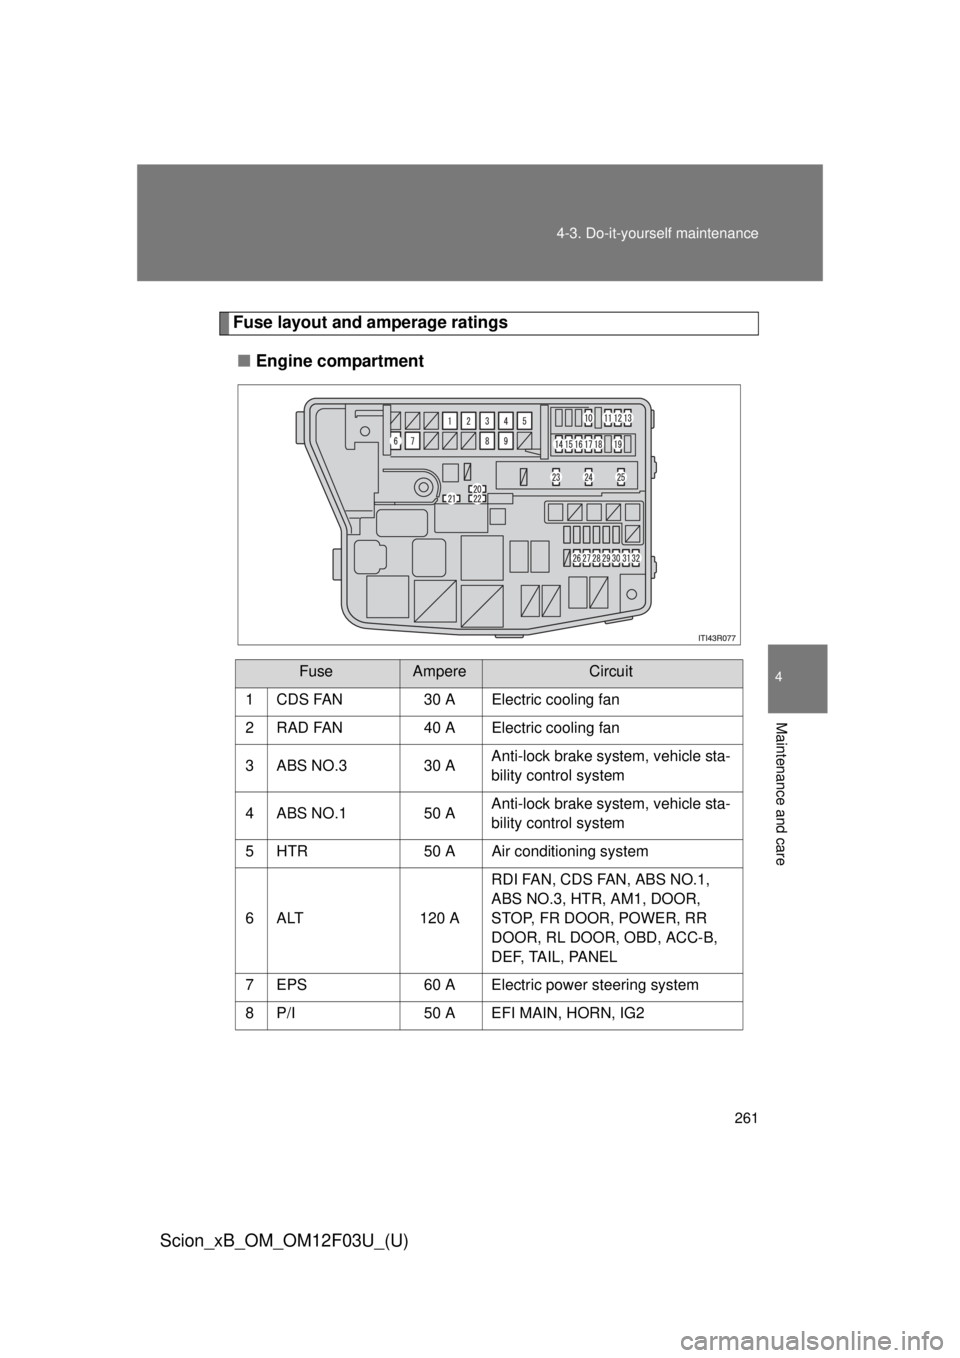
Fuse layout and amperage ratings
■ Engine compartment
FuseAmpereCircuit
1 CDS FAN 30 A Electric cooling fan
2 RAD FAN 40 A Electric cooling fan
3 ABS NO.3 30 AAnti-lock brake system, vehicle sta-
bility control system
4 ABS NO.1 50 AAnti-lock brake system, vehicle sta-
bility control system
5 HTR 50 A Air conditioning system
6 ALT 120 ARDI FAN, CDS FAN, ABS NO.1,
ABS NO.3, HTR, AM1, DOOR,
STOP, FR DOOR, POWER, RR
DOOR, RL DOOR, OBD, ACC-B,
DEF, TAIL, PANEL
7 EPS 60 A Electric power steering system
8 P/I 50 A EFI MAIN, HORN, IG2
Page 262 of 392

262 4-3. Do-it-yourself maintenance
Scion_xB_OM_OM12F03U_(U)
9 H-LP MAIN 50 AH-LP LH LO, H-LP RH LO, H-LP
LH HI, H-LP RH HI
10 ECU-B2 10 A Air conditioning system
11 ECU-B 10 A Gauges and meters, body ECU,
vehicle stability control system
12 RAD NO.1 15 A Audio system
13 DOME 10 A Interior light, personal light, lug-
gage compartment light, wireless
remote control system
14 AM2 NO.2 7.5 A No circuit
15 ALT-S 7.5 A Charging system
16 TURN-HAZ 10 A Turn signal lights, emergency
flashers
17 ETCS 10 AMultiport fuel injection system/
sequential multiport fuel injection
system
18 AM2 30 AMultiport fuel injection system/
sequential multiport fuel injection
system, starting system
19 STRG LOCK 20 A No circuit
20 SPARE Spare fuse
21 SPARE Spare fuse
22 SPARE Spare fuse
23 EFI MAIN 20 AMultiport fuel injection system/
sequential multiport fuel injection
system, EFI NO.1, EFI NO.2
24 HORN 10 A Horn
FuseAmpereCircuit
Page 263 of 392
263
4-3. Do-it-yourself maintenance
4
Maintenance and care
Scion_xB_OM_OM12F03U_(U)
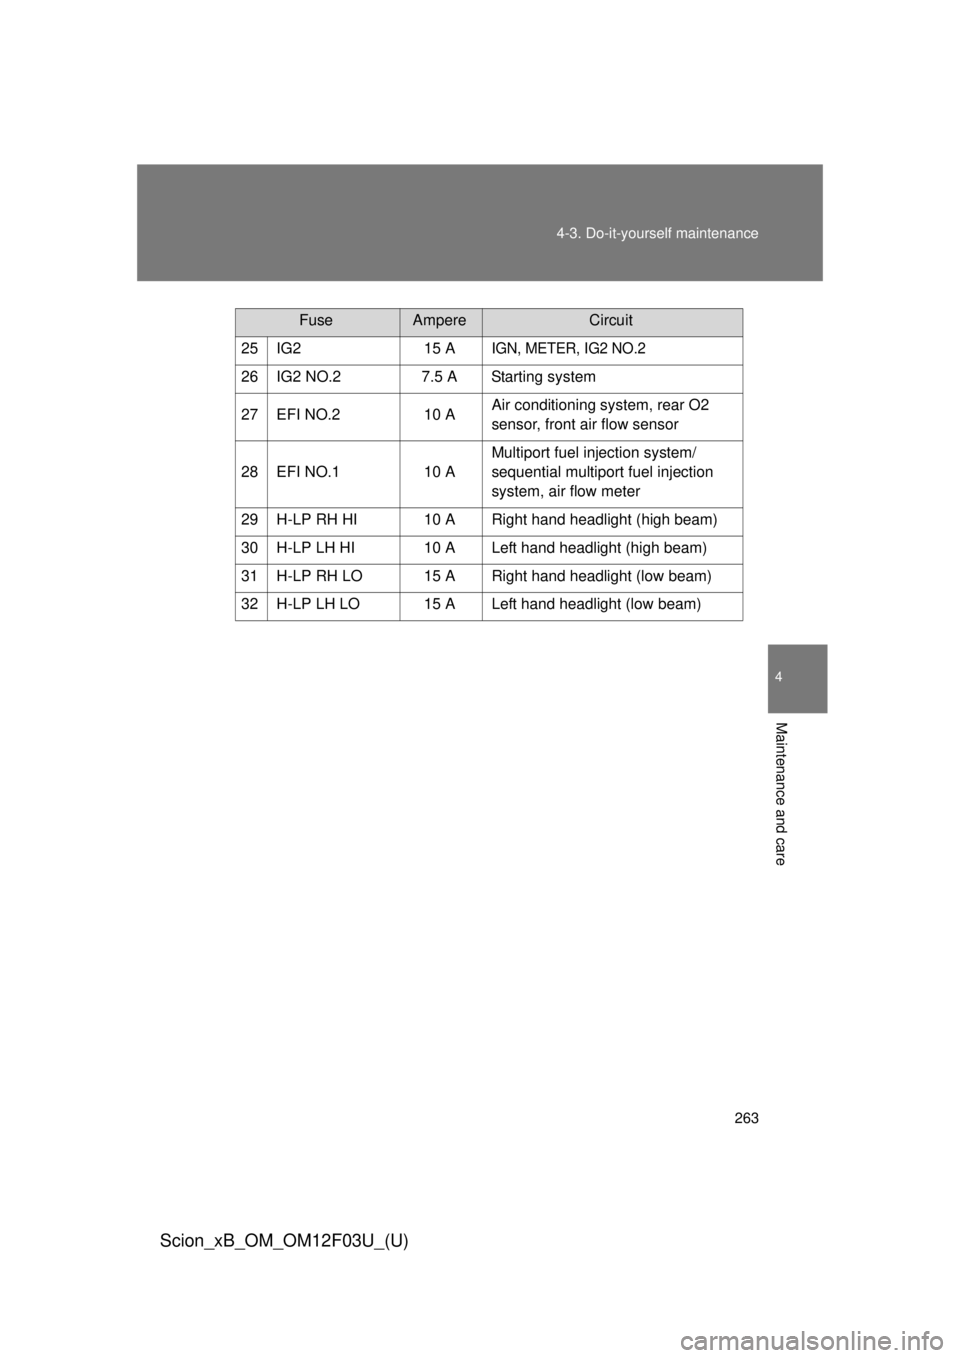
25 IG2
15 AIGN, METER, IG2 NO.2
26 IG2 NO.27.5 A Starting system
27 EFI NO.2 10 AAir conditioning system, rear O2
sensor, front air flow sensor
28 EFI NO.1 10 AMultiport fuel injection system/
sequential multiport fuel injection
system, air flow meter
29 H-LP RH HI 10 A Right hand headlight (high beam)
30 H-LP LH HI 10 A Left hand headlight (high beam)
31 H-LP RH LO 15 A Right hand headlight (low beam)
32 H-LP LH LO 15 A Left hand headlight (low beam)
FuseAmpereCircuit
Page 265 of 392
265
4-3. Do-it-yourself maintenance
4
Maintenance and care
Scion_xB_OM_OM12F03U_(U)
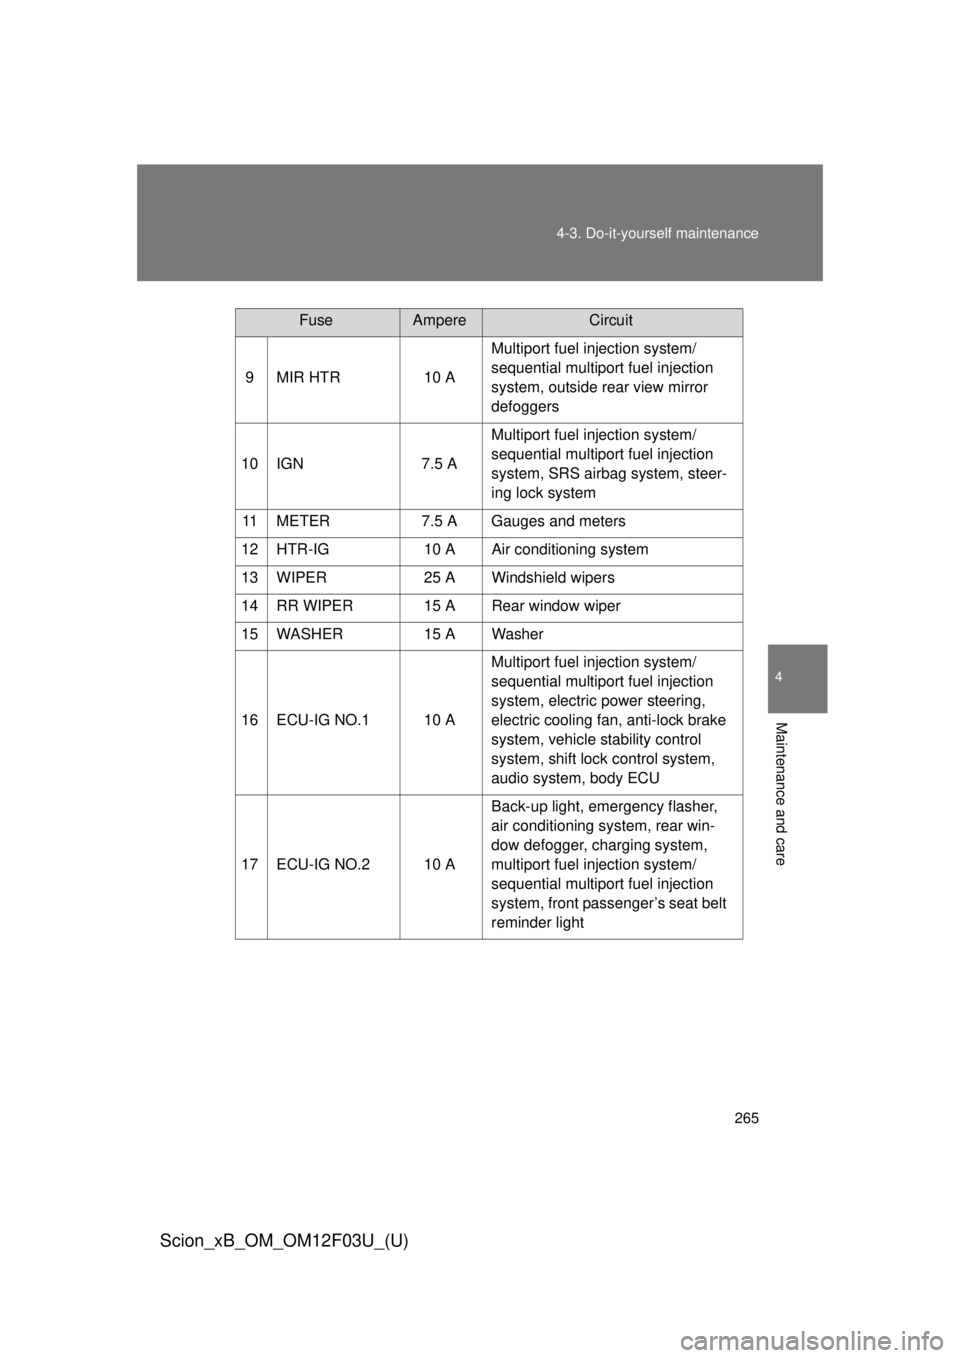
9 MIR HTR
10 AMultiport fuel injection system/
sequential multiport fuel injection
system, outside rear view mirror
defoggers
10 IGN 7.5 AMultiport fuel injection system/
sequential multiport fuel injection
system, SRS airbag system, steer-
ing lock system
11 METER 7.5 A Gauges and meters
12 HTR-IG 10 A Air conditioning system
13 WIPER 25 A Windshield wipers
14 RR WIPER 15 A Rear window wiper
15 WASHER 15 A Washer
16 ECU-IG NO.1 10 A Multiport fuel injection system/
sequential multiport fuel injection
system, electric power steering,
electric cooling fan, anti-lock brake
system, vehicle stability control
system, shift lock control system,
audio system, body ECU
17 ECU-IG NO.2 10 A Back-up light, emergency flasher,
air conditioning system, rear win-
dow defogger, charging system,
multiport fuel injection system/
sequential multiport fuel injection
system, front passenger’s seat belt
reminder light
FuseAmpereCircuit
Page 320 of 392
320 5-2. Steps to take in an emergency
Scion_xB_OM_OM12F03U_(U)
■Starting the engine when the battery is discharged
Vehicles with an automatic transmission, the engine cannot be started by
push-starting.
■ To prevent battery discharge
●Turn off the headlights and the air conditioning system while the engine is
turned off.
● Turn off any unnecessary electrical components when the vehicle is run-
ning at a low speed for an extended period, such as in heavy traffic.
■ Charging the battery
The electricity stored in the battery will discharge gradually even when the
vehicle is not in use, due to natural discharge and the draining effects of cer-
tain electrical appliances. If the vehicle is left for a long time, the battery may
discharge, and the engine may be unable to start. (The battery recharges
automatically during driving.)
Maintain the engine speed of the second vehicle and start
the engine of your vehicle by turning the engine switch to
the “ON” position.
Once the vehicle’s engine has started, remove the jumper
cables in the exact reverse or der from which they were con-
nected.
Once the engine starts, have the vehicle inspected at your Scion
dealer as soon as possible.STEP 3
STEP 4