inflation pressure TOYOTA YARIS 2014 User Guide
[x] Cancel search | Manufacturer: TOYOTA, Model Year: 2014, Model line: YARIS, Model: TOYOTA YARIS 2014Pages: 712, PDF Size: 30.2 MB
Page 495 of 712
495 4-3. Do-it-yourself maintenance
4
Maintenance and care
YARIS_F(including HV)_WE_52E26E
CAUTION
Proper inflation is critical to save tire performance
Keep your tires properly inflated. Otherwise, the following conditions may
occur and result in an accident causing death or serious injury:
Excessive wear
Uneven wear
Poor handling
Possibility of blowouts resulting from overheated tires
Poor sealing of the tire bead
Wheel deformation and/or tire separation
A greater possibility of tire damage from road hazards
NOTICE
When inspecting and adjusting tire inflation pressure
Be sure to put the tire valve caps back on.
Without the valve caps, dirt or moisture could get into the valve and cause
air leakage, which could result in an accident. If the caps are lost, replace
them as soon as possible.
Page 585 of 712
5
585 5-2. Steps to take in an emergency
When trouble arises
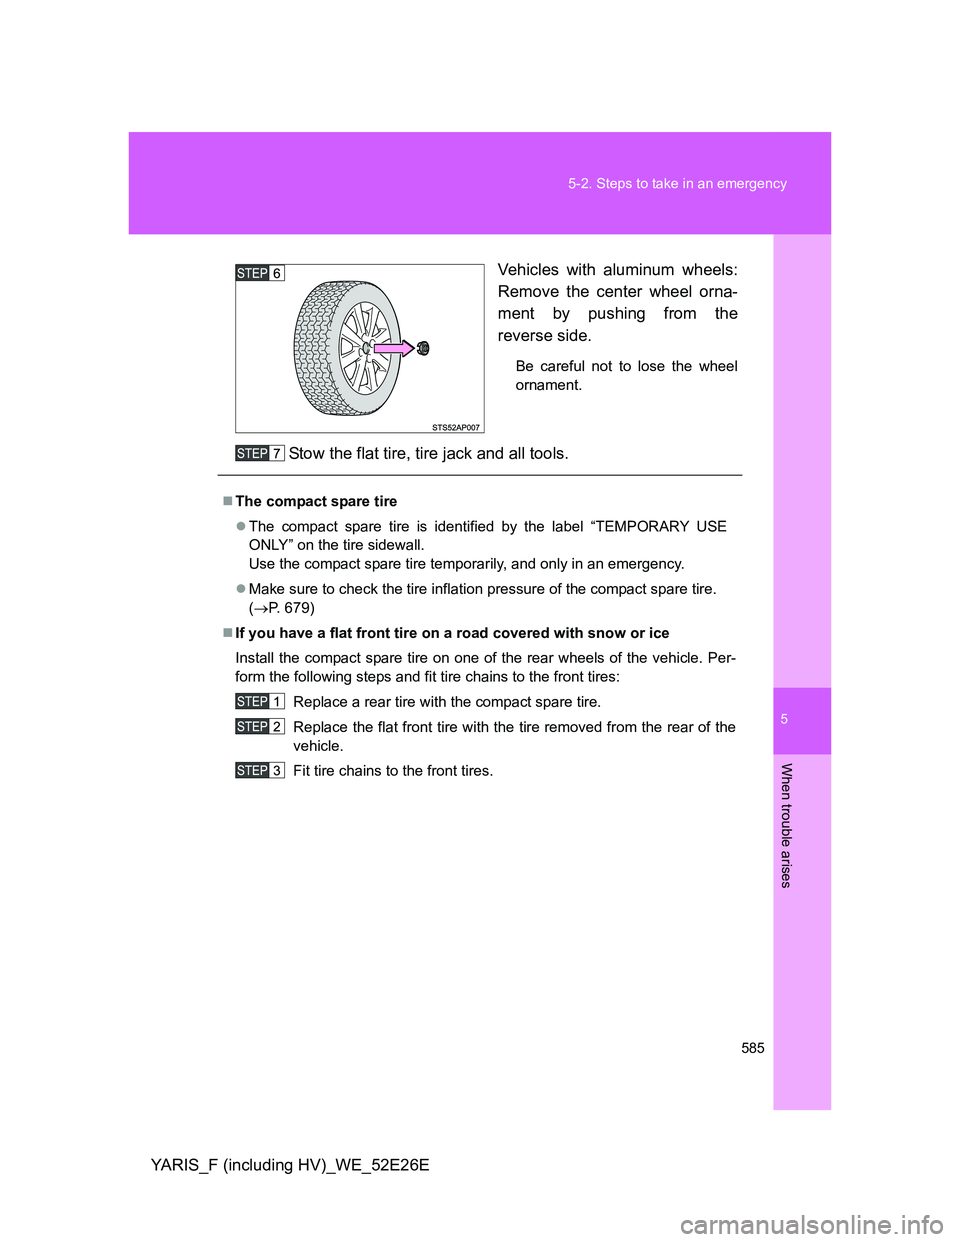
YARIS_F (including HV)_WE_52E26EVehicles with aluminum wheels:
Remove the center wheel orna-
ment by pushing from the
reverse side.
Be careful not to lose the wheel
ornament.
Stow the flat tire, tire jack and all tools.
The compact spare tire
The compact spare tire is identified by the label “TEMPORARY USE
ONLY” on the tire sidewall.
Use the compact spare tire temporarily, and only in an emergency.
Make sure to check the tire inflation pressure of the compact spare tire.
(P. 679)
If you have a flat front tire on a road covered with snow or ice
Install the compact spare tire on one of the rear wheels of the vehicle. Per-
form the following steps and fit tire chains to the front tires:
Replace a rear tire with the compact spare tire.
Replace the flat front tire with the tire removed from the rear of the
vehicle.
Fit tire chains to the front tires.
Page 600 of 712
600 5-2. Steps to take in an emergency
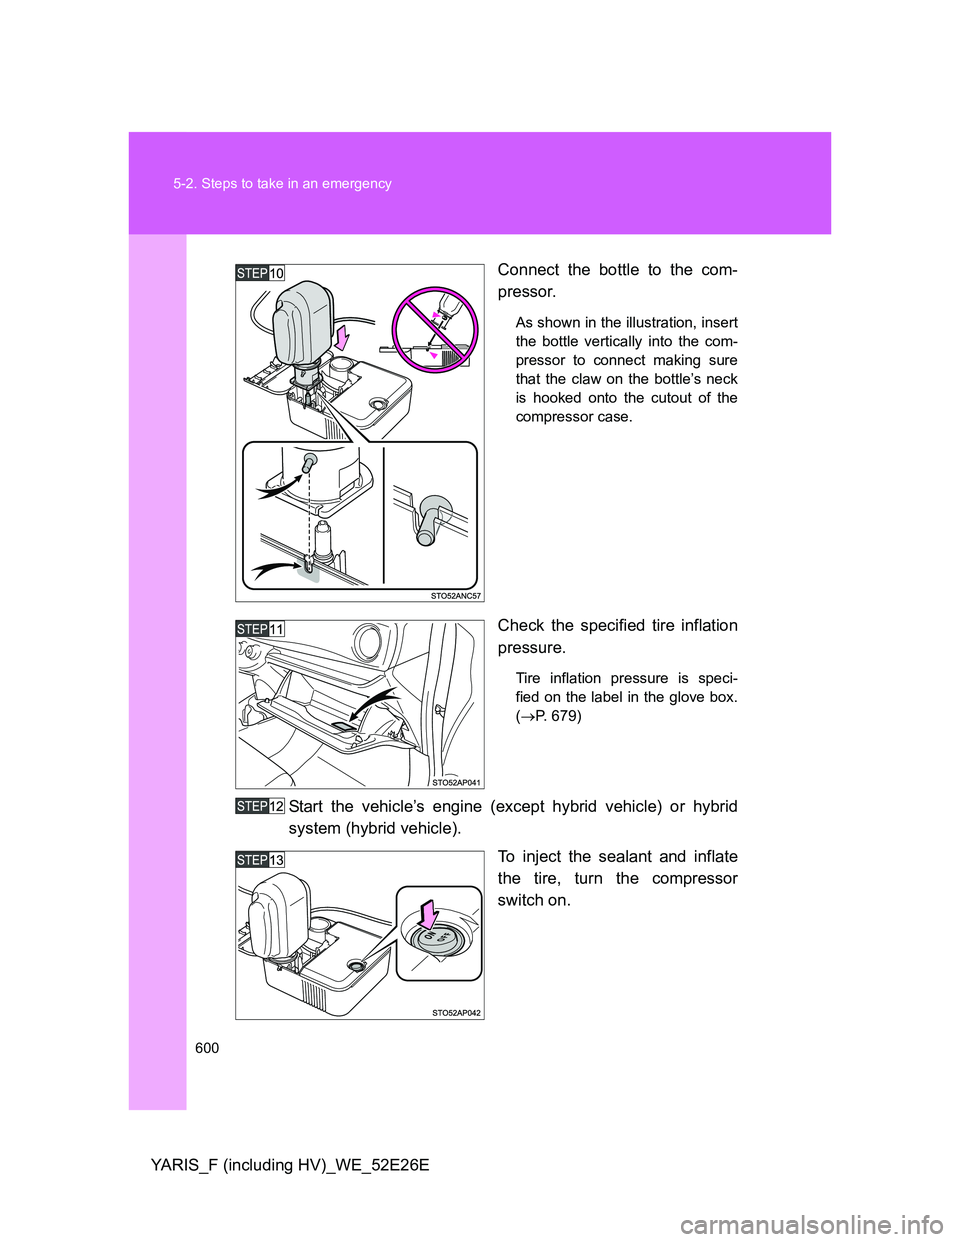
YARIS_F (including HV)_WE_52E26EConnect the bottle to the com-
pressor.
As shown in the illustration, insert
the bottle vertically into the com-
pressor to connect making sure
that the claw on the bottle’s neck
is hooked onto the cutout of the
compressor case.
Check the specified tire inflation
pressure.
Tire inflation pressure is speci-
fied on the label in the glove box.
(P. 679)
Start the vehicle’s engine (except hybrid vehicle) or hybrid
system (hybrid vehicle).
To inject the sealant and inflate
the tire, turn the compressor
switch on.
Page 601 of 712
5
601 5-2. Steps to take in an emergency
When trouble arises
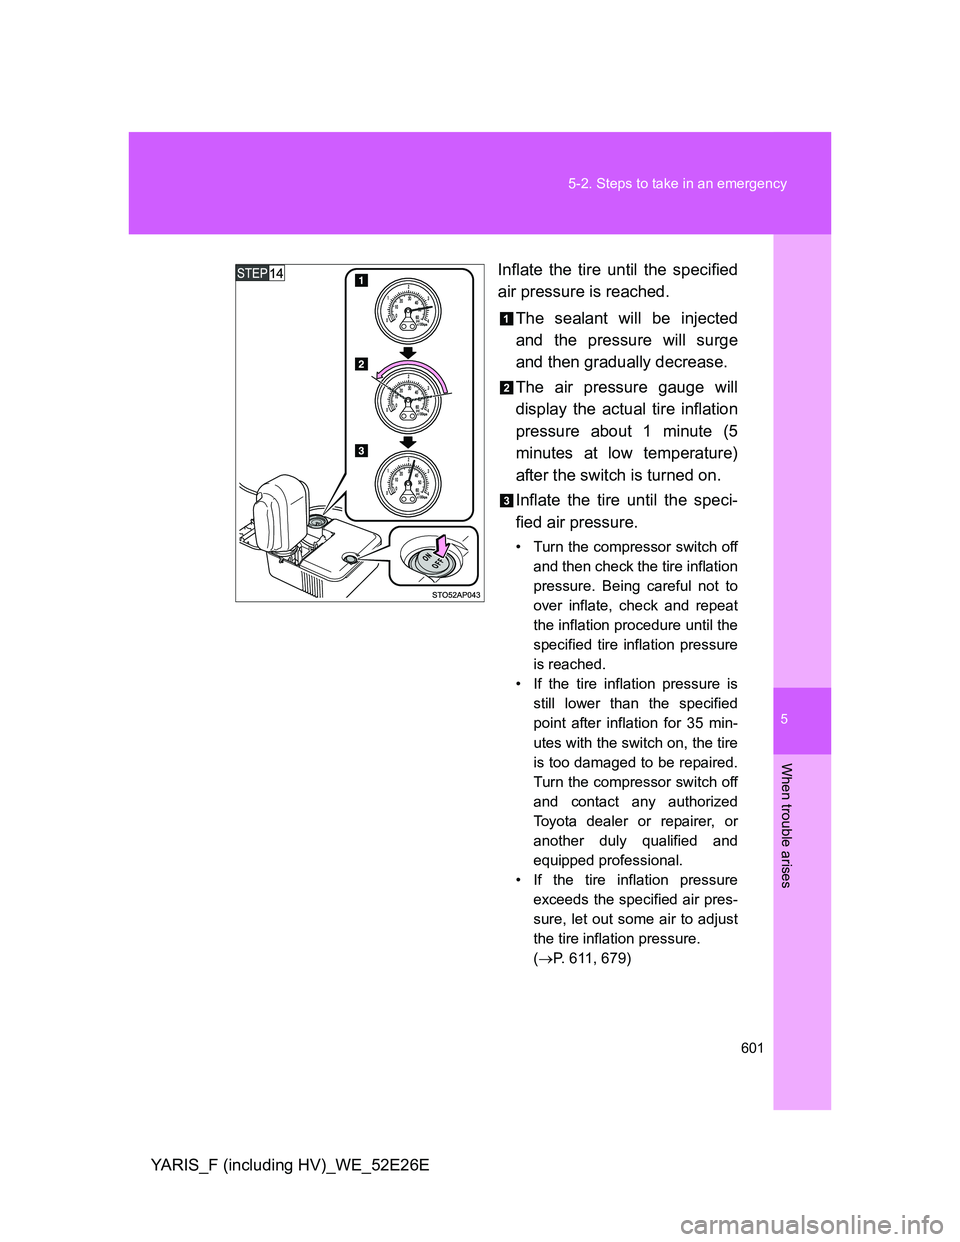
YARIS_F (including HV)_WE_52E26EInflate the tire until the specified
air pressure is reached.
The sealant will be injected
and the pressure will surge
and then gradually decrease.
The air pressure gauge will
display the actual tire inflation
pressure about 1 minute (5
minutes at low temperature)
after the switch is turned on.
Inflate the tire until the speci-
fied air pressure.
• Turn the compressor switch off
and then check the tire inflation
pressure. Being careful not to
over inflate, check and repeat
the inflation procedure until the
specified tire inflation pressure
is reached.
• If the tire inflation pressure is
still lower than the specified
point after inflation for 35 min-
utes with the switch on, the tire
is too damaged to be repaired.
Turn the compressor switch off
and contact any authorized
Toyota dealer or repairer, or
another duly qualified and
equipped professional.
• If the tire inflation pressure
exceeds the specified air pres-
sure, let out some air to adjust
the tire inflation pressure.
(P. 611, 679)
Page 603 of 712
5
603 5-2. Steps to take in an emergency
When trouble arises
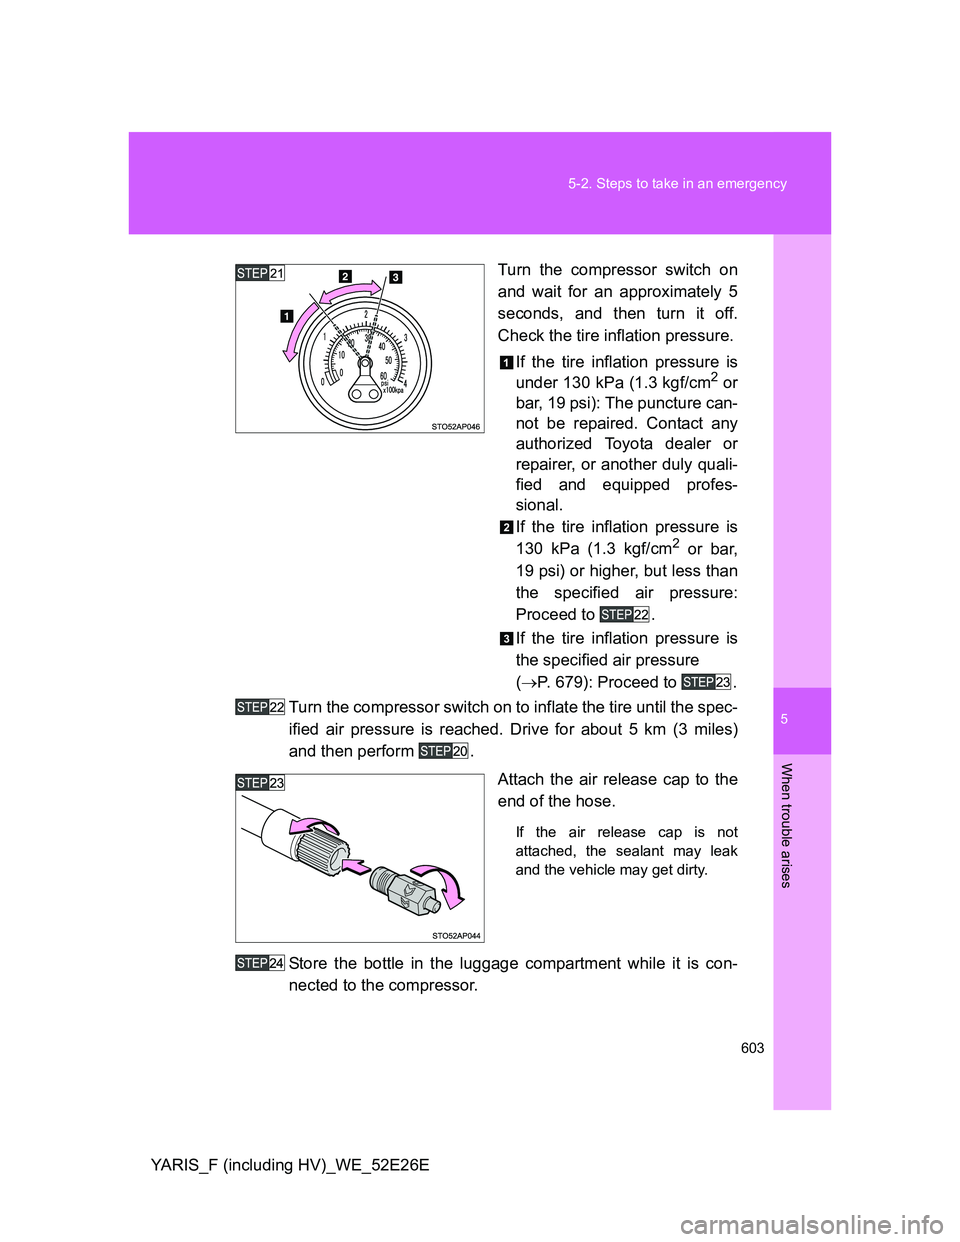
YARIS_F (including HV)_WE_52E26ETurn the compressor switch on
and wait for an approximately 5
seconds, and then turn it off.
Check the tire inflation pressure.
If the tire inflation pressure is
under 130 kPa (1.3 kgf/cm
2 or
bar, 19 psi): The puncture can-
not be repaired. Contact any
authorized Toyota dealer or
repairer, or another duly quali-
fied and equipped profes-
sional.
If the tire inflation pressure is
130 kPa (1.3 kgf/cm
2 or bar,
19 psi) or higher, but less than
the specified air pressure:
Proceed to .
If the tire inflation pressure is
the specified air pressure
(P. 679): Proceed to .
Turn the compressor switch on to inflate the tire until the spec-
ified air pressure is reached. Drive for about 5 km (3 miles)
and then perform .
Attach the air release cap to the
end of the hose.
If the air release cap is not
attached, the sealant may leak
and the vehicle may get dirty.
Store the bottle in the luggage compartment while it is con-
nected to the compressor.
Page 607 of 712
5
607 5-2. Steps to take in an emergency
When trouble arises
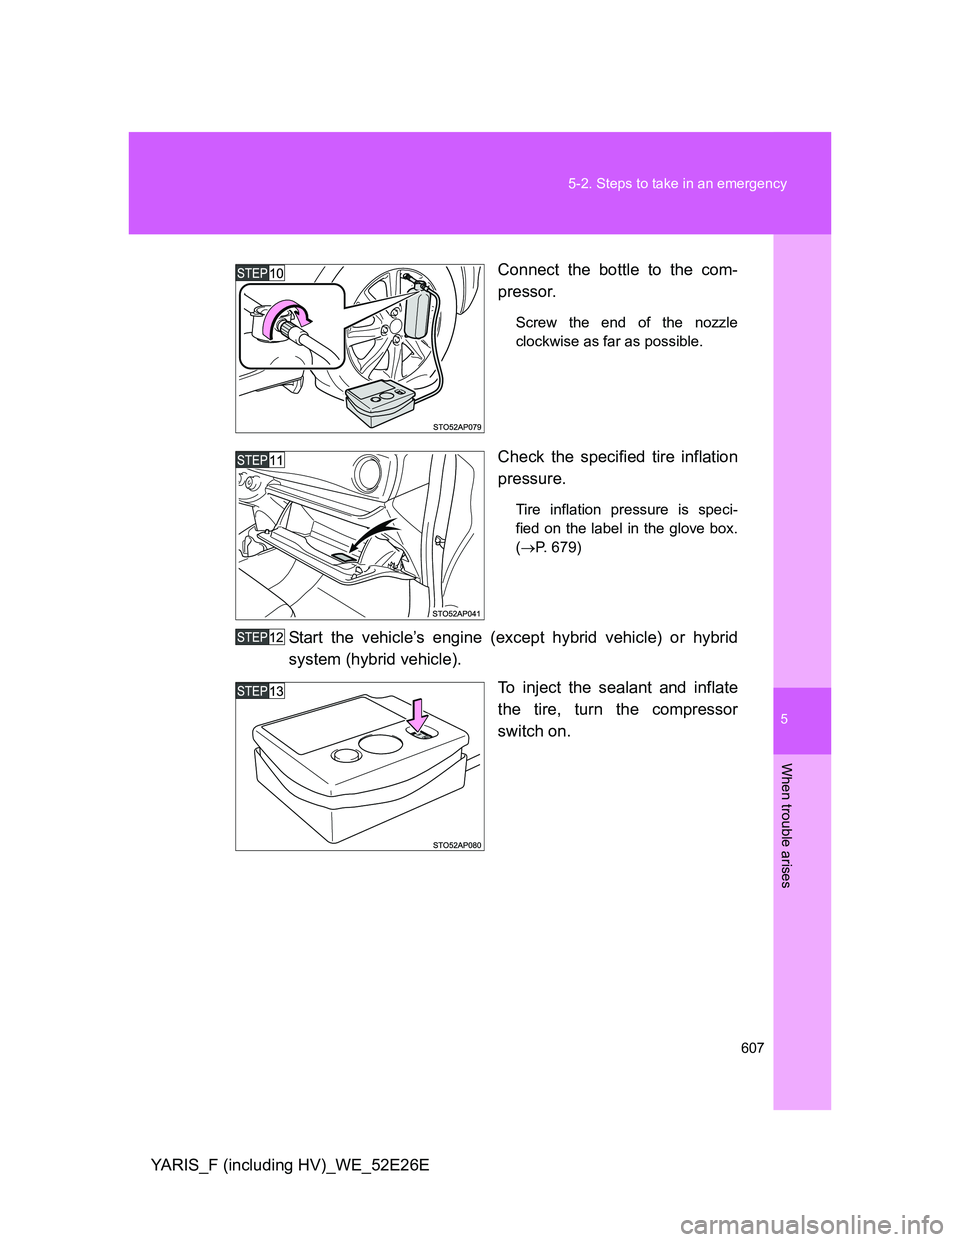
YARIS_F (including HV)_WE_52E26EConnect the bottle to the com-
pressor.
Screw the end of the nozzle
clockwise as far as possible.
Check the specified tire inflation
pressure.
Tire inflation pressure is speci-
fied on the label in the glove box.
(P. 679)
Start the vehicle’s engine (except hybrid vehicle) or hybrid
system (hybrid vehicle).
To inject the sealant and inflate
the tire, turn the compressor
switch on.
Page 608 of 712
608 5-2. Steps to take in an emergency
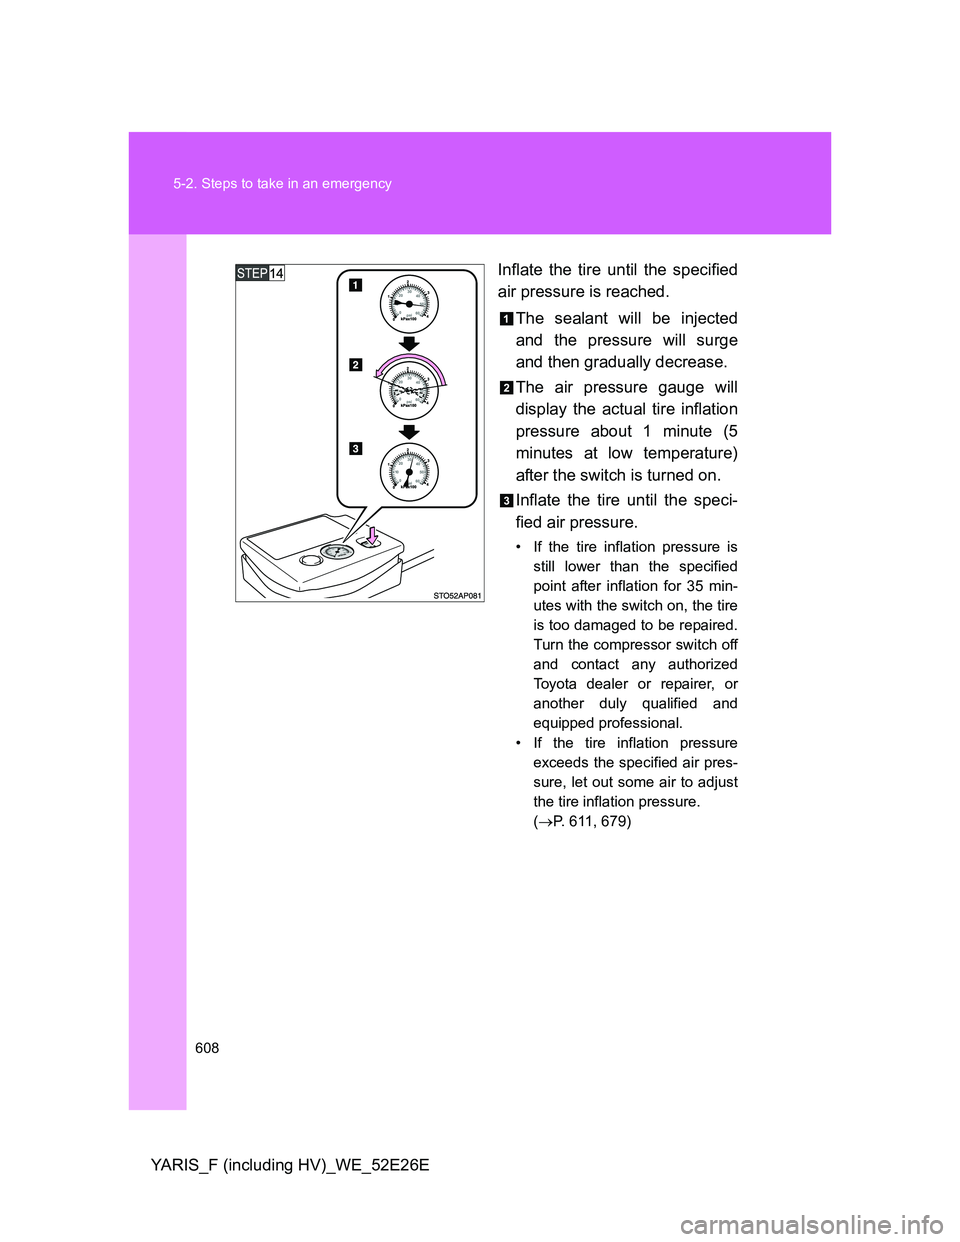
YARIS_F (including HV)_WE_52E26EInflate the tire until the specified
air pressure is reached.
The sealant will be injected
and the pressure will surge
and then gradually decrease.
The air pressure gauge will
display the actual tire inflation
pressure about 1 minute (5
minutes at low temperature)
after the switch is turned on.
Inflate the tire until the speci-
fied air pressure.
• If the tire inflation pressure is
still lower than the specified
point after inflation for 35 min-
utes with the switch on, the tire
is too damaged to be repaired.
Turn the compressor switch off
and contact any authorized
Toyota dealer or repairer, or
another duly qualified and
equipped professional.
• If the tire inflation pressure
exceeds the specified air pres-
sure, let out some air to adjust
the tire inflation pressure.
(P. 611, 679)
Page 610 of 712
610 5-2. Steps to take in an emergency
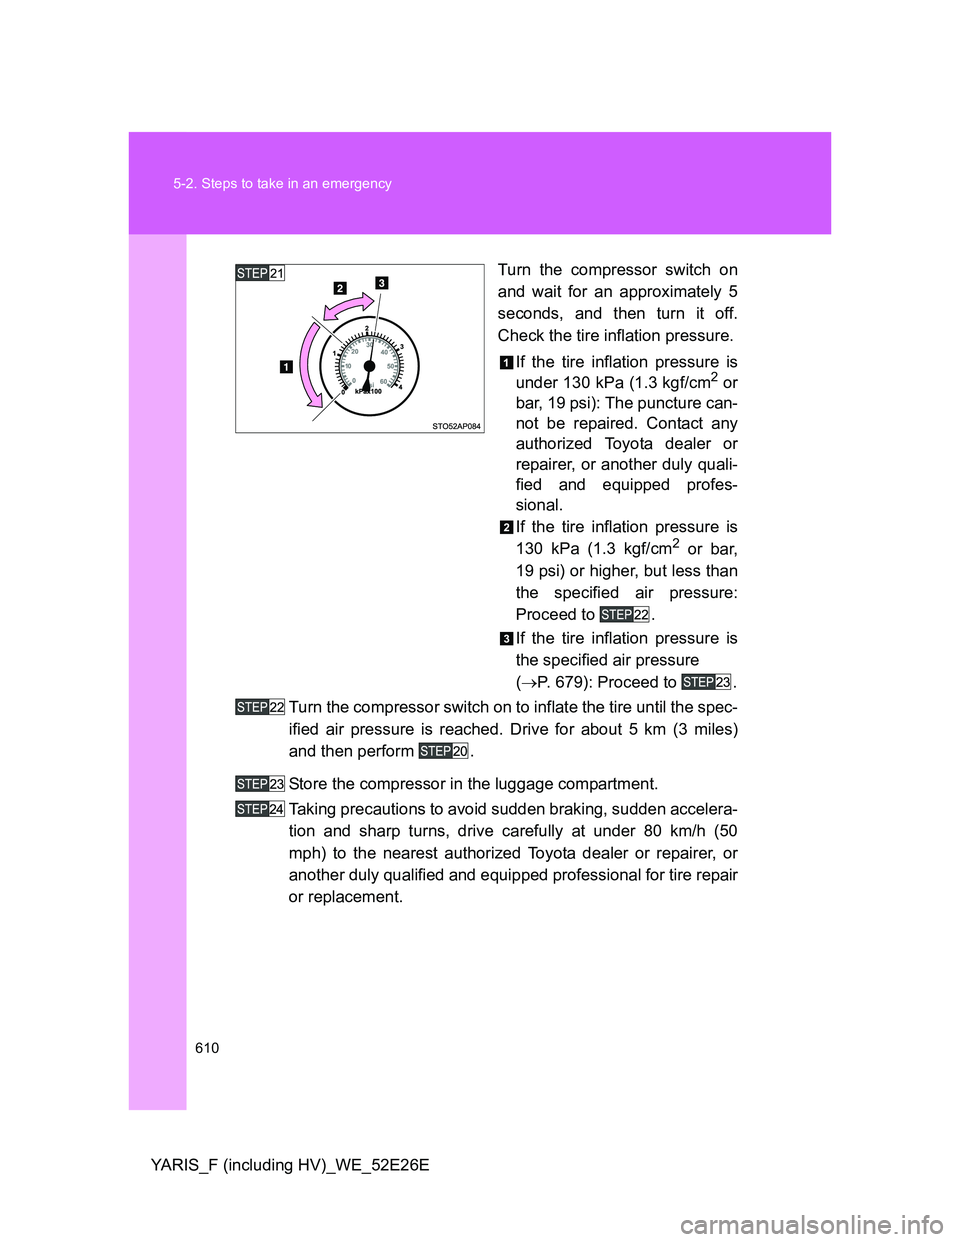
YARIS_F (including HV)_WE_52E26ETurn the compressor switch on
and wait for an approximately 5
seconds, and then turn it off.
Check the tire inflation pressure.
If the tire inflation pressure is
under 130 kPa (1.3 kgf/cm
2 or
bar, 19 psi): The puncture can-
not be repaired. Contact any
authorized Toyota dealer or
repairer, or another duly quali-
fied and equipped profes-
sional.
If the tire inflation pressure is
130 kPa (1.3 kgf/cm
2 or bar,
19 psi) or higher, but less than
the specified air pressure:
Proceed to .
If the tire inflation pressure is
the specified air pressure
(P. 679): Proceed to .
Turn the compressor switch on to inflate the tire until the spec-
ified air pressure is reached. Drive for about 5 km (3 miles)
and then perform .
Store the compressor in the luggage compartment.
Taking precautions to avoid sudden braking, sudden accelera-
tion and sharp turns, drive carefully at under 80 km/h (50
mph) to the nearest authorized Toyota dealer or repairer, or
another duly qualified and equipped professional for tire repair
or replacement.
Page 611 of 712
5
611 5-2. Steps to take in an emergency
When trouble arises
YARIS_F (including HV)_WE_52E26E
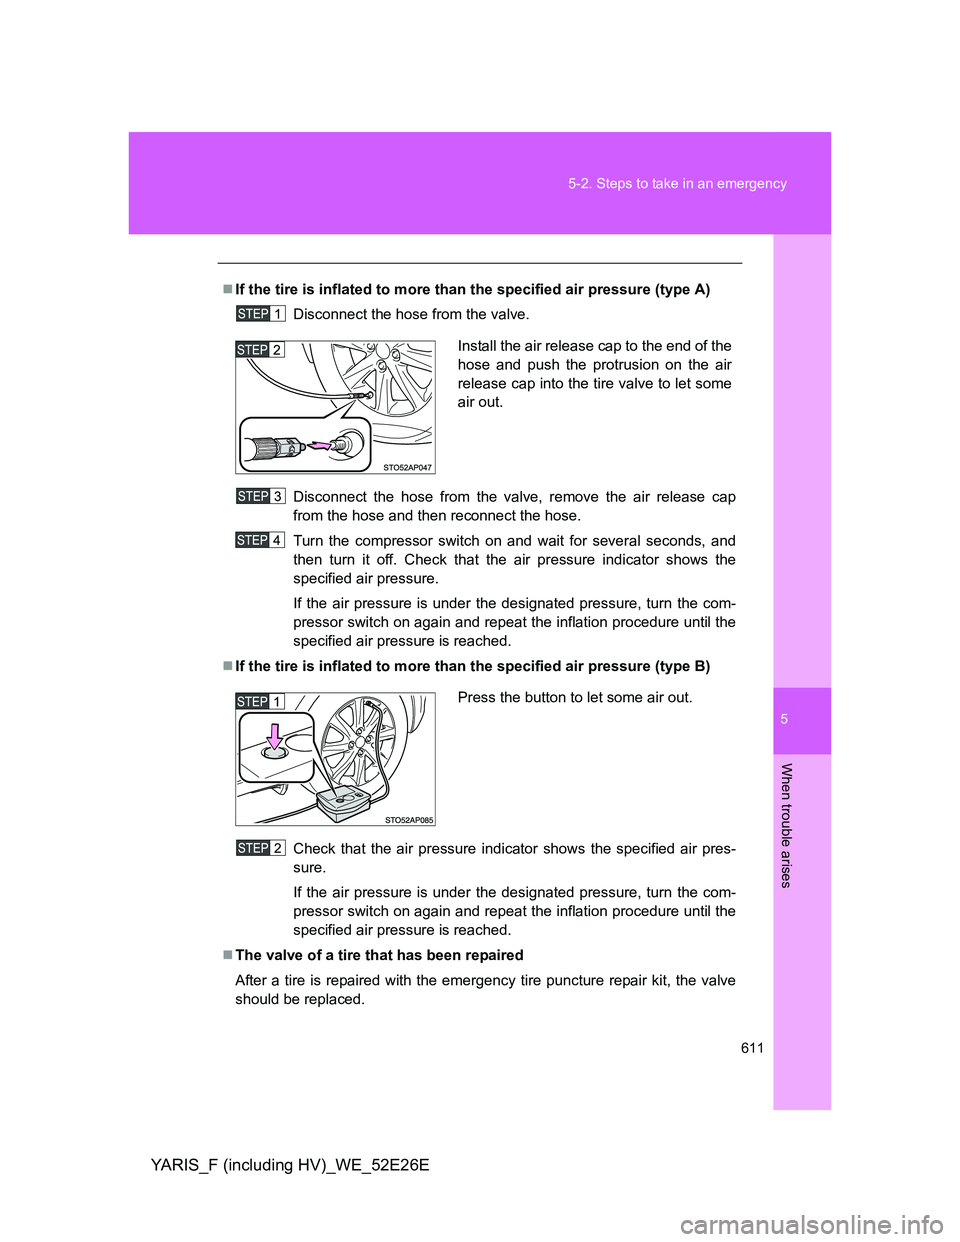
If the tire is inflated to more than the specified air pressure (type A)
Disconnect the hose from the valve.
Disconnect the hose from the valve, remove the air release cap
from the hose and then reconnect the hose.
Turn the compressor switch on and wait for several seconds, and
then turn it off. Check that the air pressure indicator shows the
specified air pressure.
If the air pressure is under the designated pressure, turn the com-
pressor switch on again and repeat the inflation procedure until the
specified air pressure is reached.
If the tire is inflated to more than the specified air pressure (type B)
Check that the air pressure indicator shows the specified air pres-
sure.
If the air pressure is under the designated pressure, turn the com-
pressor switch on again and repeat the inflation procedure until the
specified air pressure is reached.
The valve of a tire that has been repaired
After a tire is repaired with the emergency tire puncture repair kit, the valve
should be replaced.
Install the air release cap to the end of the
hose and push the protrusion on the air
release cap into the tire valve to let some
air out.
Press the button to let some air out.
Page 614 of 712
614 5-2. Steps to take in an emergency
YARIS_F (including HV)_WE_52E26E
CAUTION
Connect the valve and hose securely with the tire installed on the vehicle.
If the hose is not properly connected to the valve, air leakage may occur
as sealant may be sprayed out.
If the hose comes off the valve while inflating the tire, there is a risk that
the hose will move abruptly due to air pressure.
After inflation of the tire has completed, the sealant may splatter when the
hose is disconnected or some air is let out of the tire.
Follow the operation procedure to repair the tire. If the procedures not fol-
lowed, the sealant may spray out.
Keep back from the tire while it is being repaired, as there is a chance of it
bursting while the repair operation is being performed. If you notice any
cracks or deformation of the tire, turn off the compressor switch and stop
the repair operation immediately.
The repair kit may overheat if operated for a long period of time. Do not
operate the repair kit continuously for more than 40 minutes.
Parts of the repair kit become hot during operation. Be careful when han-
dling the repair kit during and after operation. Do not touch the metal part
around the connecting area between the bottle and compressor. It will be
extremely hot.
Do not attach the vehicle speed warning sticker to an area other than the
one indicated. If the sticker is attached to an area where an SRS airbag is
located, such as the pad of the steering wheel, it may prevent the SRS air-
bag from operating properly.
Driving to spread the liquid sealant evenly
Observe the following precautions to reduce the risk of accidents.
Failing to do so may result in a loss of vehicle control and cause death or
serious injury.
Drive the vehicle carefully at a low speed. Be especially careful when turn-
ing and cornering.
If the vehicle does not drive straight or you feel a pull through the steering
wheel, stop the vehicle and check the following.
• Tire condition. The tire may have separated from the wheel.
• Tire inflation pressure. If the tire inflation pressure is 130 kPa (1.3
kgf/cm
2 or bar, 19 psi) or less, the tire may be severely damaged.