warning lights TOYOTA YARIS 2021 Owner's Manual
[x] Cancel search | Manufacturer: TOYOTA, Model Year: 2021, Model line: YARIS, Model: TOYOTA YARIS 2021Pages: 568, PDF Size: 110.34 MB
Page 204 of 568
204
YARIS(HB) Owner's Manual_Europe_MK0001_en
4-5. Using the driving support systems
WARNING
■Before using LTA system
●Do not rely solely upon the LTA sys-
tem. The LTA system does not automatically drive the vehicle or reduce the amount of attention that
must be paid to the area in front of the vehicle. The driver must always assume full responsibility for driving
safely by paying careful attention to the surrounding conditions and operating the steering wheel to cor-
rect the path of the vehicle. Also, the driver must take adequate breaks when fatigued, such as from
driving for a long period of time.
●Failure to perform appropriate driv-
ing operations and pay careful attention may lead to an accident, resulting in death or serious injury.
●When not using the LTA system, use the LTA switch to turn the sys-
tem off.
■Situations unsuitable for LTA
system
In the following situations, use the LTA switch to turn the system off. Fail-
ure to do so may lead to an accident, resulting in death or serious injury.
●Vehicle is driven on a road surface which is slippery due to rainy weather, fallen snow, freezing, etc.
●Vehicle is driven on a snow-cov-ered road.
●White (yellow) lines are difficult to see due to rain, snow, fog, dust,
etc.
●Vehicle is driven in a temporary
lane or restricted lane due to con- struction work.
●Vehicle is driven in a construction zone.
●A spare tire, tire chains, etc., are equipped.
●When the tires have been exces-sively worn, or when the tire infla-tion pressure is low.
●When tires of a size other than specified are installed.
●Vehicle is driven in traffic lanes other than that highways and free-
ways.
●When your vehicle is towing a
trailer or during emergency towing
■Preventing LTA system malfunc-
tions and operations performed by mistake
●Do not modify the headlights or
place stickers, etc., on the surface of the lights.
●Do not modify the suspension, etc. If the suspension, etc., needs to be replaced, contact any authorized
Toyota retailer or Toyota authorized repairer, or any reliable repairer.
●Do not install or place anything on the hood or grille. Also, do not install a grille guard (bull bars, kan-
garoo bar, etc.).
●If your windshield needs repairs,
contact any authorized Toyota retailer or Toyota authorized repairer, or any reliable repairer.
■Conditions in which functions may not operate properly
In the following situations, the func- tions may not operate properly and the vehicle may depart from its lane.
Drive safely by always paying careful attention to your surroundings and operate the steering wheel to correct
the path of the vehicle without relying solely on the functions.
Page 206 of 568
206
YARIS(HB) Owner's Manual_Europe_MK0001_en
4-5. Using the driving support systems
■Lane departure alert function
When the system determines that
the vehicle might depart from its
lane or course*, a warning is dis-
played on the multi-information dis-
play, and either a warning buzzer
will sound or the steering wheel will
vibrate to alert the driver.
When the warning buzzer sounds or
the steering wheel vibrates, check the
area around your vehicle and carefully
WARNING
●The vehicle is driven in an area without white (yellow) lines, such as
in front of a tollgate or checkpoint, or at an intersection, etc.
●The white (yellow) lines are cracked, “Raised pavement marker” or stones are present.
●The white (yellow) lines cannot be seen or are difficult to see due to
sand, etc.
●The vehicle is driven on a road sur-
face that is wet due to rain, pud- dles, etc.
●The traffic lines are yellow (which may be more difficult to recognize than lines that are white).
●The white (yellow) lines cross over a curb, etc.
●The vehicle is driven on a bright surface, such as concrete.
●If the edge of the road is not clear or straight.
●The vehicle is driven on a surface that is bright due to reflected light,
etc.
●The vehicle is driven in an area
where the brightness changes sud- denly, such as at the entrances and exits of tunnels, etc.
●Light from the headlights of an oncoming vehicle, the sun, etc.,
enters the camera.
●The vehicle is driven on a slope.
●The vehicle is driven on a road which tilts left or right, or a winding
road.
●The vehicle is driven on an
unpaved or rough road.
●The traffic lane is excessively nar-
row or wide.
●The vehicle is extremely tilted due to carrying heavy luggage or having improper tire pressure.
●The distance to the preceding vehi-cle is extremely short.
●The vehicle is moving up and down a large amount due to road condi-
tions during driving (poor roads or road seams).
●When driving in a tunnel or at night with the headlights off or when a headlight is dim due to its lens
being dirty or it being misaligned.
●The vehicle is struck by a cross-
wind.
●The vehicle is affected by wind from
a vehicle driven in a nearby lane.
●The vehicle has just changed lanes
or crossed an intersection.
●Tires which differ by structure, man-
ufacturer, brand or tread pattern are used.
●Snow tires, etc., are equipped.
●The vehicle is being driven at
extremely high speeds.
Functions included in LTA
system
Page 216 of 568
216
YARIS(HB) Owner's Manual_Europe_MK0001_en
4-5. Using the driving support systems
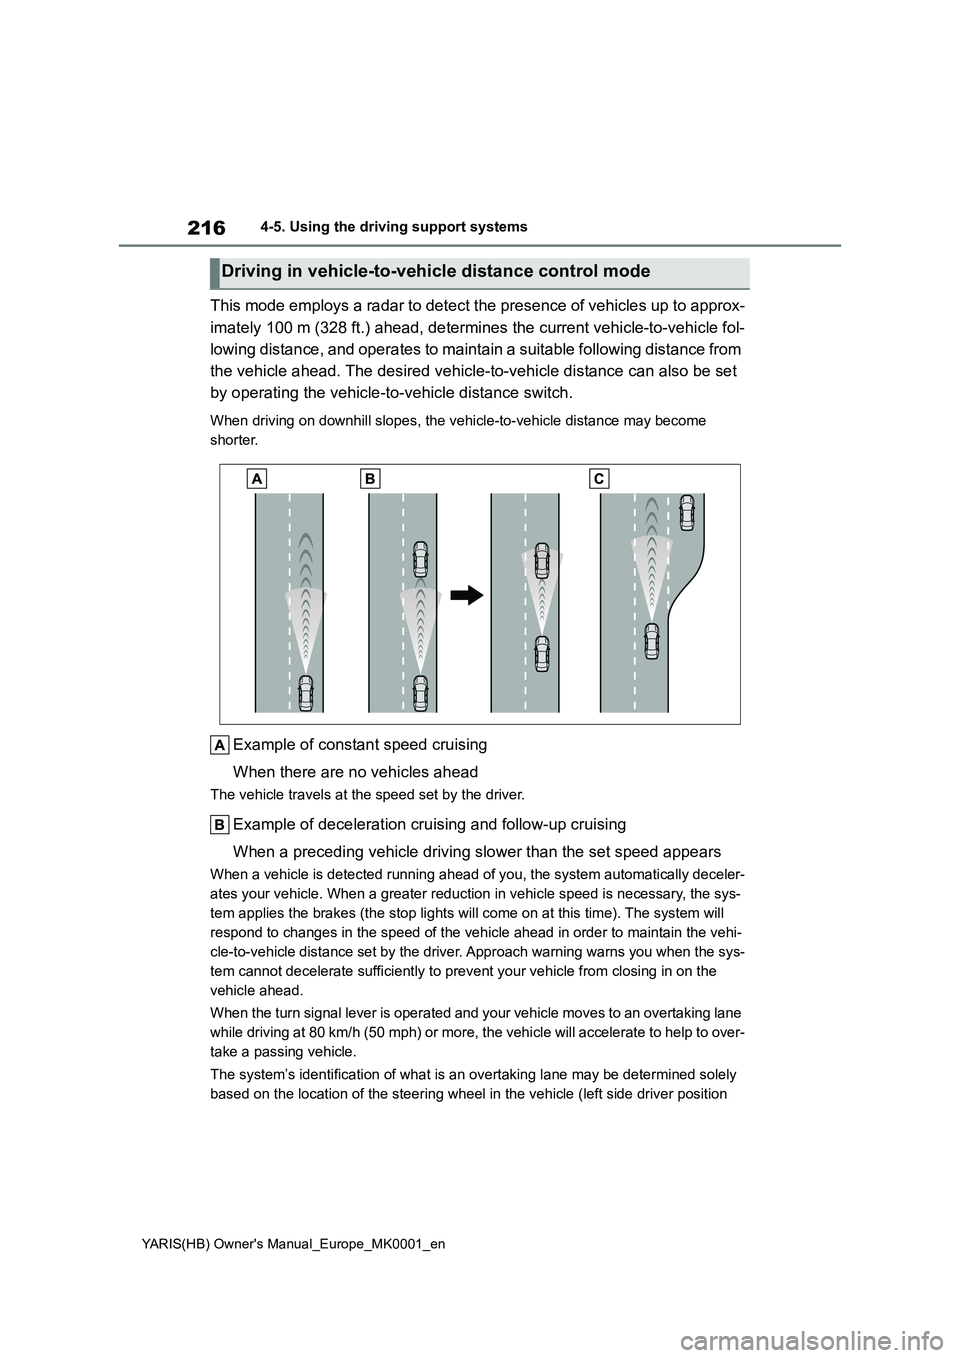
This mode employs a radar to detect the presence of vehicles up to approx-
imately 100 m (328 ft.) ahead, determines the current vehicle-to-vehicle fol-
lowing distance, and operates to maintain a suitable following distance from
the vehicle ahead. The desired vehicle-to-vehicle distance can also be set
by operating the vehicle-to-vehicle distance switch.
When driving on downhill slopes, the vehicle-to-vehicle distance may become
shorter.
Example of constant speed cruising
When there are no vehicles ahead
The vehicle travels at the speed set by the driver.
Example of deceleration cruising and follow-up cruising
When a preceding vehicle driving slower than the set speed appears
When a vehicle is detected running ahead of you, the system automatically deceler-
ates your vehicle. When a greater reduction in vehicle speed is necessary, the sys-
tem applies the brakes (the stop lights will come on at this time). The system will
respond to changes in the speed of the vehicle ahead in order to maintain the vehi-
cle-to-vehicle distance set by the driver. Approach warning warns you when the sys-
tem cannot decelerate sufficiently to prevent your vehicle from closing in on the
vehicle ahead.
When the turn signal lever is operated and your vehicle moves to an overtaking lane
while driving at 80 km/h (50 mph) or more, the vehicle will accelerate to help to over-
take a passing vehicle.
The system’s identification of what is an overtaking lane may be determined solely
based on the location of the steering wheel in the vehicle (left side driver position
Driving in vehicle-to-vehicle distance control mode
Page 243 of 568
243
4
YARIS(HB) Owner's Manual_Europe_MK0001_en
4-5. Using the driving support systems
Driving
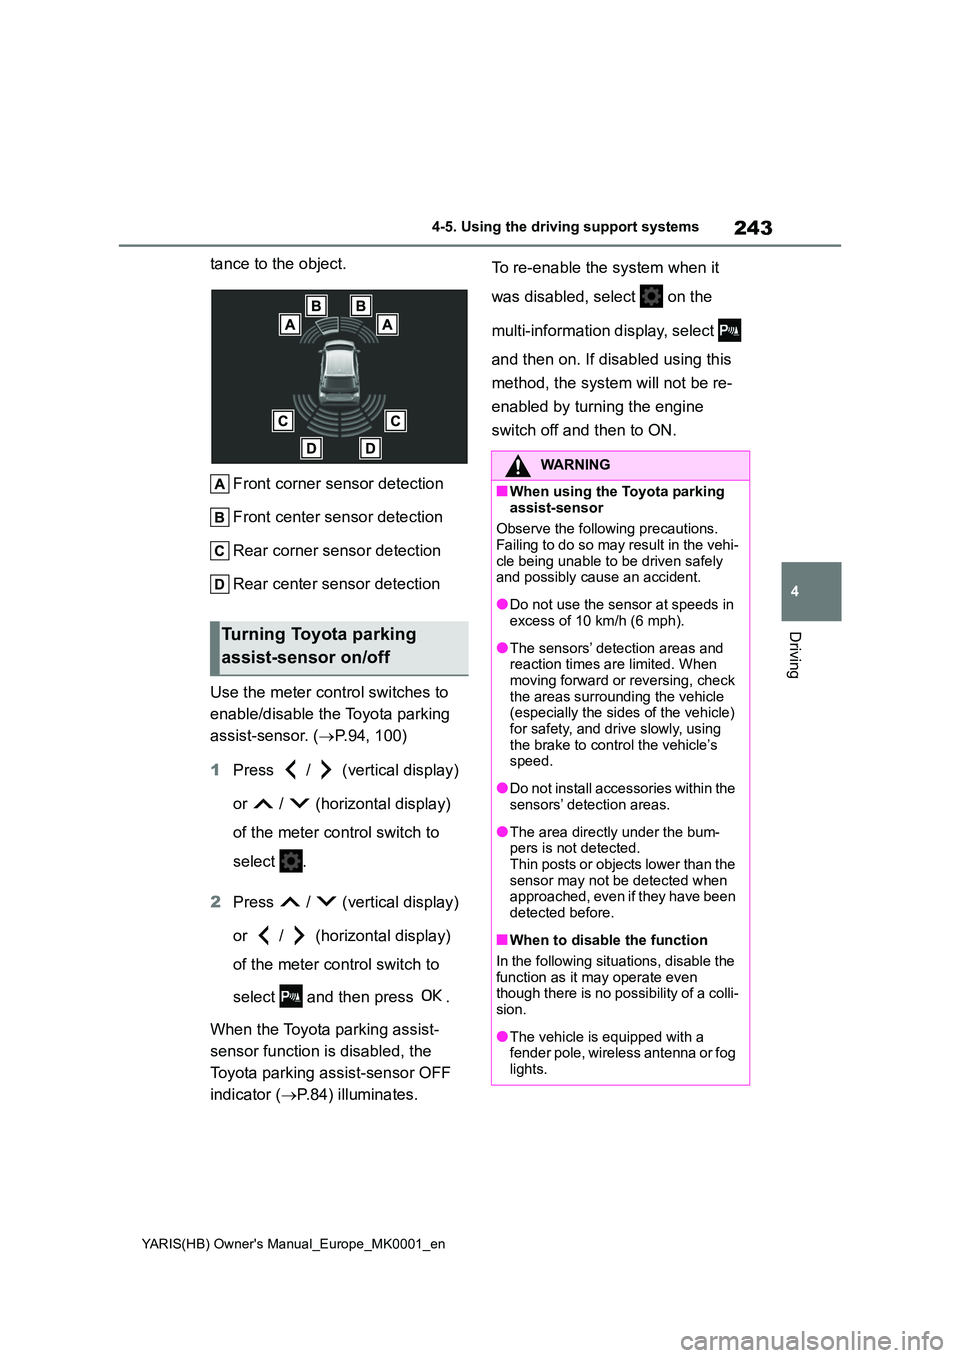
tance to the object.
Front corner sensor detection
Front center sensor detection
Rear corner sensor detection
Rear center sensor detection
Use the meter control switches to
enable/disable the Toyota parking
assist-sensor. ( →P.94, 100)
1 Press / (vertical display)
or / (horizontal display)
of the meter control switch to
select .
2 Press / (vertical display)
or / (horizontal display)
of the meter control switch to
select and then press .
When the Toyota parking assist-
sensor function is disabled, the
Toyota parking assist-sensor OFF
indicator ( →P.84) illuminates.
To re-enable the system when it
was disabled, select on the
multi-information display, select
and then on. If disabled using this
method, the system will not be re-
enabled by turning the engine
switch off and then to ON.
Turning Toyota parking
assist-sensor on/off
WARNING
■When using the Toyota parking
assist-sensor
Observe the following precautions. Failing to do so may result in the vehi-
cle being unable to be driven safely and possibly cause an accident.
●Do not use the sensor at speeds in excess of 10 km/h (6 mph).
●The sensors’ detection areas and reaction times are limited. When moving forward or reversing, check
the areas surrounding the vehicle (especially the sides of the vehicle) for safety, and drive slowly, using
the brake to control the vehicle’s speed.
●Do not install accessories within the sensors’ detection areas.
●The area directly under the bum-pers is not detected.Thin posts or objects lower than the
sensor may not be detected when approached, even if they have been detected before.
■When to disable the function
In the following situations, disable the
function as it may operate even though there is no possibility of a colli-sion.
●The vehicle is equipped with a fender pole, wireless antenna or fog
lights.
Page 304 of 568
304
YARIS(HB) Owner's Manual_Europe_MK0001_en
5-4. Other interior features
■To prevent battery discharge
If the vanity lights remain on when the
engine switch is OFF, the lights will go off automatically after 20 minutes.
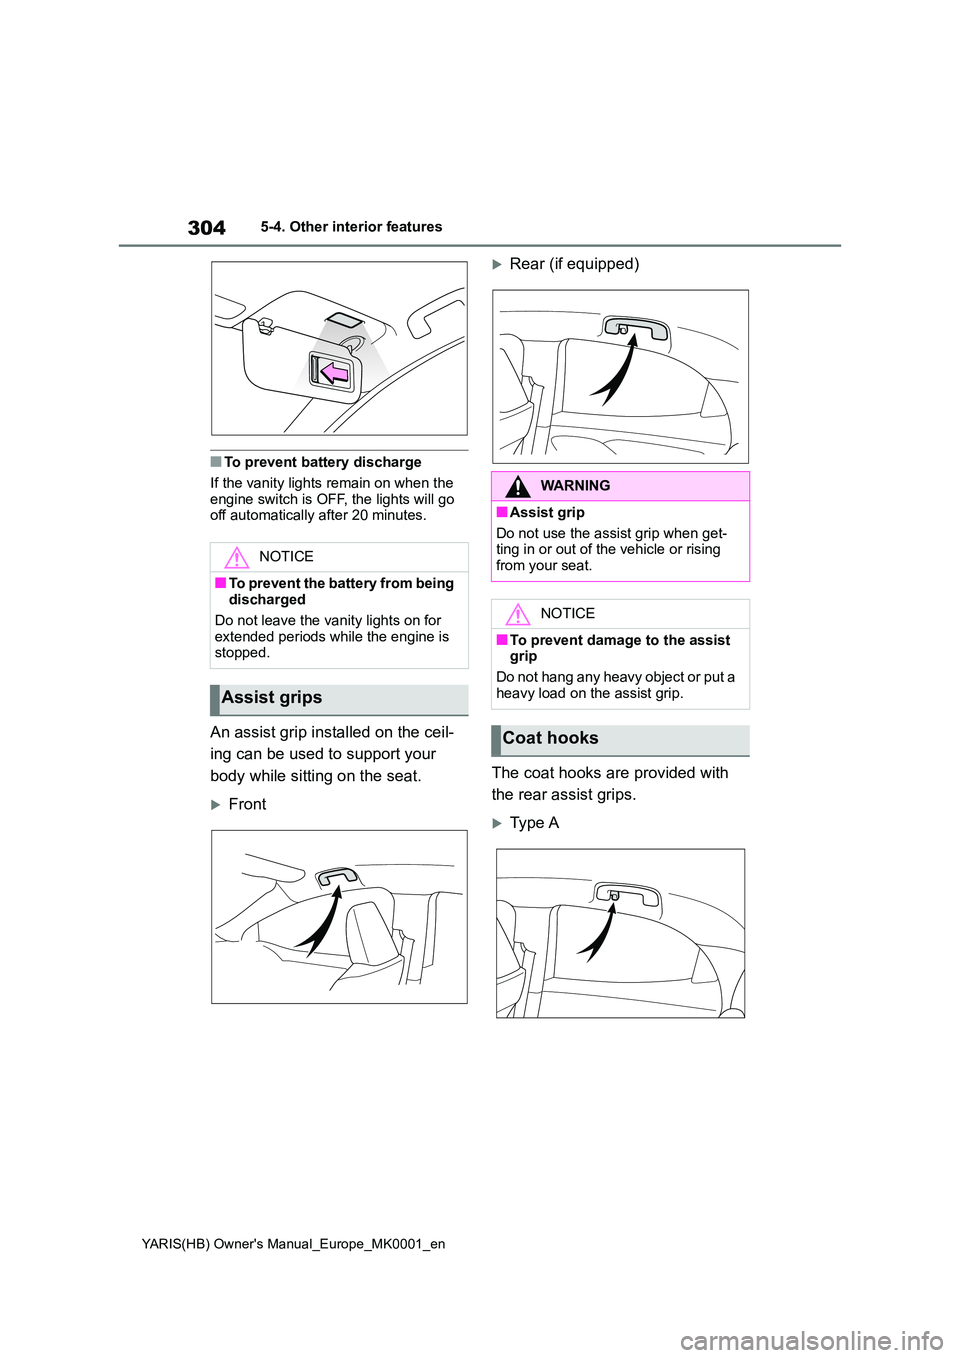
An assist grip installed on the ceil-
ing can be used to support your
body while sitting on the seat.
Front
Rear (if equipped)
The coat hooks are provided with
the rear assist grips.
Typ e A
NOTICE
■To prevent the battery from being discharged
Do not leave the vanity lights on for
extended periods while the engine is stopped.
Assist grips
WARNING
■Assist grip
Do not use the assist grip when get- ting in or out of the vehicle or rising
from your seat.
NOTICE
■To prevent damage to the assist grip
Do not hang any heavy object or put a
heavy load on the assist grip.
Coat hooks
Page 335 of 568
335
6
YARIS(HB) Owner's Manual_Europe_MK0001_en
6-3. Do-it-yourself maintenance
Maintenance and care
■How to initialize the tire pres-
sure warning system
1Park the vehicle in a safe place
and turn the engine switch off.
Initialization cannot be performed while
the vehicle is moving.
2Adjust the tire inflation pressure
to the specified cold tire inflation
pressure level. (→P.417)
Make sure to adjust the tire pressure to
the specified cold tire inflation pressure
level. The tire pressure warning system
will operate based on this pressure
level.
3Turn the engine switch to ON.
4Press / (vertical display)
or / (horizontal display)
of the meter control switch to
select .
5Press / (vertical display)
or / (horizontal display)
to select “Vehicle Settings” and
then press and hold .
6Press / to select “TPWS
setting” and then press .
7Press / to select “Setting
Pressure”. Then press and hold
until the tire pressure warn-
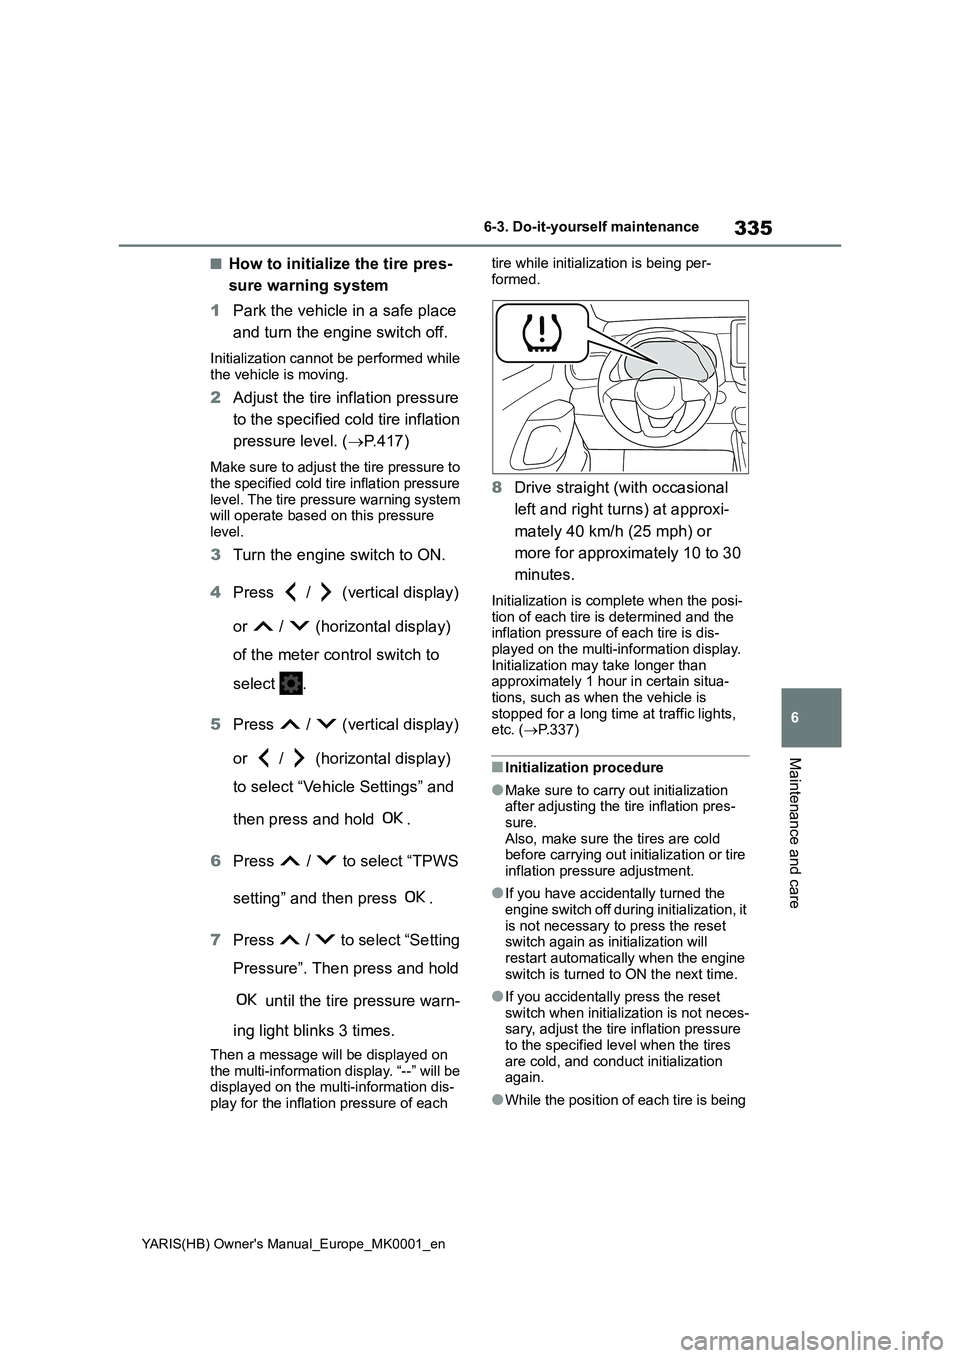
ing light blinks 3 times.
Then a message will be displayed on
the multi-information display. “--” will be
displayed on the multi-information dis-
play for the inflation pressure of each tire while initialization is being per-
formed.
8Drive straight (with occasional
left and right turns) at approxi-
mately 40 km/h (25 mph) or
more for approximately 10 to 30
minutes.
Initialization is complete when the posi-
tion of each tire is determined and the
inflation pressure of each tire is dis-
played on the multi-information display.
Initialization may take longer than
approximately 1 hour in certain situa-
tions, such as when the vehicle is
stopped for a long time at traffic lights,
etc. (→P.337)
■Initialization procedure
●Make sure to carry out initialization
after adjusting the tire inflation pres-
sure.
Also, make sure the tires are cold
before carrying out initialization or tire
inflation pressure adjustment.
●If you have accidentally turned the
engine switch off during initialization, it
is not necessary to press the reset
switch again as initialization will
restart automatically when the engine
switch is turned to ON the next time.
●If you accidentally press the reset
switch when initialization is not neces-
sary, adjust the tire inflation pressure
to the specified level when the tires
are cold, and conduct initialization
again.
●While the position of each tire is being
Page 337 of 568
337
6
YARIS(HB) Owner's Manual_Europe_MK0001_en
6-3. Do-it-yourself maintenance
Maintenance and care
3Press / to select “TPWS
setting” and then press .
4Press / to select “Identi-
fying Each Wheel & Position”.
Then press and hold until
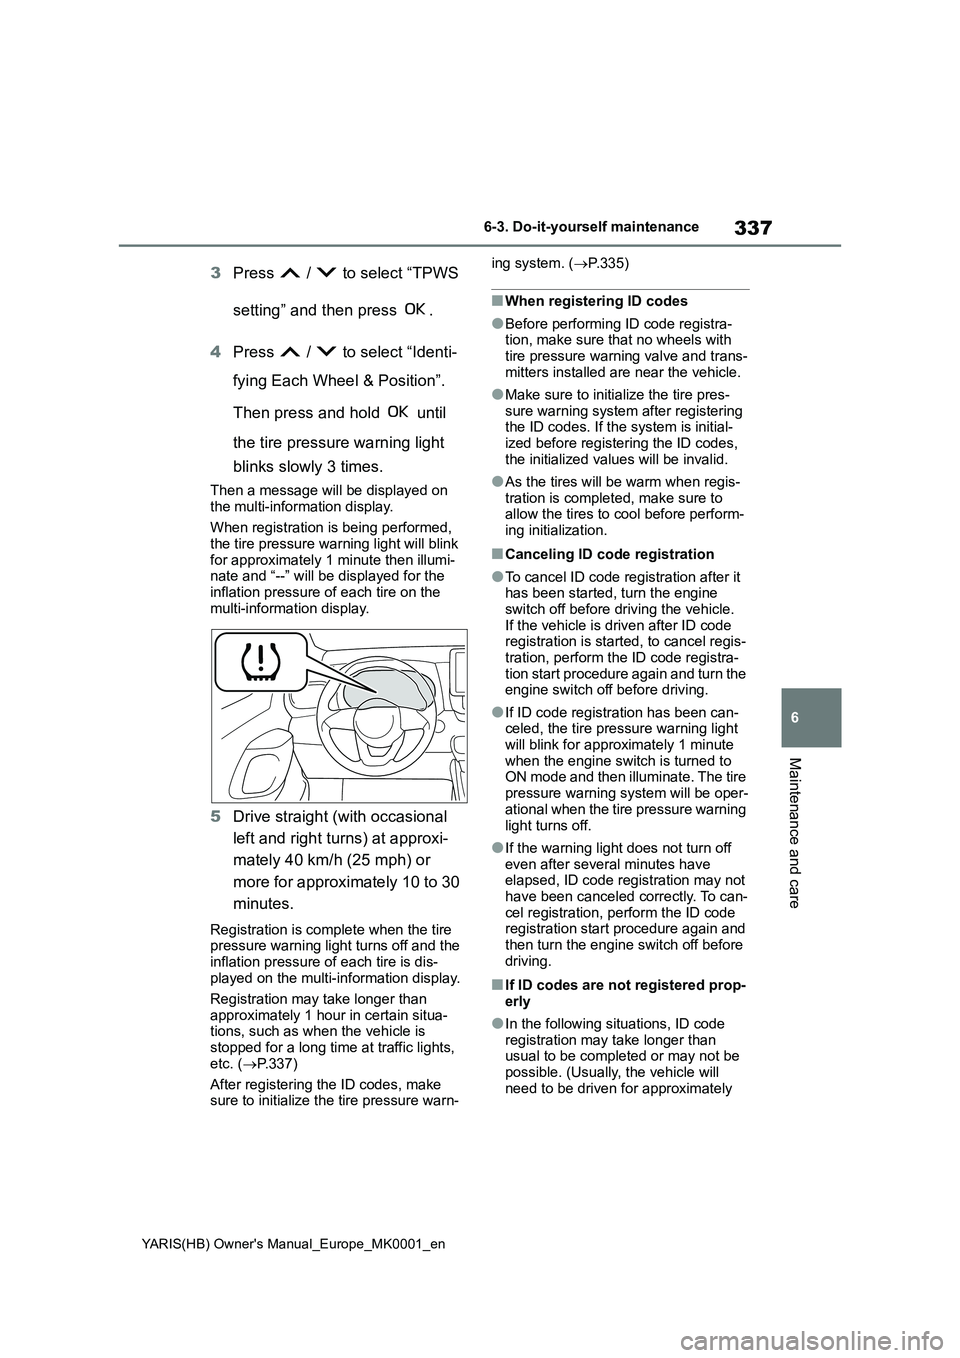
the tire pressure warning light
blinks slowly 3 times.
Then a message will be displayed on
the multi-information display.
When registration is being performed,
the tire pressure warning light will blink
for approximately 1 minute then illumi-
nate and “--” will be displayed for the
inflation pressure of each tire on the
multi-information display.
5Drive straight (with occasional
left and right turns) at approxi-
mately 40 km/h (25 mph) or
more for approximately 10 to 30
minutes.
Registration is complete when the tire
pressure warning light turns off and the
inflation pressure of each tire is dis-
played on the multi-information display.
Registration may take longer than
approximately 1 hour in certain situa-
tions, such as when the vehicle is
stopped for a long time at traffic lights,
etc. (→P.337)
After registering the ID codes, make
sure to initialize the tire pressure warn-ing system. (→P.335)
■When registering ID codes
●Before performing ID code registra-
tion, make sure that no wheels with
tire pressure warning valve and trans-
mitters installed are near the vehicle.
●Make sure to initialize the tire pres-
sure warning system after registering
the ID codes. If the system is initial-
ized before registering the ID codes,
the initialized values will be invalid.
●As the tires will be warm when regis-
tration is completed, make sure to
allow the tires to cool before perform-
ing initialization.
■Canceling ID code registration
●To cancel ID code registration after it
has been started, turn the engine
switch off before driving the vehicle.
If the vehicle is driven after ID code
registration is started, to cancel regis-
tration, perform the ID code registra-
tion start procedure again and turn the
engine switch off before driving.
●If ID code registration has been can-
celed, the tire pressure warning light
will blink for approximately 1 minute
when the engine switch is turned to
ON mode and then illuminate. The tire
pressure warning system will be oper-
ational when the tire pressure warning
light turns off.
●If the warning light does not turn off
even after several minutes have
elapsed, ID code registration may not
have been canceled correctly. To can-
cel registration, perform the ID code
registration start procedure again and
then turn the engine switch off before
driving.
■If ID codes are not registered prop-
erly
●In the following situations, ID code
registration may take longer than
usual to be completed or may not be
possible. (Usually, the vehicle will
need to be driven for approximately
Page 350 of 568
350
YARIS(HB) Owner's Manual_Europe_MK0001_en
6-3. Do-it-yourself maintenance
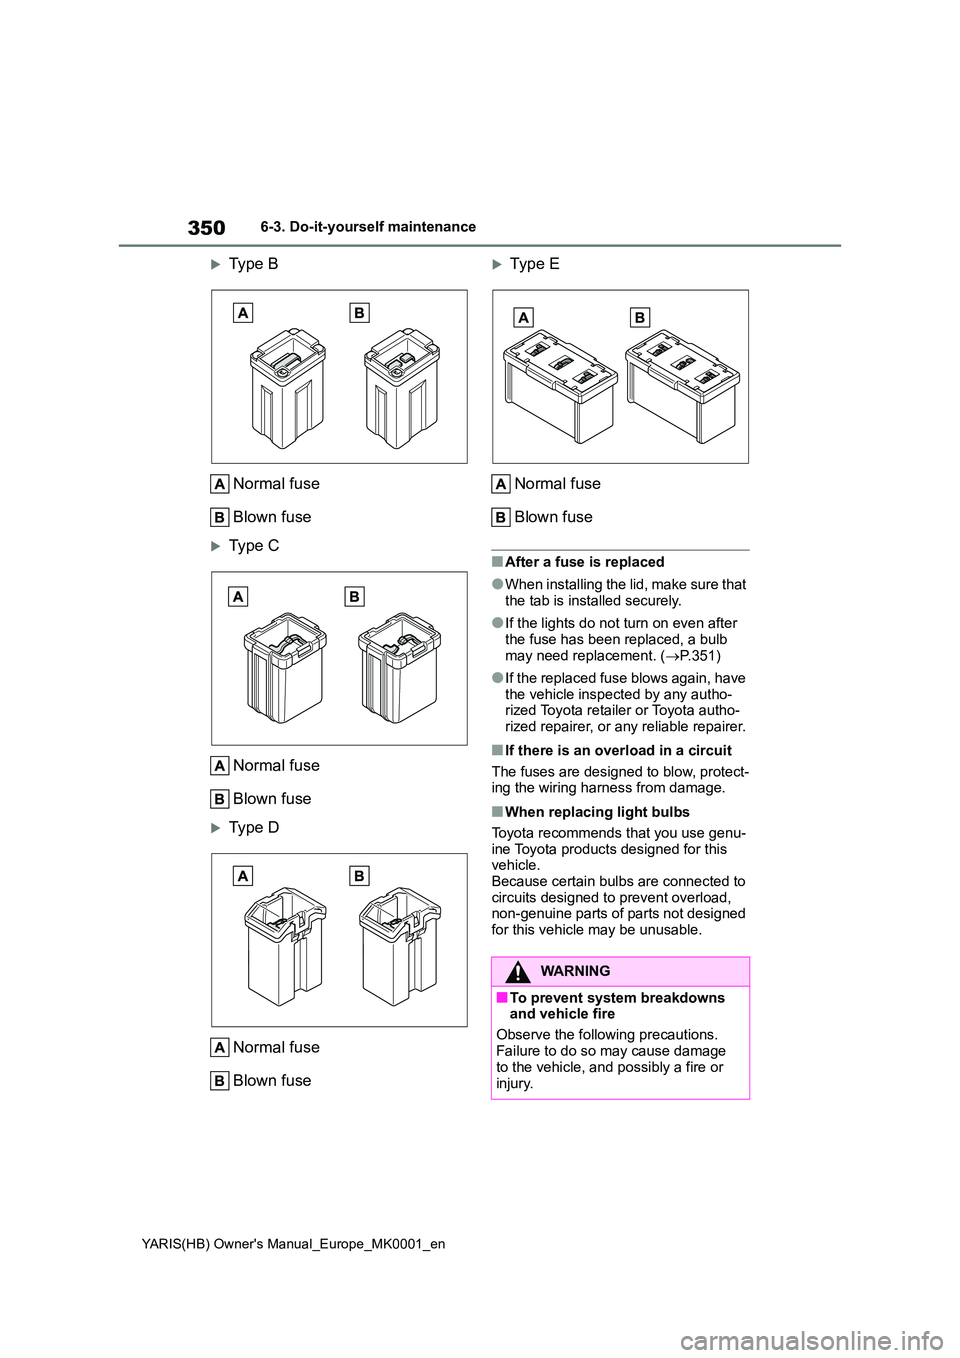
Type B
Normal fuse
Blown fuse
Type C
Normal fuse
Blown fuse
Type D
Normal fuse
Blown fuse
Typ e E
Normal fuse
Blown fuse
■After a fuse is replaced
●When installing the lid, make sure that the tab is installed securely.
●If the lights do not turn on even after the fuse has been replaced, a bulb
may need replacement. ( →P.351)
●If the replaced fuse blows again, have
the vehicle inspected by any autho- rized Toyota retailer or Toyota autho-rized repairer, or any reliable repairer.
■If there is an overload in a circuit
The fuses are designed to blow, protect- ing the wiring harness from damage.
■When replacing light bulbs
Toyota recommends that you use genu-
ine Toyota products designed for this vehicle.Because certain bulbs are connected to
circuits designed to prevent overload, non-genuine parts of parts not designed for this vehicle may be unusable.
WARNING
■To prevent system breakdowns and vehicle fire
Observe the following precautions.
Failure to do so may cause damage to the vehicle, and possibly a fire or
injury.
Page 351 of 568
351
6
YARIS(HB) Owner's Manual_Europe_MK0001_en
6-3. Do-it-yourself maintenance
Maintenance and care
Check the wattage of the light bulb
to be replaced. ( →P.419)
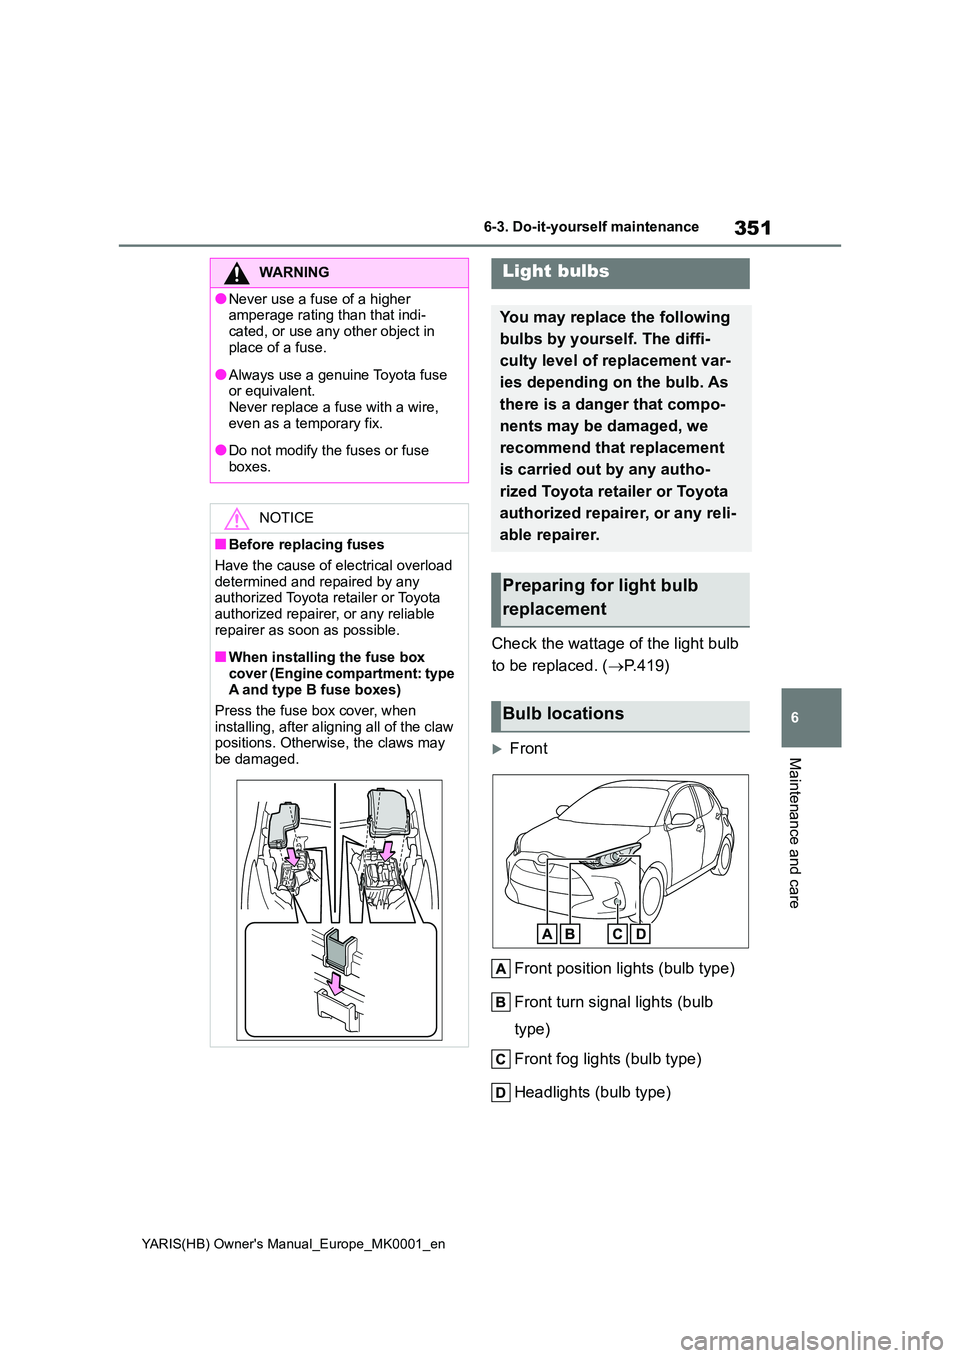
Front
Front position lights (bulb type)
Front turn signal lights (bulb
type)
Front fog lights (bulb type)
Headlights (bulb type)
WARNING
●Never use a fuse of a higher amperage rating than that indi-
cated, or use any other object in place of a fuse.
●Always use a genuine Toyota fuse or equivalent.Never replace a fuse with a wire,
even as a temporary fix.
●Do not modify the fuses or fuse
boxes.
NOTICE
■Before replacing fuses
Have the cause of electrical overload
determined and repaired by any authorized Toyota retailer or Toyota authorized repairer, or any reliable
repairer as soon as possible.
■When installing the fuse box
cover (Engine compartment: type A and type B fuse boxes)
Press the fuse box cover, when
installing, after aligning all of the claw positions. Otherwise, the claws may
be damaged.
Light bulbs
You may replace the following
bulbs by yourself. The diffi-
culty level of replacement var-
ies depending on the bulb. As
there is a danger that compo-
nents may be damaged, we
recommend that replacement
is carried out by any autho-
rized Toyota retailer or Toyota
authorized repairer, or any reli-
able repairer.
Preparing for light bulb
replacement
Bulb locations
Page 358 of 568
358
YARIS(HB) Owner's Manual_Europe_MK0001_en
6-3. Do-it-yourself maintenance
2Push the lens into place.
After installation, confirm that the lens is
properly installed by gently pulling it.
Fitting portion
WARNING
■Replacing light bulbs
●Turn off the lights. Do not attempt to
replace the bulb immediately after turning off the lights. The bulbs become very hot and may cause
burns.
●Do not touch the glass portion of
the light bulb with bare hands. When it is unavoidable to hold the glass portion, use and hold with a
clean dry cloth to avoid getting moisture and oils on the bulb. Also, if the bulb is scratched or dropped,
it may blow out or crack.
●Fully install light bulbs and any
parts used to secure them. Failure to do so may result in heat damage, fire, or water entering the light unit.
This may damage the lights or cause condensation to build up on the lens.
■To prevent damage or fire
Make sure bulbs are fully seated and
locked.