display TOYOTA YARIS HATCHBACK 2009 User Guide
[x] Cancel search | Manufacturer: TOYOTA, Model Year: 2009, Model line: YARIS HATCHBACK, Model: TOYOTA YARIS HATCHBACK 2009Pages: 402, PDF Size: 7.61 MB
Page 212 of 402
200
3-2. Using the audio system
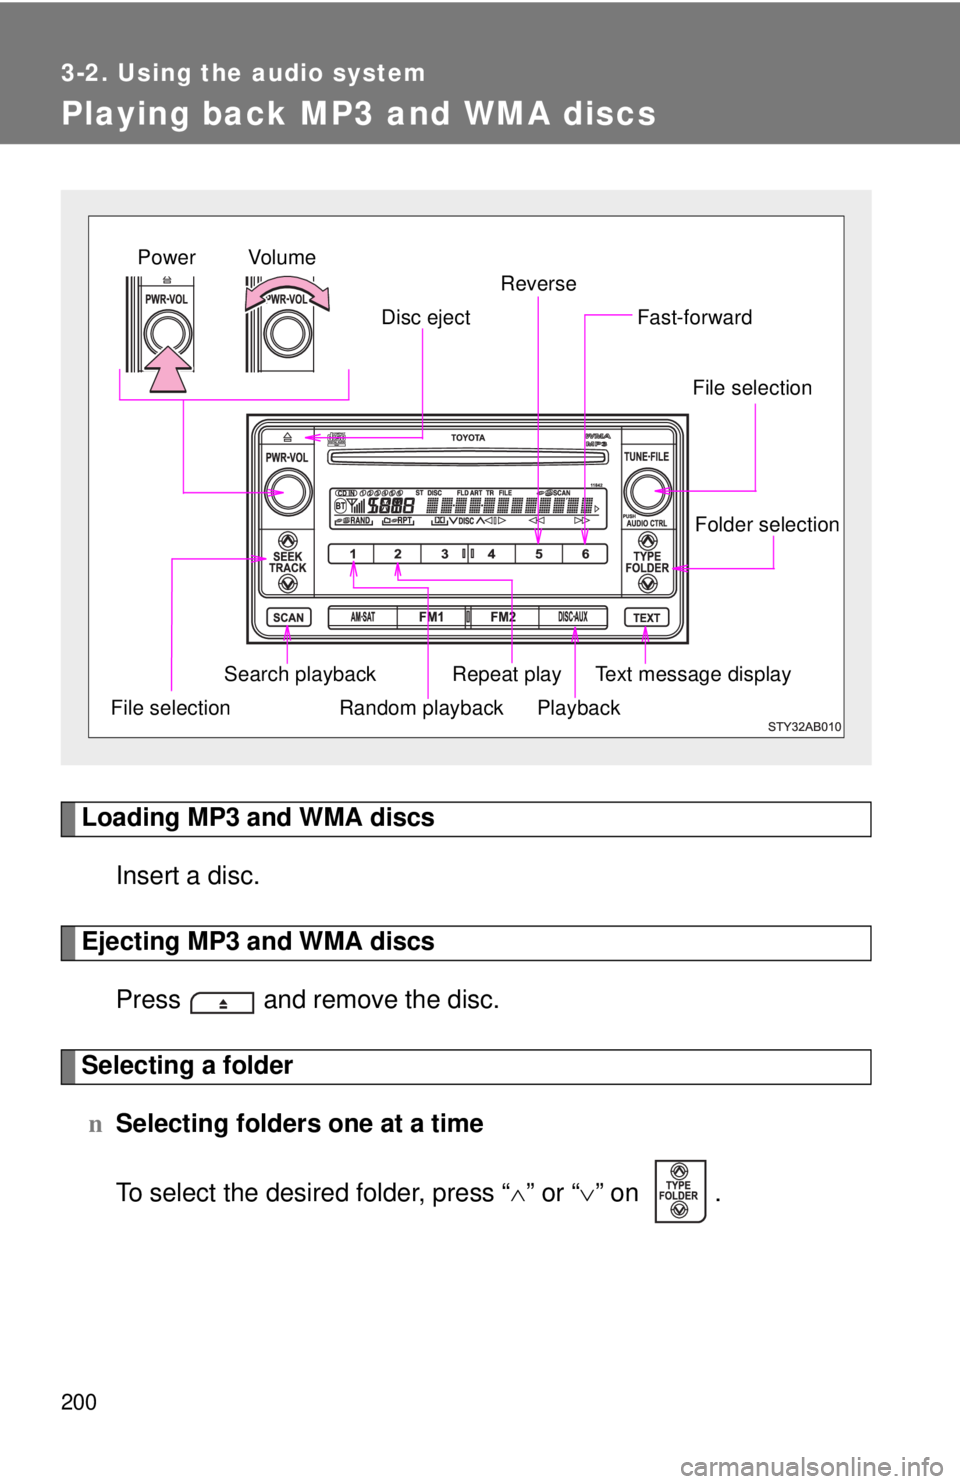
Playing back MP3 and WMA discs
Loading MP3 and WMA discs
Insert a disc.
Ejecting MP3 and WMA discs
Press and remove the disc.
Selecting a folder
nSelecting folders one at a time
To select the desired folder, press “ ∧” or “ ∨” on
.
Random playback
File selection File selection
Repeat play Playback
Disc eject
Text message display
Folder selection
Search playback
Fast-forward
Reverse
Vo lu m e
Power
Page 214 of 402
202 3-2. Using the audio system
Random playback
nTo play files from a partic ular folder in random order
Press (RAND).
n T
o play all of the files on a disc in random order
Press and hold (RAND) until you hear a beep.
Switching the display
Press .
Each time the switch is pressed, the display changes in the order of
Folder no./File no./Elapsed time →Folder name→File name→Album title
(MP3 only) →Track title →Artist name.
nDisplay
Up to 12 characters can be displayed at a time.
If there are 13 characters or more, pressing and holding for 1 second
or more will display the remaining characters.
A maximum of 24 characters can be displayed.
If is pressed for 1 second or more again or has not been pressed for
6 seconds or more, the display will return to the first 12 characters.
Depending on the contents recorded, the characters may not be displayed
prop
erly or may not be displayed at all.
n Cancelin
g random playback
Press
(RAND) again.
n Canceling repeat play
Press (RPT) again.
n Error messages
“ERROR”: This indicates a trouble either in the CD or inside the player.
The CD may be dirty, damaged or inserted up-side down.
“NO MUSIC”:This indicates that the MP 3/WMA file
is not included in the CD.
Page 216 of 402
204 3-2. Using the audio system
• Compatible channel modes: stereo, joint stereo, dual channel and monaural
l WMA file compatibility
• Compatible standards
WMA Ver. 7, 8, 9
• Compatible sampling frequencies 32, 44.1, 48 (kHz)
• Compatible bit rates (only compatible with 2-channel playback)
Ver. 7, 8: CBR 48, 64, 80, 96, 128, 160, 192 (kbps)
Ver. 9: CBR 48, 64, 80, 96, 128, 160, 192, 256, 320 (kbps)
l Compatible media
Media that can be used for MP3 and WMA playback are CD-Rs and CD-
RWs.
Playback in some instances may not be possible, depending on the status
of the CD-R or CD-RW. Playback may not be possible or the audio may
jump if the disc is scratched or marked with fingerprints.
l Compatible disc formats
The following disc formats can be used.
• Disc formats: CD-ROM Mode 1 and Mode 2
CD-ROM XA Mode 2, Form 1 and Form 2
• File formats: ISO9660 Level 1, Level 2, (Romeo, Joliet)
MP3 and WMA files written in any format other than those listed above
may not play correctly, and their file names and folder names may not
be displayed correctly.
Items related to standards and limitations are as follows.
• Maximum directory hierarchy: 8 levels
• Maximum length of folder names/file names: 32 characters
• Maximum number of folders: 192 (including the root)
• Maximum number of files per disc: 255
l File names
The only files that can be recognized as MP3/WMA and played are those
with the extension .mp3 or .wma.
l Multi-sessions
As the audio system is compatible with multi-sessions, it is possible to play
discs that contain MP3 and WMA files. However, only the first session can
be played.
Page 219 of 402
207
3-2. Using the audio system
3
Interior features
Optimal use of the audio system
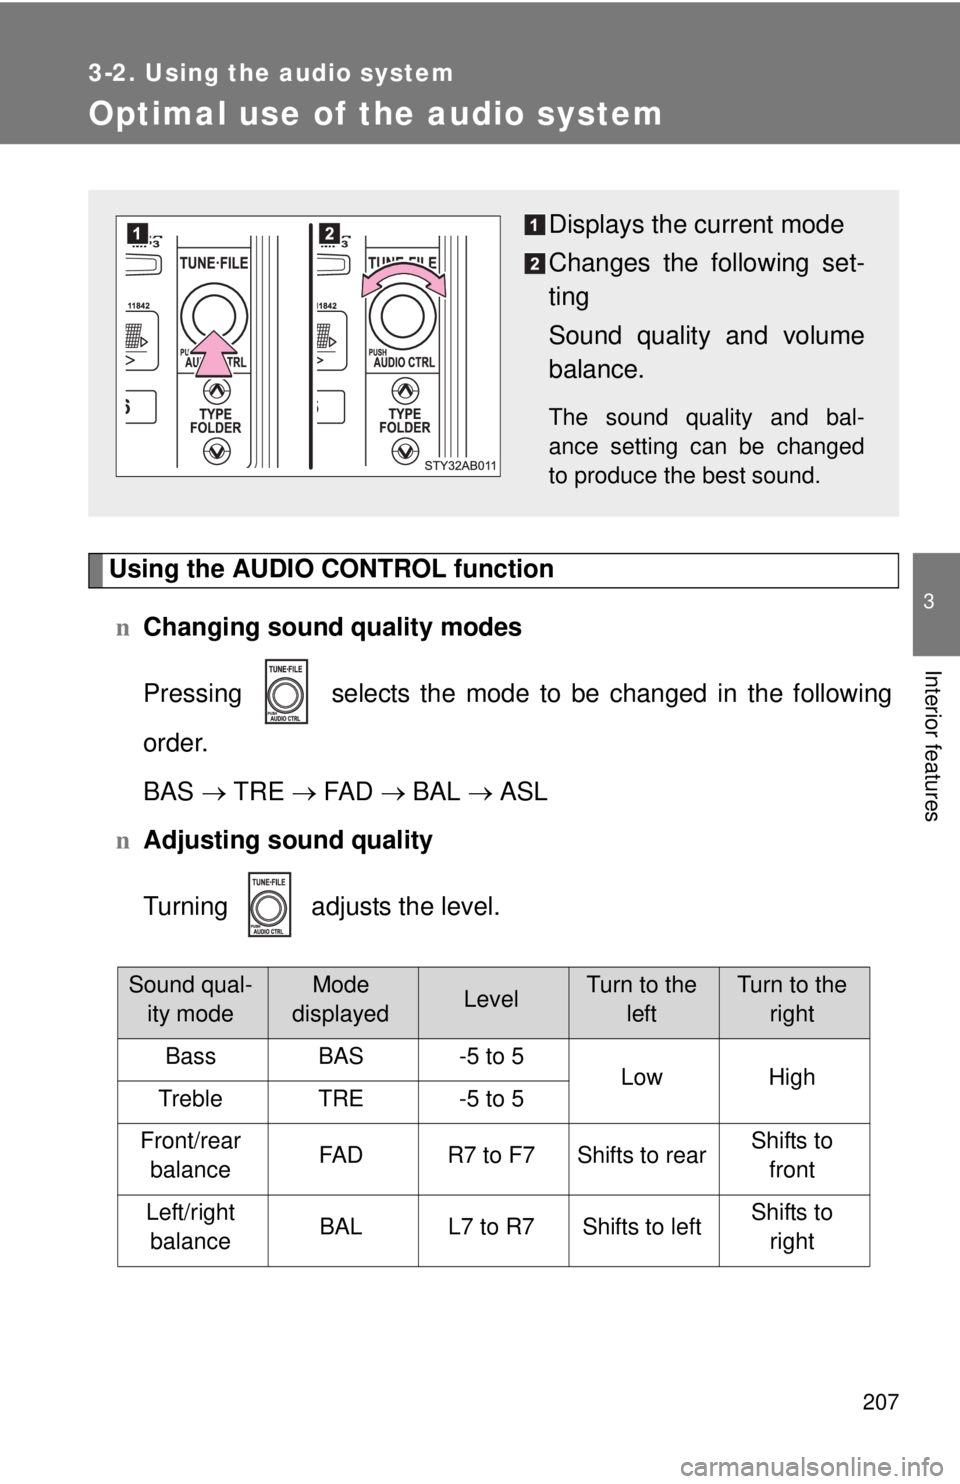
Using the AUDIO CONTROL function
nChanging sound quality modes
Pressing selects the mode to be changed in the following
order.
BAS → TRE → FA
D → BAL → ASL
n Adjusting sou
nd quality
Turning adjusts the level.
Sound qual-
ity modeMode
displayedLevelTurn to the leftTurn to the right
BassBAS-5 to 5LowHighTrebleTRE-5 to 5
Front/rear balanceFA DR7 to F7Shifts to rearShifts to front
Left/right balanceBALL7 to R7Shifts to leftShifts to right
Displays the current mode
Changes the following set -
ting
Sound quality and volume
b
alance.
The sound quality and bal-
ance setting can be changed
to produce the b
est sound.
Page 234 of 402
222 3-5. Other interior features
nThe clock is displayed when
The engine switch is in the ON position.
n When disconnecting and reco nnecting battery termi
nals
The time display will automatically be set to 1:00.
n Adjusting to a full hour (vehic
les without tachometer)
If you press the clock reset button, the minute values will be rounded to the
neares
t hour. So, minute values from “:00” to “:29” are rounded down, and
values from “:30” to “:59” are rounded up.*
*: e.g.
1:00 to 1:29 → 1:0
0
1:30 to 1:59 → 2:0
0
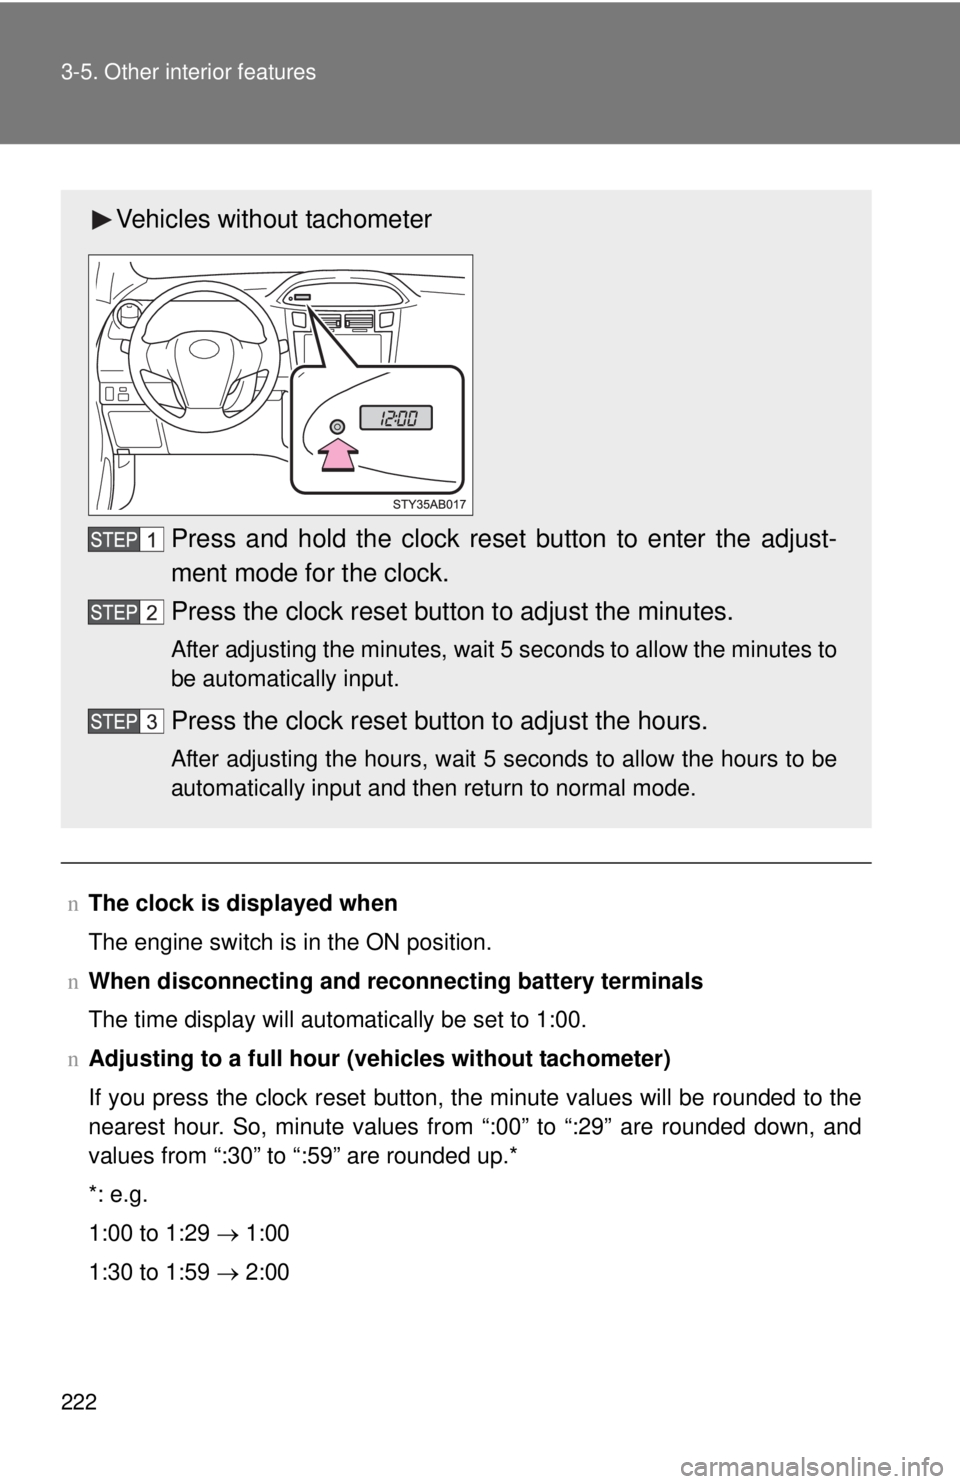
Vehicles without tachometer
Press and hold the clock reset button to enter the adjust-
ment mode for the clock.
Press the clock reset button to adjust the minutes.
After adjusting the minutes, wait 5 seconds to allow the minutes to
be automatically input.
Press the clock reset button to adjust the hours.
After adjusting the hours, wait 5 seconds to allow the hours to be
automatically input and then return to normal mode.
Page 260 of 402
249
4-3. Do-it-yourself maintenance
4
Maintenance and care
n
Engine oil consumption
lIf you consume more than 1.1 qt. (1.0 L, 0.9 lmp.qt.) every 600 miles
(1000 km), contact your Toyota dealer.
n After changing the engine oil (except Canada)
The oil change system should be reset. Perform the following procedures:
Turn the engine switch off with the Trip A reading shown.( →P. 135)
Turn the engine switch to the ON position while holding down the
trip meter reset button.
Continue to press and hold the button until the trip meter displays
000000.
If the system fails to reset, the light will continue flashing.
CAUTION
n Used engine oil
lUsed engine oil contains potentially harmful contaminants which may
cause skin disorders such as inflammation or skin cancer, so care should
be taken to avoid prolonged and repeated contact. To remove used engine
oil from your skin, wash thoroughly with soap and water.
l Dispose of used oil and filters only in a safe and acceptable manner. Do
not dispose of used oil and filters in household trash, in sewers or onto the
ground. Call your Toyota dealer, service station or auto parts store for
information concerning recycling or disposal.
l Do not leave used engine oil within the reach of children.