reset TOYOTA YARIS HATCHBACK 2010 Owners Manual
[x] Cancel search | Manufacturer: TOYOTA, Model Year: 2010, Model line: YARIS HATCHBACK, Model: TOYOTA YARIS HATCHBACK 2010Pages: 406, PDF Size: 8.14 MB
Page 6 of 406
4
OVERVIEW
Driver seatbelt reminder2
(alarm will sound if speed is over 12 mph)
Front passenger seatbelt reminder
2
(alarm will sound if speed is over 12 mph)
Brake system warning
1,2
1If indicator does not turn off within a few seconds of starting engine, there may
be a malfunction. Have vehicle inspected by your Toyota dealer.
Indicator symbols
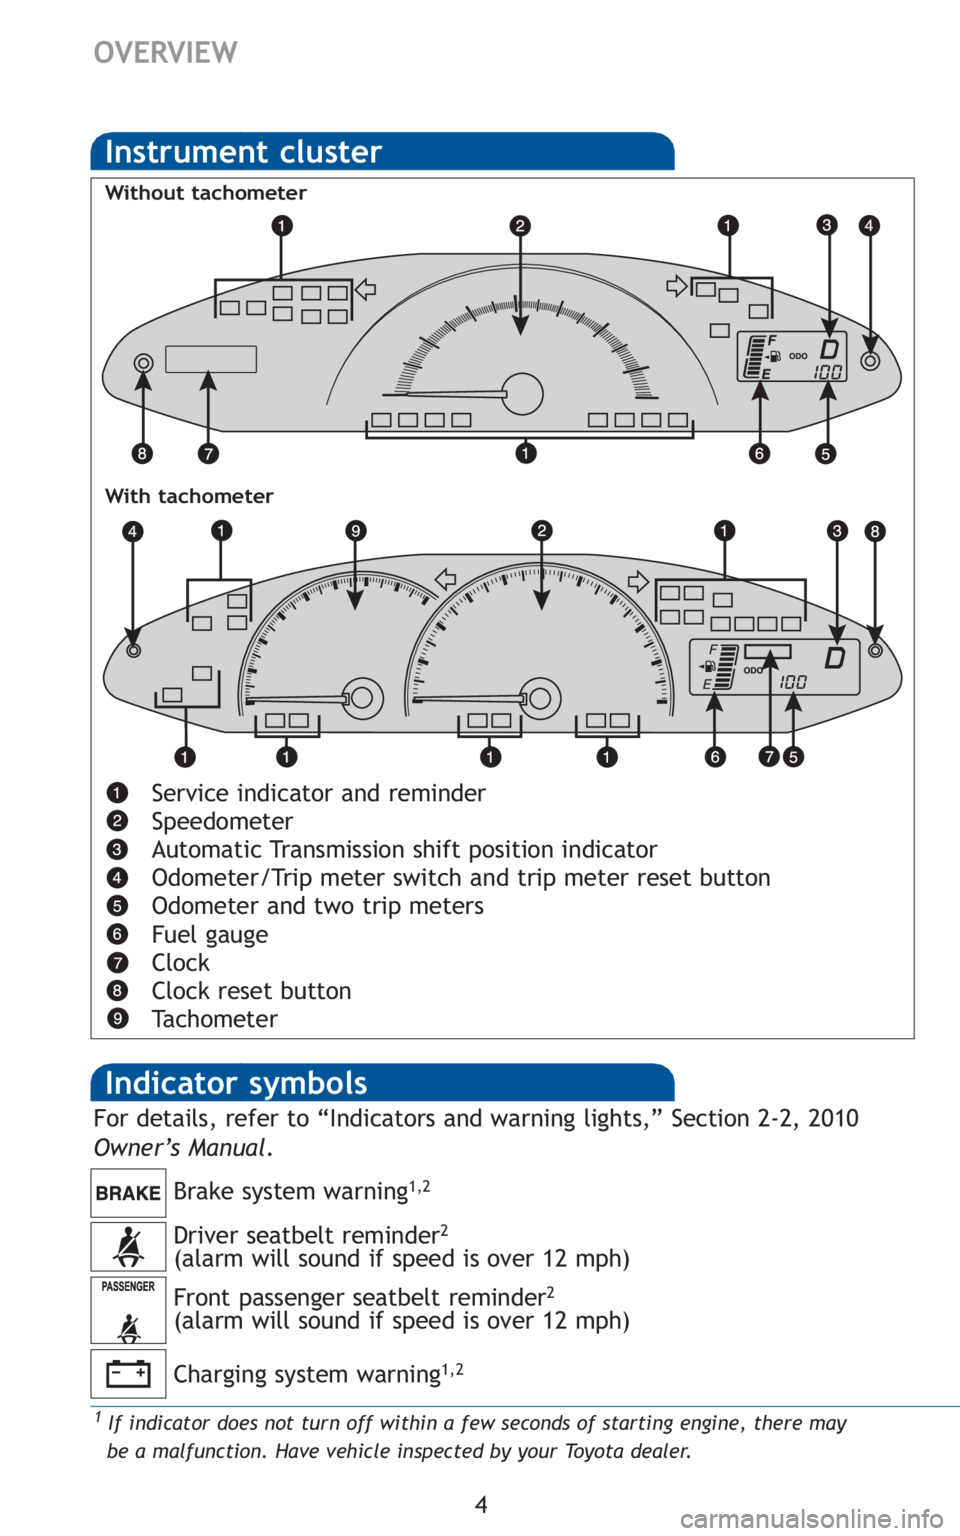
Service indicator and reminder
Speedometer
Automatic Transmission shift position indicator
Odometer/Trip meter switch and trip meter reset button
Odometer and two trip meters
Fuel gauge
Clock
Clock reset button
Tachometer
Instrument cluster
Without tachometer
With tachometer
Charging system warning1,2
For details, refer to “Indicators and warning lights,” Section 2-2, 2010
Owner’s Manual .
Page 16 of 406
14
FEATURES/OPERATIONS
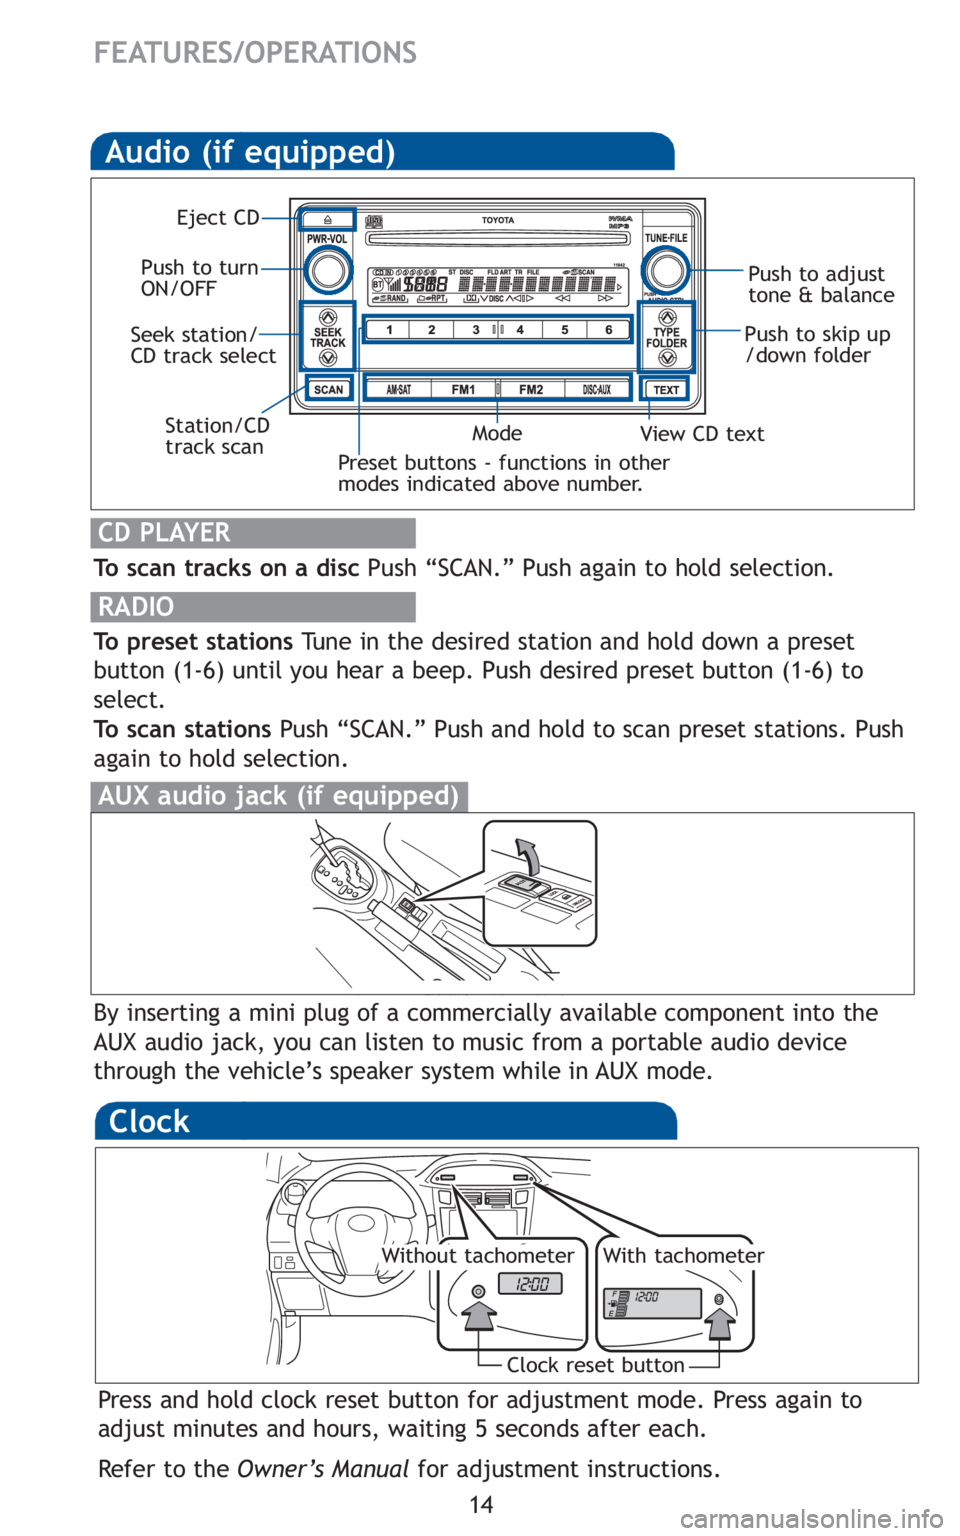
Audio (if equipped)
To scan tracks on a discPush “SCAN.” Push again to hold selection.
RADIO
To preset stationsTune in the desired station and hold down a preset
button (1-6) until you hear a beep. Push desired preset button (1-6) to
select.
To scan stations Push “SCAN.” Push and hold to scan preset stations. Push
again to hold selection.
CD PLAYER
Preset buttons - functions in other
modes indicated above number.
View CD text
Push to skip up
/down folder
Eject CD
Push to turn
ON/OFF Push to adjust
tone & balance
Mode
Seek station/
CD track select
Station/CD
track scan
By inserting a mini plug of a commercially available component into the
AUX audio jack, you can listen to music from a portable audio device
through the vehicle’s speaker system while in AUX mode.
AUX audio jack (if equipped)
Clock
Press and hold clock reset button for adjustment mode. Press again to
adjust minutes and hours, waiting 5 seconds after each.
Refer to the Owner’s Manual for adjustment instructions.
Clock reset button
Without tachometerWith tachometer
Page 152 of 406
139
2
When driving
2-2. Instrument cluster
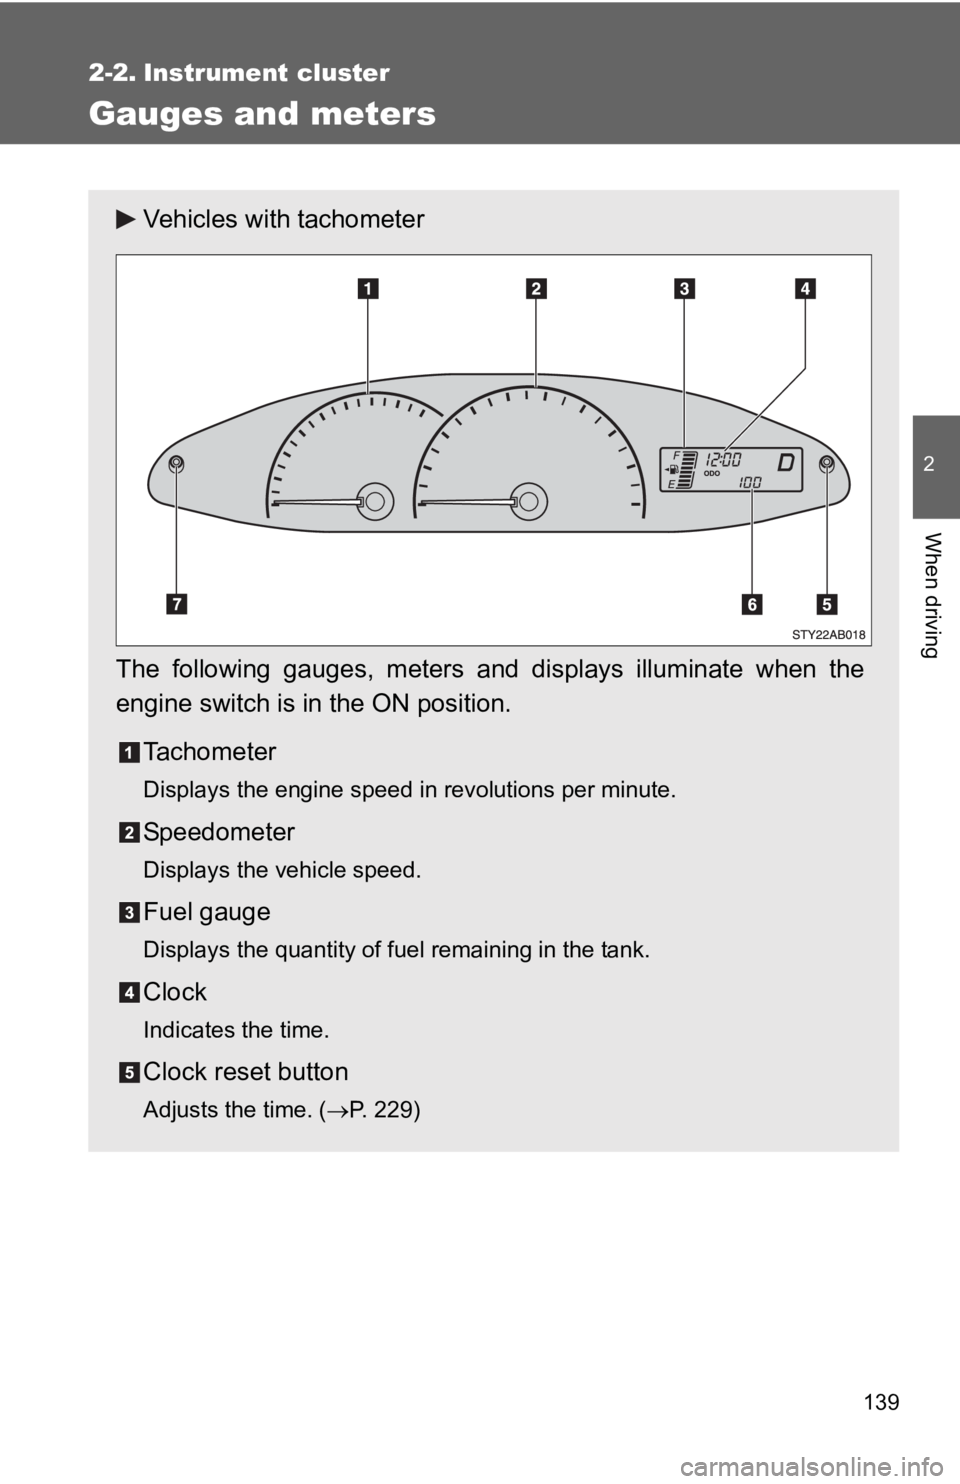
Gauges and meters
Vehicles with tachometer
The following gauges, meters and displays illuminate when the
engine switch is in the ON position. Tachometer
Displays the engine speed in revolutions per minute.
Speedometer
Displays the vehicle speed.
Fuel gauge
Displays the quantity of fuel remaining in the tank.
Clock
Indicates the time.
Clock reset button
Adjusts the time. ( →P. 229)
Page 153 of 406
140 2-2. Instrument cluster
Odometer/trip meter
Odometer:
Displays the total distance the vehicle has been driven.
Trip meter:
Displays the distance the vehicle has been driven since the meter was
last reset. Trip meters A and B can be used to record and display differ-
ent distances independently.
Odometer/trip meter switching and trip meter resetting button
Switches between odometer and trip meter displays. Pushing and hold-
ing the button will reset the trip meter when the trip meter is being dis-
played.
Page 154 of 406
141
2-2. Instrument cluster
2
When driving
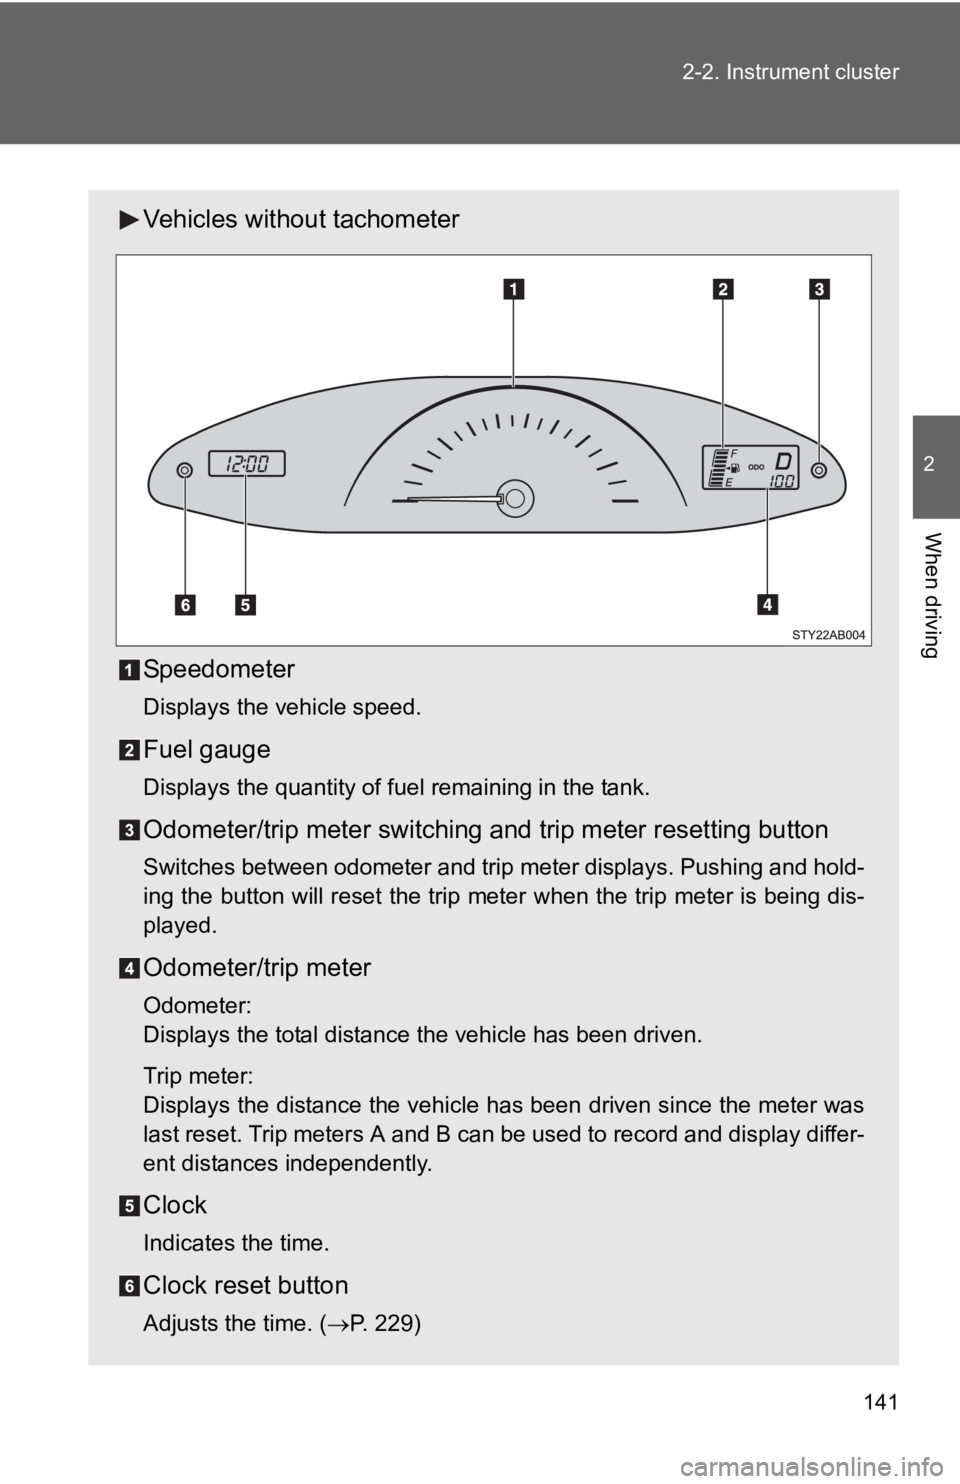
Vehicles without tachometer
Speedometer
Displays the vehicle speed.
Fuel gauge
Displays the quantity of fuel remaining in the tank.
Odometer/trip meter switching and trip meter resetting button
Switches between odometer and trip meter displays. Pushing and hold-
ing the button will reset the trip meter when the trip meter is being dis-
played.
Odometer/trip meter
Odometer:
Displays the total distance the vehicle has been driven.
Trip meter:
Displays the distance the vehicle has been driven since the meter was
last reset. Trip meters A and B can be used to record and display differ-
ent distances independently.
Clock
Indicates the time.
Clock reset button
Adjusts the time. (
→P. 229)
Page 155 of 406
142 2-2. Instrument cluster
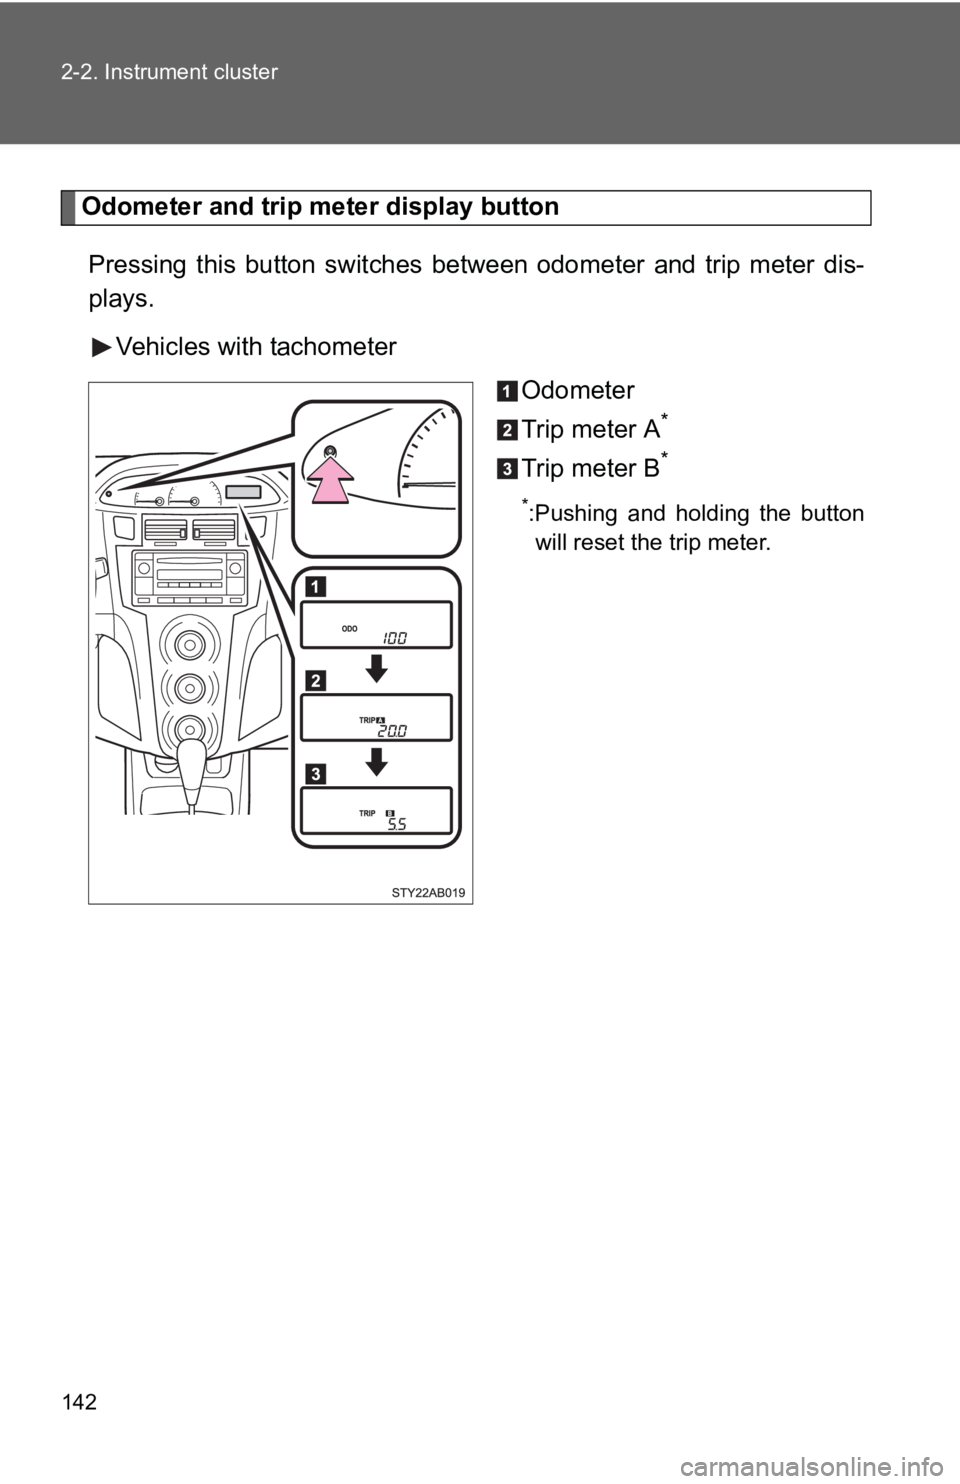
Odometer and trip meter display buttonPressing this button switches between odometer and trip meter dis-
plays.
Vehicles with tachometer Odometer
Trip meter A
*
Trip meter B*
*:Pushing and holding the buttonwill reset the trip meter.
Page 156 of 406
143
2-2. Instrument cluster
2
When driving
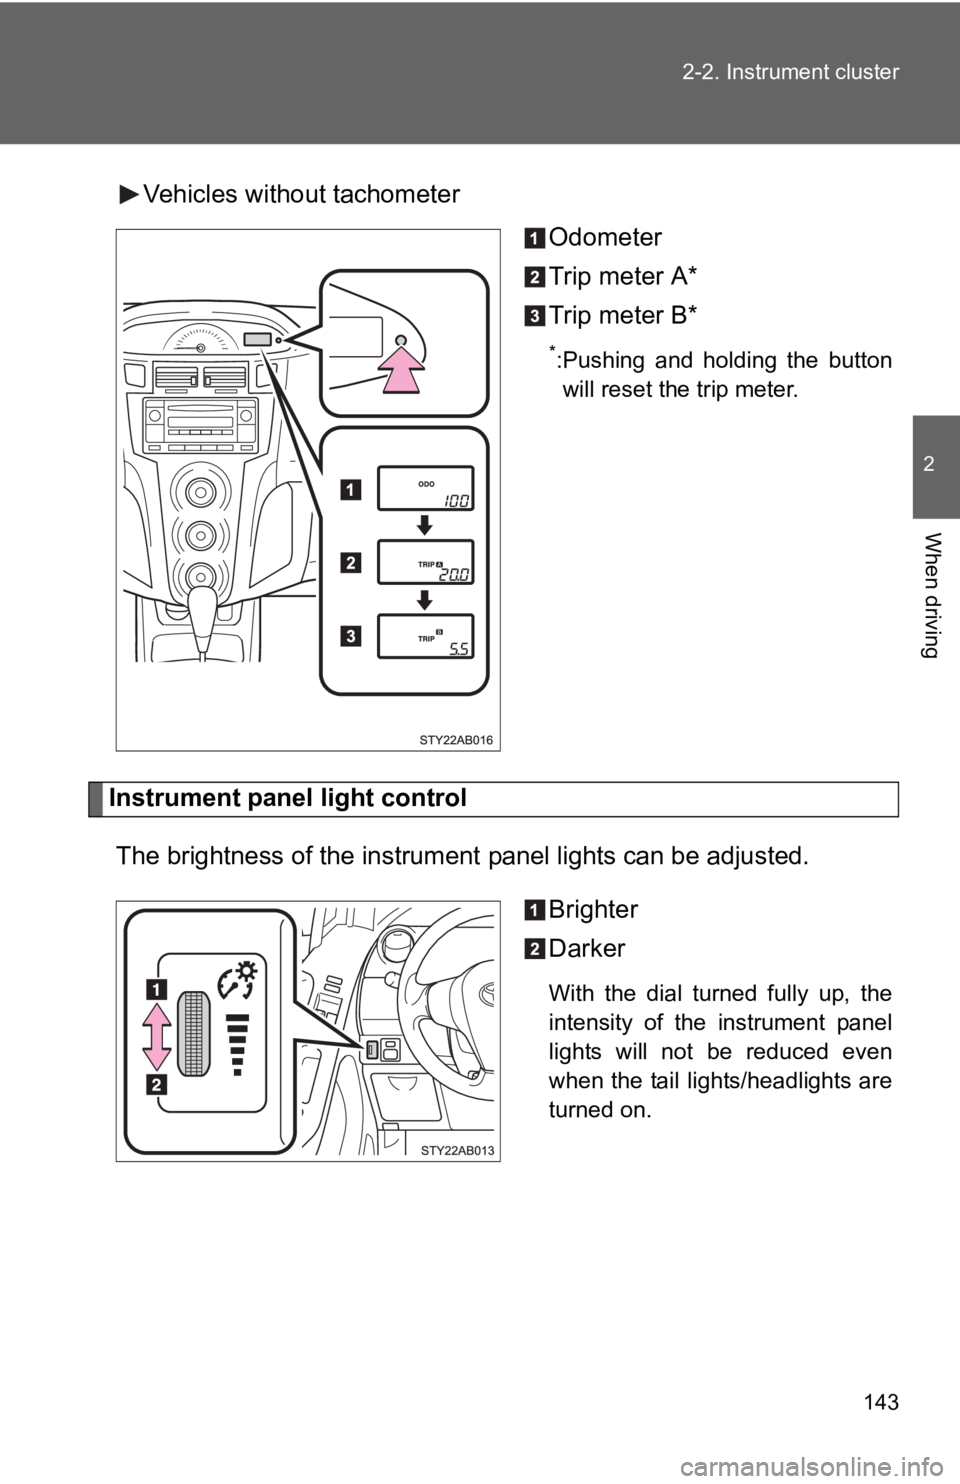
Vehicles without tachometer
Odometer
Trip meter A*
Trip meter B*
*:Pushing and holding the buttonwill reset the trip meter.
Instrument panel light control
The brightness of the instrument panel lights can be adjusted.
Brighter
Darker
With the dial turned fully up, the
intensity of the instrument panel
lights will not be reduced even
when the tail lights/headlights are
turned on.
Page 171 of 406
158 2-4. Using other driving systems
■Cruise control can be set when
●The shift lever is in D or 3 (vehicles with an automatic transmission).
● Vehicle speed is above approximately 25 mph (40 km/h).
■ Accelerating
The vehicle can be accelerated normally. After acceleration, the set speed
resumes.
■ Automatic cruise control cancellation
The set speed is automatically canceled in any of the following situations.
●Actual vehicle speed falls more than 10 mph (16 km/h) below the preset
vehicle speed.
At this time, the memorized set speed is not retained.
● Actual vehicle speed is below 25 mph (40 km/h).
● VSC is activated.
■ If the cruise control indicator flashes
Press the ON-OFF button to turn the cruise control off, and then reactivate
the system.
If the cruise control speed cannot be set or if the cruise control cancels
immediately after being activated, there may be a malfunction in the cruise
control system. Have the vehicle inspected by your Toyota dealer.
Page 209 of 406
197
3-2. Using the audio system
3
Interior features
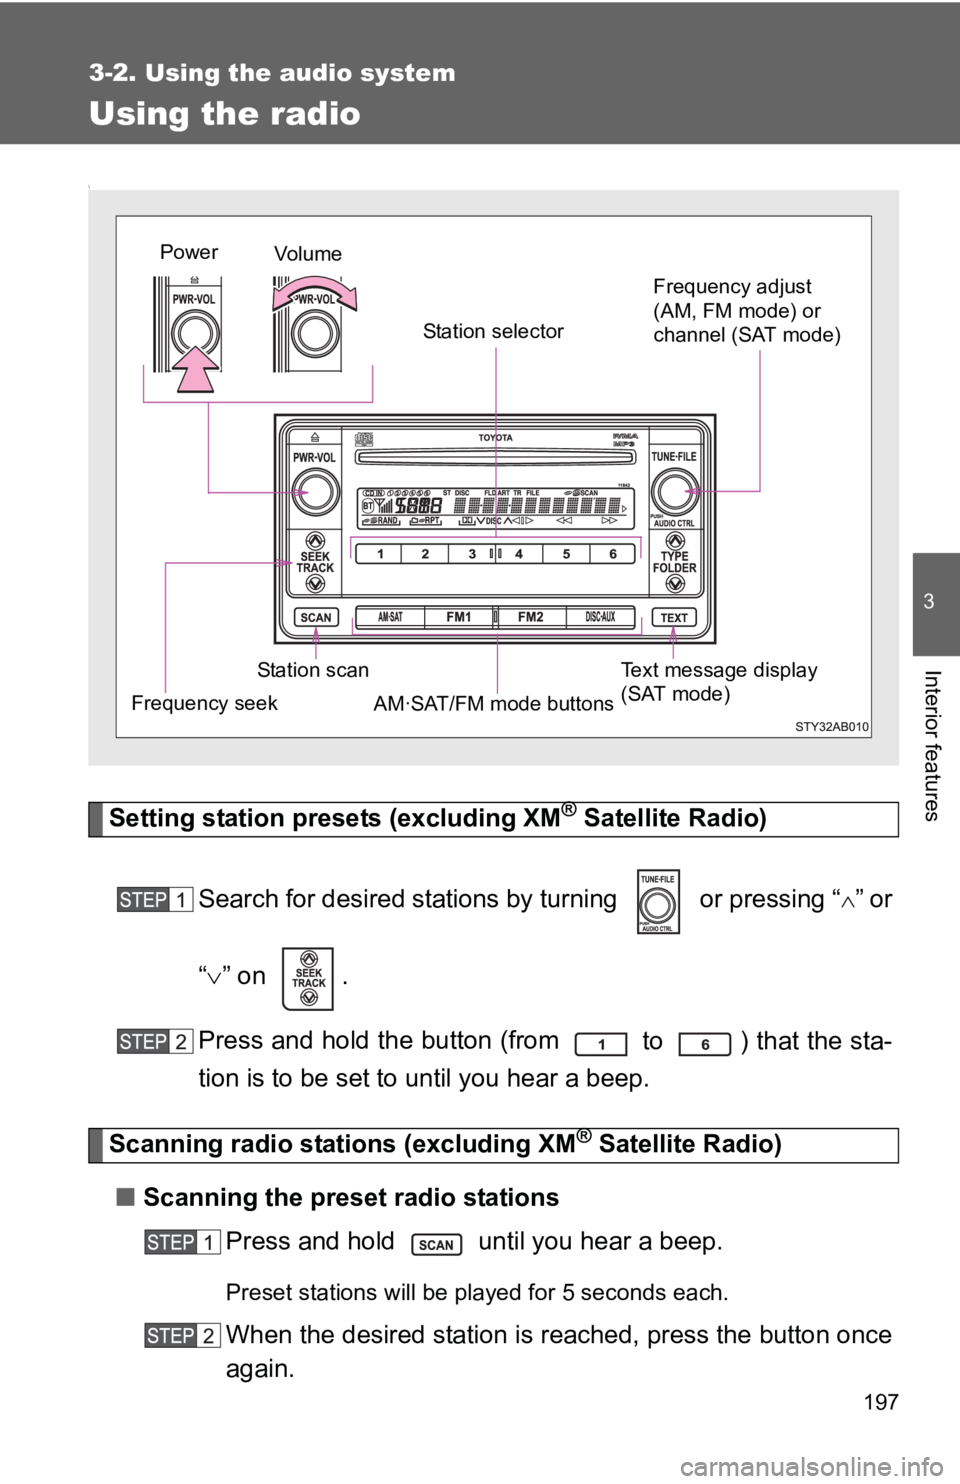
Using the radio
\
Setting station presets (excluding XM® Satellite Radio)
Search for desired stations by turning or pressing “
∧” or
“ ∨ ” on .
Press and hold the button (from
to ) that the sta-
tion is to be set to until you hear a beep.
Scanning radio stations (excluding XM® Satellite Radio)
■ Scanning the preset radio stations
Press and hold until you hear a beep.
Preset stations will be played for 5 seconds each.
When the desired station is reached, press the button once
again.
Vo lu m e
Station scan Station selector
Frequency seek Frequency adjust
(AM, FM mode) or
channel (SAT mode)
AM·SAT/FM mode buttonsPower
Text message display
(SAT mode)
Page 210 of 406
198 3-2. Using the audio system
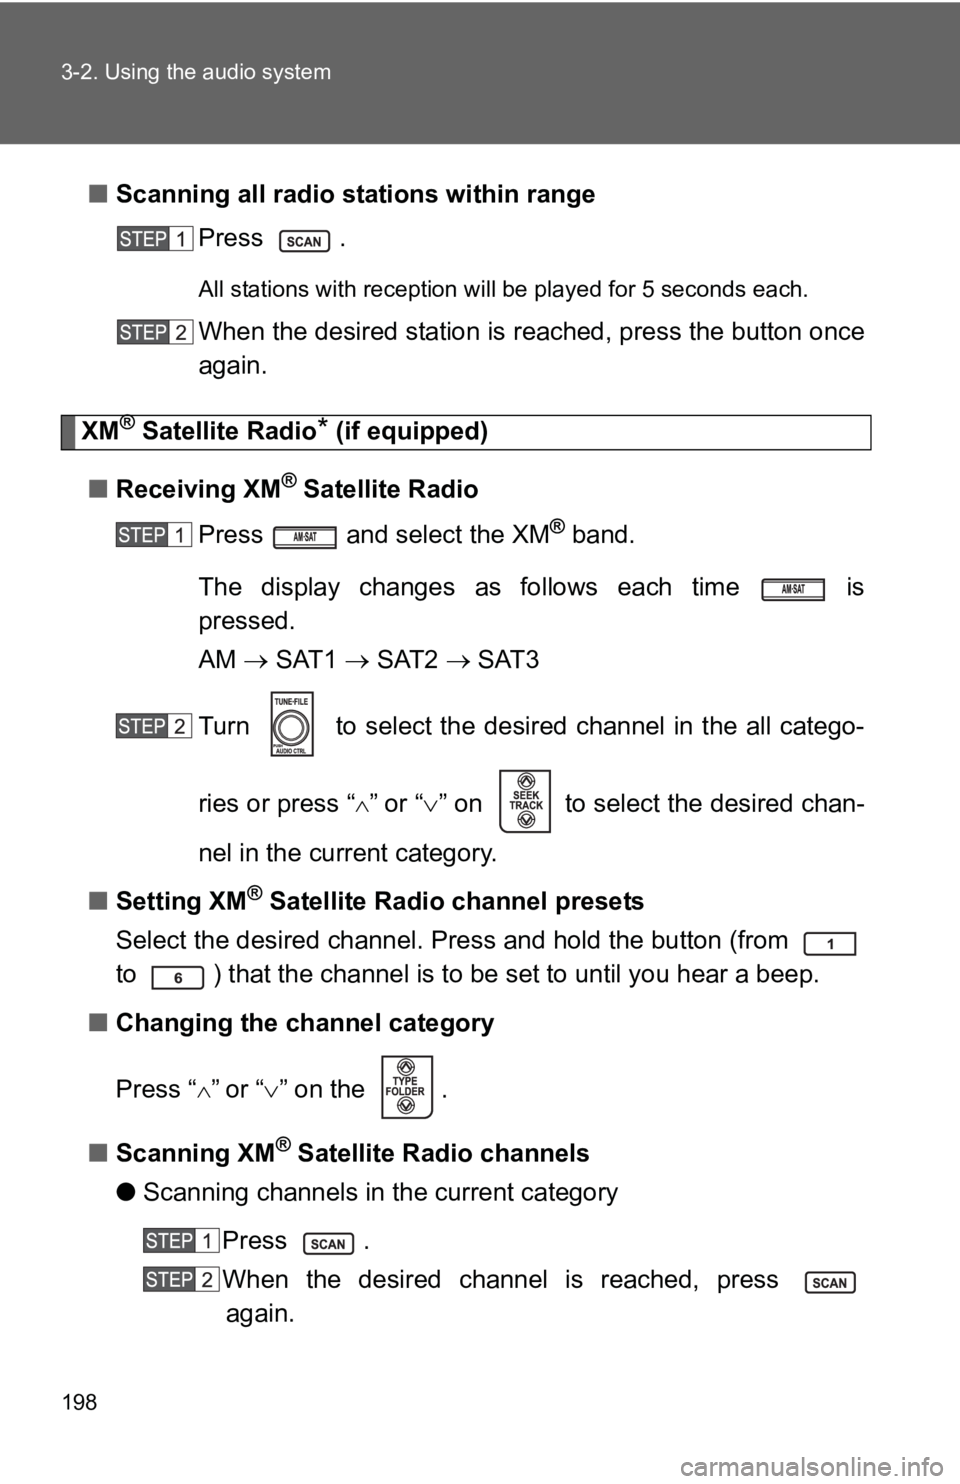
■Scanning all radio stations within range
Press .
All stations with reception will be played for 5 seconds each.
When the desired station is reached, press the button once
again.
XM® Satellite Radio* (if equipped)
■ Receiving XM
® Satellite Radio
Press and select the XM
® band.
The display changes as follows each time is
pressed.
AM → SAT1 → SAT2 → SAT3
Turn to select the desired channel in the all catego-
ries or press “
∧” or “∨ ” on to select the desired chan-
nel in the current category.
■ Setting XM
® Satellite Radio channel presets
Select the desired channel. Press and hold the button (from
to ) that the channel is to be set to until you hear a beep.
■ Changing the channel category
Press “
∧” or “ ∨” on the .
■ Scanning XM
® Satellite Radio channels
● Scanning channels in the current category
Press .
When the desired channel is reached, press again.