TOYOTA YARIS HATCHBACK 2010 Owners Manual
YARIS HATCHBACK 2010
TOYOTA
TOYOTA
https://www.carmanualsonline.info/img/14/59277/w960_59277-0.png
TOYOTA YARIS HATCHBACK 2010 Owners Manual
Trending: manual radio set, steering wheel adjustment, climate control, parking brake, Mirror adjust, low beam, clock setting
Page 1 of 406
CUSTOMER EXPERIENCE CENTER1- 8 0 0 - 3 31- 4 3 31
00505-QRG10-YARLB
Printed in U.S.A. 8/09
08-TCS-03083
10%
Cert no. SGS-COC-005612
413624M1.indd 2
8/1/09 7:59:47 AM
QUICK REFERENCE
GUIDE
YA RI S L B
2010
413624M1.indd 18/1/09 7:59:37 AM
Page 2 of 406
2010
Yaris Liftback
!A word about safe vehicle operations
This
Quick Reference Guide is a summary of basic vehicle
operations. It contains brief descriptions of fundamental
operations so you can locate and use the vehicle’s main
equipment quickly and easily.
The Quick Reference Guide is not intended as a substitute for the
Owner’s Manual located in your vehicle’s glove box. We strongly
encourage you to review the Owner’s Manualand supplementary
manuals so you will have a better understanding of your vehicle’s
capabilities and limitations.
Your dealership and the entire staff of Toyota Motor Sales, U.S.A.,
Inc. wish you many years of satisfied driving in your new Yaris.
This Quick Reference Guide is not a full description of Yaris
operations. Every Yaris owner should review the Owner’s
Manual that accompanies this vehicle.
Pay special attention to the boxed information highlighted in
color throughout the Owner’s Manual. Each box contains safe
operating instructions to help you avoid injury or equipment
malfunction.
All information in this Quick Reference Guide is current at
the time of printing. Toyota reserves the right to make
changes at any time without notice.
17
OVERVIEW
FEATURES/OPERATIONS
SAFETY AND EMERGENCY FEATURES
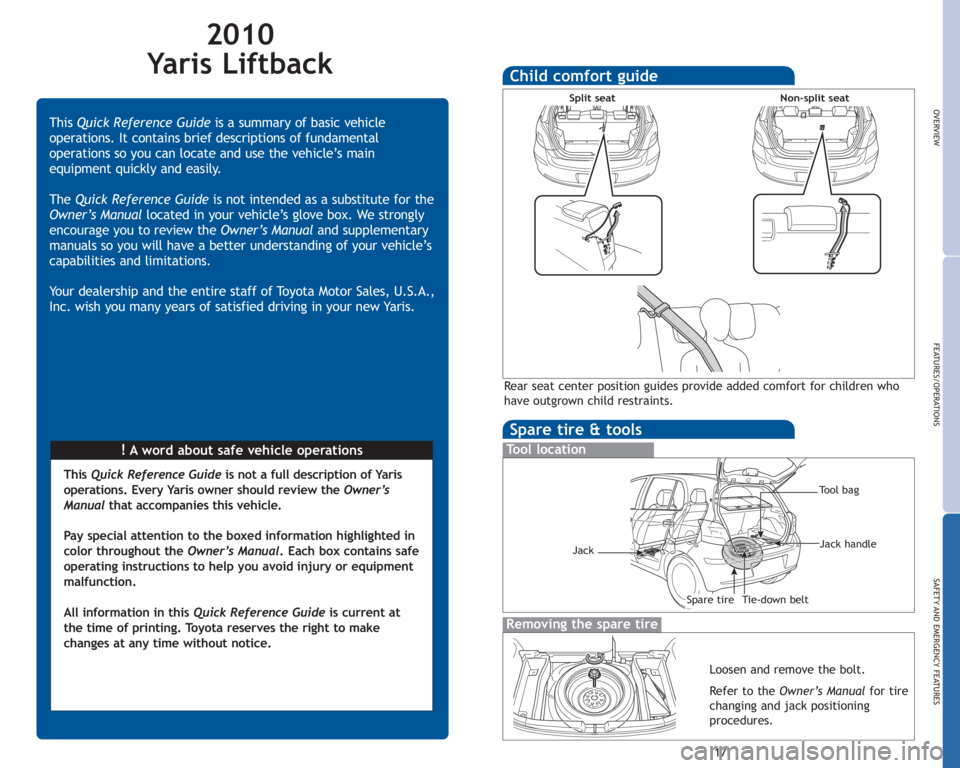
Sparetire&tools
To o l l o c a t i o n
Removing the spare tire
Loosen and remove the bolt.
Refer to the Owner’s Manual for tire
changing and jack positioning
procedures.
Tool bag
Tie-down belt Jack handleSpare tire
Jack
Child comfort guide
Rear seat center position guides provide added comfort for children who
have outgrown child restraints.
Split seat
Non-split seat
Page 3 of 406
1
OVERVIEW
FEATURES/OPERATIONS
SAFETY AND EMERGENCY FEATURES
Engine maintenance7Fuel tank door release and cap 6Hood release 7Indicator symbols4-5Instrument cluster 4Instrument panel2-3
Keyless entry* 6
Air Conditioning/Heating13Audio 14Automatic Transmission 8Clock14Cruise control13Door-Back 15Light control-Instrument panel 9Lights & turn signals 9Luggage storage box15Parking brake 8Power outlet15Seat adjustments-Front10Seat adjustments-Rear10Seat-Folding rear seat11Seats-Head restraints10Tilt steering wheel 8VSC OFF button15Windows-Power 12
Windshield wipers & washers 12
Child comfort guide 17Door locks-Power 16Seatbelts16Spare tire & tools 17
Tire Pressure Monitoring (warning) System 16
OVERVIEW
FEATURES/OPERATIONS
SAFETY AND
EMERGENCY FEATURES
INDEX
* Visit your Toyota dealer for information on customizing this feature.
Page 4 of 406
2
OVERVIEW
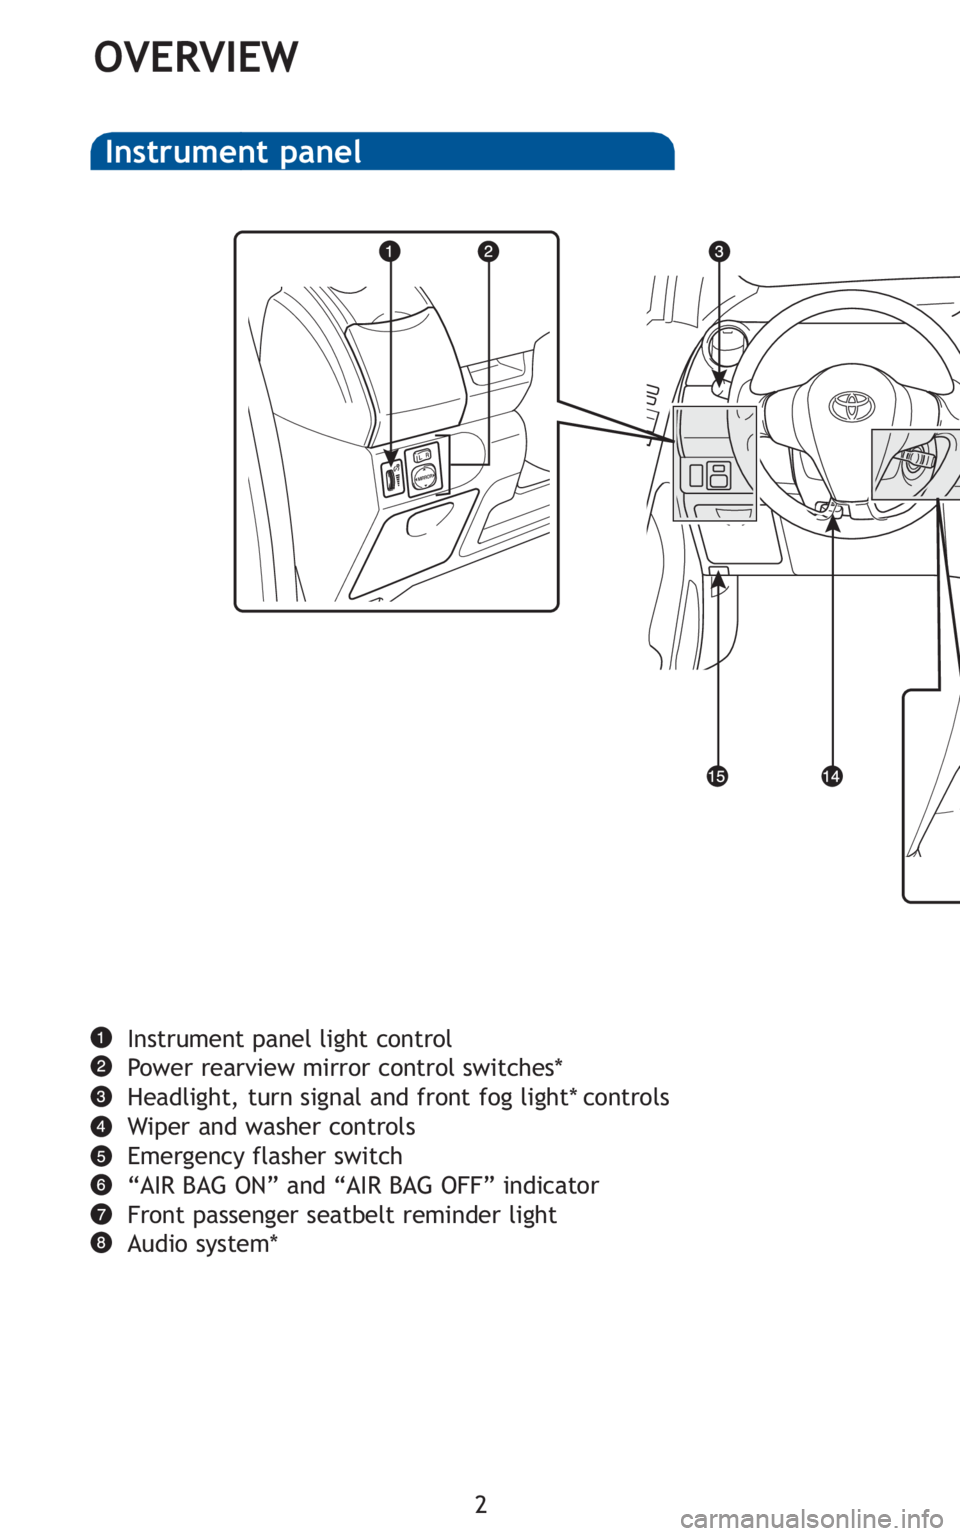
Instrument panel light control
Power rearview mirror control switches*
Headlight, turn signal and front fog light* controls
Wiper and washer controls
Emergency flasher switch
“AIR BAG ON” and “AIR BAG OFF” indicator
Front passenger seatbelt reminder light
Audio system*
Instrument panel
Page 5 of 406
3
OVERVIEW
FEATURES/OPERATIONS
SAFETY AND EMERGENCY FEATURES
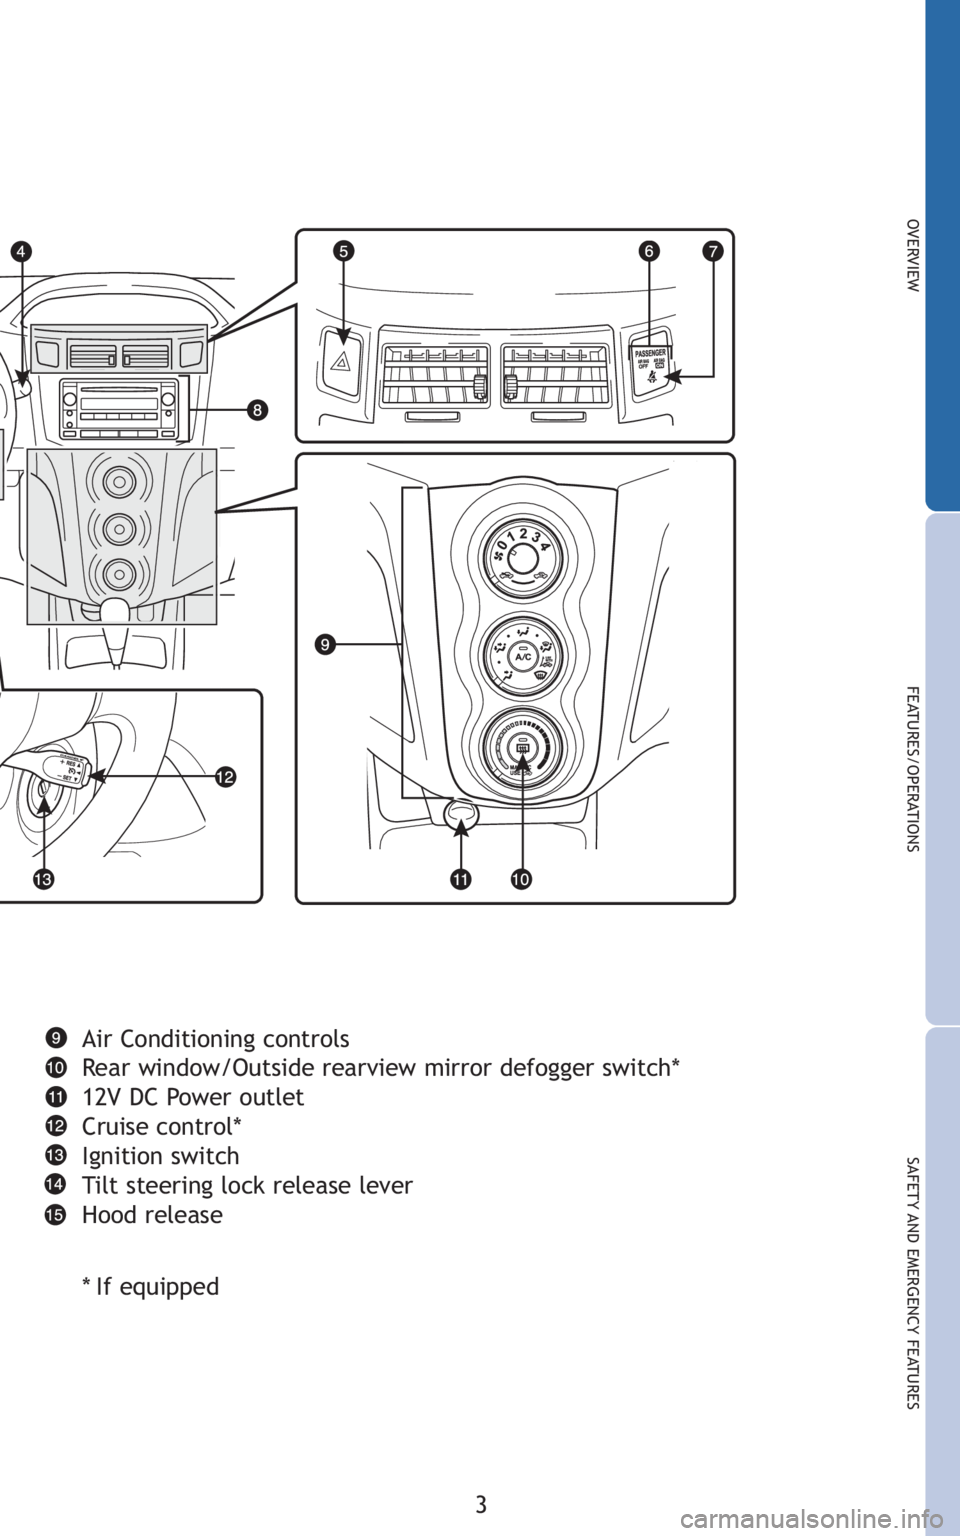
Air Conditioning controls
Rear window/Outside rearview mirror defogger switch*
12V DC Power outlet
Cruise control*
Ignition switch
Tilt steering lock release lever
Hood release
*If equipped
Page 6 of 406
4
OVERVIEW
Driver seatbelt reminder2
(alarm will sound if speed is over 12 mph)
Front passenger seatbelt reminder
2
(alarm will sound if speed is over 12 mph)
Brake system warning
1,2
1If indicator does not turn off within a few seconds of starting engine, there may
be a malfunction. Have vehicle inspected by your Toyota dealer.
Indicator symbols
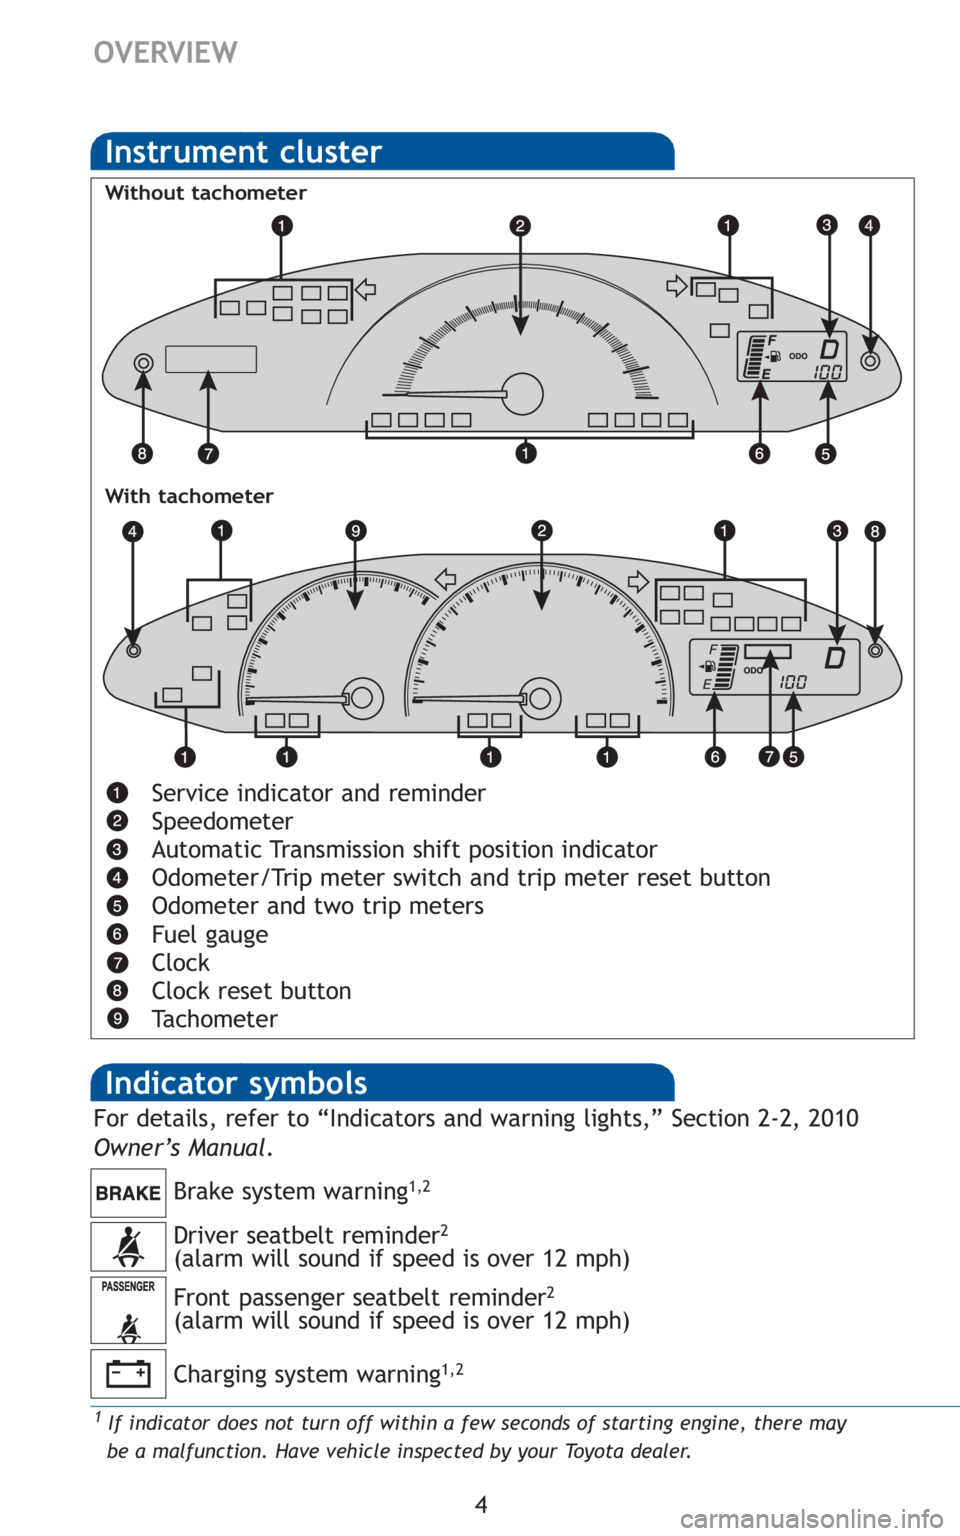
Service indicator and reminder
Speedometer
Automatic Transmission shift position indicator
Odometer/Trip meter switch and trip meter reset button
Odometer and two trip meters
Fuel gauge
Clock
Clock reset button
Tachometer
Instrument cluster
Without tachometer
With tachometer
Charging system warning1,2
For details, refer to “Indicators and warning lights,” Section 2-2, 2010
Owner’s Manual .
Page 7 of 406
5
OVERVIEW
FEATURES/OPERATIONS
SAFETY AND EMERGENCY FEATURES
2For details, refer to “If a warning light turns on or a warning buzzer sounds,” Section
5-2, 2010 Owner’s Manual.
3For details, refer to “If your vehicle overheats,” Section 5-2, 2010 Owner’s Manual.
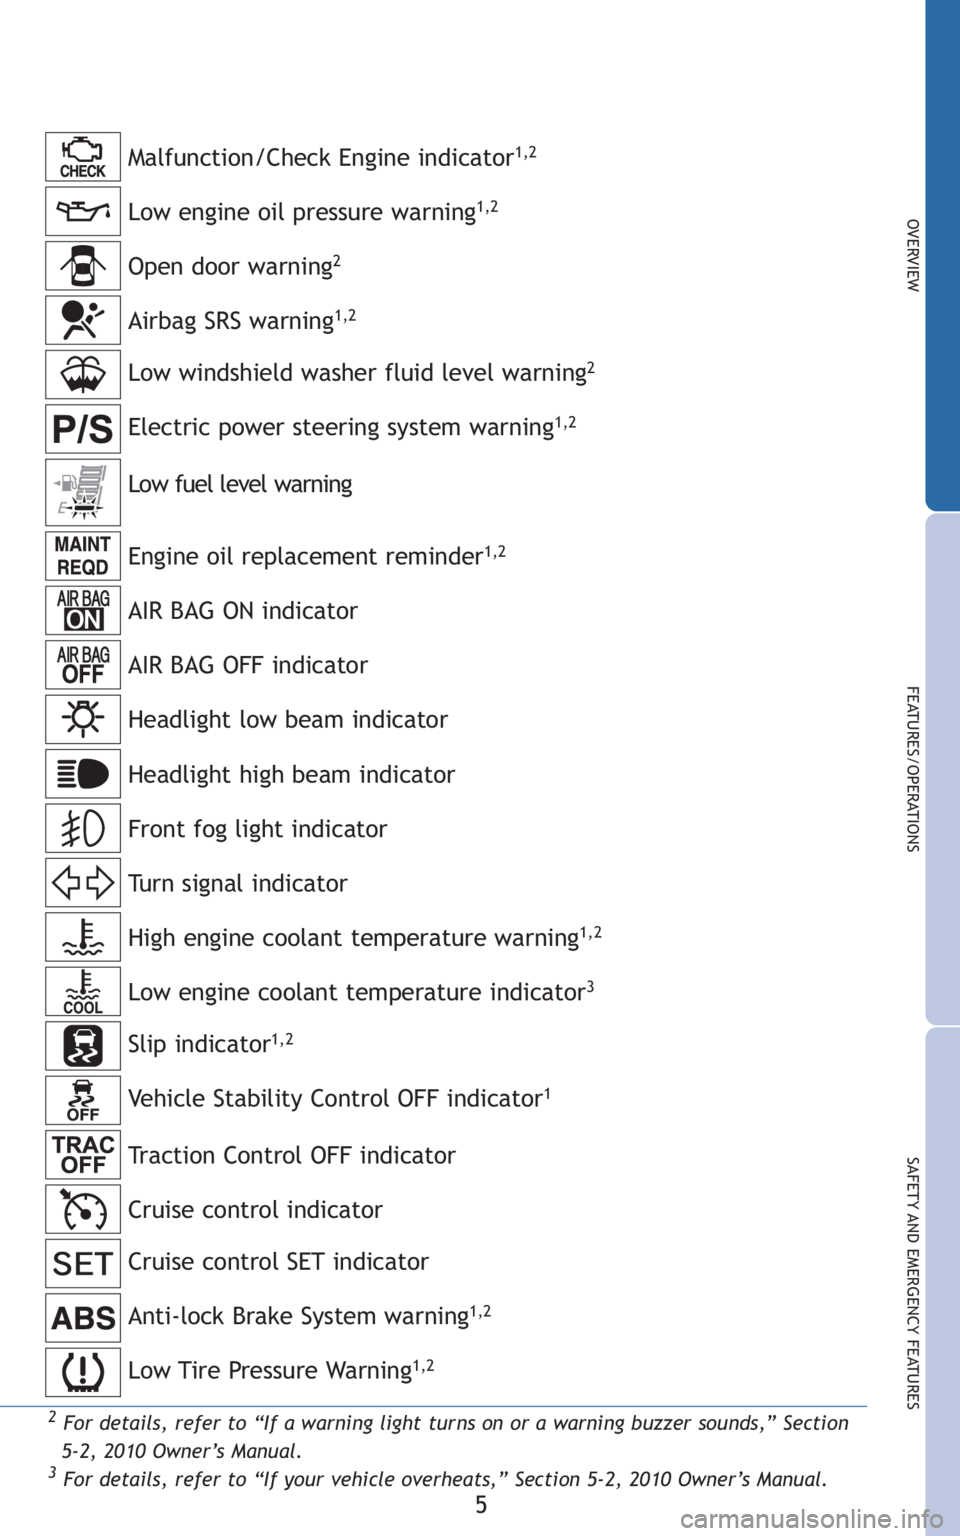
Low engine oil pressure warning1,2
Anti-lock Brake System warning1,2
Malfunction/Check Engine indicator1,2
Open door warning2
Low windshield washer fluid level warning2
Engine oil replacement reminder1,2
AIR BAG ON indicator
AIR BAG OFF indicator
Headlight low beam indicator
Turn signal indicator
Low fuel level warning
Headlight high beam indicator
High engine coolant temperature warning
1,2
Airbag SRS warning1,2
Electric power steering system warning1,2
Low engine coolant temperature indicator3
Front fog light indicator
Low Tire Pressure Warning1,2
Cruise control SET indicator
Cruise control indicator Slip indicator
1,2
Vehicle Stability Control OFF indicator1
Traction Control OFF indicator
Page 8 of 406
6
OVERVIEW
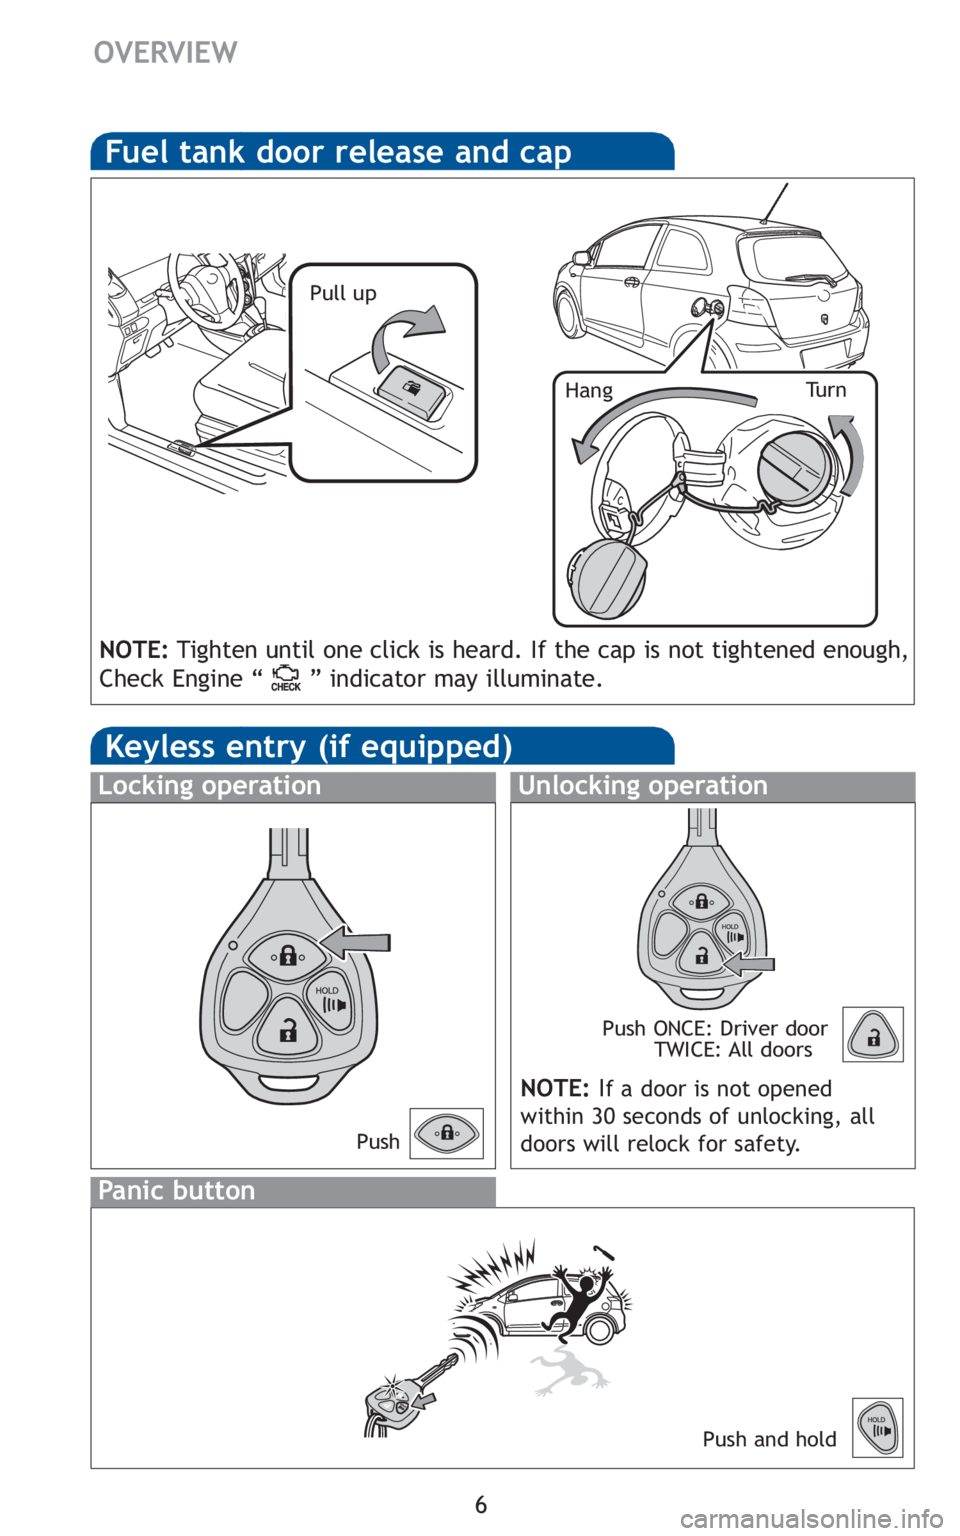
Fuel tank door release and cap
Pull up
Tu r n
Hang
NOTE: Tighten until one click is heard. If the cap is not tightened enough,
Check Engine “ ” indicator may illuminate.
Keyless entry (if equipped)
Unlocking operation
Panic button
Push ONCE: Driver door TWICE: All doors
Locking operation
Push and hold
NOTE: If a door is not opened
within 30 seconds of unlocking, all
doors will relock for safety.
Push
Page 9 of 406
7
OVERVIEW
FEATURES/OPERATIONS
SAFETY AND EMERGENCY FEATURES
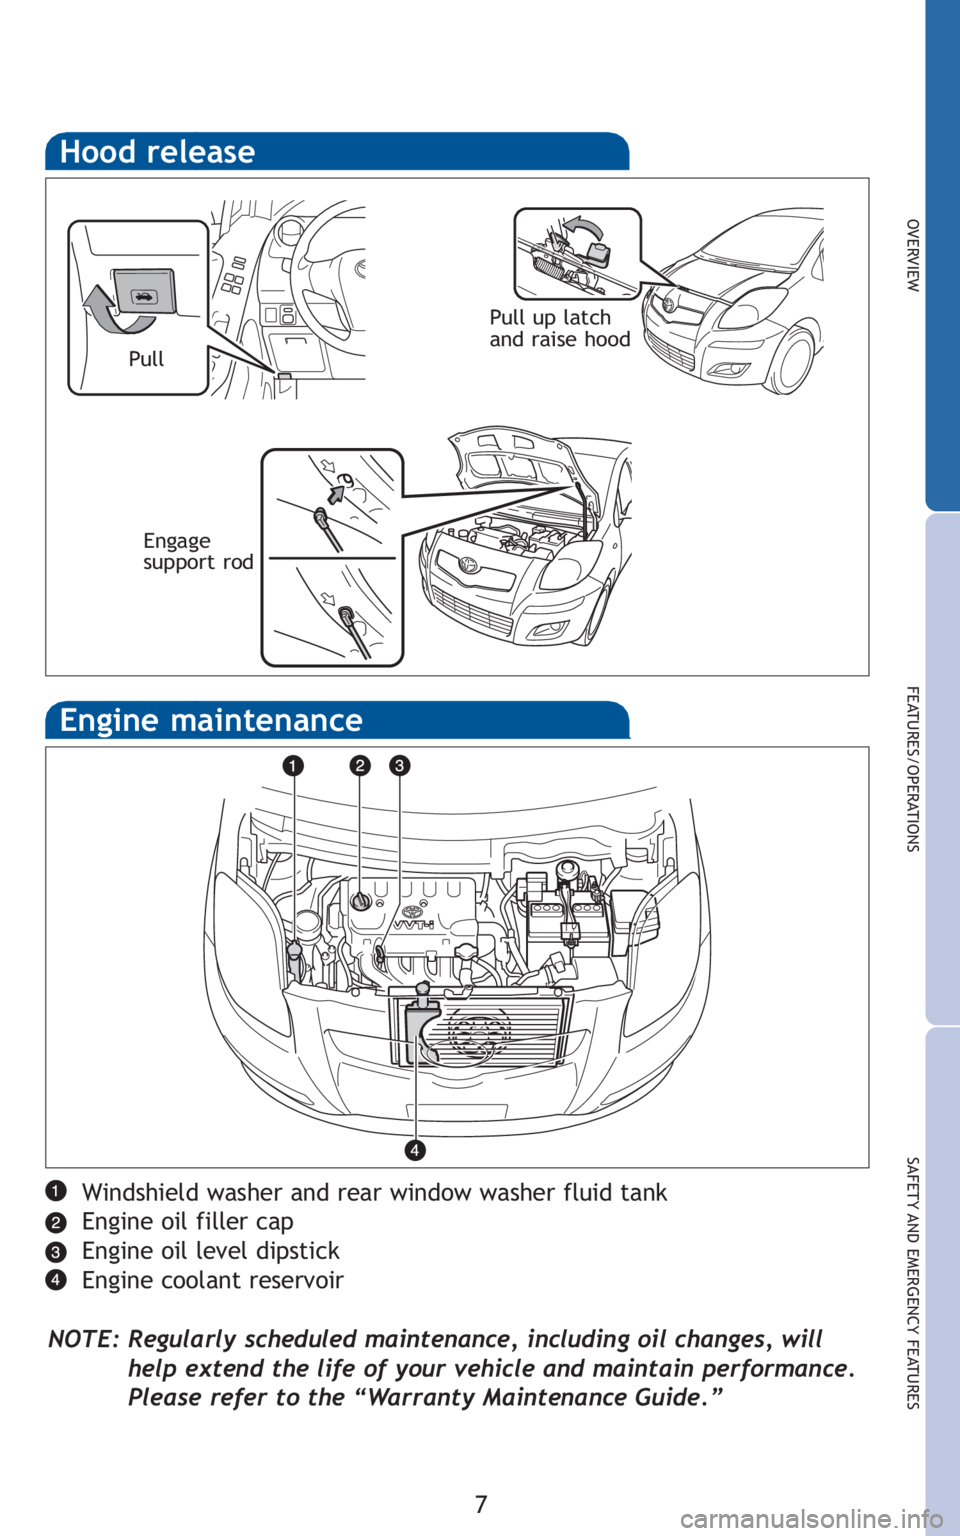
Hood release
Engine maintenance
Windshield washer and rear window washer fluid tank
Engine oil filler cap
Engine oil level dipstick
Engine coolant reservoir
NOTE: Regularly scheduled maintenance, including oil changes, will help extend the life of your vehicle and maintain performance.
Please refer to the “Warranty Maintenance Guide.”
Pull Pull up latch
and raise hood
Engage
support rod
Page 10 of 406
8
FEATURES/OPERATIONS
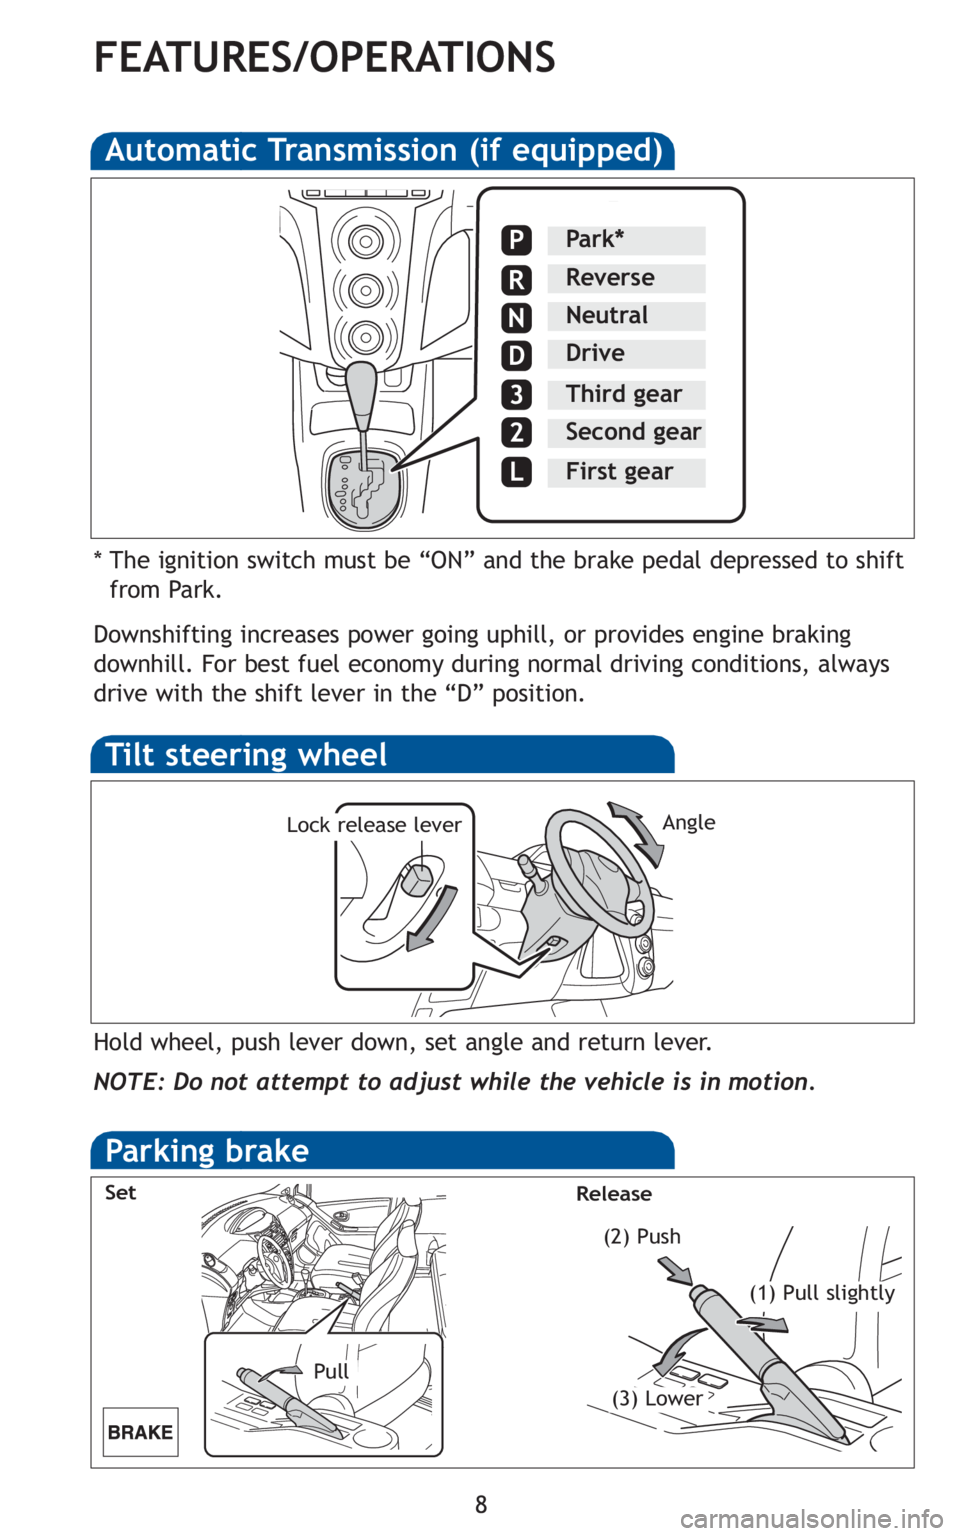
Automatic Transmission (if equipped)
* The ignition switch must be “ON” and the brake pedal depressed to shiftfrom Park.
Downshifting increases power going uphill, or provides engine braking
downhill. For best fuel economy during normal driving conditions, always
drive with the shift lever in the “D” position.
Park*
Reverse
Neutral
Drive
Third gear
Second gear
First gear
P
R
N
D
3
2
L
Tilt steering wheel
Angle
Hold wheel, push lever down, set angle and return lever.
NOTE: Do not attempt to adjust while the vehicle is in motion.
Lock release lever
Parking brake
Pull (2) Push
Set
Release
(1) Pull slightly
(3) Lower
Trending: hood release, tire size, coolant reservoir, service indicator, inflation pressure, checking oil, emergency towing
