maintenance TOYOTA YARIS HATCHBACK 2021 Workshop Manual
[x] Cancel search | Manufacturer: TOYOTA, Model Year: 2021, Model line: YARIS HATCHBACK, Model: TOYOTA YARIS HATCHBACK 2021Pages: 568, PDF Size: 110.34 MB
Page 347 of 568
347
6
YARIS(HB) Owner's Manual_Europe_MK0001_en
6-3. Do-it-yourself maintenance
Maintenance and care
6Operate the or switch
and check that the doors can be
locked/unlocked.
Vehicles with a smart entry &
start system
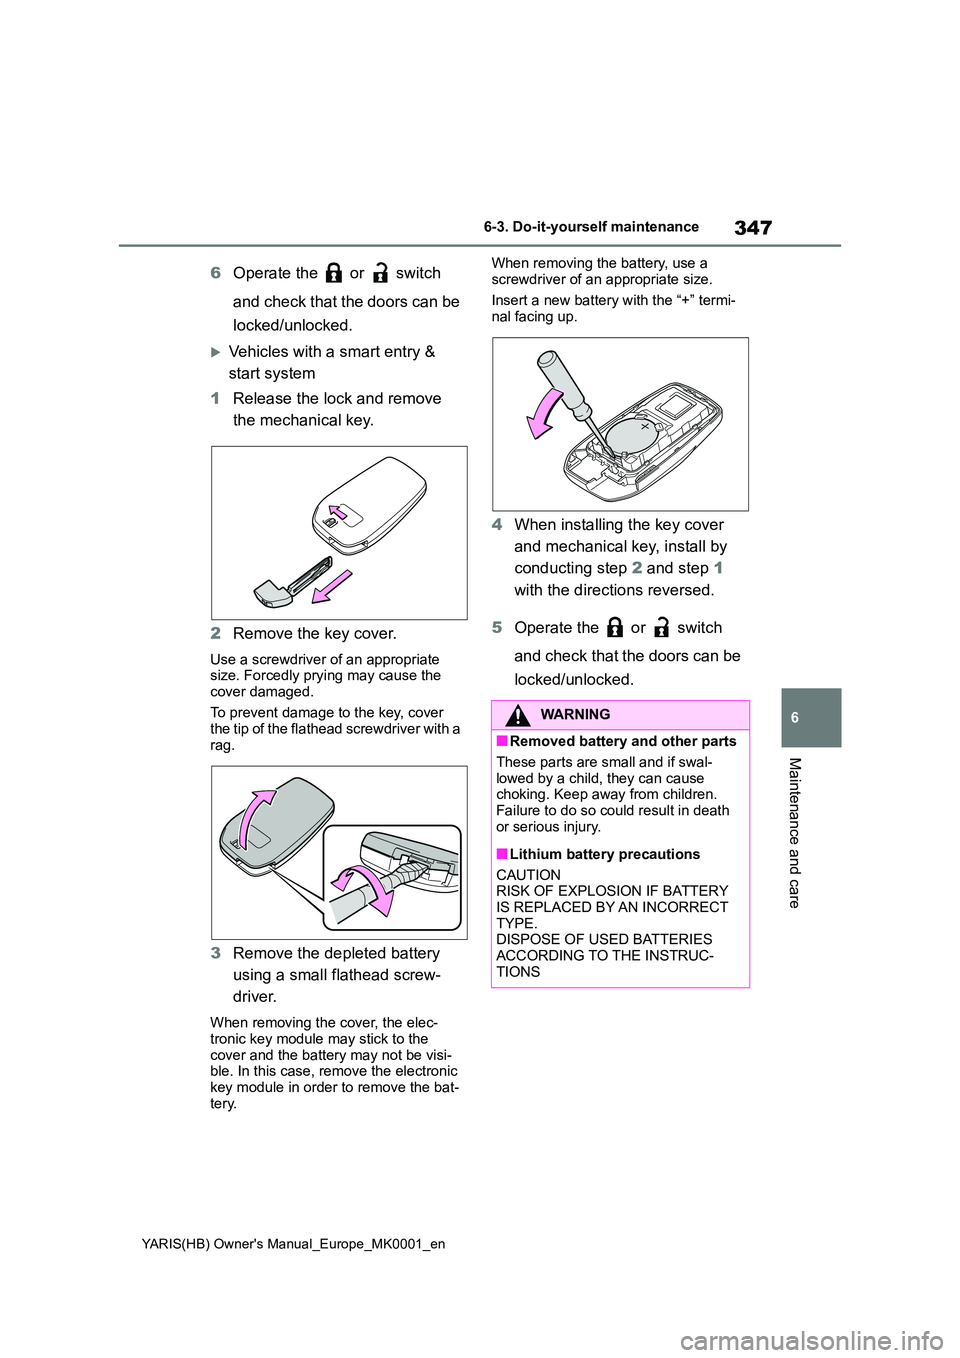
1 Release the lock and remove
the mechanical key.
2 Remove the key cover.
Use a screwdriver of an appropriate size. Forcedly prying may cause the
cover damaged.
To prevent damage to the key, cover the tip of the flathead screwdriver with a
rag.
3 Remove the depleted battery
using a small flathead screw-
driver.
When removing the cover, the elec- tronic key module may stick to the
cover and the battery may not be visi- ble. In this case, remove the electronic key module in order to remove the bat-
tery.
When removing the battery, use a
screwdriver of an appropriate size.
Insert a new battery with the “+” termi- nal facing up.
4 When installing the key cover
and mechanical key, install by
conducting step 2 and step 1
with the directions reversed.
5 Operate the or switch
and check that the doors can be
locked/unlocked.
WARNING
■Removed battery and other parts
These parts are small and if swal- lowed by a child, they can cause choking. Keep away from children.
Failure to do so could result in death or serious injury.
■Lithium battery precautions
CAUTION RISK OF EXPLOSION IF BATTERY
IS REPLACED BY AN INCORRECT TYPE.DISPOSE OF USED BATTERIES
ACCORDING TO THE INSTRUC- TIONS
Page 348 of 568
348
YARIS(HB) Owner's Manual_Europe_MK0001_en
6-3. Do-it-yourself maintenance
1Turn the engine switch off.
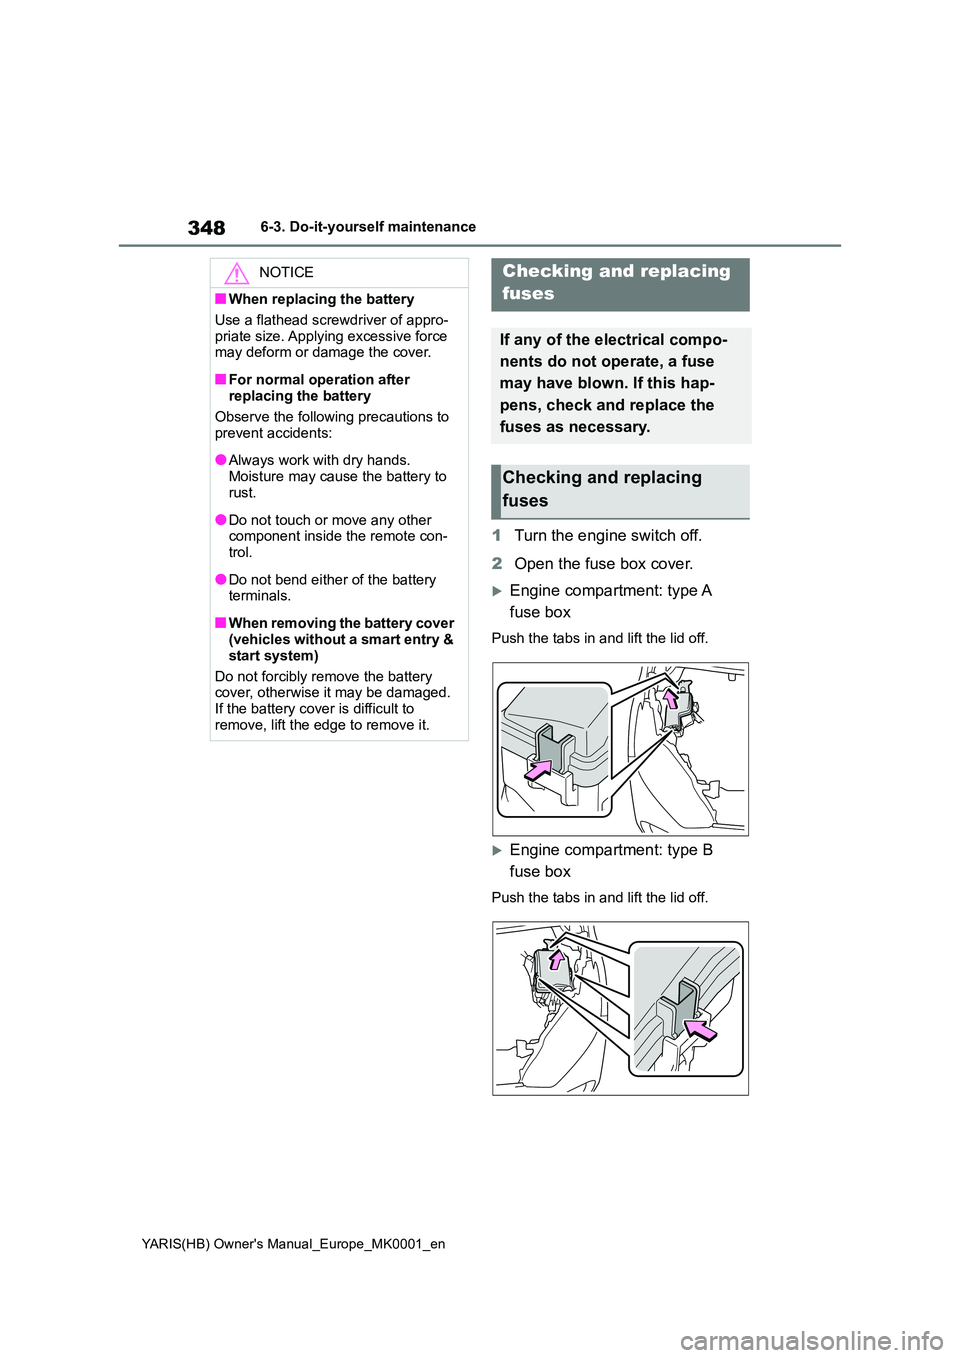
2 Open the fuse box cover.
Engine compartment: type A
fuse box
Push the tabs in and lift the lid off.
Engine compartment: type B
fuse box
Push the tabs in and lift the lid off.
NOTICE
■When replacing the battery
Use a flathead screwdriver of appro-
priate size. Applying excessive force may deform or damage the cover.
■For normal operation after replacing the battery
Observe the following precautions to
prevent accidents:
●Always work with dry hands.
Moisture may cause the battery to rust.
●Do not touch or move any other component inside the remote con-trol.
●Do not bend either of the battery terminals.
■When removing the battery cover (vehicles without a smart entry &
start system)
Do not forcibly remove the battery cover, otherwise it may be damaged.
If the battery cover is difficult to remove, lift the edge to remove it.
Checking and replacing
fuses
If any of the electrical compo-
nents do not operate, a fuse
may have blown. If this hap-
pens, check and replace the
fuses as necessary.
Checking and replacing
fuses
Page 349 of 568
349
6
YARIS(HB) Owner's Manual_Europe_MK0001_en
6-3. Do-it-yourself maintenance
Maintenance and care
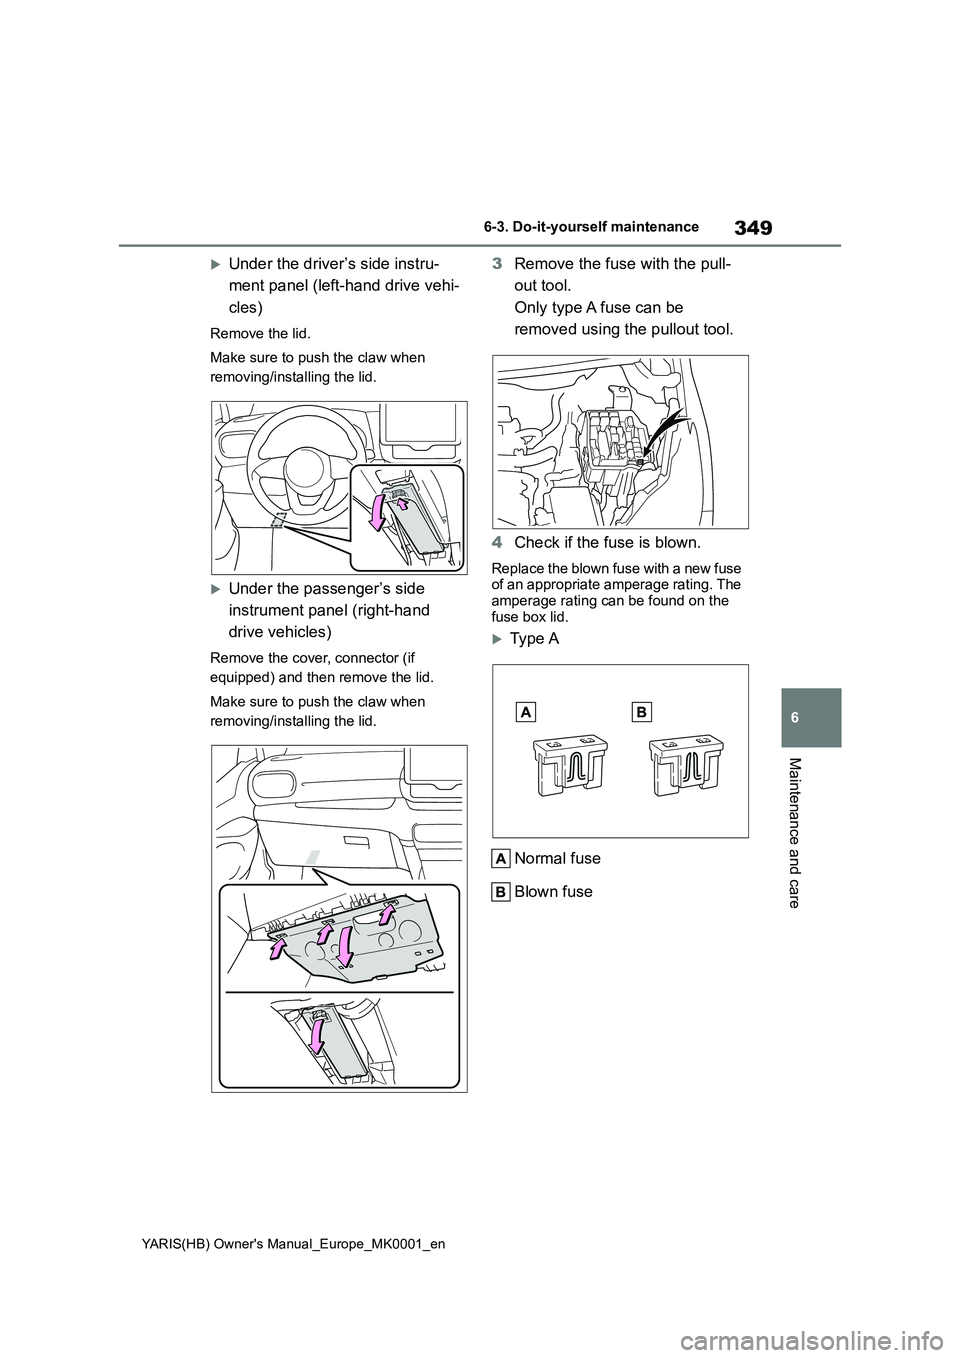
Under the driver’s side instru-
ment panel (left-hand drive vehi-
cles)
Remove the lid.
Make sure to push the claw when
removing/installing the lid.
Under the passenger’s side
instrument panel (right-hand
drive vehicles)
Remove the cover, connector (if
equipped) and then remove the lid.
Make sure to push the claw when
removing/installing the lid.
3 Remove the fuse with the pull-
out tool.
Only type A fuse can be
removed using the pullout tool.
4 Check if the fuse is blown.
Replace the blown fuse with a new fuse of an appropriate amperage rating. The
amperage rating can be found on the fuse box lid.
Typ e A
Normal fuse
Blown fuse
Page 350 of 568
350
YARIS(HB) Owner's Manual_Europe_MK0001_en
6-3. Do-it-yourself maintenance
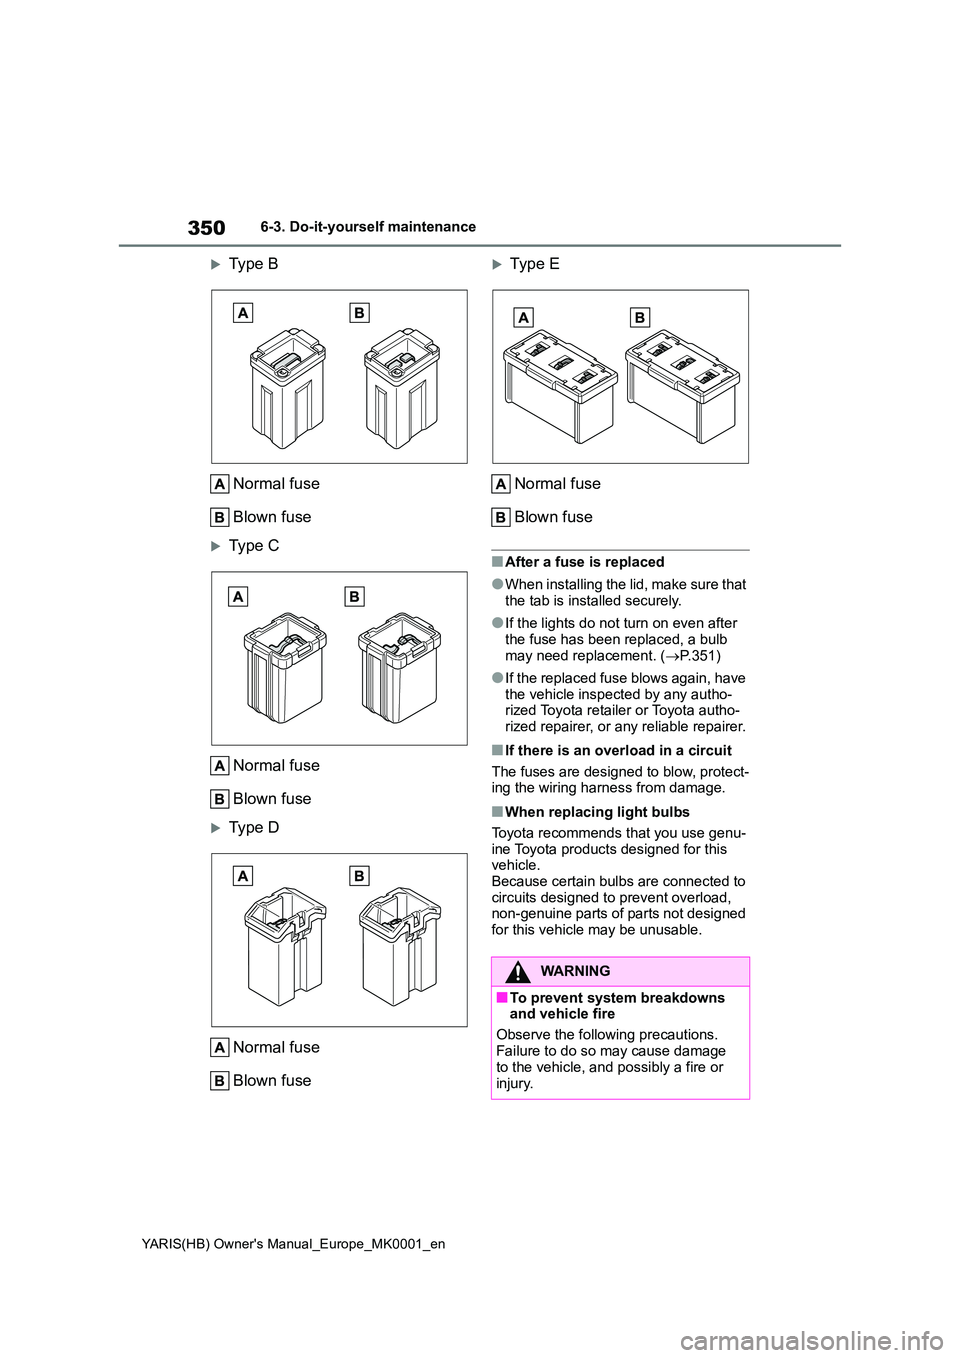
Type B
Normal fuse
Blown fuse
Type C
Normal fuse
Blown fuse
Type D
Normal fuse
Blown fuse
Typ e E
Normal fuse
Blown fuse
■After a fuse is replaced
●When installing the lid, make sure that the tab is installed securely.
●If the lights do not turn on even after the fuse has been replaced, a bulb
may need replacement. ( →P.351)
●If the replaced fuse blows again, have
the vehicle inspected by any autho- rized Toyota retailer or Toyota autho-rized repairer, or any reliable repairer.
■If there is an overload in a circuit
The fuses are designed to blow, protect- ing the wiring harness from damage.
■When replacing light bulbs
Toyota recommends that you use genu-
ine Toyota products designed for this vehicle.Because certain bulbs are connected to
circuits designed to prevent overload, non-genuine parts of parts not designed for this vehicle may be unusable.
WARNING
■To prevent system breakdowns and vehicle fire
Observe the following precautions.
Failure to do so may cause damage to the vehicle, and possibly a fire or
injury.
Page 351 of 568
351
6
YARIS(HB) Owner's Manual_Europe_MK0001_en
6-3. Do-it-yourself maintenance
Maintenance and care
Check the wattage of the light bulb
to be replaced. ( →P.419)
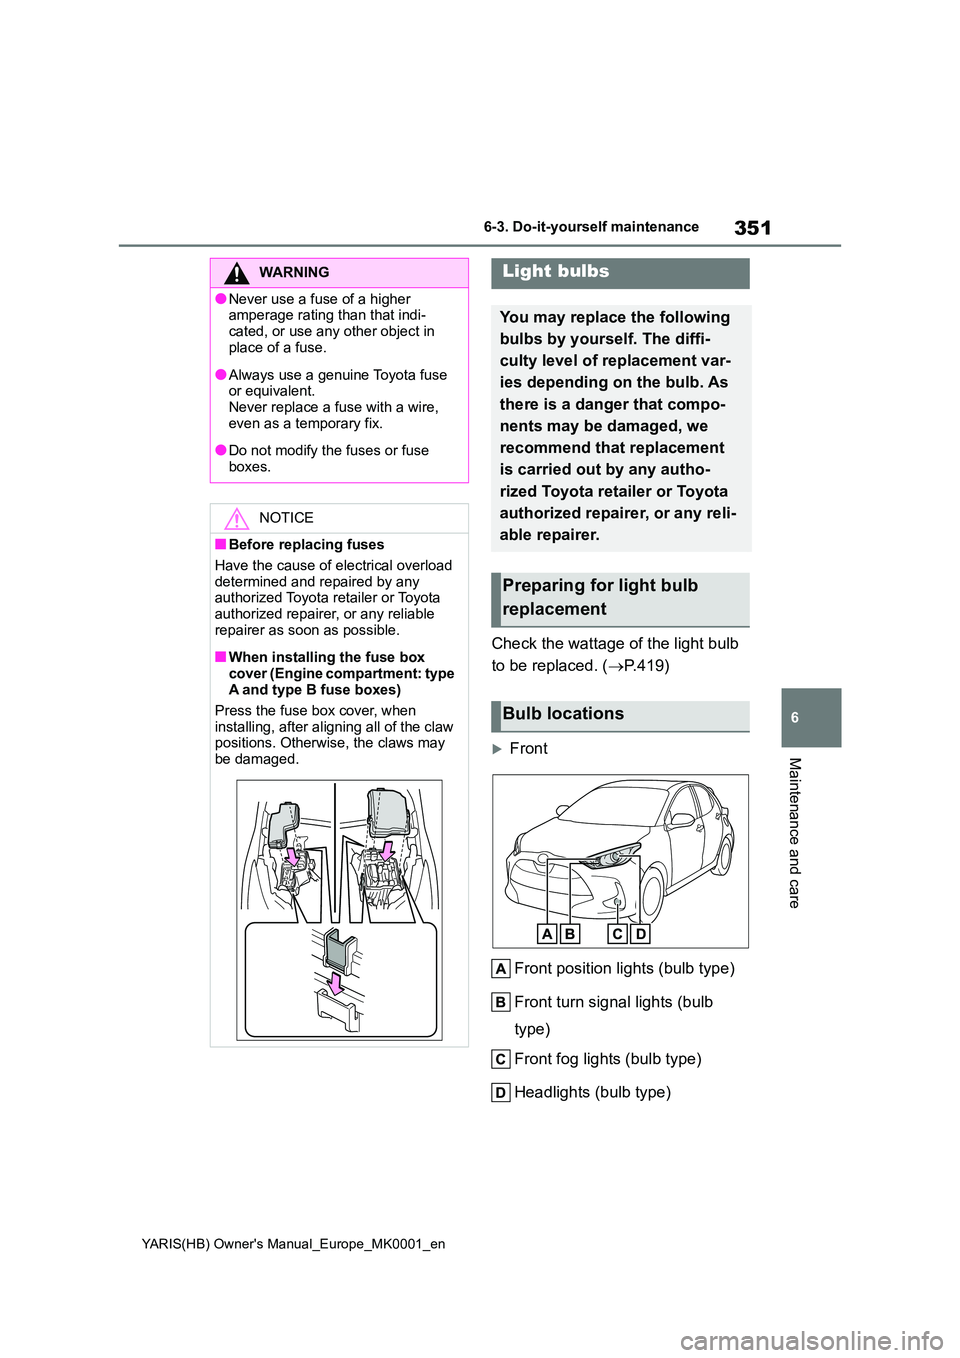
Front
Front position lights (bulb type)
Front turn signal lights (bulb
type)
Front fog lights (bulb type)
Headlights (bulb type)
WARNING
●Never use a fuse of a higher amperage rating than that indi-
cated, or use any other object in place of a fuse.
●Always use a genuine Toyota fuse or equivalent.Never replace a fuse with a wire,
even as a temporary fix.
●Do not modify the fuses or fuse
boxes.
NOTICE
■Before replacing fuses
Have the cause of electrical overload
determined and repaired by any authorized Toyota retailer or Toyota authorized repairer, or any reliable
repairer as soon as possible.
■When installing the fuse box
cover (Engine compartment: type A and type B fuse boxes)
Press the fuse box cover, when
installing, after aligning all of the claw positions. Otherwise, the claws may
be damaged.
Light bulbs
You may replace the following
bulbs by yourself. The diffi-
culty level of replacement var-
ies depending on the bulb. As
there is a danger that compo-
nents may be damaged, we
recommend that replacement
is carried out by any autho-
rized Toyota retailer or Toyota
authorized repairer, or any reli-
able repairer.
Preparing for light bulb
replacement
Bulb locations
Page 352 of 568
352
YARIS(HB) Owner's Manual_Europe_MK0001_en
6-3. Do-it-yourself maintenance
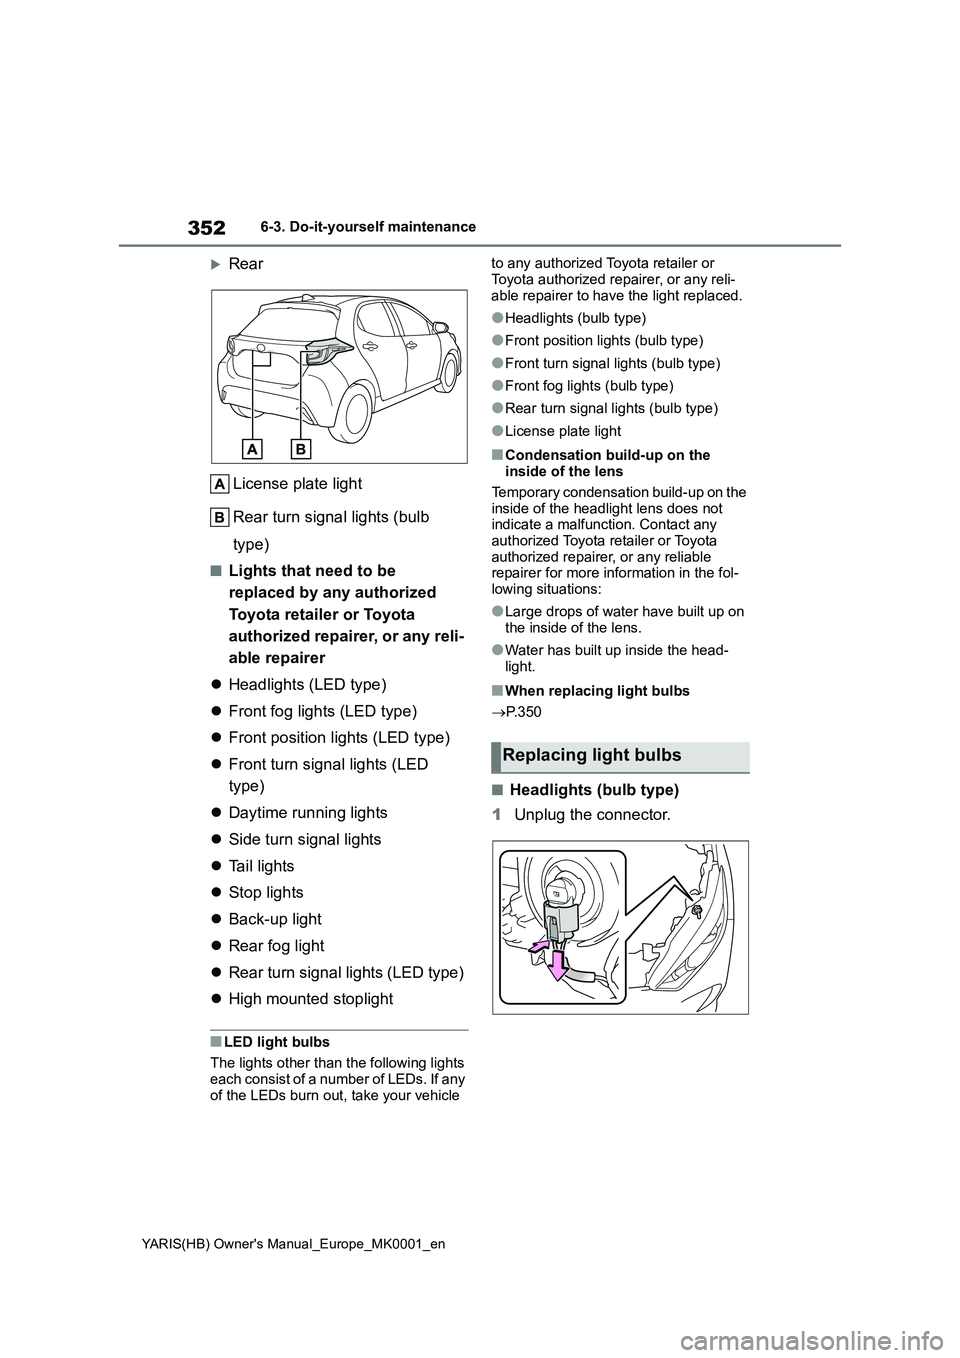
Rear
License plate light
Rear turn signal lights (bulb
type)
■Lights that need to be
replaced by any authorized
Toyota retailer or Toyota
authorized repairer, or any reli-
able repairer
zHeadlights (LED type)
zFront fog lights (LED type)
zFront position lights (LED type)
zFront turn signal lights (LED
type)
zDaytime running lights
zSide turn signal lights
zTail lights
zStop lights
zBack-up light
zRear fog light
zRear turn signal lights (LED type)
zHigh mounted stoplight
■LED light bulbs
The lights other than the following lights
each consist of a number of LEDs. If any
of the LEDs burn out, take your vehicle to any authorized Toyota retailer or
Toyota authorized repairer, or any reli-
able repairer to have the light replaced.
●Headlights (bulb type)
●Front position lights (bulb type)
●Front turn signal lights (bulb type)
●Front fog lights (bulb type)
●Rear turn signal lights (bulb type)
●License plate light
■Condensation build-up on the
inside of the lens
Temporary condensation build-up on the
inside of the headlight lens does not
indicate a malfunction. Contact any
authorized Toyota retailer or Toyota
authorized repairer, or any reliable
repairer for more information in the fol-
lowing situations:
●Large drops of water have built up on
the inside of the lens.
●Water has built up inside the head-
light.
■When replacing light bulbs
→P. 3 5 0
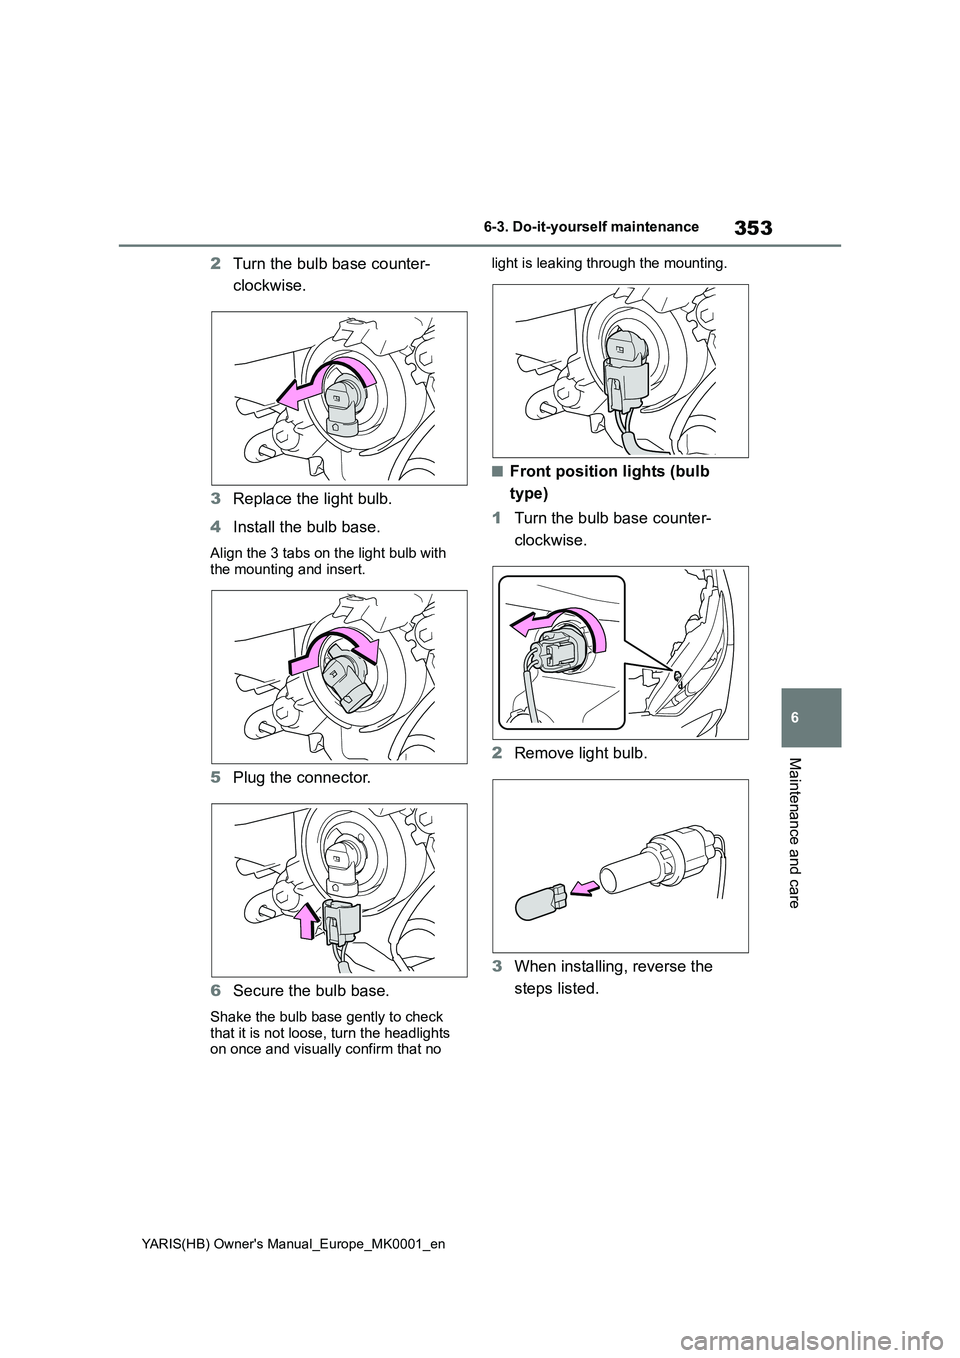
■Headlights (bulb type)
1Unplug the connector.
Replacing light bulbs
Page 353 of 568
353
6
YARIS(HB) Owner's Manual_Europe_MK0001_en
6-3. Do-it-yourself maintenance
Maintenance and care
2Turn the bulb base counter-
clockwise.
3 Replace the light bulb.
4 Install the bulb base.
Align the 3 tabs on the light bulb with the mounting and insert.
5 Plug the connector.
6 Secure the bulb base.
Shake the bulb base gently to check
that it is not loose, turn the headlights on once and visually confirm that no
light is leaking through the mounting.
■Front position lights (bulb
type)
1 Turn the bulb base counter-
clockwise.
2 Remove light bulb.
3 When installing, reverse the
steps listed.
Page 354 of 568
354
YARIS(HB) Owner's Manual_Europe_MK0001_en
6-3. Do-it-yourself maintenance
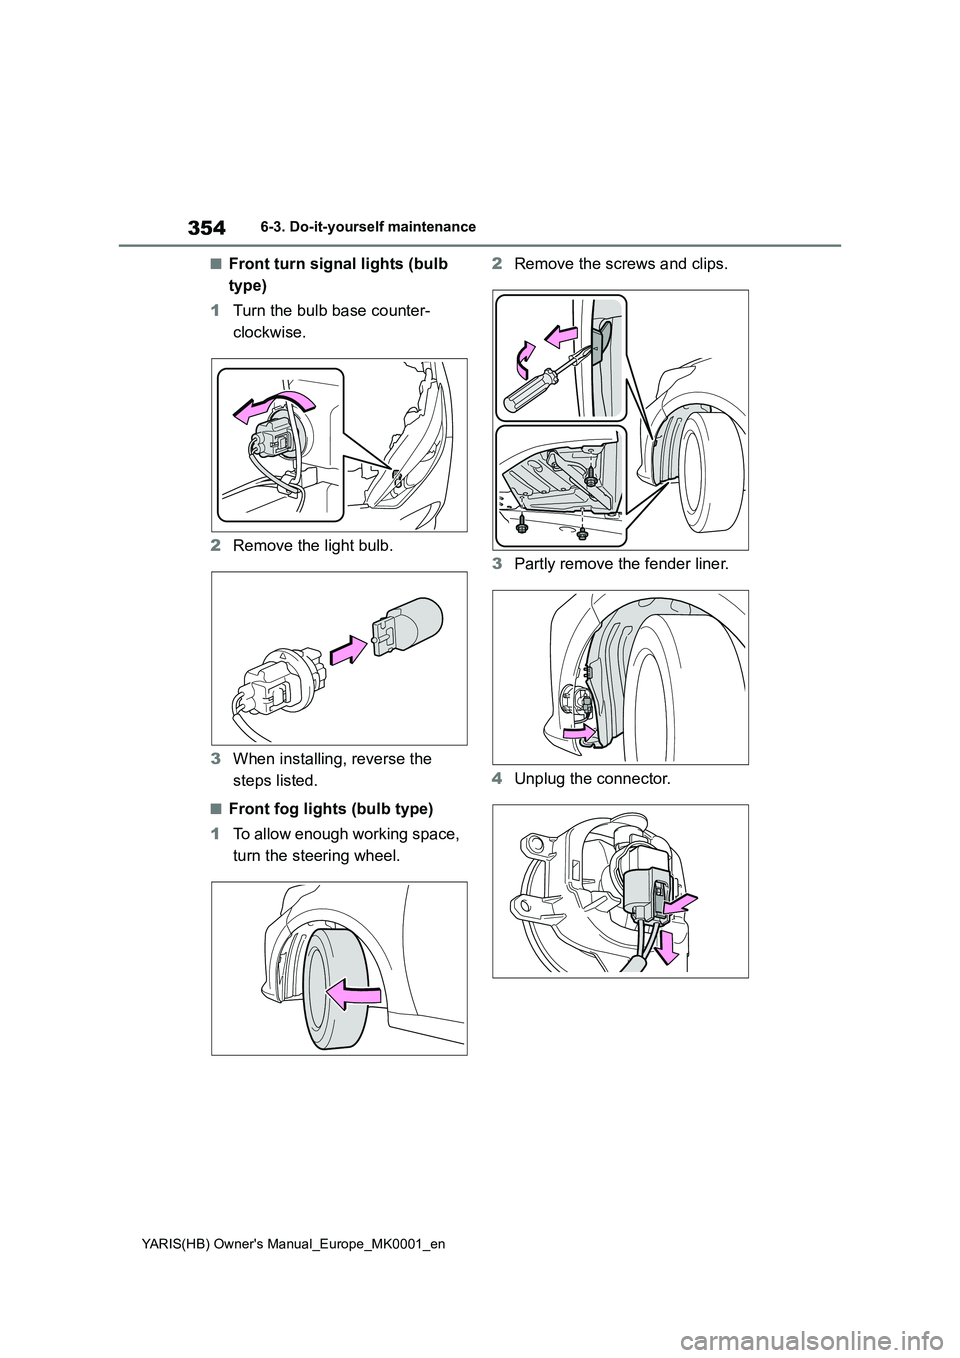
■Front turn signal lights (bulb
type)
1 Turn the bulb base counter-
clockwise.
2 Remove the light bulb.
3 When installing, reverse the
steps listed.
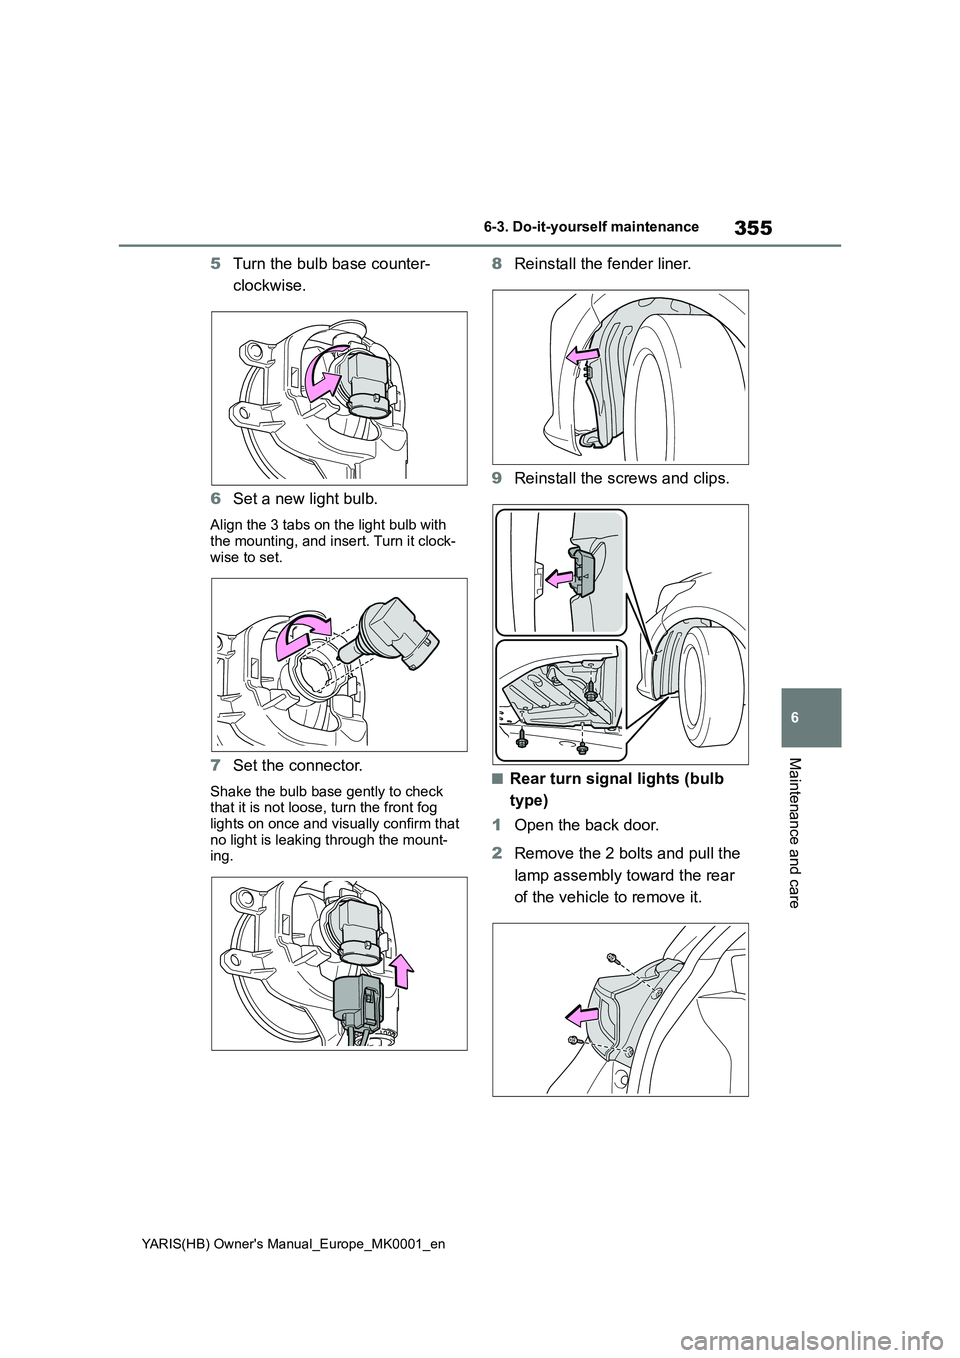
■Front fog lights (bulb type)
1 To allow enough working space,
turn the steering wheel.
2 Remove the screws and clips.
3 Partly remove the fender liner.
4 Unplug the connector.
Page 355 of 568
355
6
YARIS(HB) Owner's Manual_Europe_MK0001_en
6-3. Do-it-yourself maintenance
Maintenance and care
5Turn the bulb base counter-
clockwise.
6 Set a new light bulb.
Align the 3 tabs on the light bulb with the mounting, and insert. Turn it clock-
wise to set.
7 Set the connector.
Shake the bulb base gently to check that it is not loose, turn the front fog
lights on once and visually confirm that no light is leaking through the mount-ing.
8 Reinstall the fender liner.
9 Reinstall the screws and clips.
■Rear turn signal lights (bulb
type)
1 Open the back door.
2 Remove the 2 bolts and pull the
lamp assembly toward the rear
of the vehicle to remove it.
Page 356 of 568
356
YARIS(HB) Owner's Manual_Europe_MK0001_en
6-3. Do-it-yourself maintenance
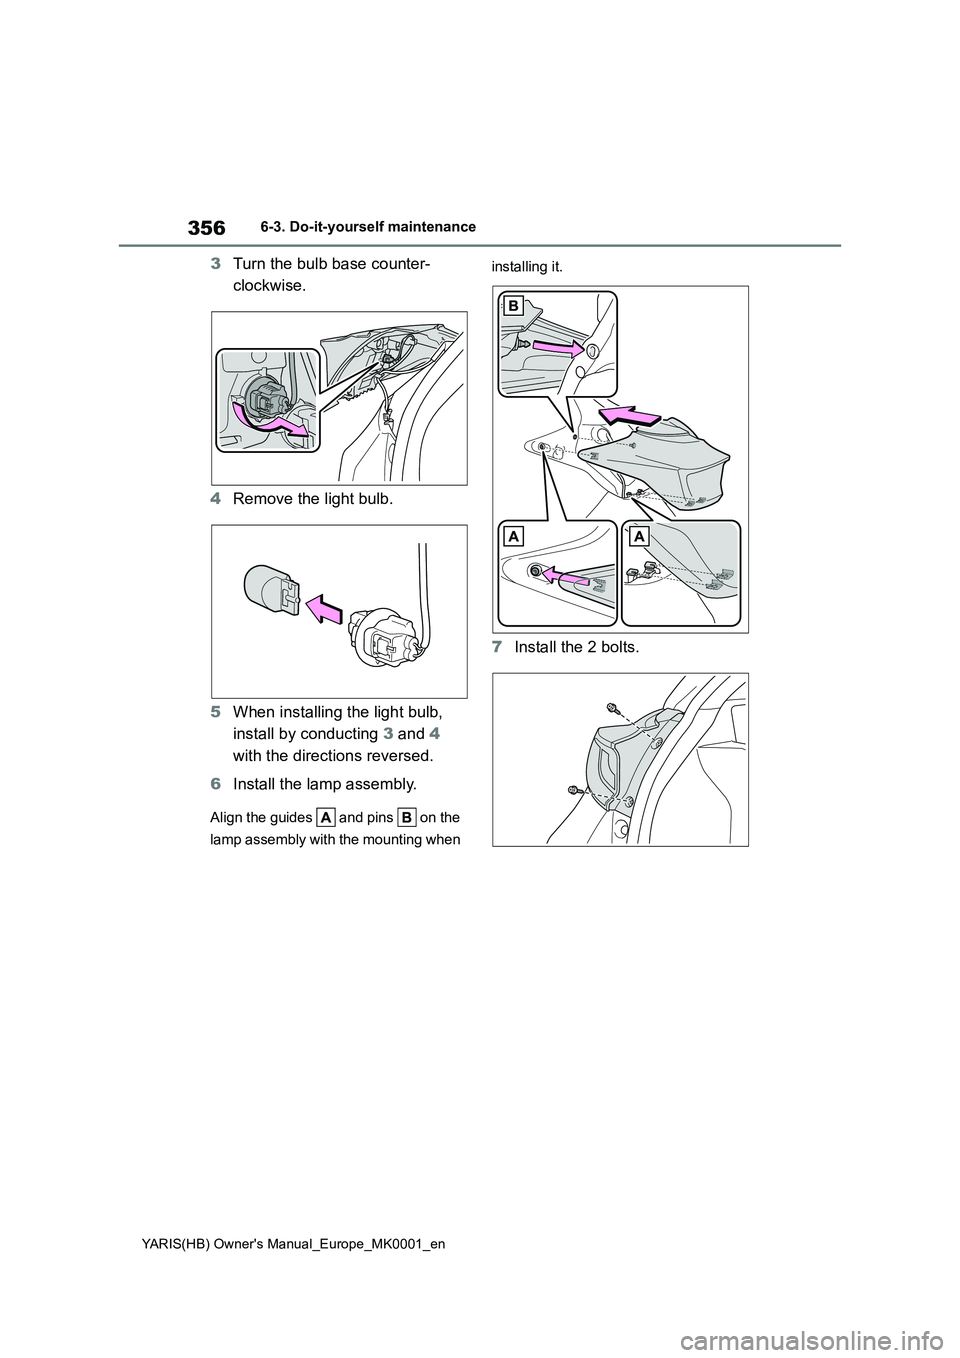
3Turn the bulb base counter-
clockwise.
4 Remove the light bulb.
5 When installing the light bulb,
install by conducting 3 and 4
with the directions reversed.
6 Install the lamp assembly.
Align the guides and pins on the
lamp assembly with the mounting when
installing it.
7 Install the 2 bolts.