TOYOTA YARIS LIFTBACK 2020 Owners Manual (in English)
YARIS LIFTBACK 2020
TOYOTA
TOYOTA
https://www.carmanualsonline.info/img/14/43158/w960_43158-0.png
TOYOTA YARIS LIFTBACK 2020 Owners Manual (in English)
Trending: fold seats, transmission, check engine, jump start terminals, coolant reservoir, key battery, service interval
Page 401 of 520
4017-3. Do-it-yourself maintenance
7
Maintenance and care
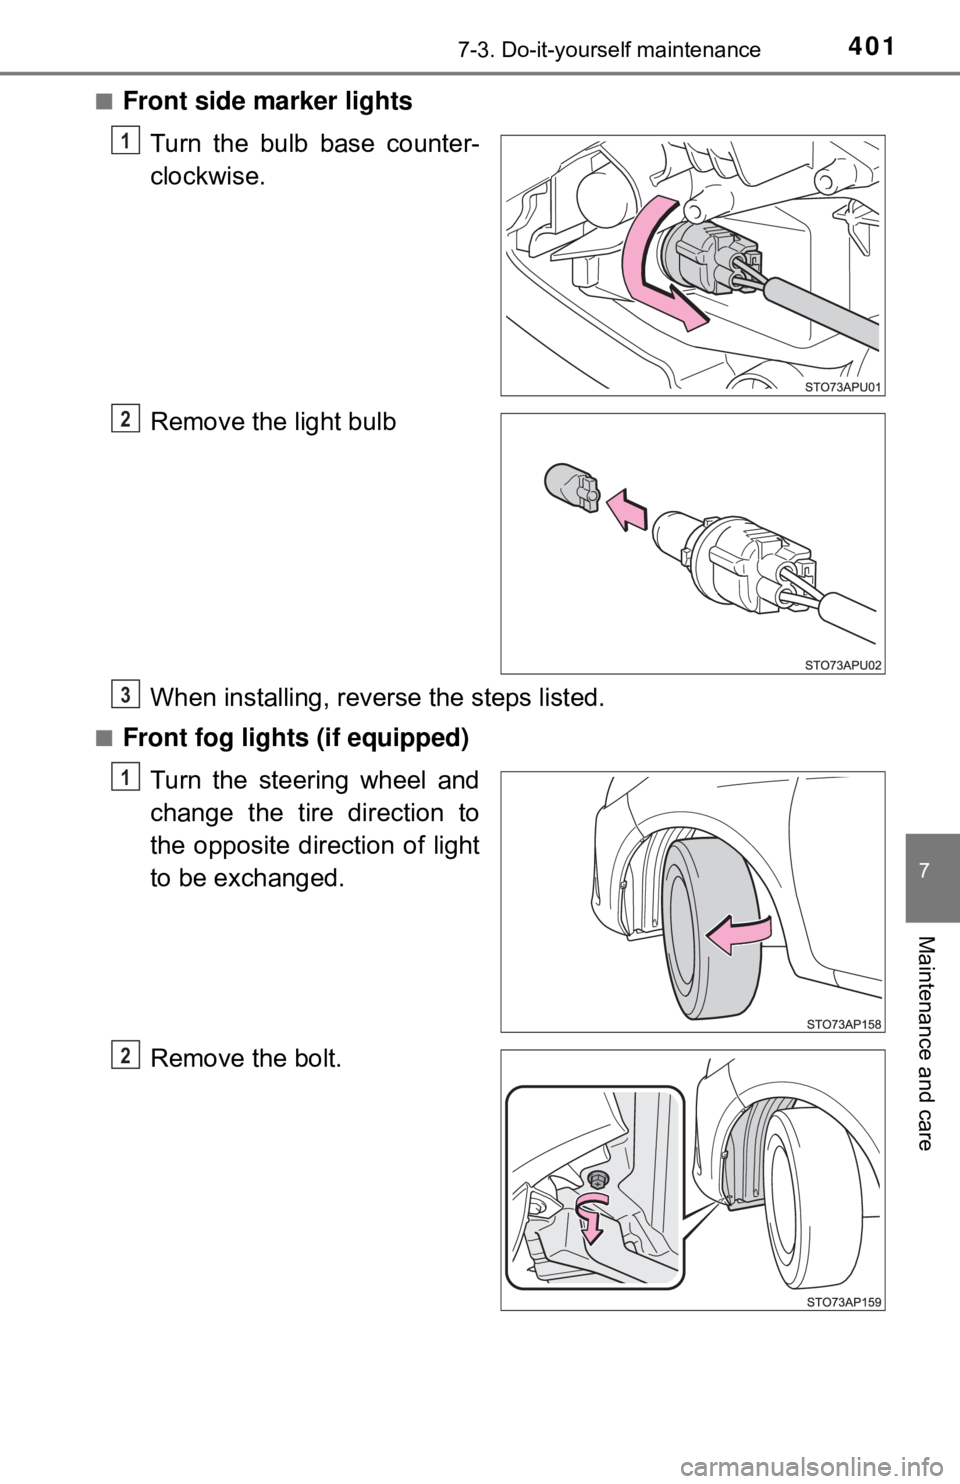
■Front side marker lightsTurn the bulb base counter-
clockwise.
Remove the light bulb
When installing, reve rse the steps listed.
■Front fog lights (if equipped)
Turn the steering wheel and
change the tire direction to
the opposite direction of light
to be exchanged.
Remove the bolt.
1
2
3
1
2
Page 402 of 520
4027-3. Do-it-yourself maintenance
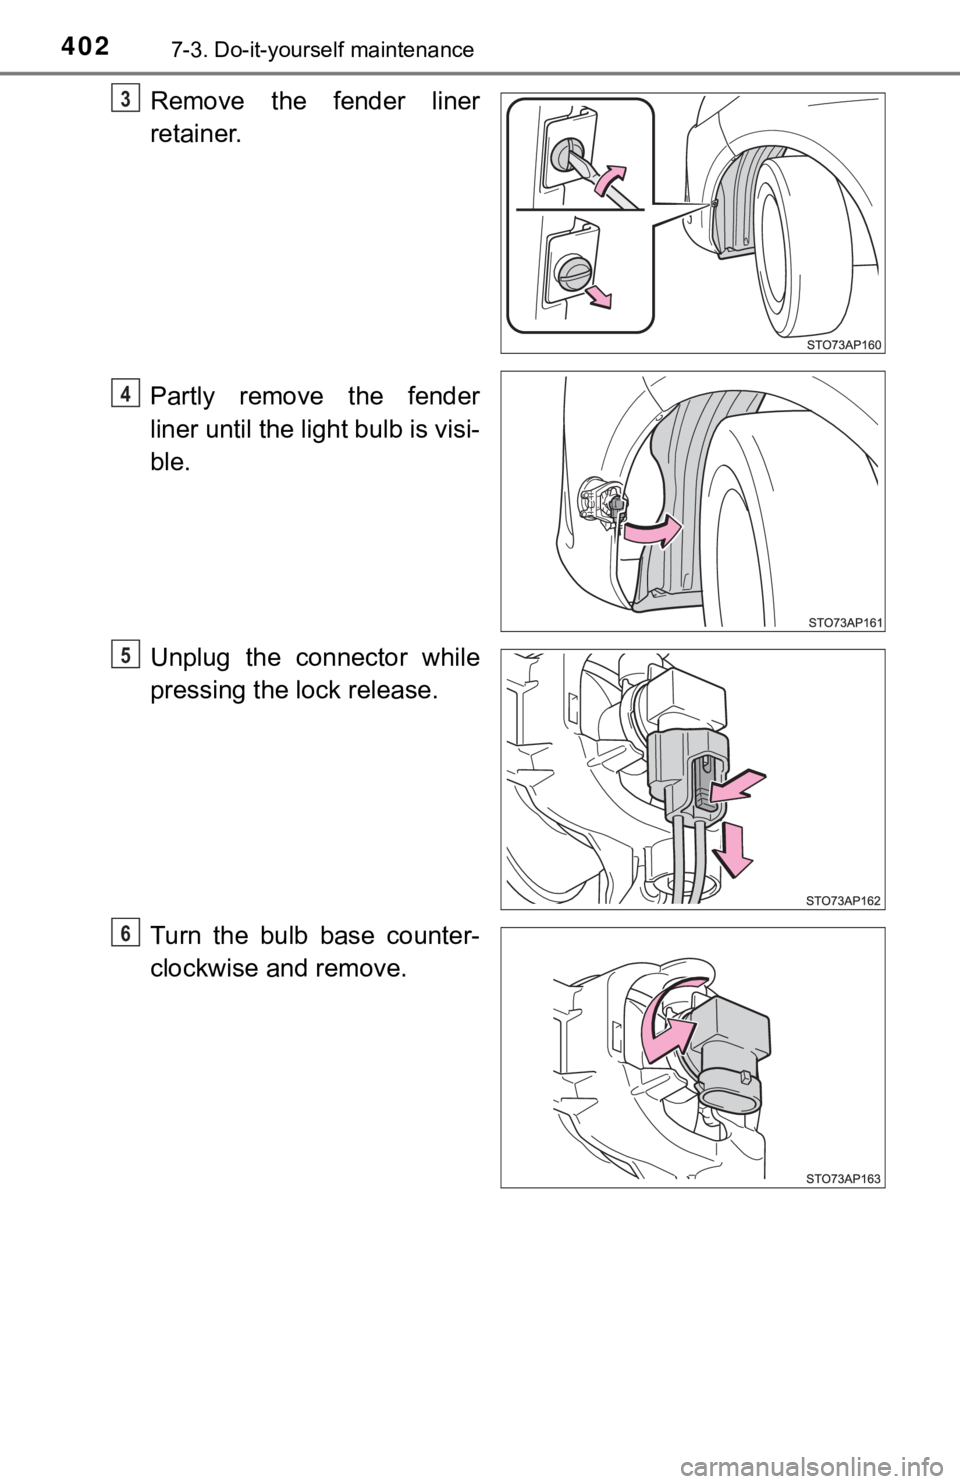
Remove the fender liner
retainer.
Partly remove the fender
liner until the light bulb is visi-
ble.
Unplug the connector while
pressing the lock release.
Turn the bulb base counter-
clockwise and remove.3
4
5
6
Page 403 of 520
4037-3. Do-it-yourself maintenance
7
Maintenance and care
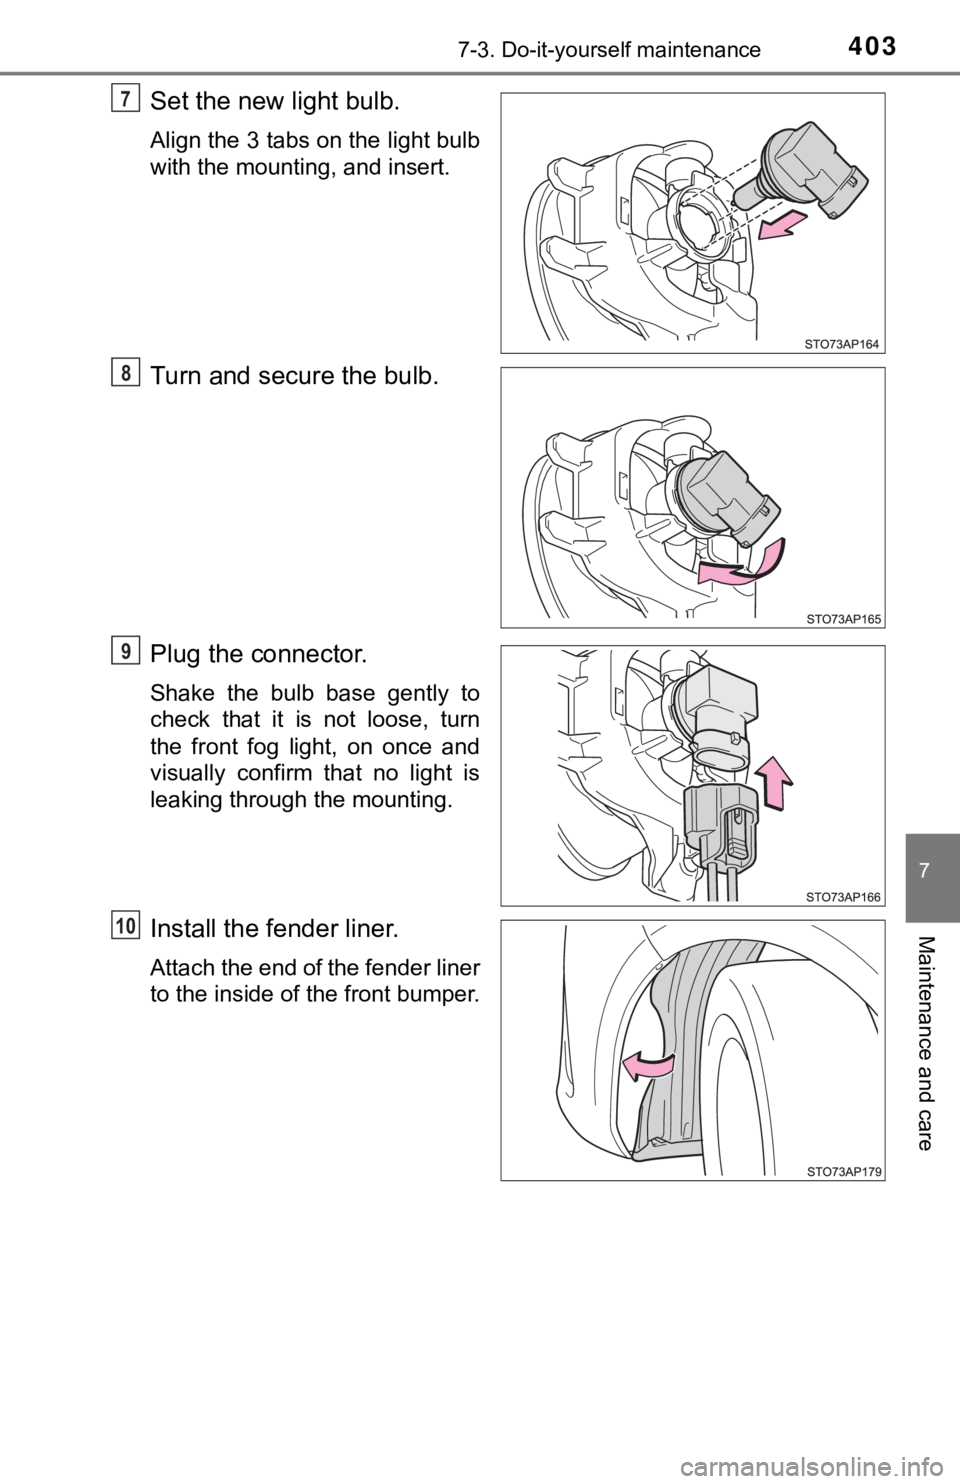
Set the new light bulb.
Align the 3 tabs on the light bulb
with the mounting, and insert.
Turn and secure the bulb.
Plug the connector.
Shake the bulb base gently to
check that it is not loose, turn
the front fog light, on once and
visually confirm that no light is
leaking through the mounting.
Install the fender liner.
Attach the end of the fender liner
to the inside of the front bumper.
7
78
79
10
Page 404 of 520
4047-3. Do-it-yourself maintenance
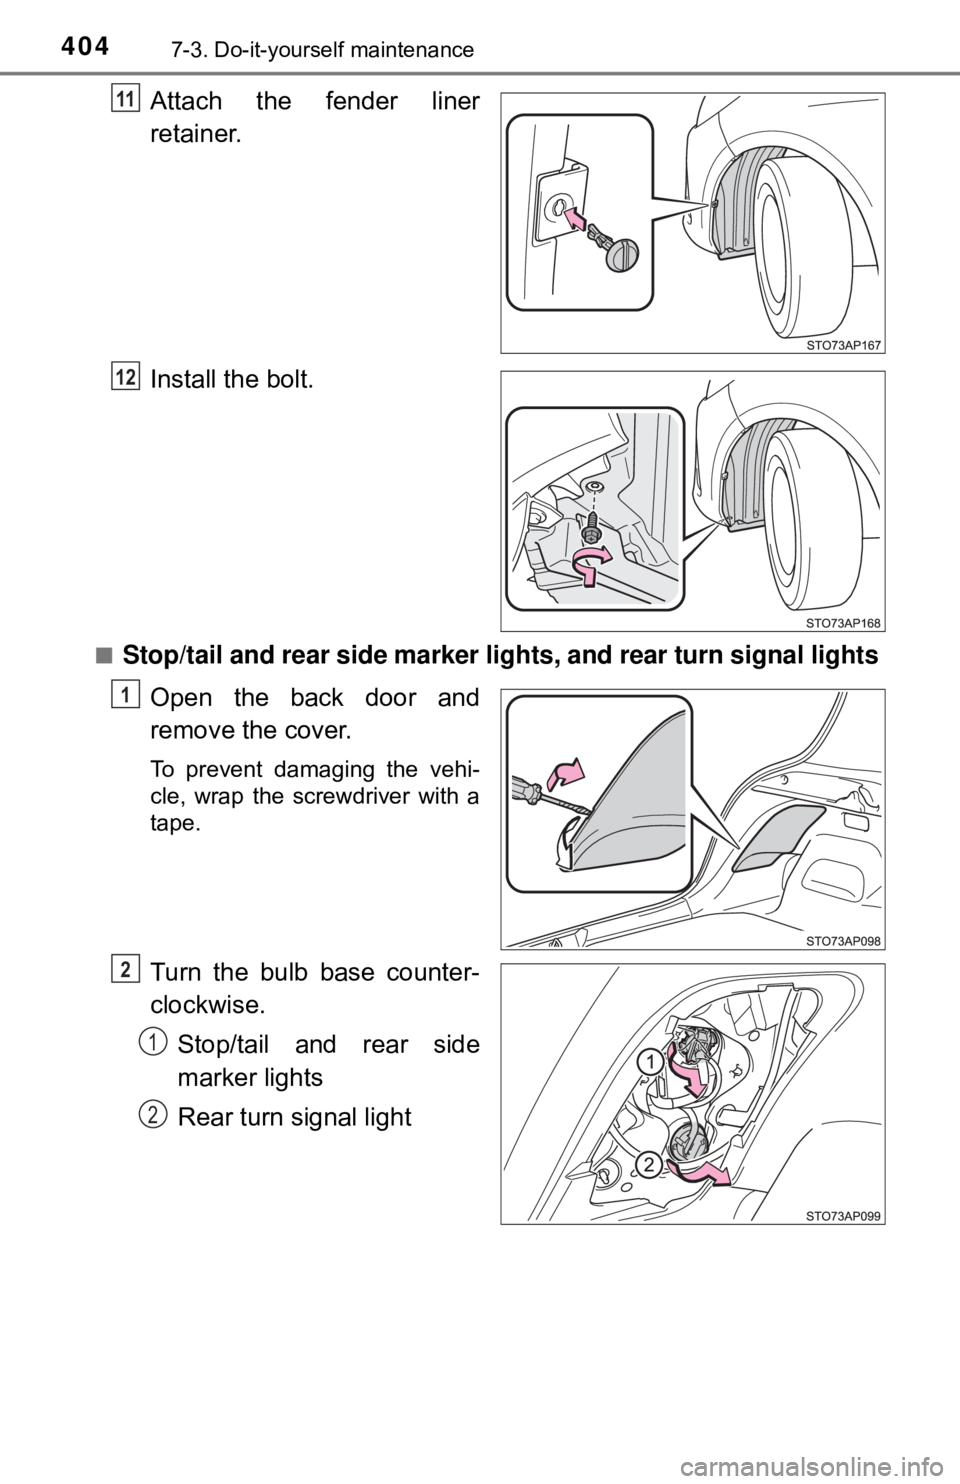
Attach the fender liner
retainer.
Install the bolt.
■Stop/tail and rear side marker lights, and rear turn signal lights
Open the back door and
remove the cover.
To prevent damaging the vehi-
cle, wrap the screwdriver with a
tape.
Turn the bulb base counter-
clockwise. Stop/tail and rear side
marker lights
Rear turn signal light
11
12
1
2
1
2
Page 405 of 520
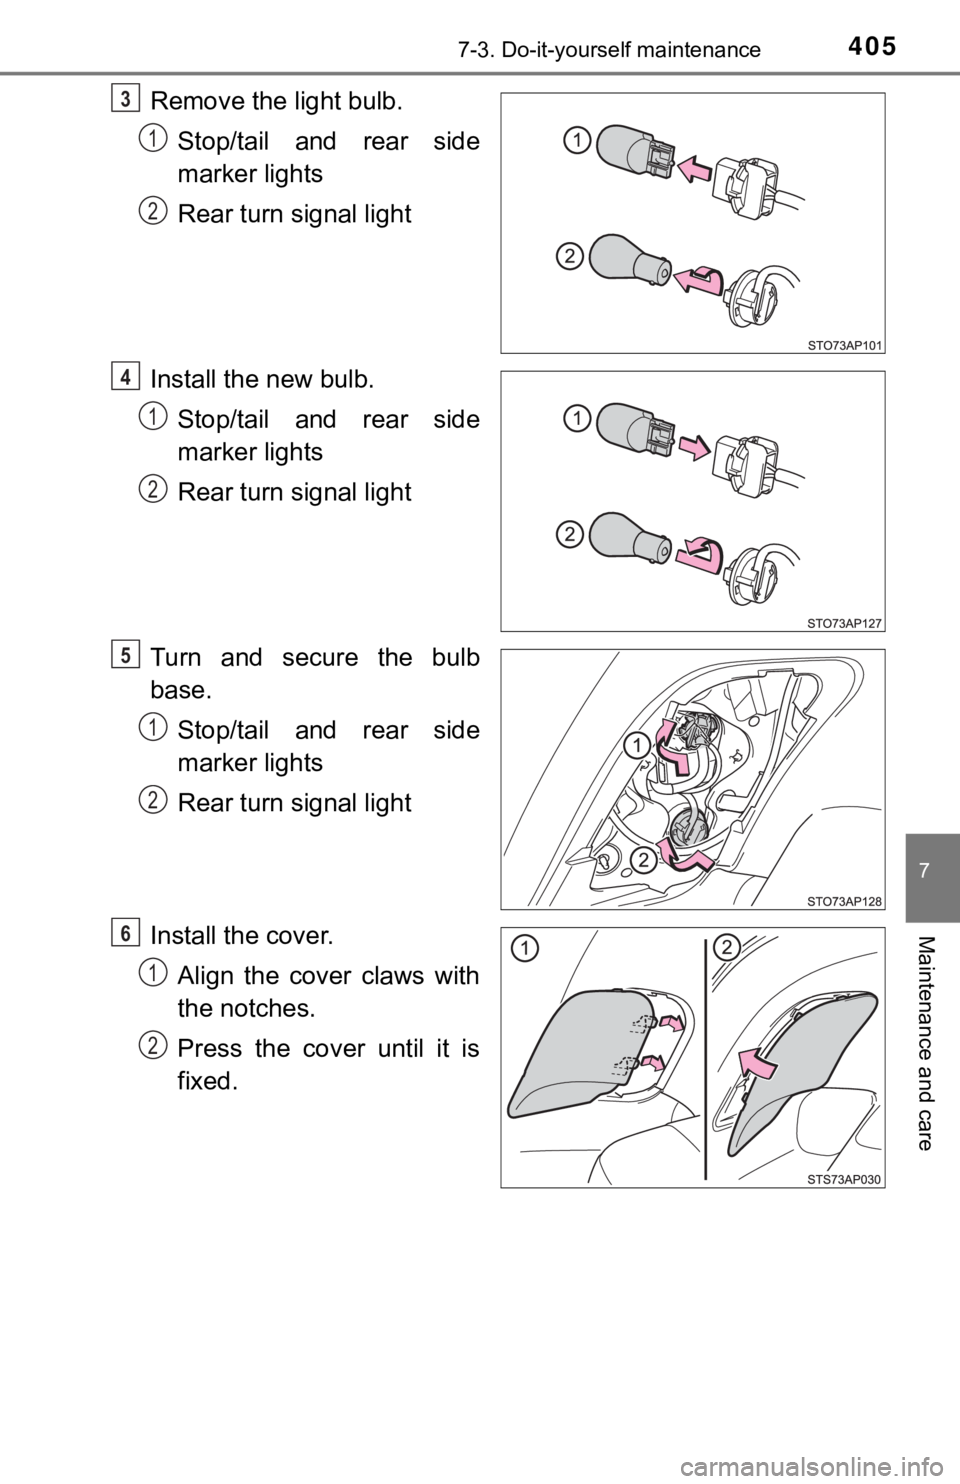
4057-3. Do-it-yourself maintenance
7
Maintenance and care
Remove the light bulb.Stop/tail and rear side
marker lights
Rear turn signal light
Install the new bulb. Stop/tail and rear side
marker lights
Rear turn signal light
Turn and secure the bulb
base. Stop/tail and rear side
marker lights
Rear turn signal light
Install the cover. Align the cover claws with
the notches.
Press the cover until it is
fixed.3
1
2
4
1
2
5
1
2
6
1
2
Page 406 of 520
4067-3. Do-it-yourself maintenance
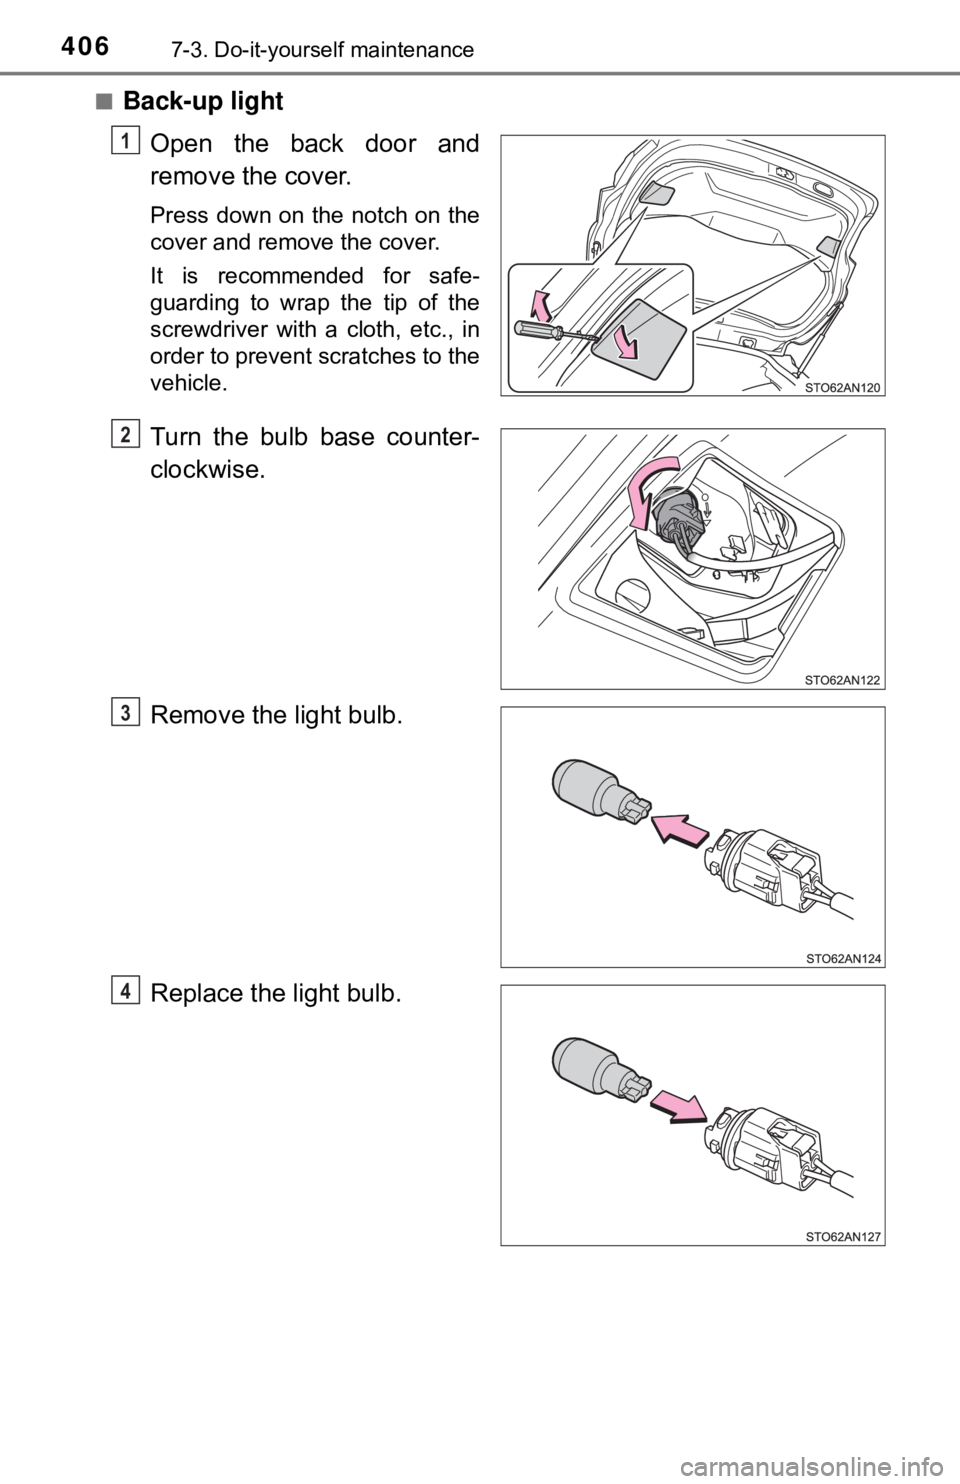
■Back-up lightOpen the back door and
remove the cover.
Press down on the notch on the
cover and remove the cover.
It is recommended for safe-
guarding to wrap the tip of the
screwdriver with a cloth, etc., in
order to prevent scratches to the
vehicle.
Turn the bulb base counter-
clockwise.
Remove the light bulb.
Replace the light bulb.
1
2
3
4
Page 407 of 520
4077-3. Do-it-yourself maintenance
7
Maintenance and care
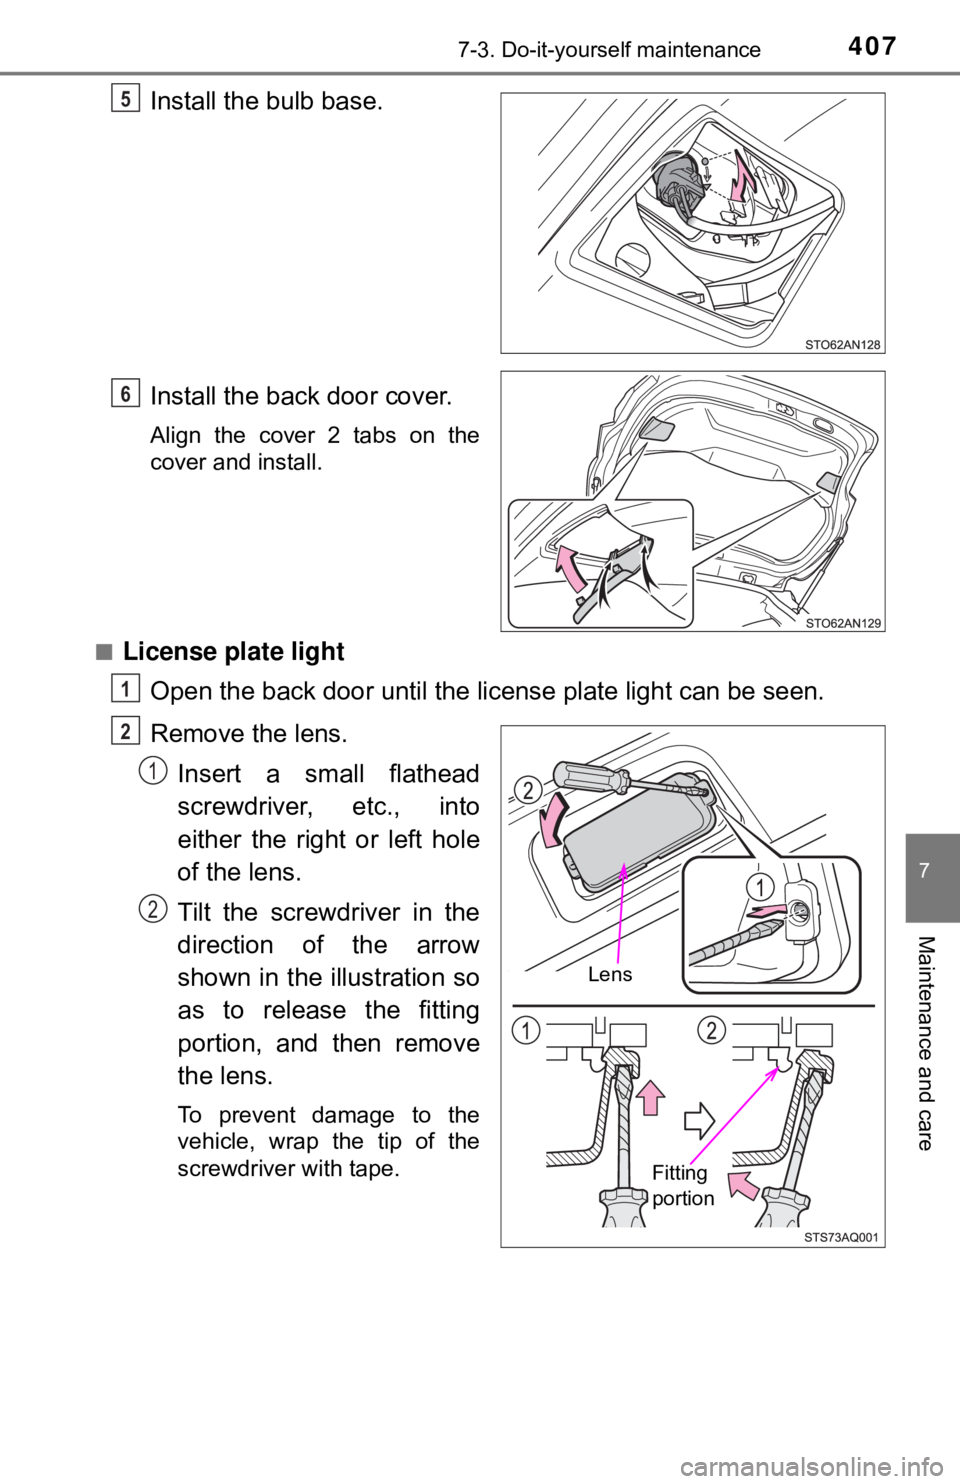
Install the bulb base.
Install the back door cover.
Align the cover 2 tabs on the
cover and install.
■
License plate light Open the back door until the license plate light can be seen.
Remove the lens.Insert a small flathead
screwdriver, etc., into
either the right or left hole
of the lens.
Tilt the screwdriver in the
direction of the arrow
shown in the illustration so
as to release the fitting
portion, and then remove
the lens.
To prevent damage to the
vehicle, wrap the tip of the
screwdriver with tape.
5
6
1
Fitting
portion
Lens
2
1
2
Page 408 of 520
4087-3. Do-it-yourself maintenance
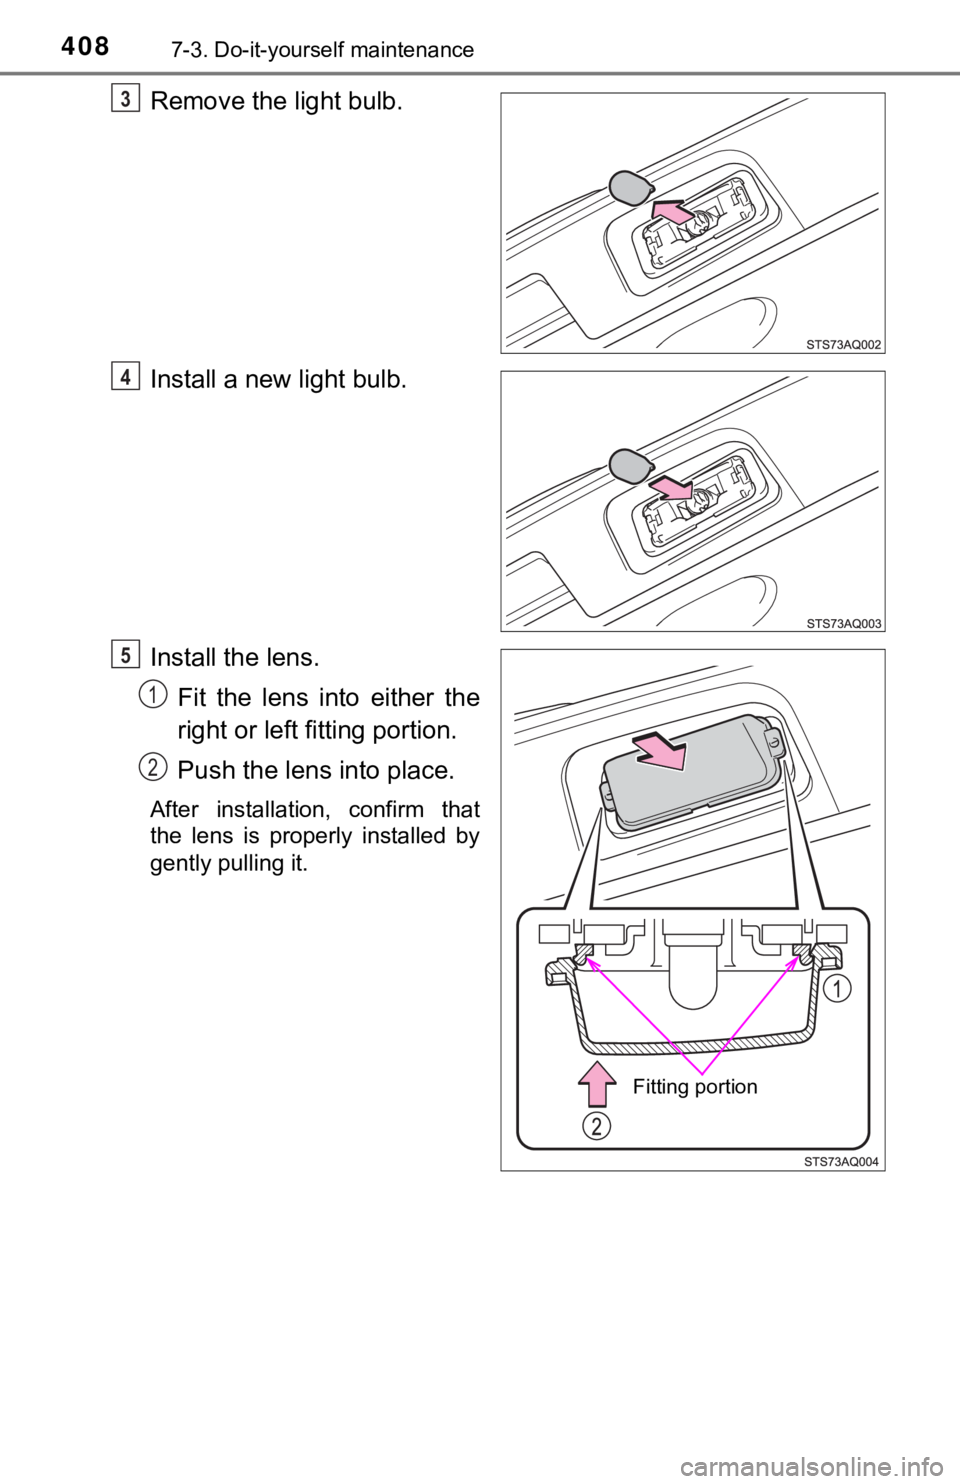
Remove the light bulb.
Install a new light bulb.
Install the lens.Fit the lens into either the
right or left fitting portion.
Push the lens into place.
After installation, confirm that
the lens is properly installed by
gently pulling it.
3
4
Fitting portion
5
1
2
Page 409 of 520
4097-3. Do-it-yourself maintenance
7
Maintenance and care
■Replacing the following bulbs
If any of the lights listed below has burnt out, have it replaced by
your Toyota dealer.
● Parking lights (vehicles with projector type headlights)
● Daytime running lights (if equipped on projector type headlights)
● High mounted stoplight
■LED Lights
The parking lights (LED type), daytime running lights (LED type) and high
mounted stoplight consists of a number of LEDs. If any of the LEDs burn out,
take your vehicle to your Toyota dealer to have the light replaced.
■ Condensation build-up on the inside of the lens
Temporary condensation build-up on the inside of the headlight lens does not
indicate a malfunction. Contact your Toyota dealer for more information in the
following situations:
●Large drops of water have built up on the inside of the lens.
● Water has built up inside the headlight.
■ When replacing light bulbs
→P. 394
Page 410 of 520
4107-3. Do-it-yourself maintenance
WARNING
■Replacing light bulbs
● Turn off the lights. Do not attempt to replace the bulb immediately after
turning off the lights.
The bulbs become very hot and may cause burns.
● Do not touch the glass portion of the light bulb with bare hands. When it is
unavoidable to hold the glass portion, use and hold with a clean dry cloth
to avoid getting moisture and oils on the bulb.
Also, if the bulb is scratched or dropped, it may blow out or crack.
● Fully install light bulbs and any parts used to secure them. Failure to do so
may result in heat damage, fire, or water entering the headlight unit. This
may damage the headlights or cause condensation to build up on the lens.
■ To prevent damage or fire
● Make sure bulbs are fully seated and locked.
● Check the wattage of the bulb before installing to prevent heat damage.
Trending: display, airbag disable, coolant reservoir, climate control, automatic transmission, spark plugs, engine oil
