bulb TOYOTA YARIS LIFTBACK 2020 Owners Manual (in English)
[x] Cancel search | Manufacturer: TOYOTA, Model Year: 2020, Model line: YARIS LIFTBACK, Model: TOYOTA YARIS LIFTBACK 2020Pages: 520, PDF Size: 8.71 MB
Page 6 of 520
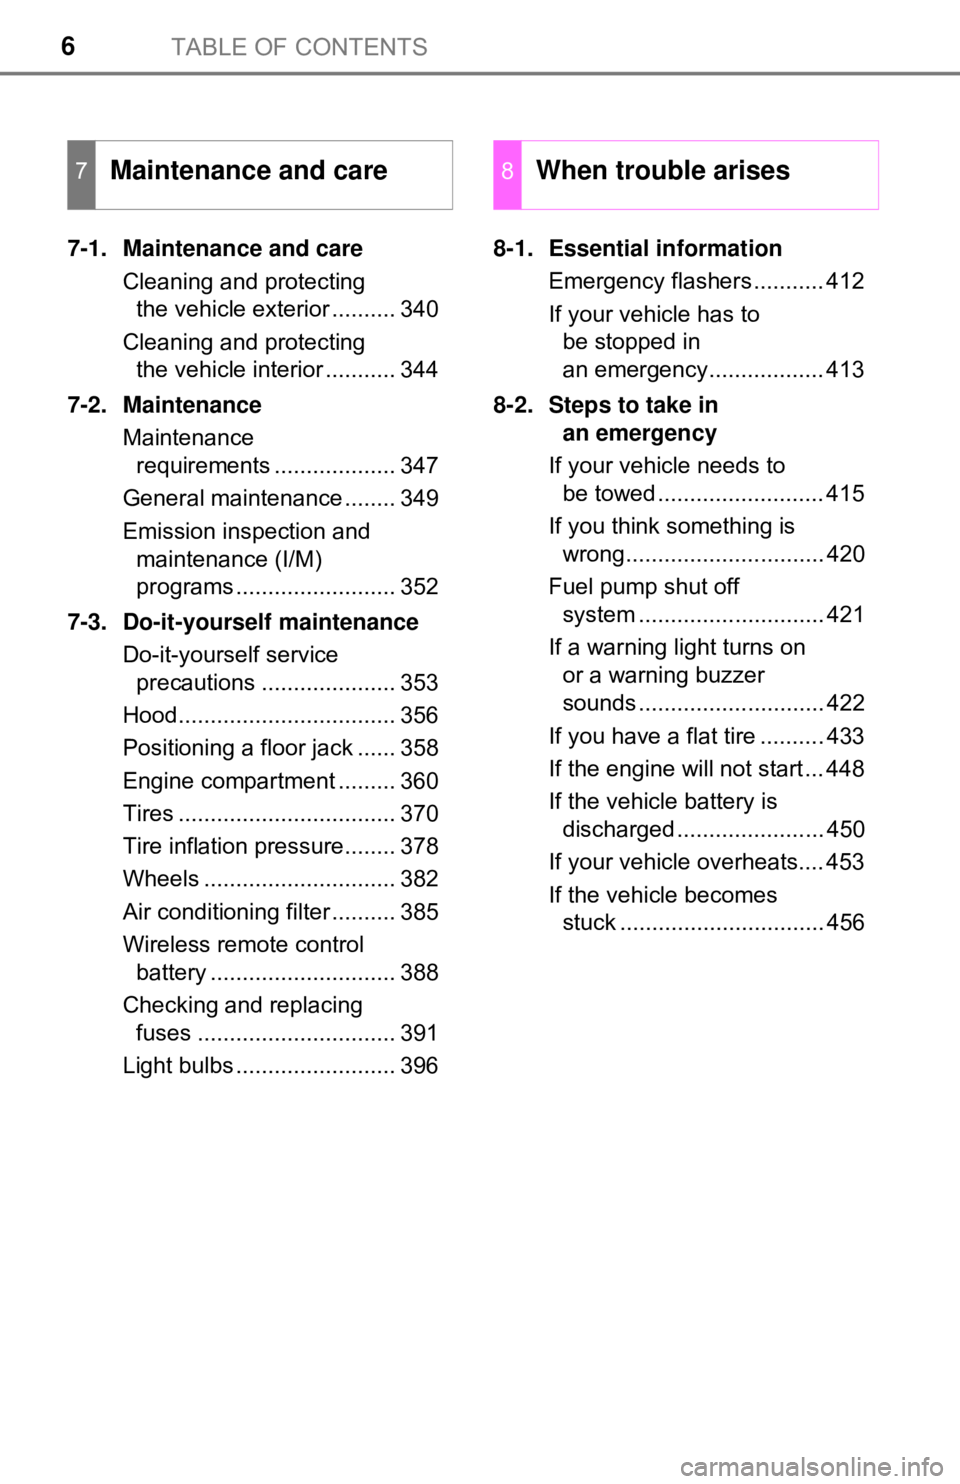
TABLE OF CONTENTS6
7-1. Maintenance and careCleaning and protecting the vehicle exterior .......... 340
Cleaning and protecting the vehicle interior ........... 344
7-2. Maintenance Maintenance requirements ................... 347
General maintenance ........ 349
Emission inspection and maintenance (I/M)
programs ......................... 352
7-3. Do-it-yourself maintenance Do-it-yourself service precautions ..................... 353
Hood.................................. 356
Positioning a floor jack ...... 358
Engine compartment ......... 360
Tires .................................. 370
Tire inflation pressure........ 378
Wheels .............................. 382
Air conditioning filter .......... 385
Wireless remote control battery ............................. 388
Checking and replacing fuses ............................... 391
Light bulbs ......................... 396 8-1. Essential information
Emergency flashers ........... 412
If your vehicle has to be stopped in
an emergency.................. 413
8-2. Steps to take in an emergency
If your vehicle needs to be towed .......................... 415
If you think something is wrong............................... 420
Fuel pump shut off system ............................. 421
If a warning light turns on or a warning buzzer
sounds ............................. 422
If you have a flat tire .......... 433
If the engine will not start ... 448
If the vehicle battery is discharged ....................... 450
If your vehicle overheats.... 453
If the vehicle becomes stuck ................................ 456
7Maintenance and care8When trouble arises
Page 15 of 520
15Pictorial index
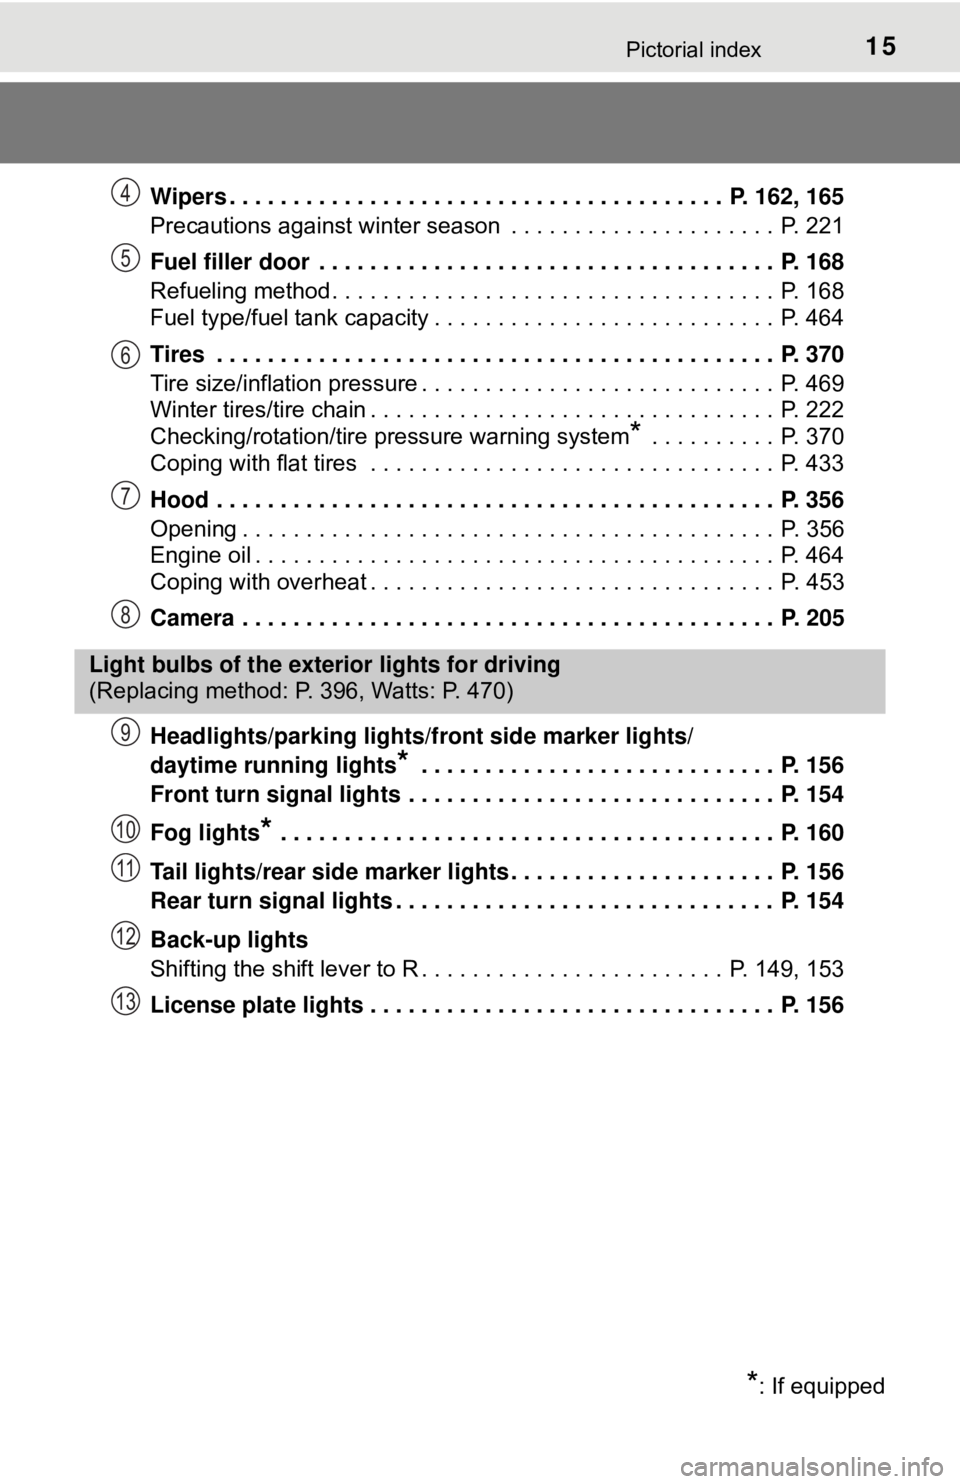
Wipers . . . . . . . . . . . . . . . . . . . . . . . . . . . . . . . . . . . . . . . P. 162, 165
Precautions against winter season . . . . . . . . . . . . . . . . . . . . . P. 221
Fuel filler door . . . . . . . . . . . . . . . . . . . . . . . . . . . . . . . . . . . . P. 168
Refueling method . . . . . . . . . . . . . . . . . . . . . . . . . . . . . . . . . . . P. 168
Fuel type/fuel tank capacity . . . . . . . . . . . . . . . . . . . . . . . . . . . P. 464
Tires . . . . . . . . . . . . . . . . . . . . . . . . . . . . . . . . . . . . . . . . . . . . P. 370
Tire size/inflation pressure . . . . . . . . . . . . . . . . . . . . . . . . . . . . P. 469
Winter tires/tire chain . . . . . . . . . . . . . . . . . . . . . . . . . . . . . . . . P. 222
Checking/rotation/tire pressure warning system
* . . . . . . . . . . P. 370
Coping with flat tires . . . . . . . . . . . . . . . . . . . . . . . . . . . . . . . . P. 433
Hood . . . . . . . . . . . . . . . . . . . . . . . . . . . . . . . . . . . . . . . . . . . . P. 356
Opening . . . . . . . . . . . . . . . . . . . . . . . . . . . . . . . . . . . . . . . . . . P. 356
Engine oil . . . . . . . . . . . . . . . . . . . . . . . . . . . . . . . . . . . . . . . . . P. 464
Coping with overheat . . . . . . . . . . . . . . . . . . . . . . . . . . . . . . . . P. 453
Camera . . . . . . . . . . . . . . . . . . . . . . . . . . . . . . . . . . . . . . . . . . P. 205
Headlights/parking lights/front side marker lights/
daytime running lights
* . . . . . . . . . . . . . . . . . . . . . . . . . . . . P. 156
Front turn signal lights . . . . . . . . . . . . . . . . . . . . . . . . . . . . . P. 154
Fog lights
* . . . . . . . . . . . . . . . . . . . . . . . . . . . . . . . . . . . . . . . P. 160
Tail lights/rear side marker lights . . . . . . . . . . . . . . . . . . . . . P. 156
Rear turn signal lights . . . . . . . . . . . . . . . . . . . . . . . . . . . . . . P. 154
Back-up lights
Shifting the shift lever to R . . . . . . . . . . . . . . . . . . . . . . . . P. 149, 153
License plate lights . . . . . . . . . . . . . . . . . . . . . . . . . . . . . . . . P. 156
4
5
6
7
8
Light bulbs of the exterior lights for driving
(Replacing method: P. 396, Watts: P. 470)
*: If equipped
9
10
11
12
13
Page 154 of 520
1544-2. Driving procedures
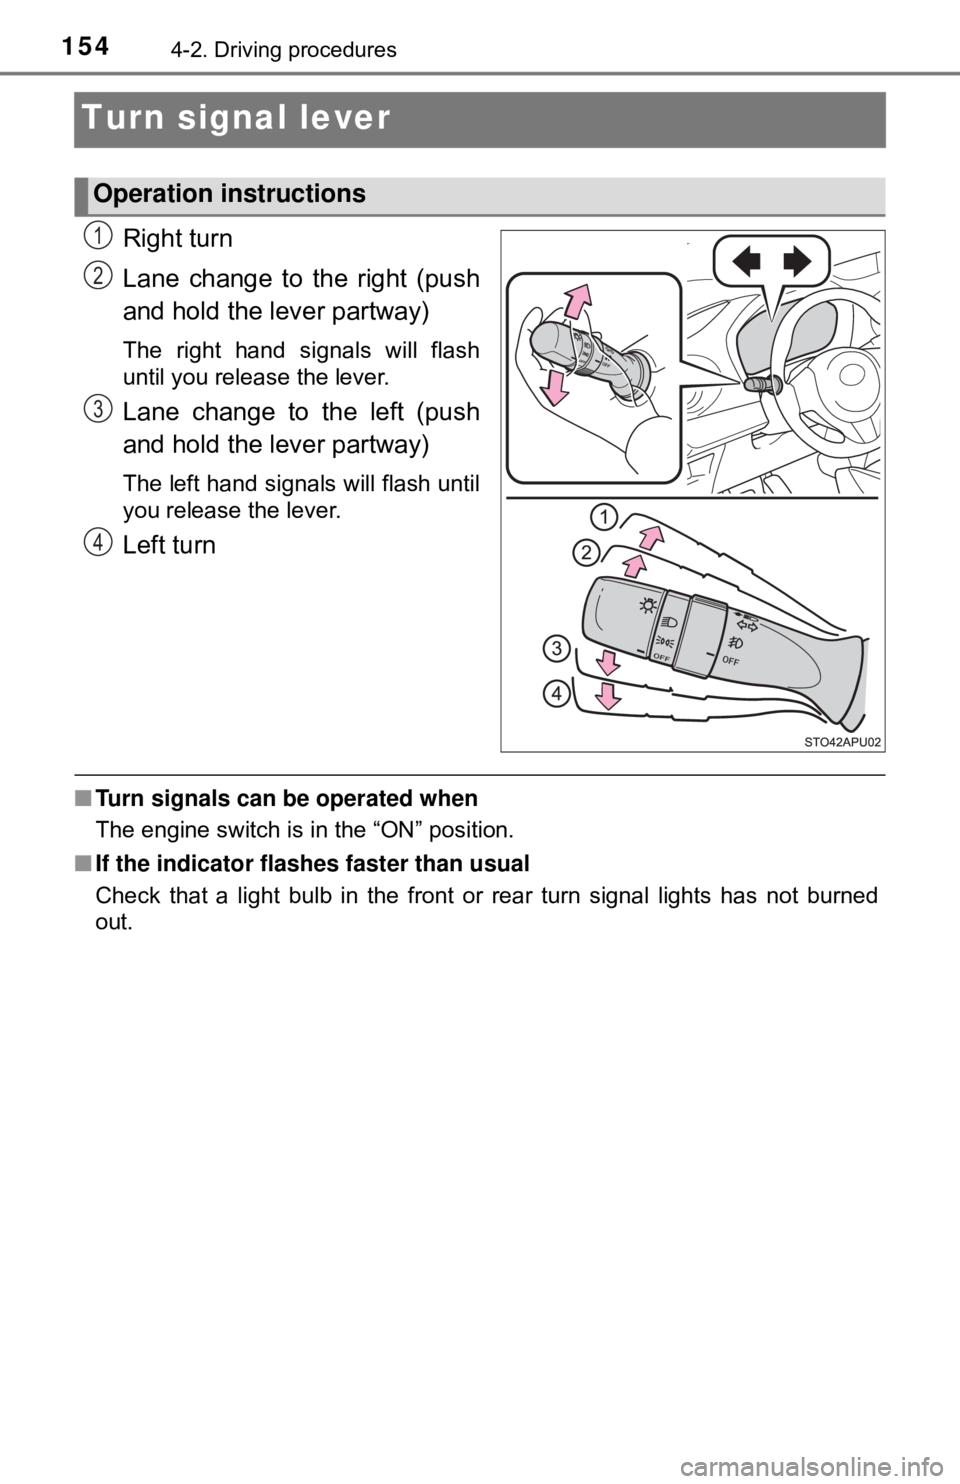
Turn signal lever
Right turn
Lane change to the right (push
and hold the lever partway)
The right hand signals will flash
until you release the lever.
Lane change to the left (push
and hold the lever partway)
The left hand signals will flash until
you release the lever.
Left turn
■Turn signals can be operated when
The engine switch is in the “ON” position.
■ If the indicator flashes faster than usual
Check that a light bulb in the front or rear turn signal lights has not burned
out.
Operation instructions
1
2
3
4
Page 339 of 520
339
7Maintenance and care
7-1. Maintenance and careCleaning and protecting the vehicle exterior .......... 340
Cleaning and protecting the vehicle interior ........... 344
7-2. Maintenance Maintenance requirements ................... 347
General maintenance........ 349
Emission inspection and maintenance (I/M)
programs......................... 352
7-3. Do-it-yourself maintenance Do-it-yourself service precautions ..................... 353
Hood ................................. 356
Positioning a floor jack ...... 358
Engine compartment ......... 360
Tires .................................. 370
Tire inflation pressure ....... 378
Wheels .............................. 382
Air conditioning filter.......... 385
Wireless remote control battery ............................. 388
Checking and replacing fuses ............................... 391
Light bulbs......................... 396
Page 354 of 520
3547-3. Do-it-yourself maintenance
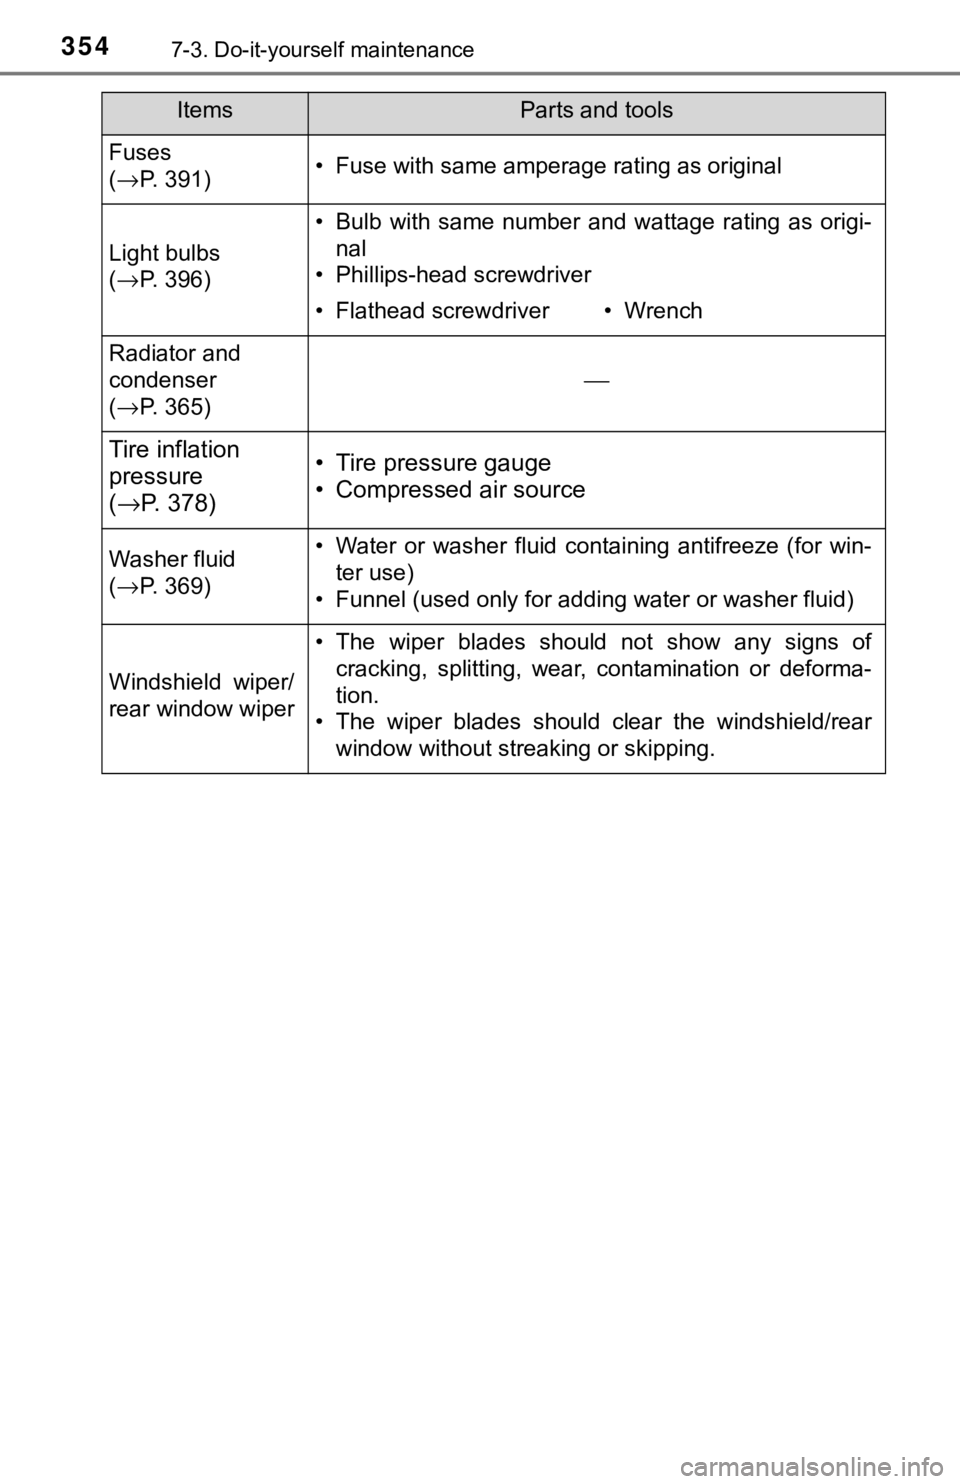
Fuses
(→ P. 391)• Fuse with same amperage rating as original
Light bulbs
(→ P. 396)
• Bulb with same number and wattage rating as origi-
nal
• Phillips-head screwdriver
• Flathead screwdriver• Wrench
Radiator and
condenser
( → P. 365)
⎯
Tire inflation
pressure
(→ P. 378)• Tire pressure gauge
• Compressed air source
Washer fluid
(→ P. 369)• Water or washer fluid containing antifreeze (for win-
ter use)
• Funnel (used only for adding water or washer fluid)
Windshield wiper/
rear window wiper
• The wiper blades should not show any signs of cracking, splitting, wear, contamination or deforma-
tion.
• The wiper blades should clear the windshield/rear
window without streaking or skipping.
ItemsParts and tools
Page 394 of 520
3947-3. Do-it-yourself maintenance
■After a fuse is replaced
●If the lights do not turn on even after the fuse has been replaced, a bulb may
need replacement. ( →P. 396)
● If the replaced fuse blows again, have the vehicle inspected by your Toyota
dealer.
■ If there is an overload in a circuit
The fuses are designed to blow, protecting the wiring harness from damage.
■ When replacing light bulbs
Toyota recommends that you use genuine Toyota products designed for this
vehicle. Because certain bulbs are connected to circuits designed to prevent
overload, non-genuine parts or parts not designed for this vehicle may be
unusable.
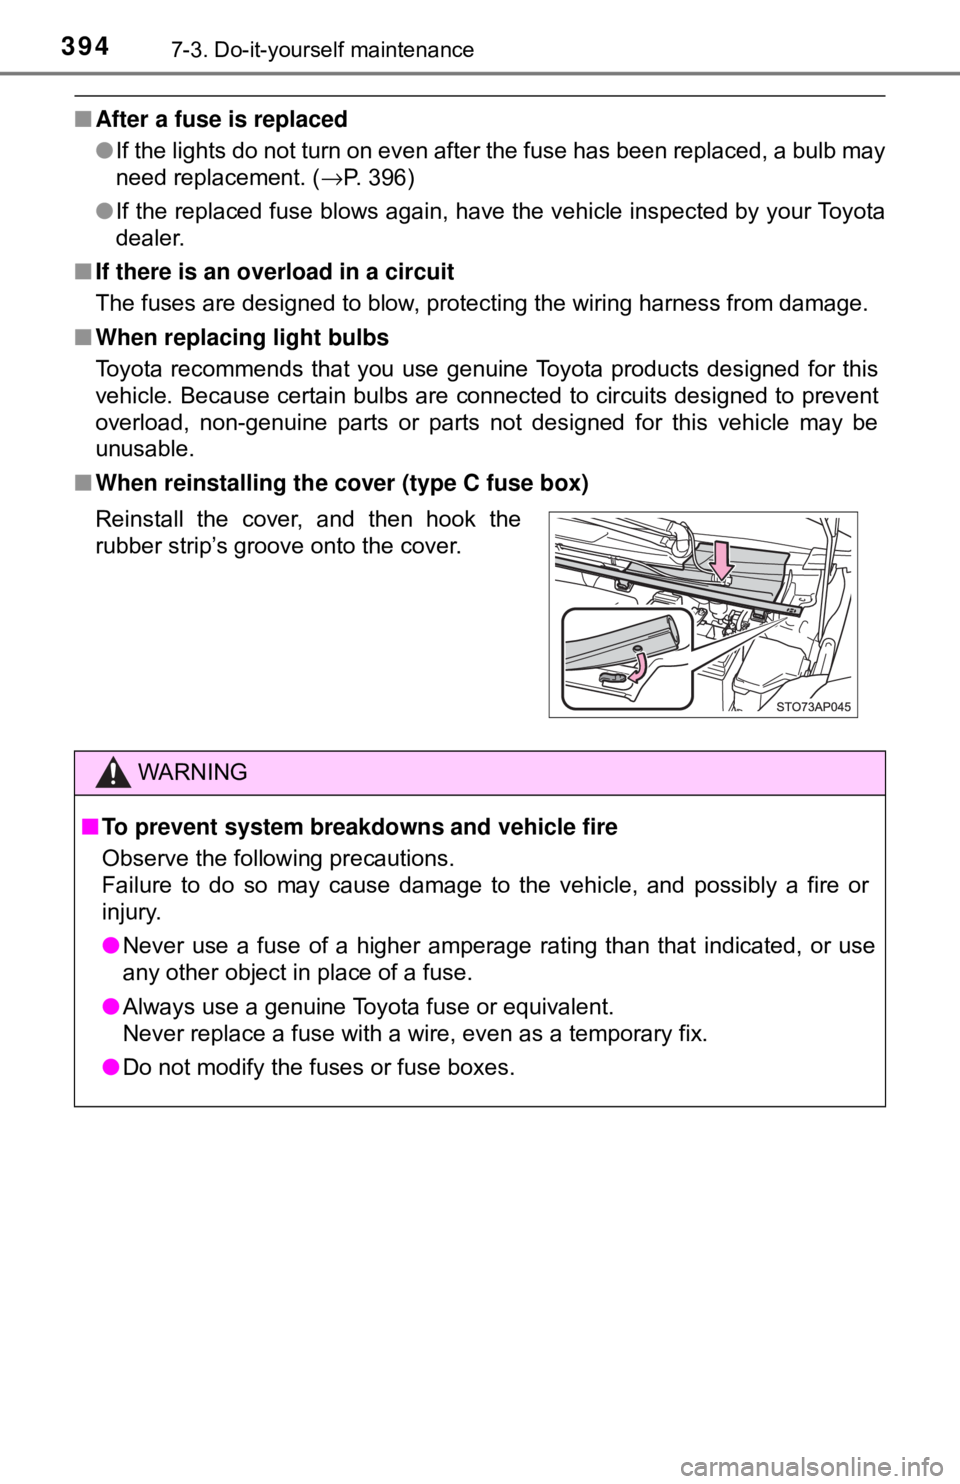
■ When reinstalling the cover (type C fuse box)
Reinstall the cover, and then hook the
rubber strip’s groove onto the cover.
WARNING
■To prevent system breakdowns and vehicle fire
Observe the following precautions.
Failure to do so may cause damage to the vehicle, and possibly a fire or
injury.
● Never use a fuse of a higher amperage rating than that indicated, or use\
any other object in place of a fuse.
● Always use a genuine Toyota fuse or equivalent.
Never replace a fuse with a wire, even as a temporary fix.
● Do not modify the fuses or fuse boxes.
Page 396 of 520
3967-3. Do-it-yourself maintenance
Light bulbs
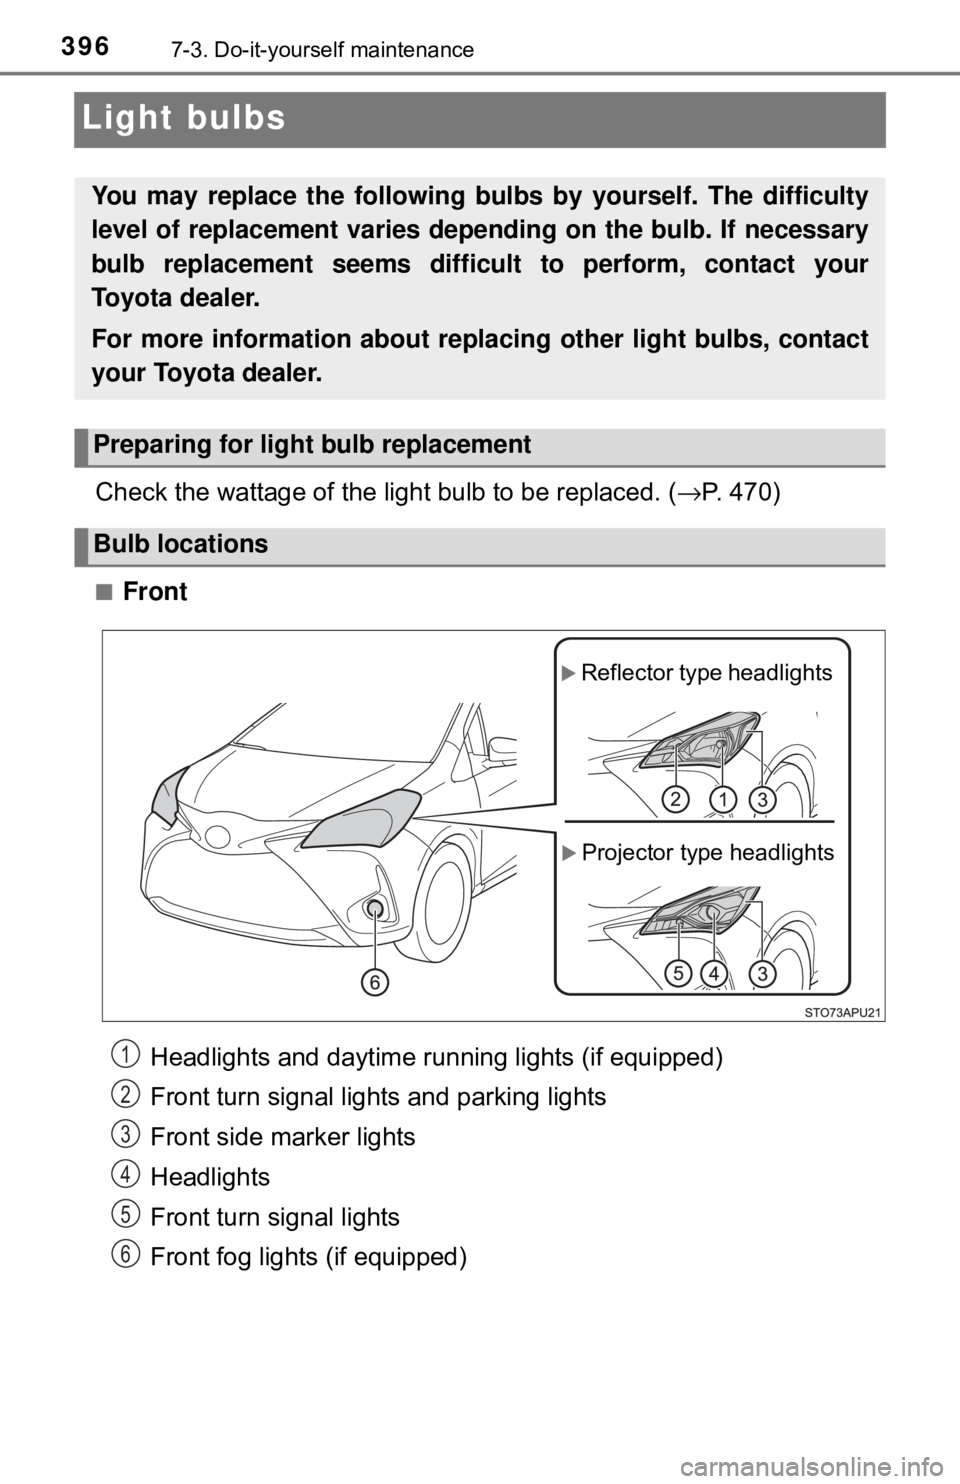
Check the wattage of the light bulb to be replaced. (→P. 470)
■Front
Headlights and daytime running lights (if equipped)
Front turn signal lights and parking lights
Front side marker lights
Headlights
Front turn signal lights
Front fog lights (if equipped)
You may replace the following bulbs by yourself. The difficulty
level of replacement varies de pending on the bulb. If necessary
bulb replacement seems difficul t to perform, contact your
Toyota dealer.
For more information about replacing other light bulbs, contact
your Toyota dealer.
Preparing for light bulb replacement
Bulb locations
Projector type headlights
Reflector type headlights
1
2
3
4
5
6
Page 397 of 520
3977-3. Do-it-yourself maintenance
7
Maintenance and care
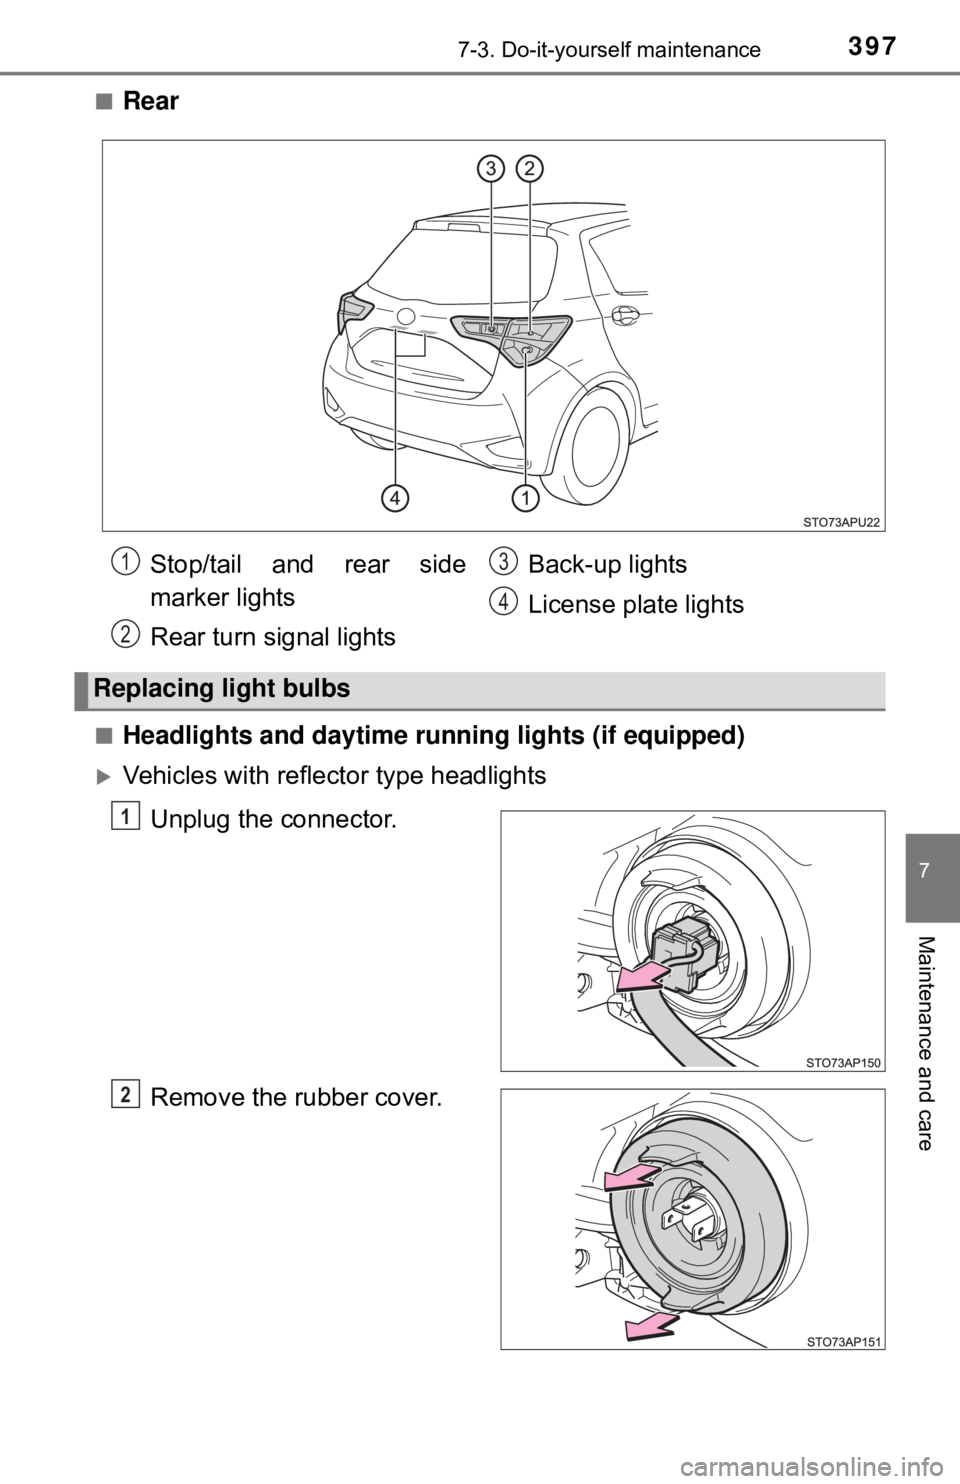
■Rear
■Headlights and daytime running lights (if equipped)
Vehicles with reflector type headlightsUnplug the connector.
Remove the rubber cover.
Stop/tail and rear side
marker lights
Rear turn signal lights Back-up lights
License plate lights
Replacing light bulbs
1
2
3
4
1
2
Page 398 of 520
3987-3. Do-it-yourself maintenance
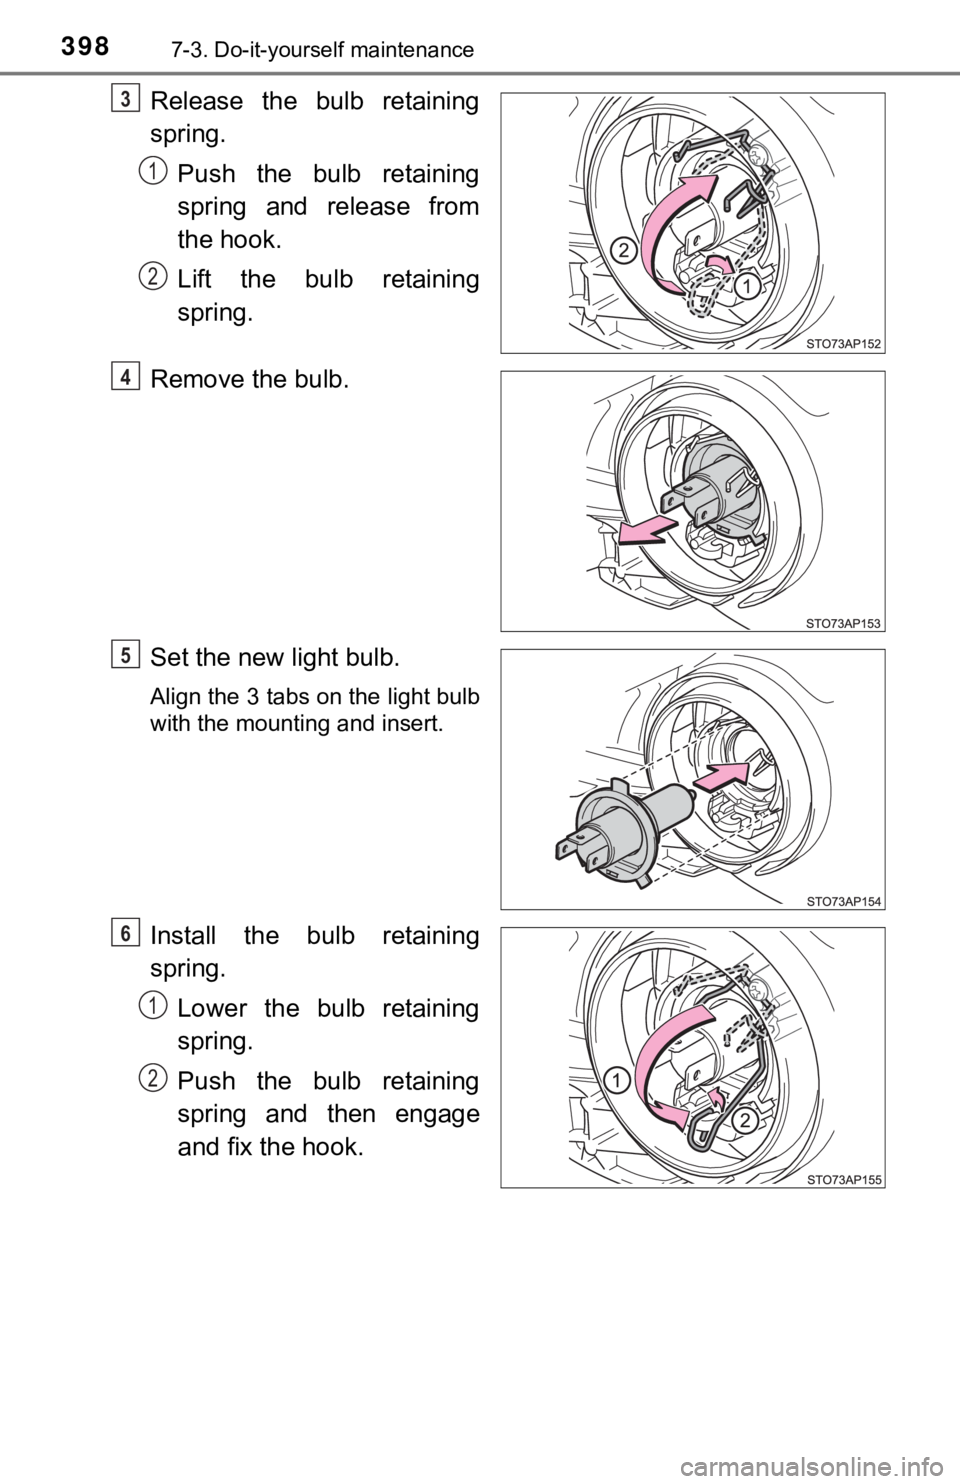
Release the bulb retaining
spring.Push the bulb retaining
spring and release from
the hook.
Lift the bulb retaining
spring.
Remove the bulb.
Set the new light bulb.
Align the 3 tabs on the light bulb
with the mounting and insert.
Install the bulb retaining
spring. Lower the bulb retaining
spring.
Push the bulb retaining
spring and then engage
and fix the hook.
3
1
2
4
5
6
1
2
Page 399 of 520
3997-3. Do-it-yourself maintenance
7
Maintenance and care
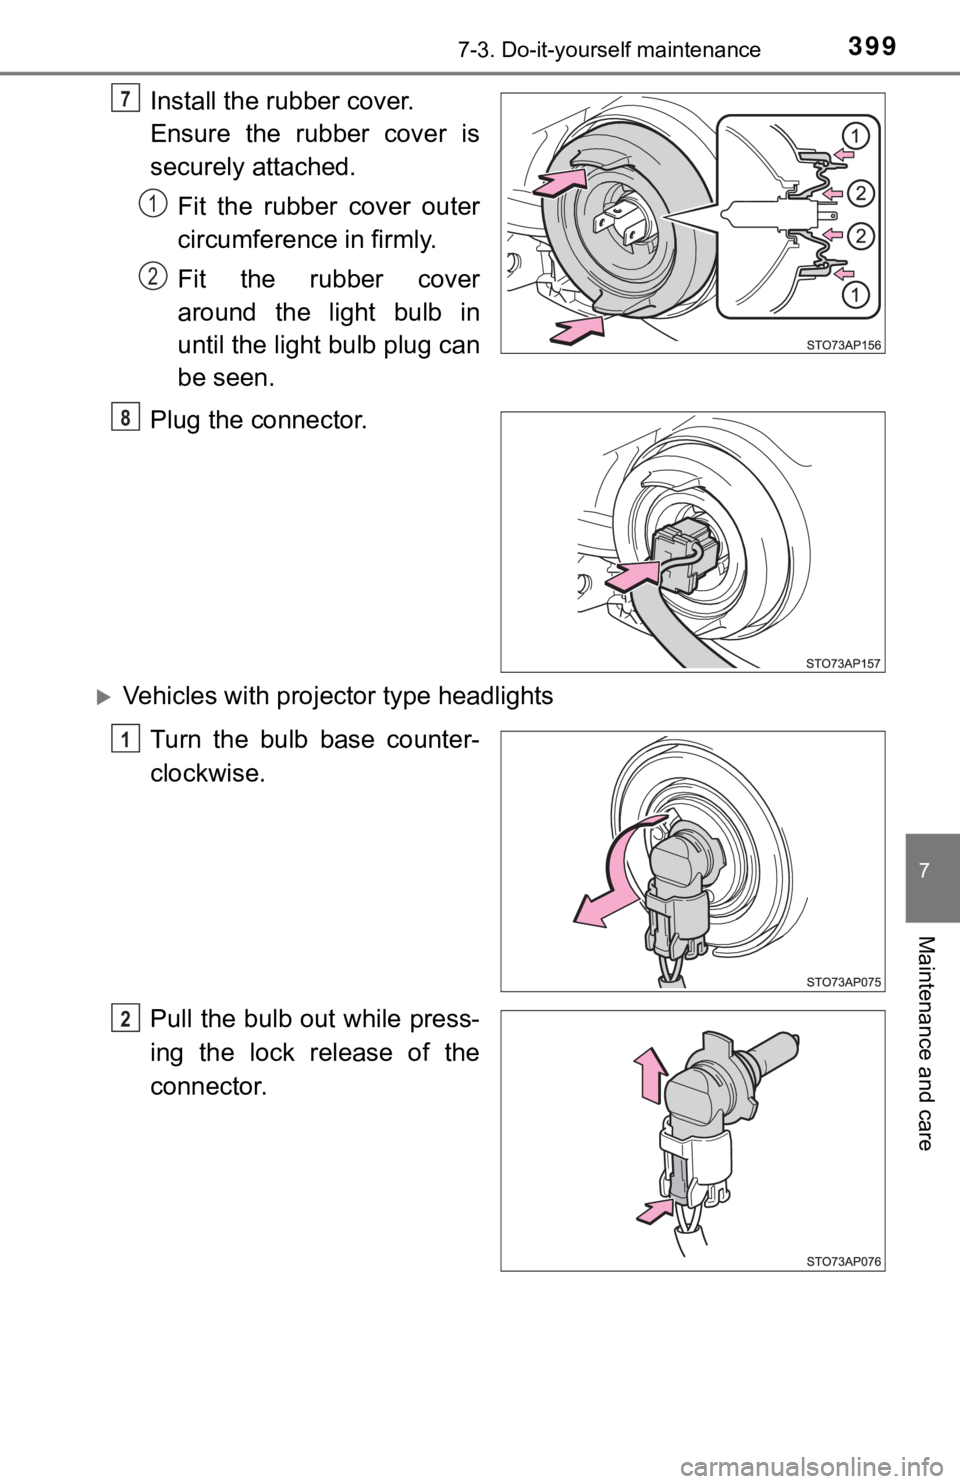
Install the rubber cover.
Ensure the rubber cover is
securely attached.Fit the rubber cover outer
circumference in firmly.
Fit the rubber cover
around the light bulb in
until the light bulb plug can
be seen.
Plug the connector.
Vehicles with proj ector type headlights
Turn the bulb base counter-
clockwise.
Pull the bulb out while press-
ing the lock release of the
connector.
7
1
2
8
1
2