seat adjustment TOYOTA YARIS LIFTBACK 2020 Owners Manual (in English)
[x] Cancel search | Manufacturer: TOYOTA, Model Year: 2020, Model line: YARIS LIFTBACK, Model: TOYOTA YARIS LIFTBACK 2020Pages: 520, PDF Size: 8.71 MB
Page 1 of 520
Pictorial indexSearch by illustration
1For safety
and securityMake sure to read through them
2Instrument
clusterHow to read the gauges and meters, the variety of
warning lights and indicators, etc.
3
Operation of
each
componentOpening and closing the doors and windows,
adjustment before driving, etc.
4DrivingOperations and advices which are necessary for
driving
5Multimedia
systemOperating the multimedia system
6Interior featuresUsage of the interior features, etc.
7Maintenance
and careCaring for your vehicle and maintenance
procedures
8When trouble
arisesWhat to do in case of malfunction or emergency
9Vehicle
specificationsVehicle specifications, customizable features, etc.
10For ownersReporting safety defects for U.S. owners, and seat
belt and SRS airbag instructions for Canadian
owners
IndexSearch by symptom
Search alphabetically
Page 27 of 520

271-1. For safe use
1
For safety and security
WARNING
Observe the following precautions.
Failure to do so may result in death or serious injury.
●Do not adjust the position of the driver’s seat while driving.
Doing so could cause the driver to lose control of the vehicle.
● Do not place a cushion between the driver or passenger and the seatback.
A cushion may prevent correct posture from being achieved, and reduce
the effectiveness of the seat belt and head restraint.
● Do not place anything under the front seats.
Objects placed under the front seats may become jammed in the seat
tracks and stop the seat from locking in place. This may lead to an acci-
dent and the adjustment mechanism may also be damaged.
● Always observe the legal speed limit when driving on public roads.
● When driving over long distances, take regular breaks before you start to
feel tired.
Also, if you feel tired or sleepy while driving, do not force yourself to con-
tinue driving and take a break immediately.
Page 64 of 520
641-2. Child safety
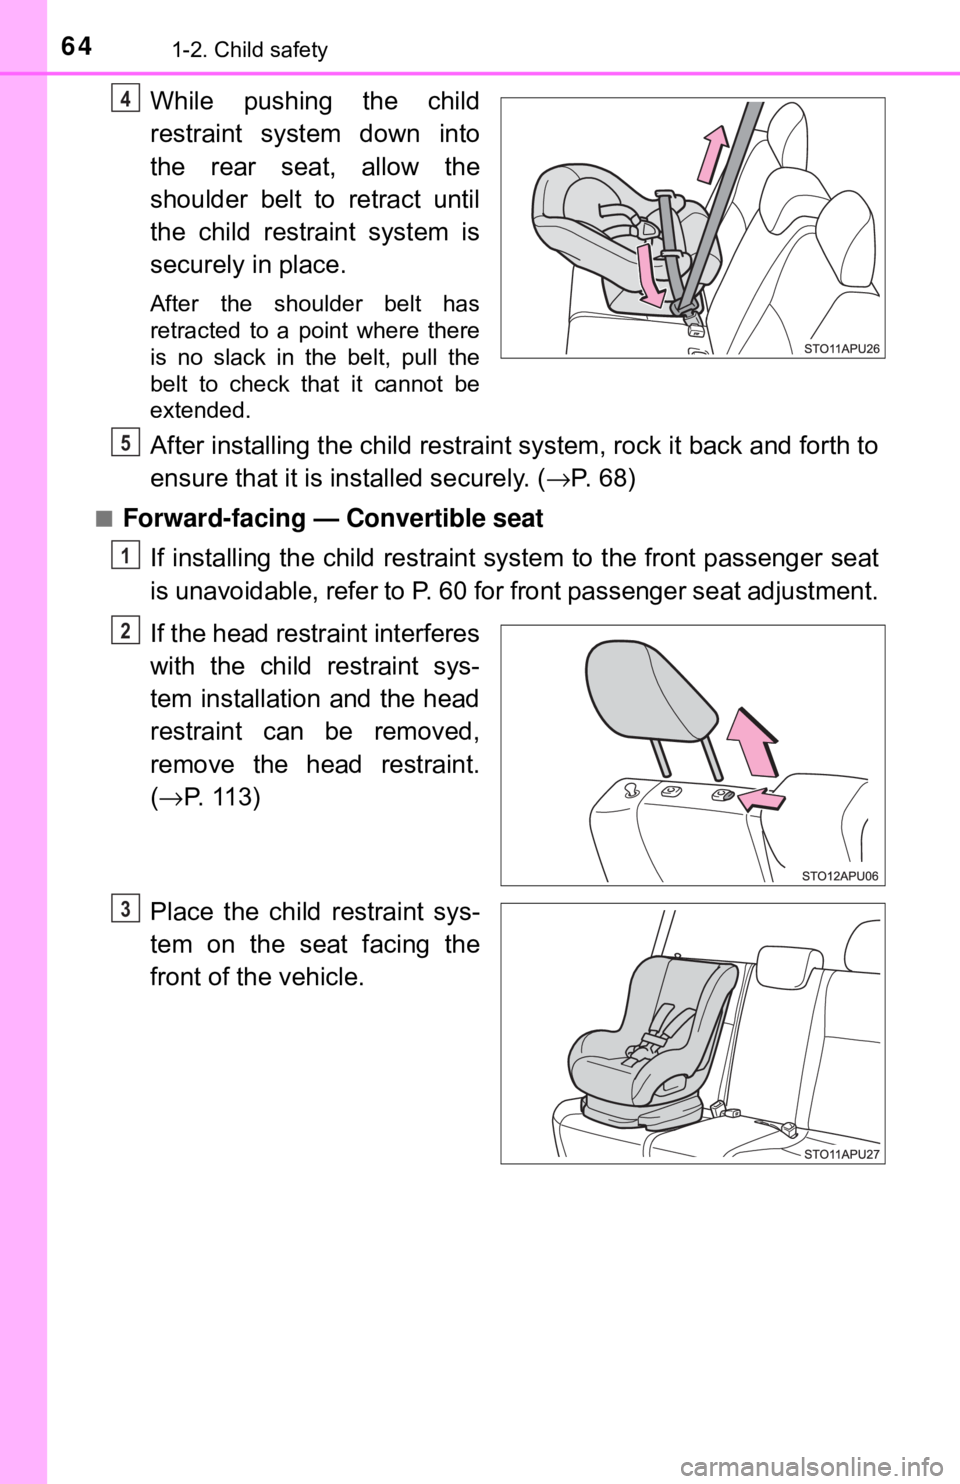
While pushing the child
restraint system down into
the rear seat, allow the
shoulder belt to retract until
the child restraint system is
securely in place.
After the shoulder belt has
retracted to a point where there
is no slack in the belt, pull the
belt to check that it cannot be
extended.
After installing the child restraint system, rock it back and forth to
ensure that it is installed securely. ( →P. 68)
■Forward-facing — Convertible seat
If installing the child restraint system to the front passenger seat
is unavoidable, refer to P. 60 for front passenger seat adjustment.
If the head restraint interferes
with the child restraint sys-
tem installation and the head
restraint can be removed,
remove the head restraint.
( → P. 113)
Place the child restraint sys-
tem on the seat facing the
front of the vehicle.
4
5
1
2
3
Page 66 of 520
661-2. Child safety
■Booster seatIf installing the child restraint system to the front passenger seat
is unavoidable, refer to P. 60 for front passenger seat adjustment.
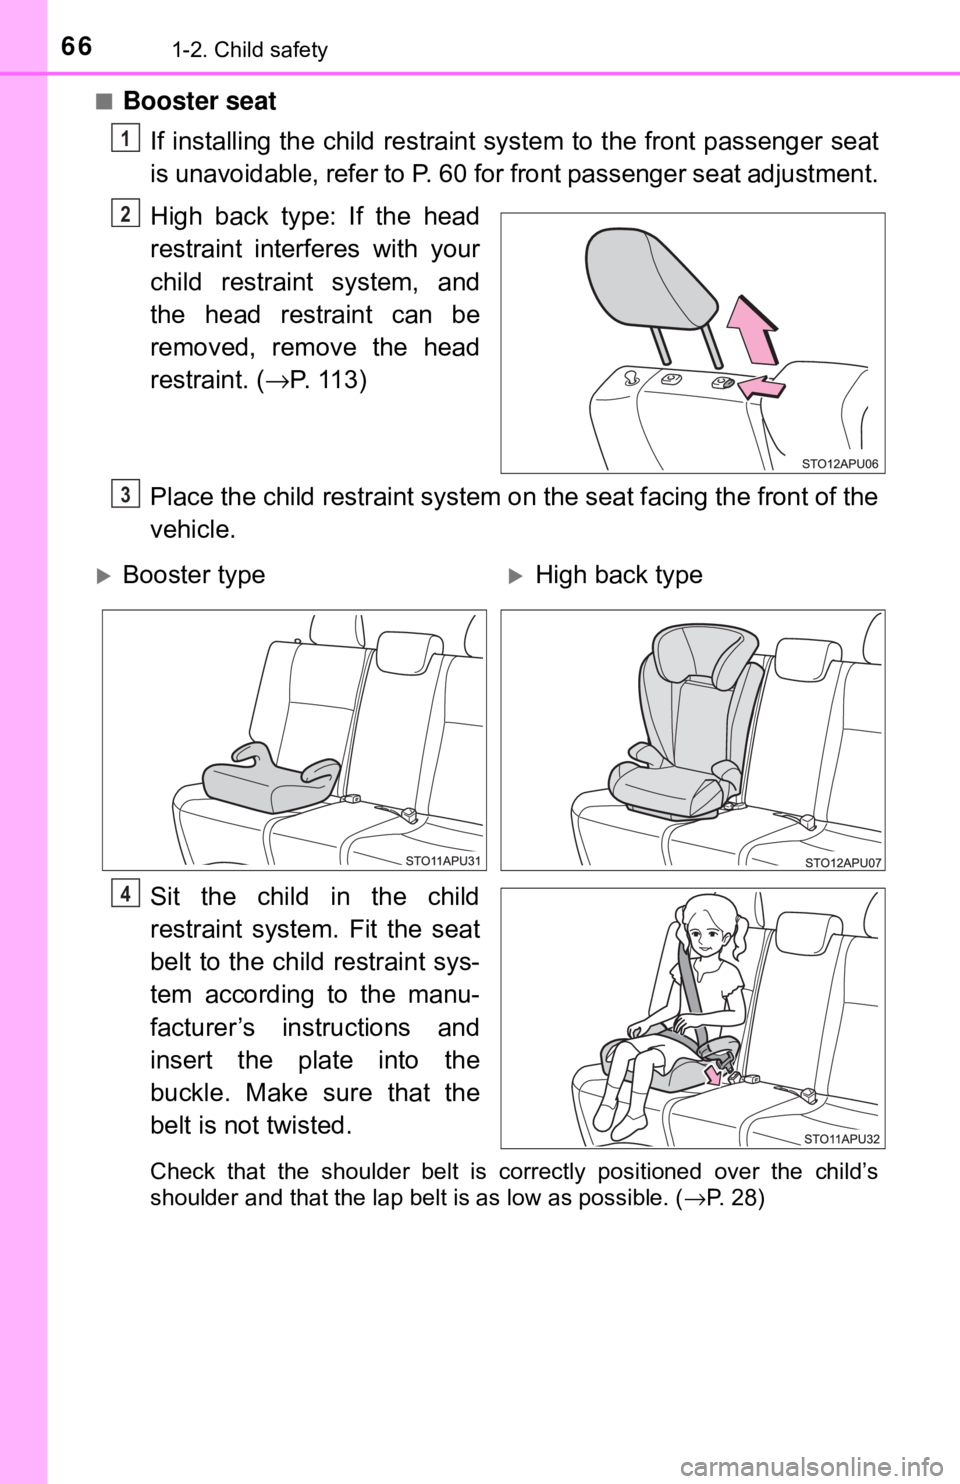
High back type: If the head
restraint interferes with your
child restraint system, and
the head restraint can be
removed, remove the head
restraint. ( →P. 11 3 )
Place the child restraint system on the seat facing the front of the
vehicle.
Sit the child in the child
restraint system. Fit the seat
belt to the child restraint sys-
tem according to the manu-
facturer’s instructions and
insert the plate into the
buckle. Make sure that the
belt is not twisted.
Check that the shoulder belt is correctly positioned over the child’s
shoulder and that the lap belt is as low as possible. ( →P. 28)
1
2
3
Booster typeHigh back type
4
Page 106 of 520
1063-3. Adjusting the seats
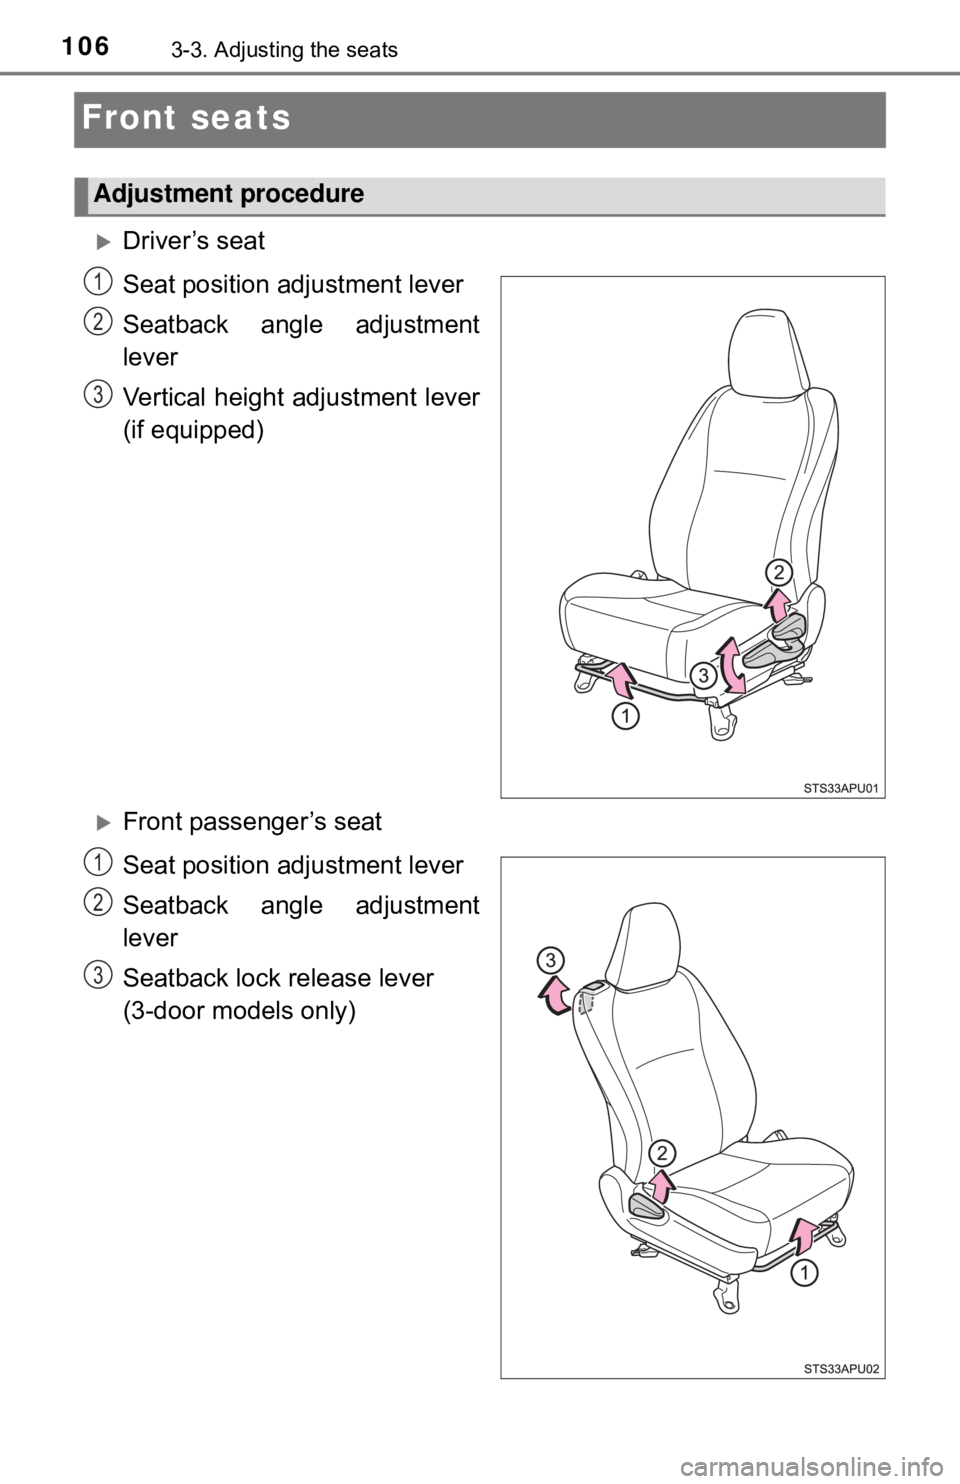
Front seats
Driver’s seat
Seat position adjustment lever
Seatback angle adjustment
lever
Vertical height adjustment lever
(if equipped)
Front passenger’s seat
Seat position ad justment lever
Seatback angle adjustment
lever
Seatback lock release lever
(3-door models only)
Adjustment procedure
1
2
3
1
2
3
Page 107 of 520
1073-3. Adjusting the seats
3
Operation of each component
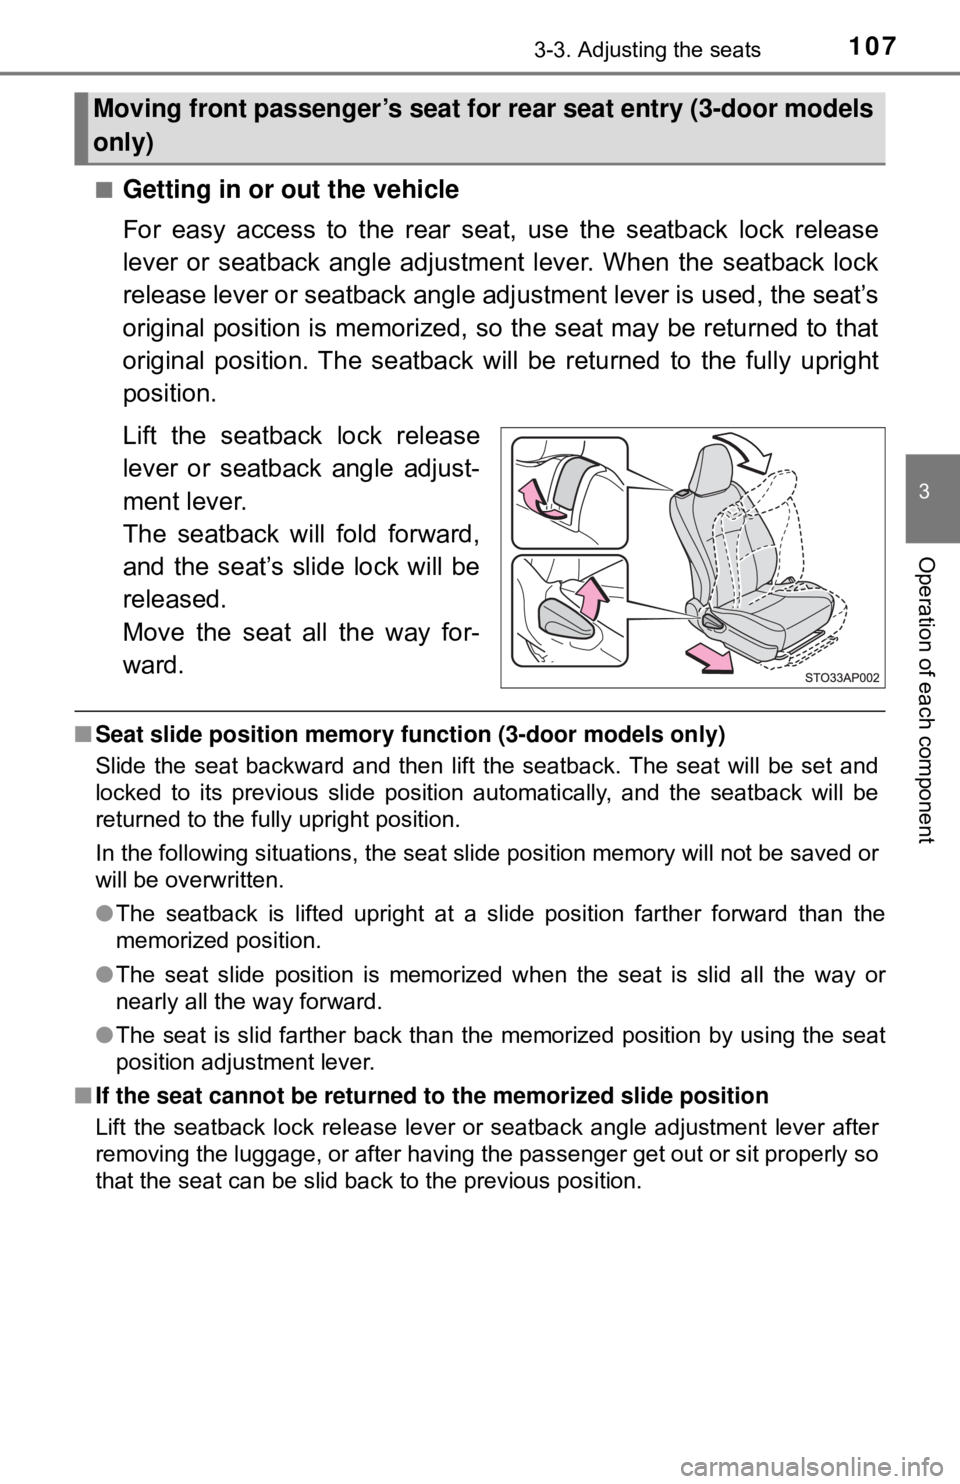
■Getting in or out the vehicle
For easy access to the rear seat, use the seatback lock release
lever or seatback angle adjustment lever. When the seatback lock
release lever or seatback angle adj ustment lever is used, the seat’s
original position is memorized, so the seat may be returned to that
original position. The seatback will be returned to the fully upright
position.
Lift the seatback lock release
lever or seatback angle adjust-
ment lever.
The seatback will fold forward,
and the seat’s slide lock will be
released.
Move the seat all the way for-
ward.
■ Seat slide position memory fu nction (3-door models only)
Slide the seat backward and then lift the seatback. The seat will be set and
locked to its previous slide position automatically, and the seatback will be
returned to the fully upright position.
In the following situations, the seat slide position memory will not be saved or
will be overwritten.
● The seatback is lifted upright at a slide position farther forward than the
memorized position.
● The seat slide position is memorized when the seat is slid all the way or
nearly all the way forward.
● The seat is slid farther back than the memorized position by using the seat
position adjustment lever.
■ If the seat cannot be returned to the memorized slide position
Lift the seatback lock release lever or seatback angle adjustment lever after
removing the luggage, or after having the passenger get out or sit properly so
that the seat can be slid back to the previous position.
Moving front passenger’s seat for rear seat entry (3-door models
only)
Page 108 of 520
1083-3. Adjusting the seats
WARNING
■When adjusting the seat position
● Take care when adjusting the seat position to ensure that other passen-
gers are not injured by the moving seat.
● Do not put your hands under the seat or near the moving parts to avoid
injury.
Fingers or hands may become jammed in the seat mechanism.
■ Seat adjustment
● Be careful that the seat does not hit passenger or luggage.
● To reduce the risk of sliding under the lap belt during a collision, do not
recline the seat more than necessary.
If the seat is too reclined, the lap belt may slide past the hips and apply
restraint forces directly to the abdomen, or your neck may contact the
shoulder belt, increasing the risk of death or serious injury in the event of
an accident.
Adjustments should not be made while driving as the seat may unexpect-
edly move and cause the driver to lose control of the vehicle.
● After adjusting the seat, make sure that the seat is locked in position.
● Never allow anyone to touch seatback lock release levers while the vehi-
cle is moving.
● If anyone is in the vicinity, make sure they are clear of the seat back path
and let them know that the seat is about to move.
■ After returning the seatback to the upright position
Make sure the seatback is securely locked by pushing it forward and rear-
ward. Failure to do so may result in death or serious injury.
NOTICE
■ To prevent the seat lock mechanism malfunction
Do not use the seatback angle adjustment lever and seatback lock release
lever at the same time. If they are used together, the seat lock mechanism
may be damaged.
Page 114 of 520
1143-3. Adjusting the seats
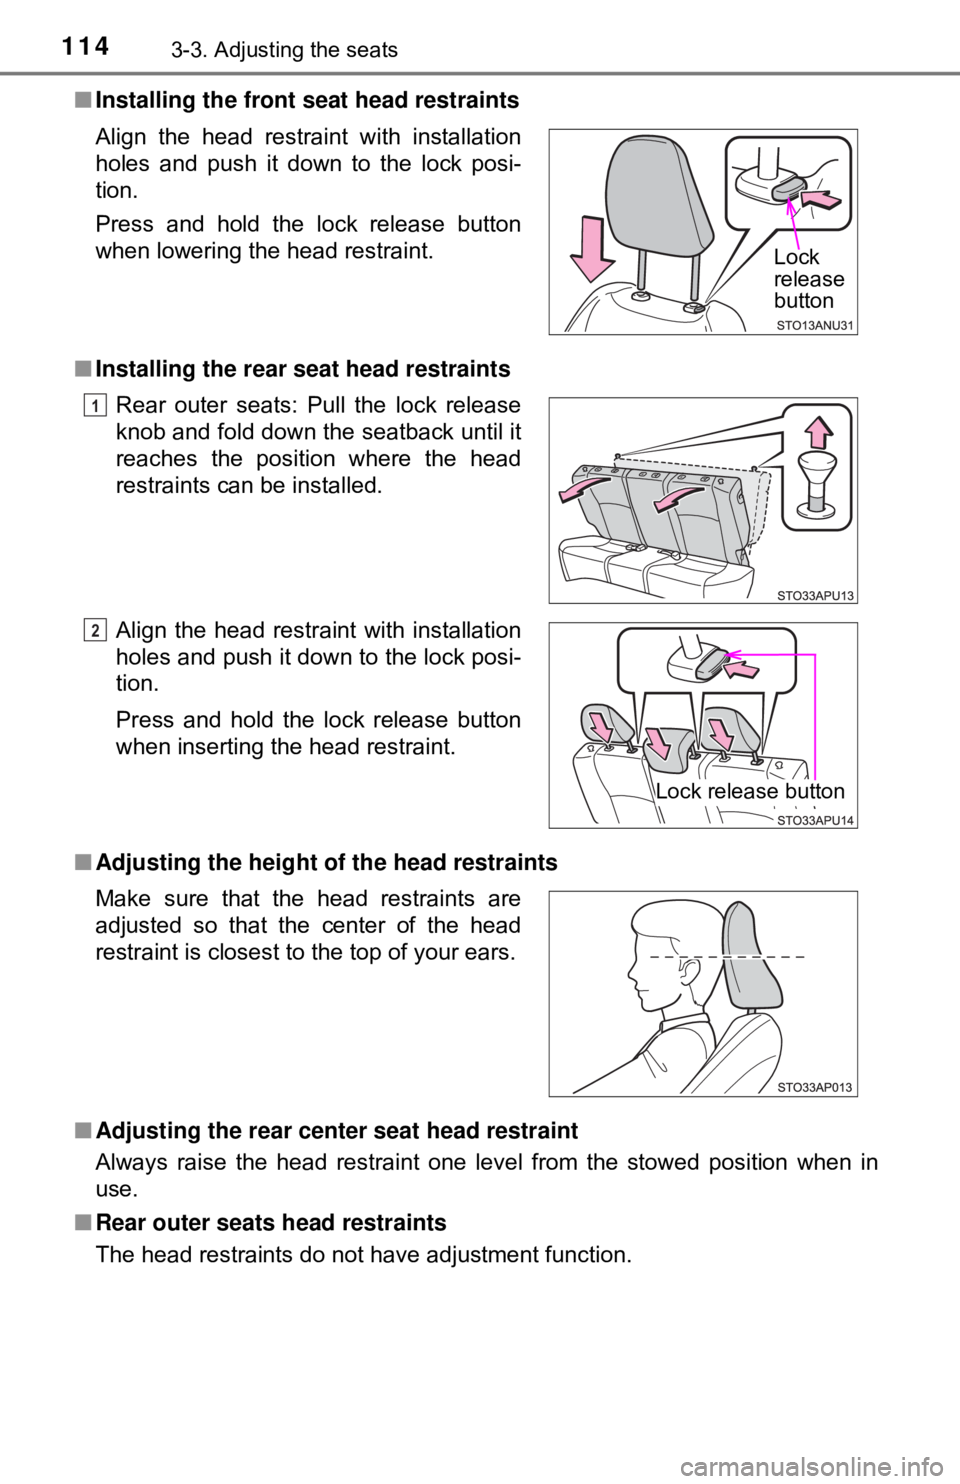
■Installing the front seat head restraints
■ Installing the rear seat head restraints
■ Adjusting the height of the head restraints
■ Adjusting the rear center seat head restraint
Always raise the head restraint one level from the stowed position when in
use.
■ Rear outer seats head restraints
The head restraints do not have adjustment function. Align the head restraint with installation
holes and push it down to the lock posi-
tion.
Press and hold the lock release button
when lowering the head restraint.
Rear outer seats: Pull the lock release
knob and fold down the seatback until it
reaches the position where the head
restraints can be installed.
Align the head restraint with installation
holes and push it down to the lock posi-
tion.
Press and hold the lock release button
when inserting the head restraint.
Make sure that the head restraints are
adjusted so that the center of the head
restraint is closest to the top of your ears.
Lock
release
button
1
2
Lock release button
Page 430 of 520
4308-2. Steps to take in an emergency
■If the tire pressure warning light frequently comes on after blinking
for 1 minute (vehicles with a tire pressure warning system)
If the tire pressure warning light frequently comes on after blinking for
1 minute when the engine switch is turned to the “ON” position, have it
checked by your Toyota dealer.
■ Customization that can be co nfigured at Toyota dealer
The vehicle speed linked seat belt reminder buzzer can be disabled.
(Customizable features →P. 488) However, Toyota recommends that the seat
belt reminder buzzer be operational to alert the driver and front passenger
when seat belts are not fastened.
WARNING
■ If both the ABS and the brake system warning lights remain on
Stop your vehicle in a safe place immediately and contact your Toyota
dealer. The vehicle will become extremely unstable during braking, and the
ABS system may fail, which could cause an accident resulting in death or
serious injury.
■ When the electric power steerin g system warning light comes on
The steering wheel may become extremely heavy.
When steering wheel operations are heavier than usual, grip the steering
wheel firmly and operate it using more force than usual.
■
If the tire pressure warning light comes on (vehicles with a tire
pressure warning system)
Be sure to observe the following precautions. Failure to do so could
cause a loss of vehicle control and result in death or serious injury.
●Stop your vehicle in a safe place as soon as possible. Adjust the tire
inflation pressure immediately.
●If the tire pressure warning light co mes on even after tire inflation pres-
sure adjustment, it is probable that you have a flat tire. Check the tires.
If a tire is flat, change it with the spare tire and have the flat tire
repaired by the nearest Toyota dealer.
●Avoid abrupt maneuvering and braking. If the vehicle tires deteriorate,
you could lose control of the steering wheel or the brakes.
■If a blowout or sudden air leakage should occur (vehicles with a tire
pressure warning system)
The tire pressure warning system may not activate immediately.
Page 513 of 520
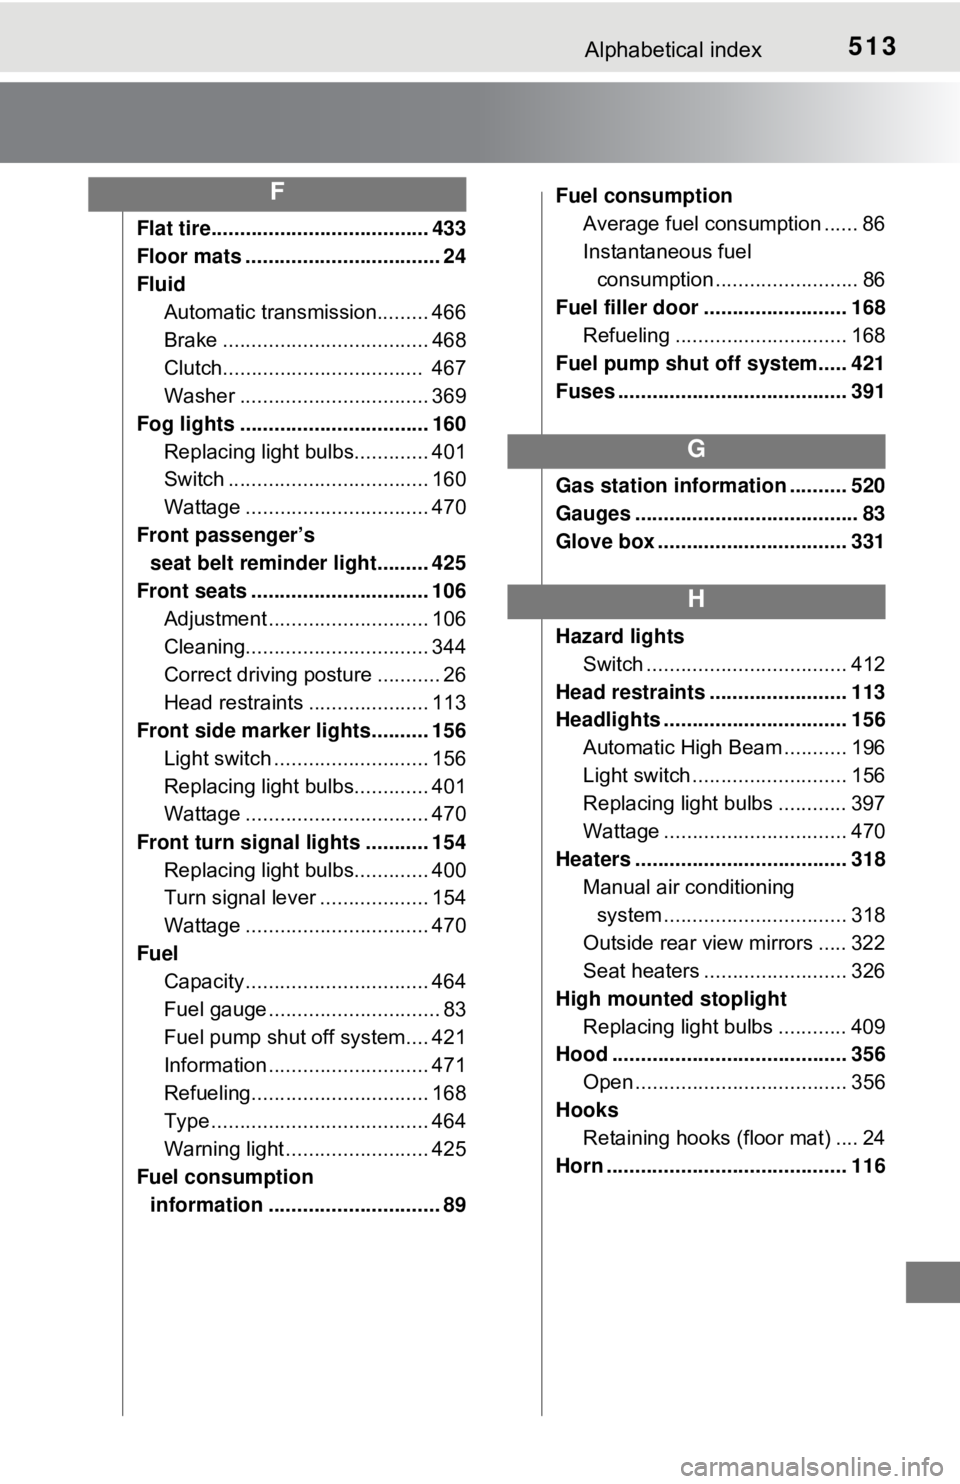
513Alphabetical index
Flat tire...................................... 433
Floor mats .................................. 24
FluidAutomatic transmission......... 466
Brake .................................... 468
Clutch................................... 467
Washer ................................. 369
Fog lights ................................. 160 Replacing light bulbs............. 401
Switch ................................... 160
Wattage ................................ 470
Front passenger’s seat belt reminder light......... 425
Front seats ............................... 106 Adjustment ............................ 106
Cleaning................................ 344
Correct driving posture ........... 26
Head restraints ..................... 113
Front side marker lights.......... 156
Light switch ........................... 156
Replacing light bulbs............. 401
Wattage ................................ 470
Front turn signal lights ........... 154 Replacing light bulbs............. 400
Turn signal lever ................... 154
Wattage ................................ 470
Fuel Capacity ................................ 464
Fuel gauge .............................. 83
Fuel pump shut off system.... 421
Information ............................ 471
Refueling............................... 168
Type ...................................... 464
Warning light ......................... 425
Fuel consumption information .............................. 89 Fuel consumption
Average fuel consumption ...... 86
Instantaneous fuel consumption ......................... 86
Fuel filler door ......................... 168 Refueling .............................. 168
Fuel pump shut off system..... 421
Fuses ........................................ 391
Gas station information .......... 520
Gauges ....................................... 83
Glove box ................................. 331
Hazard lights
Switch ................................... 412
Head restraints ........................ 113
Headlights ................................ 156 Automatic High Beam ........... 196
Light switch ........................... 156
Replacing light bulbs ............ 397
Wattage ................................ 470
Heaters ..................................... 318 Manual air conditioning
system .......... ...................... 318
Outside rear view mirrors ..... 322
Seat heaters ......................... 326
High mounted stoplight Replacing light bulbs ............ 409
Hood ......................................... 356
Open ..................................... 356
Hooks Retaining hooks (floor mat) .... 24
Horn .......................................... 116
F
G
H