ESP VAUXHALL ADAM 2014.5 User Guide
[x] Cancel search | Manufacturer: VAUXHALL, Model Year: 2014.5, Model line: ADAM, Model: VAUXHALL ADAM 2014.5Pages: 217, PDF Size: 6.68 MB
Page 102 of 217

100Instruments and controls
driver's door or the whole vehicle
whilst unlocking.
Auto relock doors : Activates or
deactivates the automatic relock
function after unlocking without opening the vehicle.
■ Restore factory settings :
Resets all settings to the default settings.
Personal settings in the
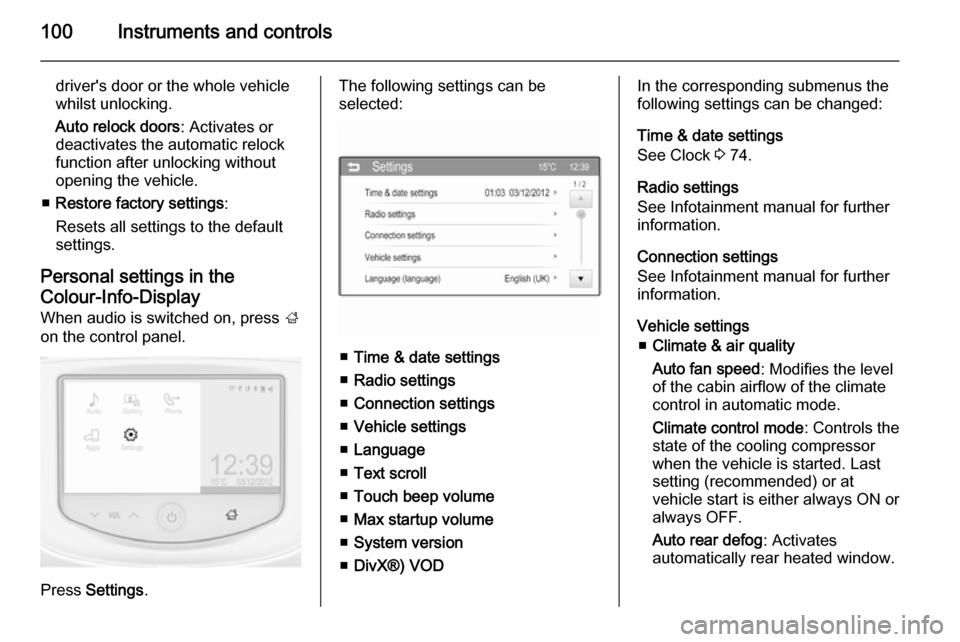
Colour-Info-Display When audio is switched on, press ;
on the control panel.
Press Settings .
The following settings can be
selected:
■ Time & date settings
■ Radio settings
■ Connection settings
■ Vehicle settings
■ Language
■ Text scroll
■ Touch beep volume
■ Max startup volume
■ System version
■ DivX®) VOD
In the corresponding submenus the
following settings can be changed:
Time & date settings
See Clock 3 74.
Radio settings
See Infotainment manual for further information.
Connection settings
See Infotainment manual for further
information.
Vehicle settings ■ Climate & air quality
Auto fan speed : Modifies the level
of the cabin airflow of the climate
control in automatic mode.
Climate control mode : Controls the
state of the cooling compressor
when the vehicle is started. Last
setting (recommended) or at
vehicle start is either always ON or
always OFF.
Auto rear defog : Activates
automatically rear heated window.
Page 107 of 217

Lighting105Turn and lane-change
signalslever up=right turn signallever down=left turn signal
If the lever is moved past the
resistance point, the turn signal is
switched on constantly. When the
steering wheel moves back, the turn
signal is automatically deactivated.
For three flashes, e.g. when changing lanes, press the lever until resistance
is felt and then release.
Move the lever to the resistance point
and hold for longer indication.
Switch the turn signal off manually by moving the lever to its original
position.
Rear fog lights
Operated by pushing the r button.
Light switch in position AUTO:
switching on rear fog light will switch
on headlights automatically.
Parking lights
When the vehicle is parked, the
parking lights on one side can be
activated:
1. Switch off ignition.
2. Move turn signal lever all the way up (right parking lights) or down
(left parking lights).
Confirmed by a signal and the
corresponding turn signal control
indicator.
Page 120 of 217

118Climate control
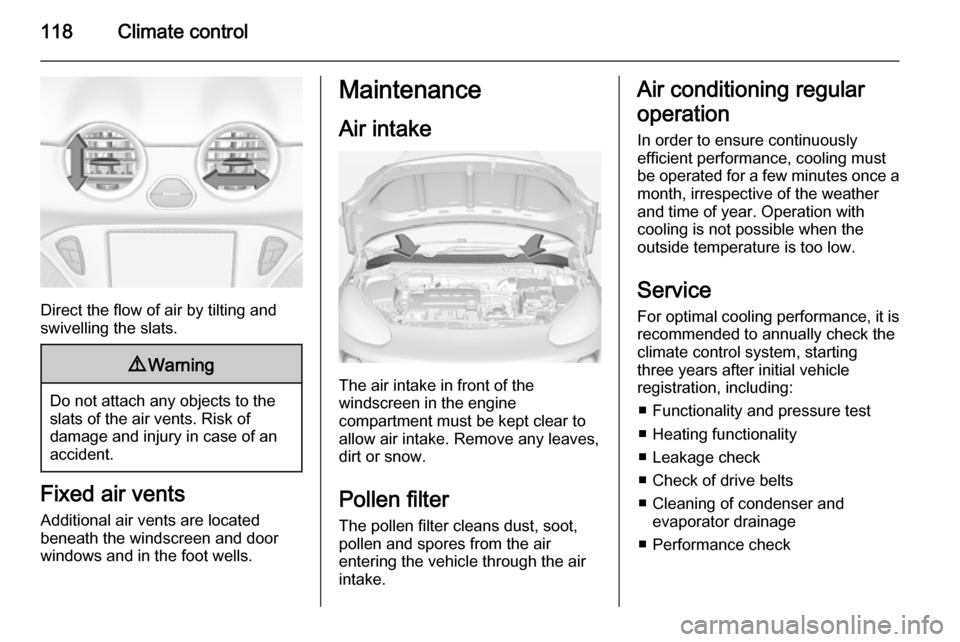
Direct the flow of air by tilting and
swivelling the slats.
9 Warning
Do not attach any objects to the
slats of the air vents. Risk of
damage and injury in case of an
accident.
Fixed air vents
Additional air vents are located
beneath the windscreen and door windows and in the foot wells.
Maintenance
Air intake
The air intake in front of the
windscreen in the engine
compartment must be kept clear to
allow air intake. Remove any leaves,
dirt or snow.
Pollen filter
The pollen filter cleans dust, soot,
pollen and spores from the air
entering the vehicle through the air
intake.
Air conditioning regular
operation In order to ensure continuously
efficient performance, cooling must
be operated for a few minutes once a
month, irrespective of the weather
and time of year. Operation with
cooling is not possible when the
outside temperature is too low.
Service
For optimal cooling performance, it is recommended to annually check the
climate control system, starting
three years after initial vehicle
registration, including:
■ Functionality and pressure test■ Heating functionality
■ Leakage check
■ Check of drive belts
■ Cleaning of condenser and evaporator drainage
■ Performance check
Page 123 of 217

Driving and operating121
Possible reasons for a non-starting
engine:
■ Clutch pedal not operated
■ Timeout occurred
Turbo engine warm-up Upon start-up, engine available
torque may be limited for a short time, especially when the engine
temperature is cold. The limitation is
to allow the lubrication system to fully
protect the engine.
Overrun cut-off The fuel supply is automatically cut off
during overrun, i.e. when the vehicle
is driven with a gear engaged but accelerator is released.Stop-start system
The stop-start system helps to save
fuel and to reduce the exhaust
emissions. When conditions allow, it
switches off the engine as soon as the
vehicle is at a low speed or at a
standstill, e.g. at a traffic light or in a
traffic jam. It starts the engine
automatically as soon as the clutch is depressed. A vehicle battery sensor
ensures that an Autostop is only performed if the vehicle battery is
sufficiently charged for a restart.
Activation The stop-start system is available as
soon as the engine is started, the
vehicle starts-off and the conditions
as stated below in this section are
fulfilled.Deactivation
Deactivate the stop-start system
manually by pressing the eco button.
The deactivation is indicated when
the LED in the button extinguishes.
Autostop
If the vehicle is at a low speed or at a
standstill, activate an Autostop as
follows:
■ Depress the clutch pedal
■ set the lever in neutral
■ release the clutch pedal
The engine will be switched off while
the ignition stays on.
Page 127 of 217

Driving and operating125Caution
It is not advisable to drive with thehand resting on the selector lever.
Brakes
The brake system comprises two independent brake circuits.
If a brake circuit fails, the vehicle can
still be braked using the other brake
circuit. However, braking effect is
achieved only when the brake pedal
is depressed firmly. Considerably
more force is needed for this. The
braking distance is extended. Seek the assistance of a workshop before
continuing your journey.
When the engine is not running, the
support of the brake servo unit
disappears once the brake pedal has been depressed once or twice.
Braking effect is not reduced, but
braking requires significantly greater
force. It is especially important to bear
this in mind when being towed.
Control indicator R 3 84.
Antilock brake system
Antilock brake system (ABS)
prevents the wheels from locking.ABS starts to regulate brake pressure as soon as a wheel shows a tendency to lock. The vehicle remains
steerable, even during hard braking.
ABS control is made apparent
through a pulse in the brake pedal
and the noise of the regulation
process.
For optimum braking, keep the brake
pedal fully depressed throughout the
braking process, despite the fact that
the pedal is pulsating. Do not reduce
the pressure on the pedal.
After starting off the system performs a self-test which may be audible.
Control indicator u 3 84.
Adaptive brake light
During full braking, all three brake
lights flash for the duration of ABS
control.
Page 132 of 217

130Driving and operatingDriver assistance
systems9 Warning
Driver assistance systems are
developed to support the driver
and not to replace the driver's
attention.
The driver accepts full
responsibility when driving the
vehicle.
When using driver assistance
systems, always take care
regarding the current traffic
situation.
Cruise control
The Cruise control can store and
maintain speeds of approx. 20 to
120 mph. Deviations from the stored
speeds may occur when driving uphill or downhill.
For safety reasons the cruise controlcannot be activated until the foot
brake has been operated once.
Activating in first gear is not possible.
Do not use the cruise control if it is not advisable to maintain a constant
speed.
Control indicator m 3 86.
Switching on
Press button m, control indicator m in
instrument cluster illuminates white.
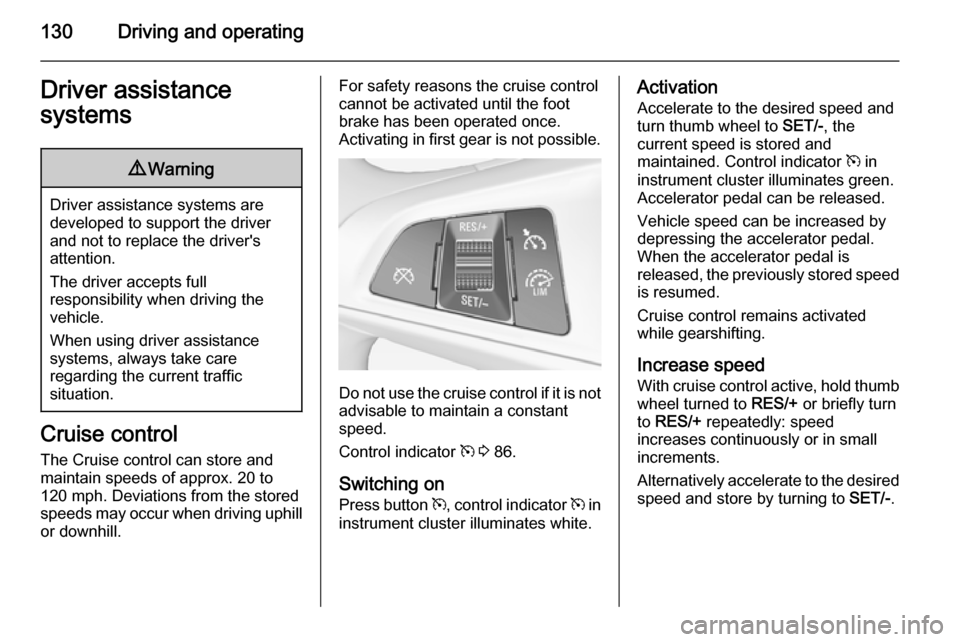
Activation
Accelerate to the desired speed and
turn thumb wheel to SET/-, the
current speed is stored and
maintained. Control indicator m in
instrument cluster illuminates green.
Accelerator pedal can be released.
Vehicle speed can be increased by
depressing the accelerator pedal.
When the accelerator pedal is
released, the previously stored speed
is resumed.
Cruise control remains activated
while gearshifting.
Increase speed With cruise control active, hold thumb
wheel turned to RES/+ or briefly turn
to RES/+ repeatedly: speed
increases continuously or in small
increments.
Alternatively accelerate to the desired speed and store by turning to SET/-.
Page 134 of 217

132Driving and operating
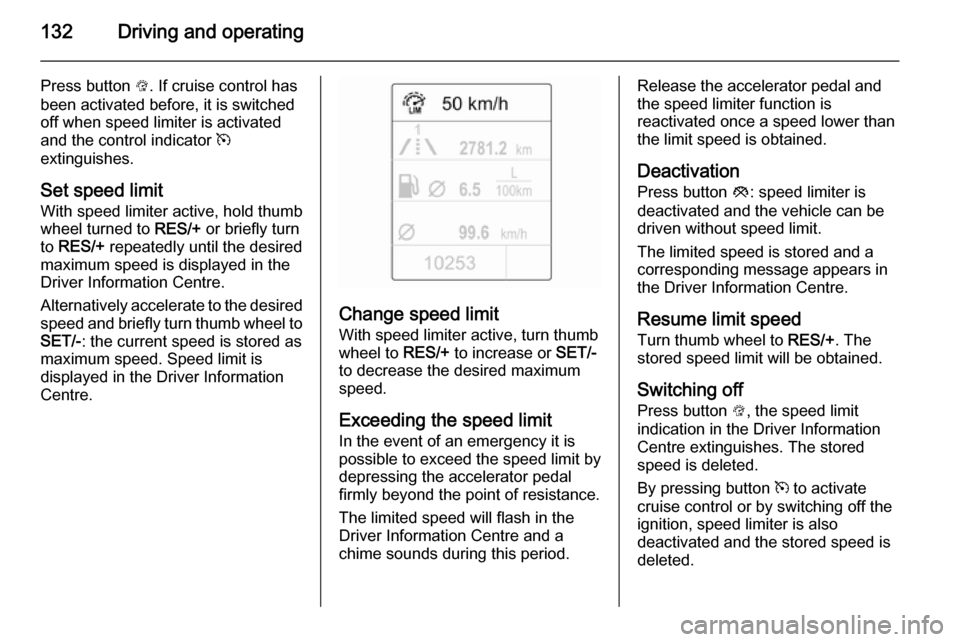
Press button L. If cruise control has
been activated before, it is switched
off when speed limiter is activated
and the control indicator m
extinguishes.
Set speed limit
With speed limiter active, hold thumb
wheel turned to RES/+ or briefly turn
to RES/+ repeatedly until the desired
maximum speed is displayed in the
Driver Information Centre.
Alternatively accelerate to the desired speed and briefly turn thumb wheel to
SET/- : the current speed is stored as
maximum speed. Speed limit is
displayed in the Driver Information
Centre.
Change speed limit
With speed limiter active, turn thumb
wheel to RES/+ to increase or SET/-
to decrease the desired maximum
speed.
Exceeding the speed limit
In the event of an emergency it is
possible to exceed the speed limit by
depressing the accelerator pedal firmly beyond the point of resistance.
The limited speed will flash in the
Driver Information Centre and a
chime sounds during this period.
Release the accelerator pedal and the speed limiter function is
reactivated once a speed lower than
the limit speed is obtained.
Deactivation
Press button y: speed limiter is
deactivated and the vehicle can be driven without speed limit.
The limited speed is stored and a
corresponding message appears in
the Driver Information Centre.
Resume limit speedTurn thumb wheel to RES/+. The
stored speed limit will be obtained.
Switching off
Press button L, the speed limit
indication in the Driver Information
Centre extinguishes. The stored
speed is deleted.
By pressing button m to activate
cruise control or by switching off the
ignition, speed limiter is also
deactivated and the stored speed is
deleted.
Page 135 of 217

Driving and operating133Parking assistRear parking assist9 Warning
It is the driver who bears full
responsibility for the parking
manoeuvre.
Always check the surrounding
area while reversing and using the rear parking assist system.
The rear parking assist makes
parking easier by measuring the
distance between the vehicle and
rear obstacles. It informs and warns
the driver by giving acoustic signals.
The system has four ultrasonic
parking sensors in the rear bumper.
Activation
When reverse gear is engaged, the
system is ready to operate
automatically.
An illuminated LED in the parking
assist button r indicates that the
system is ready to operate.
Indication
The system warns the driver with
acoustic signals against potentially
hazardous obstacles behind the
vehicle in a distance range up to
1.5 metre. The interval between the
sounds becomes shorter as the
vehicle gets closer to that obstacle.
When the distance is less than about
30 cm, the sound is continuous.
Deactivation
The system automatically switches
off when reverse gear is disengaged.
Manual deactivation is also possible
by pressing the parking assist button
r .
In both cases the LED in the button extinguishes.
Page 136 of 217

134Driving and operating
Fault
In the event of a fault or if the system does not work temporarily, e.g.
because of high external noise level
or other interference factors, the LED
in the button flashes for 3 seconds
and then extinguishes. Control
indicator r illuminates in the
instrument cluster 3 85 and a
message pops-up in the Driver
Information Centre.
Front-rear parking assist9 Warning
The driver bears full responsibility
for the parking manoeuvre.
Always check the surrounding
area when driving backwards or
forwards while using parking
assist system.
The front-rear parking assist
measures the distance between the
vehicle and obstacles in front and
behind the vehicle. The system gives acoustic signals and display
messages.
The system has six ultrasonic parking
sensors each in the rear and front
bumper.
It uses two different acoustic warning
signals for the front and rear
monitoring areas, each with a
different tone frequency.
Front-rear parking assist is always
combined with advanced parking
assist, see Advanced parking assist
section below.
Parking assist button and operation
logic
Front-rear parking assist and
advanced parking assist both use the same button for activation and
deactivation:
A brief press of button D activates
or deactivates the parking assist.
Long press of button D (approx. one
second) activates or deactivates the
advanced parking assist, see
separate description.
Page 137 of 217

Driving and operating135
Button logic operates the systems by
pressing as follows:
■ If only front-rear parking assist is active, a brief press deactivates
front-rear parking assist.
■ If only front-rear parking assist is active, long press activates
advanced parking assist.
■ If only advanced parking assist is active, a brief press activates front-
rear parking assist.
■ If only advanced parking assist is active, long press deactivates
advanced parking assist.
■ If forward gear or neutral is selected, a brief press activates ordeactivates only front parking
assist.
■ If reverse gear is selected, a brief press activates or deactivates frontand rear parking assist.
Operation
When reverse gear is engaged, the
front and rear parking assist is ready to operate.An illuminated LED in the parking
assist button D indicates that the
system is ready to operate.
The front parking assist can also be
activated at a speed up to 7 mph with
a brief press of the parking assist button.
If the D button is switched on once
within an ignition cycle, the front
parking assist is deactivated at a
speed above 7 mph. It will be
reactivated if vehicle speed has not
exceeded 16 mph beforehand. If
vehicle speed has exceeded 16 mph
beforehand, front parking assist
remains deactivated when speed
drops below 7 mph.
When the system is deactivated, the
LED in the button extinguishes and
Park Assist Off pops-up in the Driver
Information Centre.
The system is deactivated
automatically when exceeding
16 mph.Indication
The system warns the driver with acoustic signals against potentially
hazardous obstacles behind the
vehicle in a distance range up to
1.5 metres and in front up to
1.2 metres . Depending on which side
of the vehicle is closer to an obstacle,
you will hear acoustic warning signals in the vehicle on the respective side.
The interval between the sounds
becomes shorter as the vehicle gets closer to that obstacle. When the
distance is less than approx. 30 cm,
the sound is continuous.
Additionally the distance to obstacles
is shown in the Driver Information Centre 3 87 or, depending on the
version, on the Colour-Info-Display 3 91.