clock VAUXHALL ADAM 2015.5 User Guide
[x] Cancel search | Manufacturer: VAUXHALL, Model Year: 2015.5, Model line: ADAM, Model: VAUXHALL ADAM 2015.5Pages: 233, PDF Size: 6.98 MB
Page 170 of 233
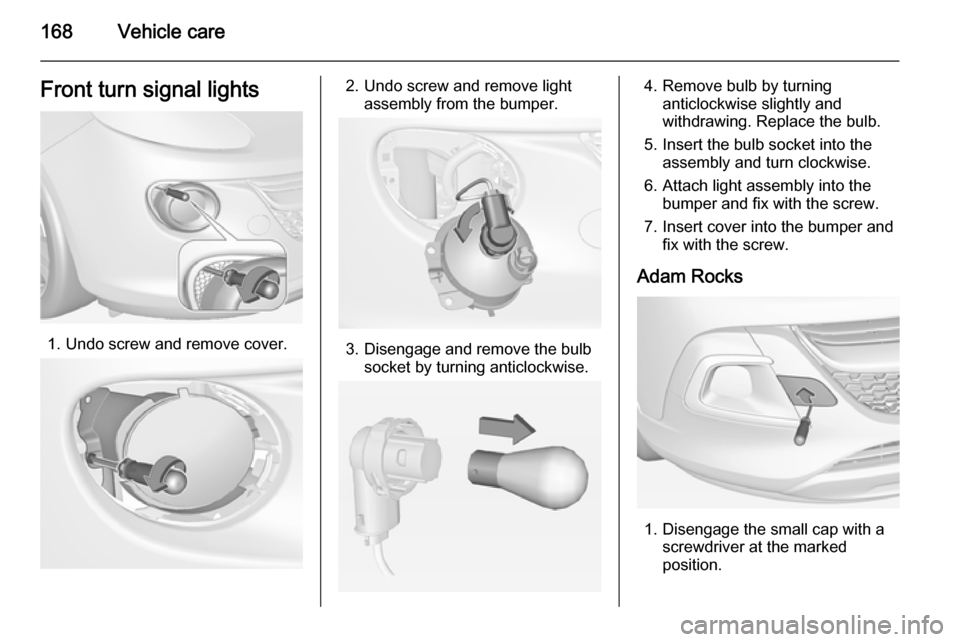
168Vehicle careFront turn signal lights
1. Undo screw and remove cover.
2. Undo screw and remove lightassembly from the bumper.
3. Disengage and remove the bulbsocket by turning anticlockwise.
4. Remove bulb by turninganticlockwise slightly and
withdrawing. Replace the bulb.
5. Insert the bulb socket into the assembly and turn clockwise.
6. Attach light assembly into the bumper and fix with the screw.
7. Insert cover into the bumper and fix with the screw.
Adam Rocks
1. Disengage the small cap with a screwdriver at the marked
position.
Page 171 of 233
Vehicle care169
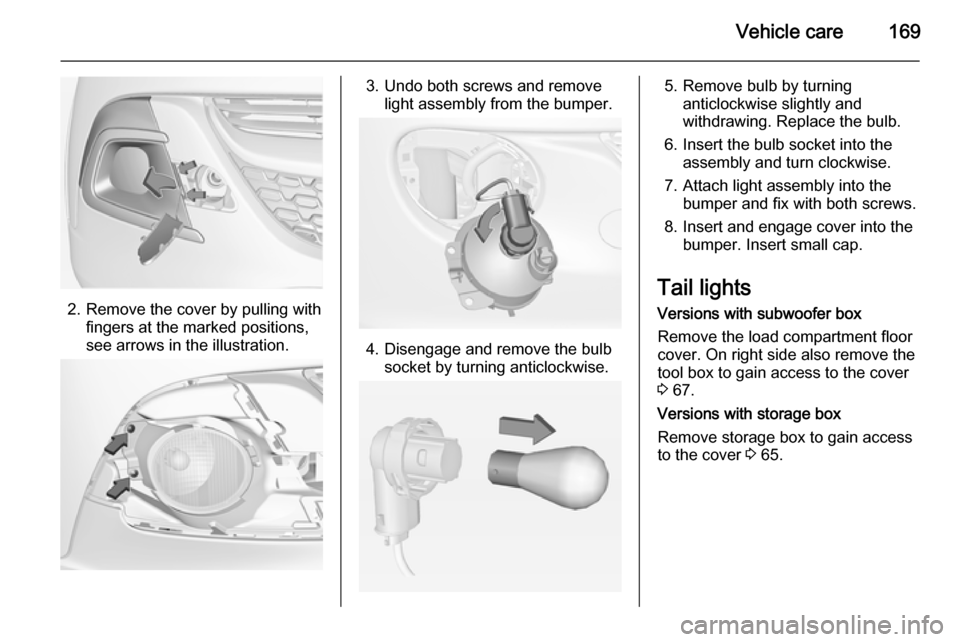
2. Remove the cover by pulling withfingers at the marked positions,
see arrows in the illustration.
3. Undo both screws and remove light assembly from the bumper.
4. Disengage and remove the bulbsocket by turning anticlockwise.
5. Remove bulb by turninganticlockwise slightly and
withdrawing. Replace the bulb.
6. Insert the bulb socket into the assembly and turn clockwise.
7. Attach light assembly into the bumper and fix with both screws.
8. Insert and engage cover into the bumper. Insert small cap.
Tail lights Versions with subwoofer box
Remove the load compartment floor
cover. On right side also remove the
tool box to gain access to the cover
3 67.
Versions with storage box
Remove storage box to gain access
to the cover 3 65.
Page 172 of 233

170Vehicle care
1. Release the cover on therespective side and remove.
2. Unscrew the plastic securing nut from the inside by hand.
3. Carefully withdraw the lightassembly from the recesses and
remove.
4. Turn bulb holder anticlockwise and remove. Replace bulb by
withdrawing:
turn signal light 1
tail light 2
tail light / brake light 3
If tail light 2 and tail light/brake
light 3 are LEDs, seek the
assistance of a workshop for
replacement.
5. Insert and turn bulb holder clockwise into the tail light
assembly. Ensure the wires
remain in the cable ducts.
Page 173 of 233
Vehicle care171
Fit light assembly with theretaining pins into the recesses of
the vehicle body and tighten the
plastic securing nut from inside
the load compartment. Pull the
circular gasket over the recess in
the lamp housing.
Close cover and engage.
Reversing light/rear fog light Reversing light is located on the left
side of the bumper, and the rear fog
light is located on the right side of the
bumper.
The description of bulb replacement
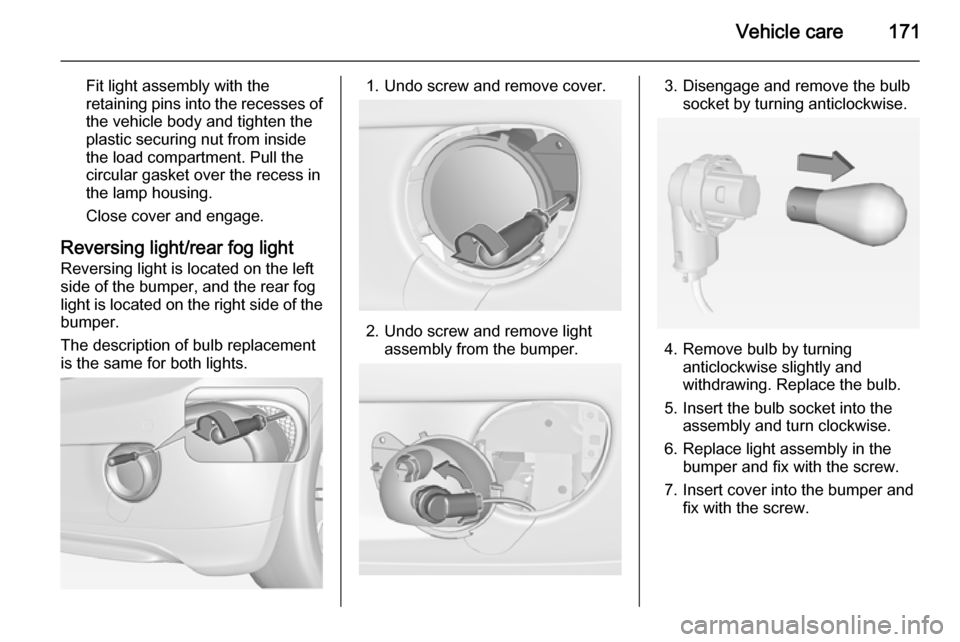
is the same for both lights.1. Undo screw and remove cover.
2. Undo screw and remove light assembly from the bumper.
3. Disengage and remove the bulbsocket by turning anticlockwise.
4. Remove bulb by turninganticlockwise slightly and
withdrawing. Replace the bulb.
5. Insert the bulb socket into the assembly and turn clockwise.
6. Replace light assembly in the bumper and fix with the screw.
7. Insert cover into the bumper and fix with the screw.
Page 174 of 233

172Vehicle care
Adam Rocks
1. Remove the cover by pulling byhand at the marked position, see
arrow in the illustration.
2. Undo both screws and remove light assembly from the bumper.
3. Disengage and remove the bulb socket by turning anticlockwise.
4. Remove bulb by turninganticlockwise slightly and
withdrawing. Replace the bulb.
5. Insert the bulb socket into the assembly and turn clockwise.
6. Attach light assembly into the bumper and fix with both screws.
7. Insert and engage cover into the bumper.
Side turn signal lights
To replace bulb, remove lamp
housing:
1. Slide lamp to its left side and remove with its right end.
Page 175 of 233

Vehicle care173
2. Turn bulb holder anticlockwiseand remove from housing.
3. Pull bulb from bulb holder andreplace it.
4. Insert bulb holder and turnclockwise.
5. Insert left end of the lamp, slide to
the left and insert right end.
Number plate light
1. Insert screwdriver in recess of the
cover, press to the side and
release spring.
2. Remove lamp downwards, taking care not to pull on the cable.
3. Remove bulb holder from lamp housing by turning anticlockwise.
Page 176 of 233
174Vehicle care
4. Pull bulb from bulb holder andreplace it.
5. Insert bulb holder into lamp housing and turn clockwise.
6. Insert lamp into bumper and allow
it to engage.
Interior lights Courtesy light, reading lights
Have bulbs replaced by a workshop.
Load compartment light
Have bulbs replaced by a workshop.
Dome light
Have bulbs replaced by a workshop.
Ambient light
Have bulbs replaced by a workshop.
Starlight panelHave bulbs replaced by a workshop.
Instrument panel
illumination
Have bulbs replaced by a workshop.Electrical system
Fuses
Data on the replacement fuse must match the data on the defective fuse.
There are two fuse boxes in the
vehicle:
■ in the front left of the engine compartment,
■ in left-hand drive vehicles behind the light switch, or, in right-hand
drive vehicles, behind the
glovebox.
Before replacing a fuse, turn off the
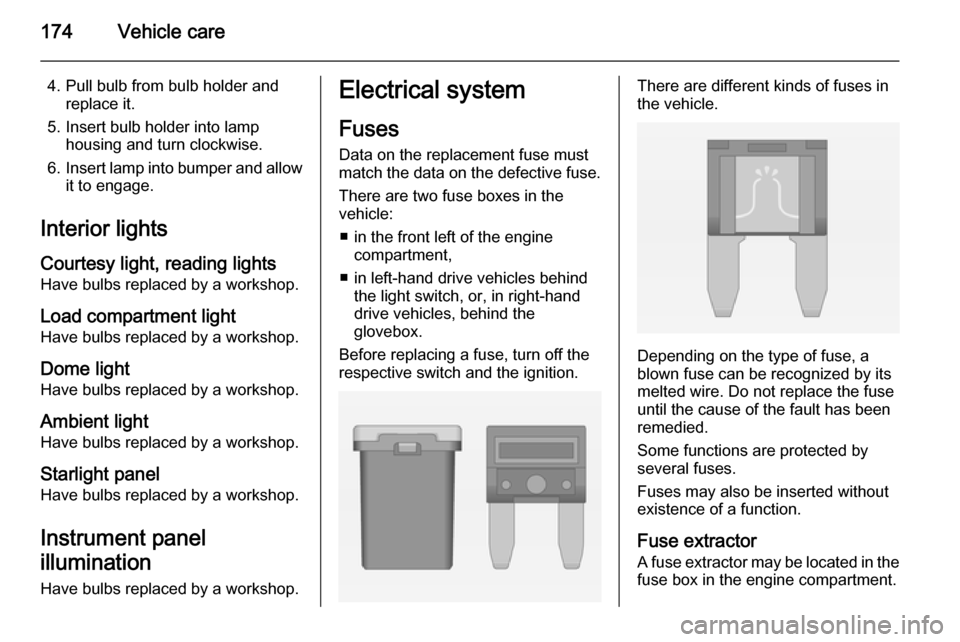
respective switch and the ignition.There are different kinds of fuses in
the vehicle.
Depending on the type of fuse, a
blown fuse can be recognized by its
melted wire. Do not replace the fuse until the cause of the fault has been
remedied.
Some functions are protected by
several fuses.
Fuses may also be inserted without existence of a function.
Fuse extractor A fuse extractor may be located in the fuse box in the engine compartment.
Page 197 of 233
Vehicle care195
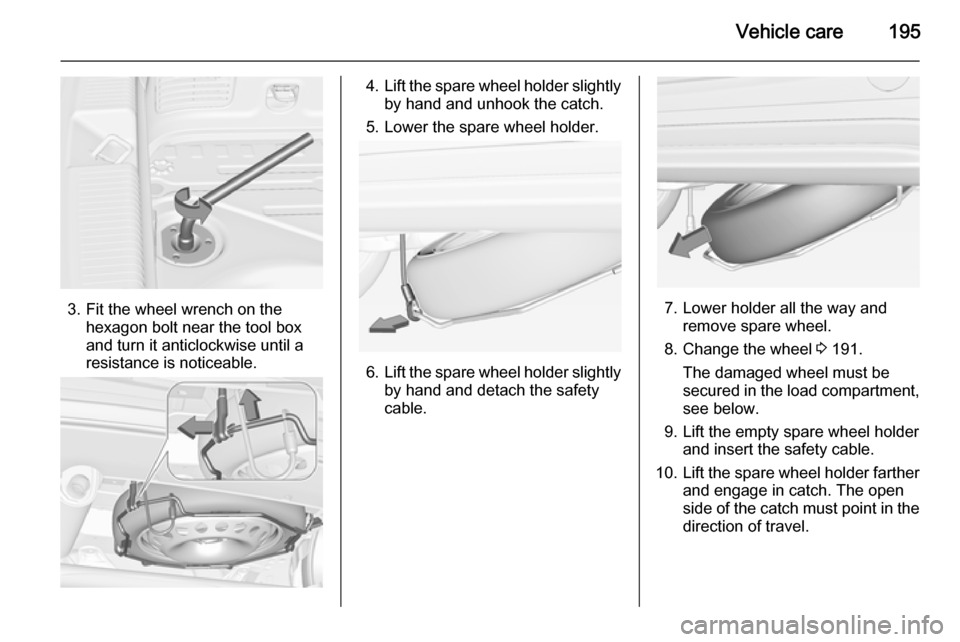
3. Fit the wheel wrench on thehexagon bolt near the tool box
and turn it anticlockwise until a
resistance is noticeable.
4. Lift the spare wheel holder slightly
by hand and unhook the catch.
5. Lower the spare wheel holder.
6. Lift the spare wheel holder slightly
by hand and detach the safety
cable.
7. Lower holder all the way and remove spare wheel.
8. Change the wheel 3 191.
The damaged wheel must be
secured in the load compartment,
see below.
9. Lift the empty spare wheel holder and insert the safety cable.
10. Lift the spare wheel holder farther
and engage in catch. The open
side of the catch must point in the direction of travel.
Page 198 of 233
196Vehicle care
11. Close the empty spare wheelholder by turning the hexagon boltclockwise successively using the
wheel wrench.
12. Stow wheel wrench and the jack in the tool box in vehicle floor.
13. Close the load compartment floor.
Stowing a damaged wheel in the
load compartment The spare wheel holder is not
designed for other tyre sizes than the
spare wheel.
A damaged wheel wider than the
spare wheel must be stowed in the
load compartment and secured with a strap. Vehicle tools 3 179.Wheels with tyre size up to
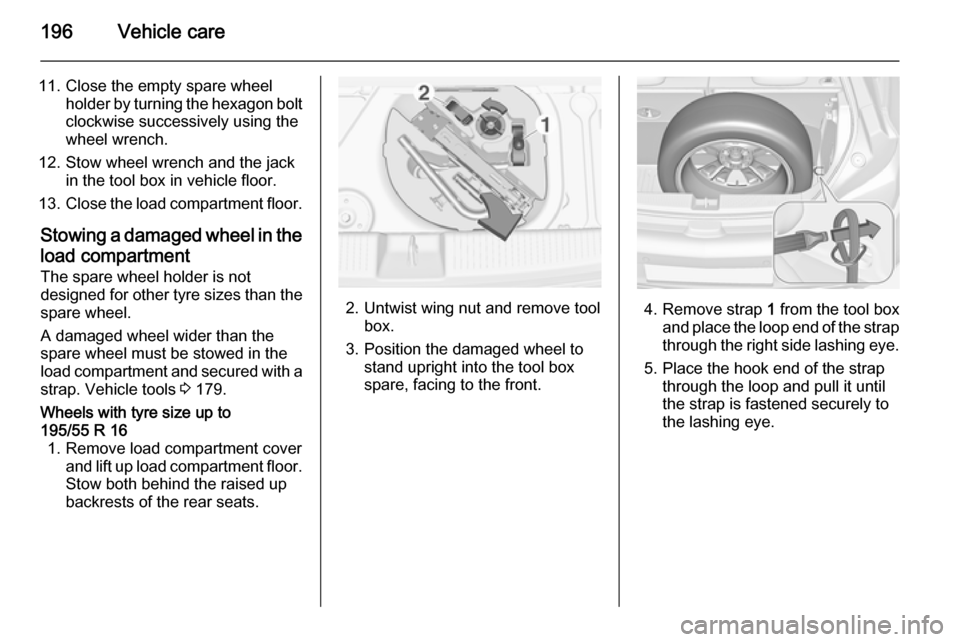
195/55 R 16 1. Remove load compartment cover and lift up load compartment floor.
Stow both behind the raised up
backrests of the rear seats.
2. Untwist wing nut and remove tool box.
3. Position the damaged wheel to stand upright into the tool box
spare, facing to the front.4. Remove strap 1 from the tool box
and place the loop end of the strap
through the right side lashing eye.
5. Place the hook end of the strap through the loop and pull it until
the strap is fastened securely to
the lashing eye.
Page 228 of 233

226IndexAAccessories and vehicle modifications .......................... 158
Adjustable air vents ...................120
Airbag and belt tensioners ...........86
Airbag deactivation ................45, 86
Airbag label................................... 40 Airbag system .............................. 40
Air conditioning regular operation ................................ 121
Air conditioning system .............. 113
Air intake .................................... 120
Air vents...................................... 120
Antilock brake system ................ 132
Antilock brake system (ABS) .......87
Anti-theft alarm system ................26
Anti-theft locking system .............. 26
Appearance care ........................203
Ashtrays ....................................... 79
Automatic anti-dazzle ..................29
Automatic light control ...............105
Automatic locking ........................24
B Battery discharge protection ......111
Battery voltage ........................... 100
Belts.............................................. 38
Bicycle rack .................................. 55
Bonnet ....................................... 160Brake and clutch fluid.................208
Brake and clutch system .............87
Brake assist ............................... 133
Brake fluid .................................. 162
Brakes ............................... 132, 162
Breakdown.................................. 200
Bulb replacement ....................... 165
C Capacities .................................. 220
Car Pass ...................................... 20
Catalytic converter .....................127
Central locking system ................22
Changing tyre and wheel size ...186
Charging system .......................... 86
Child restraint installation locations ................................... 48
Child restraints.............................. 47
Child restraint systems ................47
Cigarette lighter ........................... 79
City mode ................................... 136
Climate control ............................. 15
Climate control systems .............112
Clock ............................................ 77
Code ............................................. 97
Colour-Info-Display .......................95
Control indicators.......................... 83
Control of the vehicle .................122
Controls ........................................ 72
Convex shape .............................. 28