clock VAUXHALL ADAM 2015.5 Owner's Manual
[x] Cancel search | Manufacturer: VAUXHALL, Model Year: 2015.5, Model line: ADAM, Model: VAUXHALL ADAM 2015.5Pages: 233, PDF Size: 6.98 MB
Page 61 of 233
Storage59
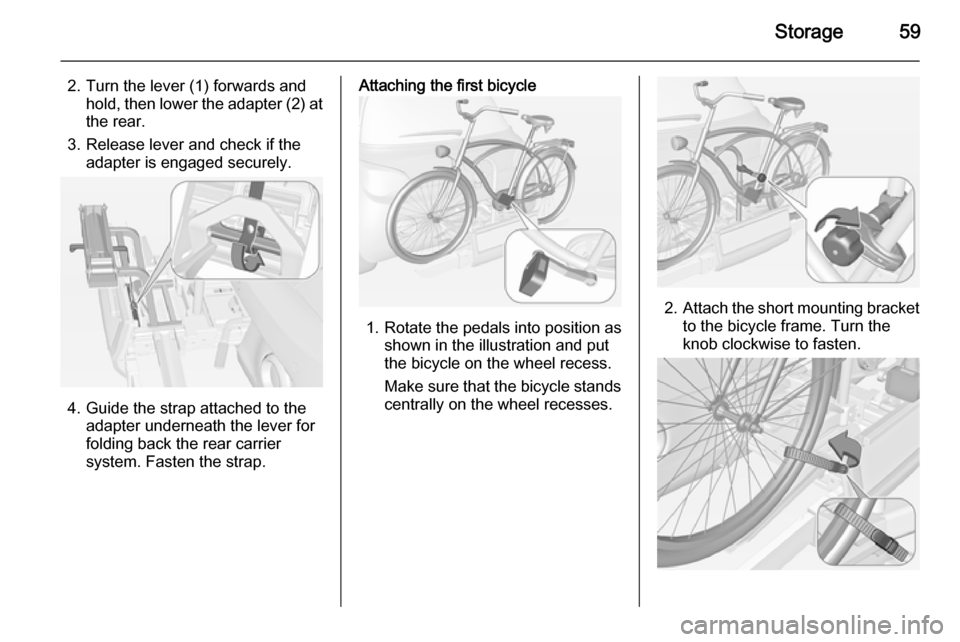
2. Turn the lever (1) forwards andhold, then lower the adapter (2) at
the rear.
3. Release lever and check if the adapter is engaged securely.
4. Guide the strap attached to theadapter underneath the lever for
folding back the rear carrier system. Fasten the strap.
Attaching the first bicycle
1. Rotate the pedals into position as shown in the illustration and put
the bicycle on the wheel recess.
Make sure that the bicycle stands centrally on the wheel recesses.
2. Attach the short mounting bracket
to the bicycle frame. Turn the
knob clockwise to fasten.
Page 63 of 233
Storage61
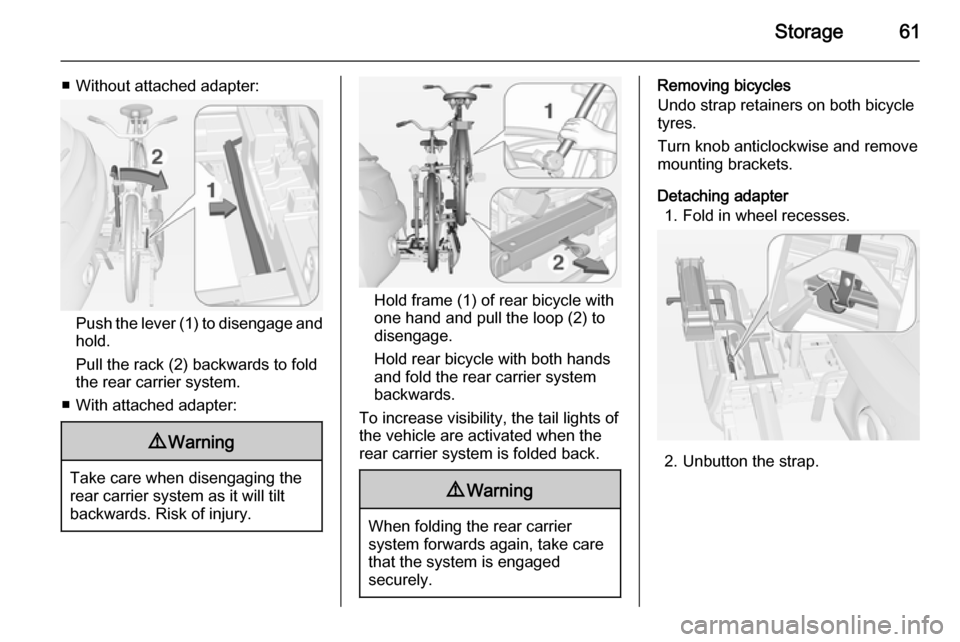
■ Without attached adapter:
Push the lever (1) to disengage andhold.
Pull the rack (2) backwards to fold
the rear carrier system.
■ With attached adapter:
9 Warning
Take care when disengaging the
rear carrier system as it will tilt
backwards. Risk of injury.
Hold frame (1) of rear bicycle with
one hand and pull the loop (2) to
disengage.
Hold rear bicycle with both hands
and fold the rear carrier system
backwards.
To increase visibility, the tail lights of
the vehicle are activated when the
rear carrier system is folded back.
9 Warning
When folding the rear carrier
system forwards again, take care
that the system is engaged
securely.
Removing bicycles
Undo strap retainers on both bicycle
tyres.
Turn knob anticlockwise and remove
mounting brackets.
Detaching adapter 1. Fold in wheel recesses.
2. Unbutton the strap.
Page 79 of 233
Instruments and controls77
If outside temperature drops to 3 °C,
a warning message is displayed in the Driver Information Centre.9 Warning
The road surface may already be
icy even though the display
indicates a few degrees above 0
°C.
Clock
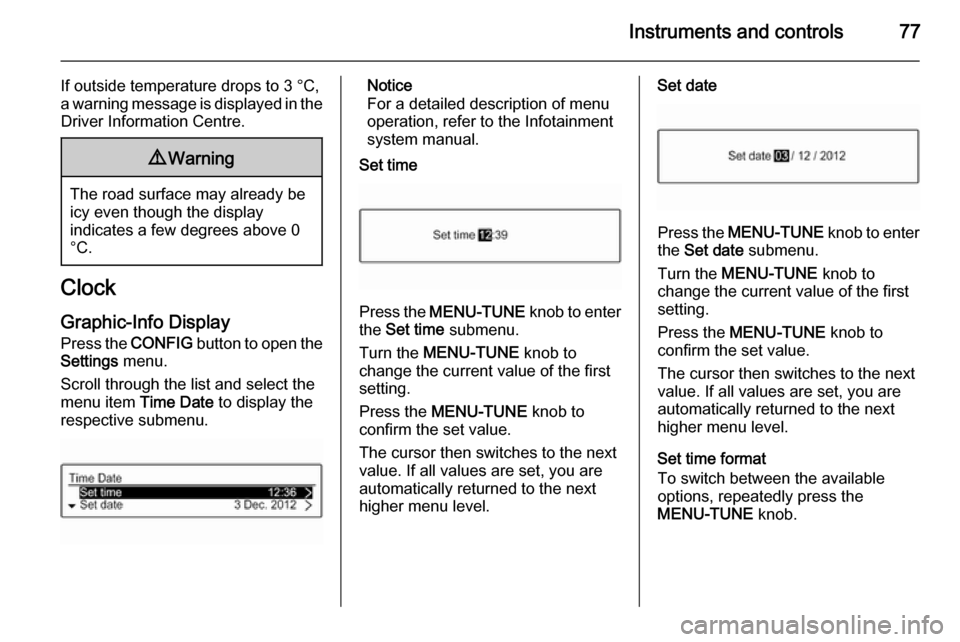
Graphic-Info Display
Press the CONFIG button to open the
Settings menu.
Scroll through the list and select the
menu item Time Date to display the
respective submenu.
Notice
For a detailed description of menu
operation, refer to the Infotainment
system manual.
Set time
Press the MENU-TUNE knob to enter
the Set time submenu.
Turn the MENU-TUNE knob to
change the current value of the first setting.
Press the MENU-TUNE knob to
confirm the set value.
The cursor then switches to the next
value. If all values are set, you are
automatically returned to the next
higher menu level.
Set date
Press the MENU-TUNE knob to enter
the Set date submenu.
Turn the MENU-TUNE knob to
change the current value of the first setting.
Press the MENU-TUNE knob to
confirm the set value.
The cursor then switches to the next
value. If all values are set, you are
automatically returned to the next
higher menu level.
Set time format
To switch between the available
options, repeatedly press the
MENU-TUNE knob.
Page 80 of 233
78Instruments and controls
Set date format
To switch between the available
options, repeatedly press the
MENU-TUNE knob.
RDS clock synchronization
The RDS signal of most VHF
transmitters automatically sets the
time. RDS time synchronisation can
take a few minutes. Some
transmitters do not send a correct
time signal. In such cases, it is
recommended to switch off the
automatic time synchronisation.
To switch between the options On
and Off, repeatedly press the
MENU-TUNE knob.
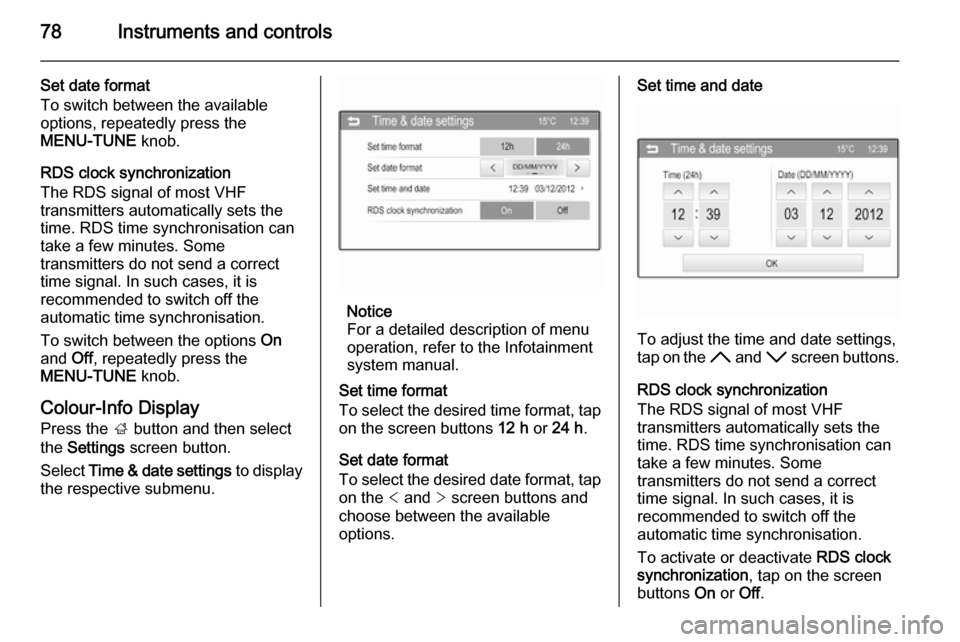
Colour-Info Display
Press the ; button and then select
the Settings screen button.
Select Time & date settings to display
the respective submenu.
Notice
For a detailed description of menu
operation, refer to the Infotainment
system manual.
Set time format
To select the desired time format, tap
on the screen buttons 12 h or 24 h .
Set date format
To select the desired date format, tap on the < and > screen buttons and
choose between the available
options.
Set time and date
To adjust the time and date settings,
tap on the H and I screen buttons.
RDS clock synchronization
The RDS signal of most VHF
transmitters automatically sets the
time. RDS time synchronisation can take a few minutes. Some
transmitters do not send a correct
time signal. In such cases, it is
recommended to switch off the
automatic time synchronisation.
To activate or deactivate RDS clock
synchronization , tap on the screen
buttons On or Off.
Page 103 of 233

Instruments and controls101
In the corresponding submenus the
following settings can be changed:
Languages
Selection of the desired language.
Time Date
See Clock 3 77.
Radio settings
See Infotainment system manual for further information.
Phone settings
See Infotainment system manual for further information.
Vehicle settings ■ Climate and air quality
Auto fan speed : Modifies the level
of the cabin airflow of the climate
control in automatic mode.
Air conditioning mode : Controls the
state of the cooling compressor
when the vehicle is started. Last
setting (recommended) or at
vehicle start is either always ON or
always OFF.Auto rear demist : Activates
automatically rear heated window.
■ Comfort settings
Chime volume : Changes the
volume of warning chimes.
Personalization by driver : Activates
or deactivates the personalisation
function.
Rear auto wipe in reverse :
Activates or deactivates automatic
switching on of the rear window
wiper when reverse gear is
engaged.
■ Park assist / Collision detection
Park assist : Activates or
deactivates the ultrasonic sensors.
Side blind zone alert : Changes the
settings for the side blind spot alert
system.
■ Exterior ambient lighting
Exterior lighting by unlocking :
Activates or deactivates the entry
lighting.
Duration upon exit of vehicle :Activates or deactivates and
changes the duration of exit
lighting.
■ Power door locks
Auto door lock : Activates or
deactivates the automatic door
locking function after switching on ignition.
Stop door lock if door open :
Activates or deactivates the door
locking function while a door is
open.
Delayed door lock : Activates or
deactivates the delayed door
locking function. This menu option
is displayed with Stop door lock if
door open deactivated. Central
locking system 3 22.
■ Remote locking, unlocking, starting
Remote unlock feedback :
Activates or deactivates the hazard warning flasher feedback whilst
unlocking.
Passive door unlock : Changes the
configuration to unlock only the
driver's door or the whole vehicle
whilst unlocking.
Page 104 of 233
102Instruments and controls
Auto relock doors: Activates or
deactivates the automatic relock
function after unlocking without opening the vehicle.
■ Restore factory settings :
Resets all settings to the default settings.
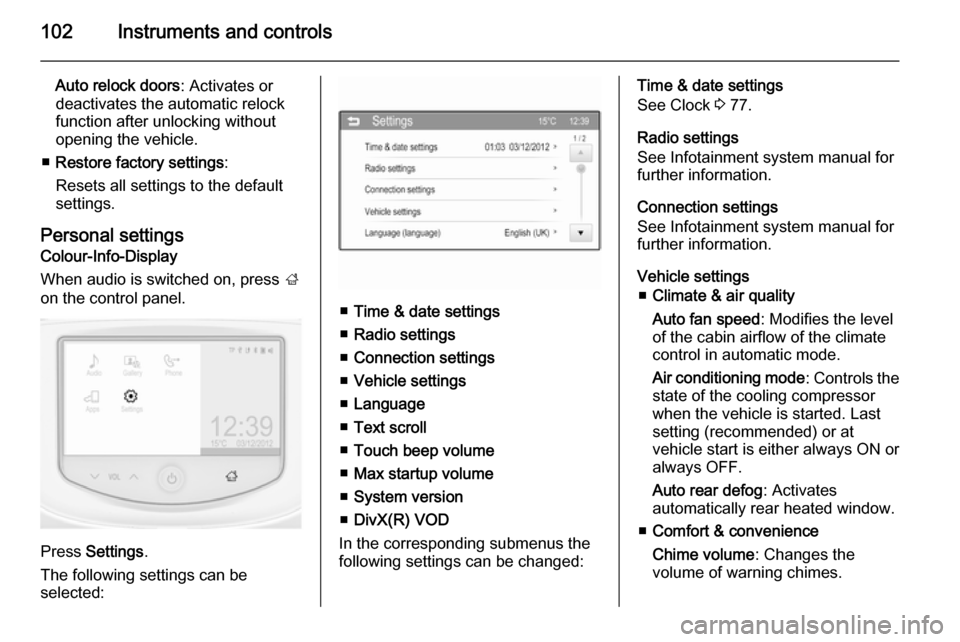
Personal settings Colour-Info-Display
When audio is switched on, press ;
on the control panel.
Press Settings .
The following settings can be
selected:
■ Time & date settings
■ Radio settings
■ Connection settings
■ Vehicle settings
■ Language
■ Text scroll
■ Touch beep volume
■ Max startup volume
■ System version
■ DivX(R) VOD
In the corresponding submenus the
following settings can be changed:
Time & date settings
See Clock 3 77.
Radio settings
See Infotainment system manual for
further information.
Connection settings
See Infotainment system manual for further information.
Vehicle settings ■ Climate & air quality
Auto fan speed : Modifies the level
of the cabin airflow of the climate
control in automatic mode.
Air conditioning mode : Controls the
state of the cooling compressor
when the vehicle is started. Last
setting (recommended) or at
vehicle start is either always ON or always OFF.
Auto rear defog : Activates
automatically rear heated window.
■ Comfort & convenience
Chime volume : Changes the
volume of warning chimes.
Page 108 of 233
106LightingHeadlight range
adjustment
Manual headlight range
adjustment
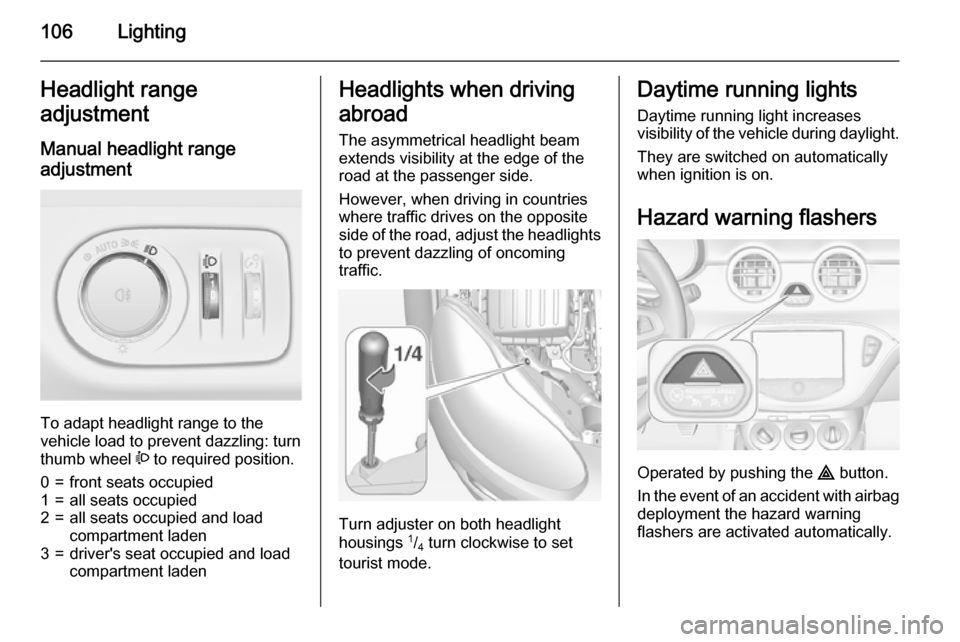
To adapt headlight range to the
vehicle load to prevent dazzling: turn
thumb wheel ? to required position.
0=front seats occupied1=all seats occupied2=all seats occupied and load
compartment laden3=driver's seat occupied and load
compartment ladenHeadlights when driving
abroad
The asymmetrical headlight beam
extends visibility at the edge of the
road at the passenger side.
However, when driving in countries
where traffic drives on the opposite
side of the road, adjust the headlights to prevent dazzling of oncoming
traffic.
Turn adjuster on both headlight
housings 1
/4 turn clockwise to set
tourist mode.
Daytime running lights
Daytime running light increases
visibility of the vehicle during daylight.
They are switched on automatically
when ignition is on.
Hazard warning flashers
Operated by pushing the ¨ button.
In the event of an accident with airbag
deployment the hazard warning
flashers are activated automatically.
Page 156 of 233

154Driving and operating
Fuel filler flap is located at right rear
side of the vehicle.
The fuel filler flap can only be opened
when the vehicle is unlocked.
Push the flap to engage. Then open
the flap.
Turn the fuel filler cap slowly
anticlockwise to open.
The fuel filler cap can be retained in
the bracket on the fuel filler flap.
For refuelling, fully insert the pump
nozzle and switch it on.
After automatic cut-off, it can be
topped up with max. two doses of fuel.
Caution
Wipe off any overflowing fuel
immediately.
To close, turn the fuel filler cap
clockwise until it clicks.
Close the flap and let engage.
Liquid gas refuelling Follow the operating and safety
instructions of the filling station when
refuelling.
The filling valve for the liquid gas is
behind the fuel filler cap.
Unscrew protective cap from the filler
neck.
Page 168 of 233
166Vehicle care
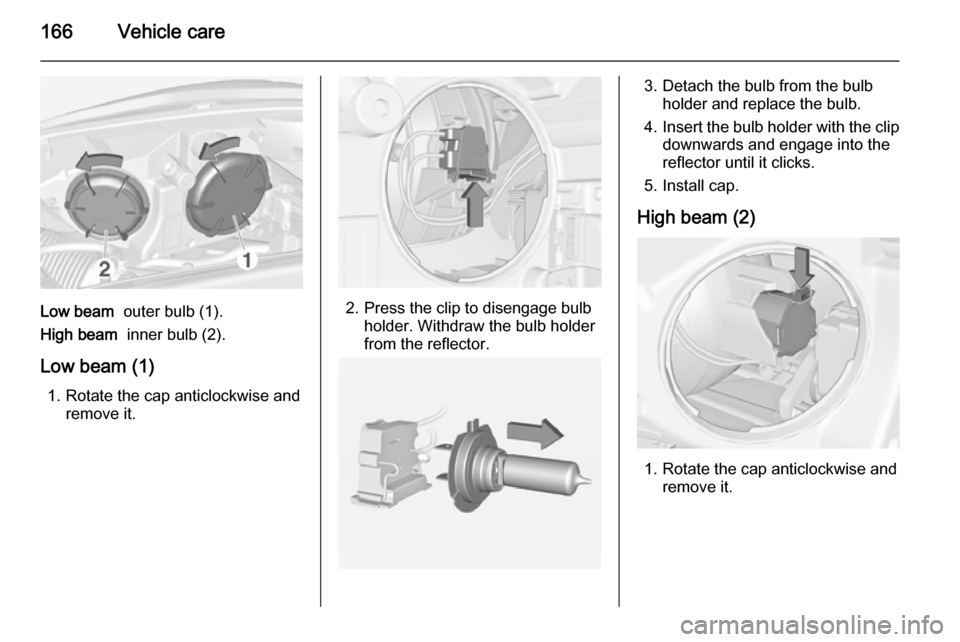
Low beam outer bulb (1).
High beam inner bulb (2).
Low beam (1) 1. Rotate the cap anticlockwise and remove it.2. Press the clip to disengage bulbholder. Withdraw the bulb holder
from the reflector.
3. Detach the bulb from the bulb holder and replace the bulb.
4. Insert the bulb holder with the clip
downwards and engage into the
reflector until it clicks.
5. Install cap.
High beam (2)
1. Rotate the cap anticlockwise and remove it.
Page 169 of 233
Vehicle care167
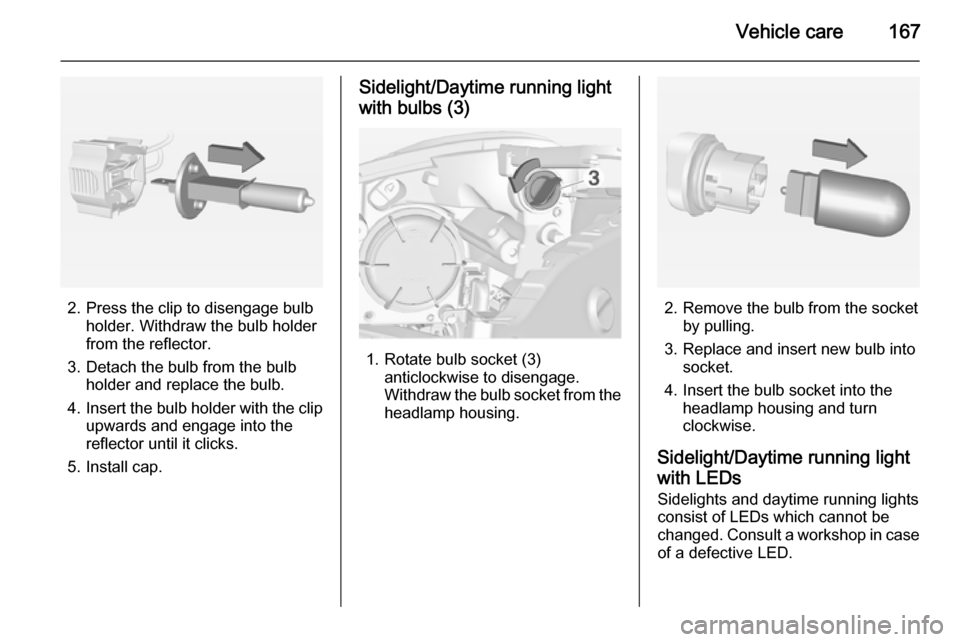
2. Press the clip to disengage bulbholder. Withdraw the bulb holder
from the reflector.
3. Detach the bulb from the bulb holder and replace the bulb.
4. Insert the bulb holder with the clip
upwards and engage into the
reflector until it clicks.
5. Install cap.
Sidelight/Daytime running light
with bulbs (3)
1. Rotate bulb socket (3) anticlockwise to disengage.
Withdraw the bulb socket from the
headlamp housing.
2. Remove the bulb from the socket by pulling.
3. Replace and insert new bulb into socket.
4. Insert the bulb socket into the headlamp housing and turn
clockwise.
Sidelight/Daytime running light with LEDs Sidelights and daytime running lights
consist of LEDs which cannot be
changed. Consult a workshop in case
of a defective LED.