light VAUXHALL ADAM 2016 Workshop Manual
[x] Cancel search | Manufacturer: VAUXHALL, Model Year: 2016, Model line: ADAM, Model: VAUXHALL ADAM 2016Pages: 237, PDF Size: 7.16 MB
Page 134 of 237

132Driving and operatingAlways move the selector lever in the
appropriate direction as far as it will
go. Upon release, it automatically
returns to the centre position.N:neutral positionD/M:switch between automatic (D)
and manual (M) shift mode.
The transmission display
shows either D or M with the
selected gear<:upshifting in manual mode]:downshifting in manual modeR:reverse gear. Engage only
when vehicle is stationary
If selector lever is moved from R to the
left, D is directly engaged.
If selector lever is moved from D to
< or ], the manual mode M is
selected and the transmission shifts.
Starting off
Depress the brake pedal and move
the selector lever to D/M or R. If D is
selected, transmission is in automatic mode and first gear is engaged. If R
is selected, reverse gear is engaged.
The vehicle starts to move when the
brake is released.
To start-off without depressing the
foot brake, accelerate immediately
after engaging a gear as long as D or
R flashes.
If neither the accelerator nor the
brake pedal are depressed, no gear is engaged and D or R flashes for a
brief time in the display.
Stopping the vehicle
In D, first gear is engaged and the
clutch is released when the vehicle is
stopped. In R, reverse gear remains
engaged.
Engine braking
Automatic mode
When driving downhill, the manual
transmission automated does not
shift into higher gears until a fairly
high engine speed has been reached. It shifts down in good time when
braking.
Manual mode
To utilise the engine braking effect, select a lower gear in good time when
driving downhill. Changing intomanual mode is only possible while
the engine is running or during an
Autostop.
Rocking the vehicle
Rocking the vehicle is only
permissible if the vehicle is stuck in
sand, mud or snow. Move the selector
lever between R and D in a repeat
pattern. Do not race the engine and
avoid sudden acceleration.
Parking
The most recently engaged gear (see transmission display) remains
engaged when switching off ignition.
With N, no gear is engaged.
Therefore always apply the parking
brake when switching off ignition. If
parking brake is not applied, P flashes
in the transmission display and the
key cannot be removed from the
ignition switch. P stops flashing in the
transmission display as soon as the
parking brake is slightly applied.
When the ignition is switched off, the
transmission no longer responds to
movement of the selector lever.
Page 136 of 237

134Driving and operatingBrakes
The brake system comprises two
independent brake circuits.
If a brake circuit fails, the vehicle can
still be braked using the other brake
circuit. However, braking effect is
achieved only when the brake pedal
is depressed firmly. Considerably
more force is needed for this. The
braking distance is extended. Seek the assistance of a workshop before
continuing the journey.
When the engine is not running, the
support of the brake servo unit
disappears once the brake pedal has been depressed once or twice.
Braking effect is not reduced, but
braking requires significantly greater
force. It is especially important to bear this in mind when being towed.
Control indicator R 3 84.
Antilock brake system
Antilock brake system (ABS)
prevents the wheels from locking.ABS starts to regulate brake pressure as soon as a wheel shows a tendency to lock. The vehicle remains
steerable, even during hard braking.
ABS control is made apparent
through a pulse in the brake pedal
and the noise of the regulation
process.
For optimum braking, keep the brake
pedal fully depressed throughout the
braking process, despite the fact that the pedal is pulsating. Do not reduce
the pressure on the pedal.
After starting off the system performs
a self-test which may be audible.
Control indicator u 3 85.
Adaptive brake light
During full braking, all three brake
lights flash for the duration of ABS
control.Fault9 Warning
If there is a fault in the ABS, the
wheels may be liable to lock due
to braking that is heavier than
normal. The advantages of ABS are no longer available. During
hard braking, the vehicle can no longer be steered and may
swerve.
Have the cause of the fault remedied
by a workshop.
Page 137 of 237
Driving and operating135Parking brake
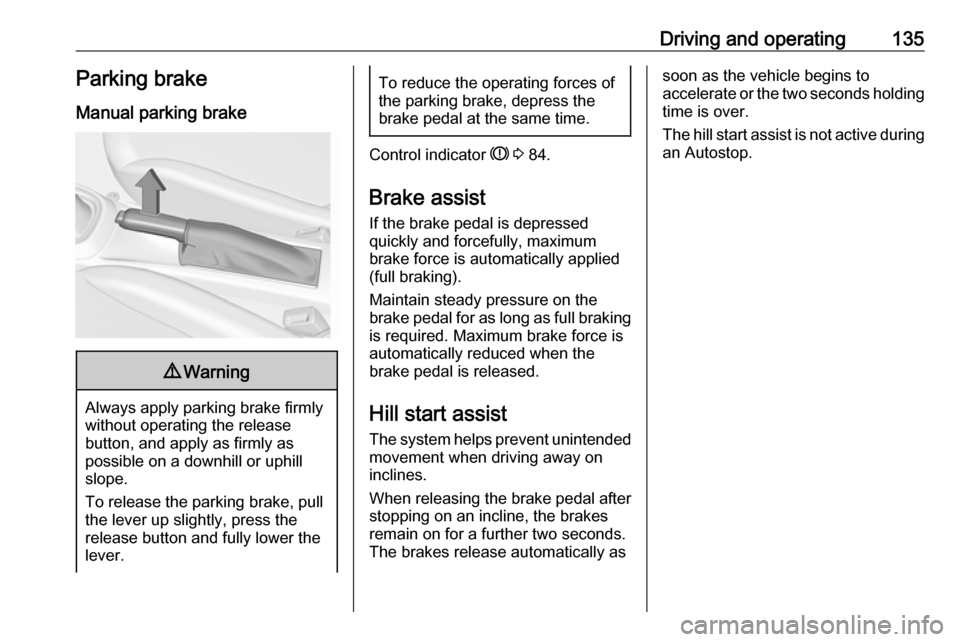
Manual parking brake9 Warning
Always apply parking brake firmly
without operating the release
button, and apply as firmly as
possible on a downhill or uphill
slope.
To release the parking brake, pull
the lever up slightly, press the
release button and fully lower the
lever.
To reduce the operating forces of
the parking brake, depress the
brake pedal at the same time.
Control indicator R 3 84.
Brake assist
If the brake pedal is depressed
quickly and forcefully, maximum
brake force is automatically applied
(full braking).
Maintain steady pressure on the
brake pedal for as long as full braking is required. Maximum brake force is
automatically reduced when the
brake pedal is released.
Hill start assist
The system helps prevent unintended movement when driving away on
inclines.
When releasing the brake pedal after
stopping on an incline, the brakes
remain on for a further two seconds.
The brakes release automatically as
soon as the vehicle begins to
accelerate or the two seconds holding
time is over.
The hill start assist is not active during
an Autostop.
Page 153 of 237
Driving and operating151Side blind spot alertThe Side blind spot alert system
detects and reports objects on either
side of the vehicle, within a specified
"blind spot" zone. The system alerts visually in each exterior mirror, when
detecting objects that may not be
visible in the interior and exterior
mirrors.
Side blind spot alert uses some of the
advanced parking assist sensors
which are located in the front and rear bumper on both sides of the vehicle.9 Warning
Side blind spot alert does not
replace driver vision.
The system does not detect:
● Vehicles outside the side blind zones which may be rapidly
approaching.
● Pedestrians, cyclists or animals.
Before changing a lane, always
check all mirrors, look over the
shoulder and use the turn signal.
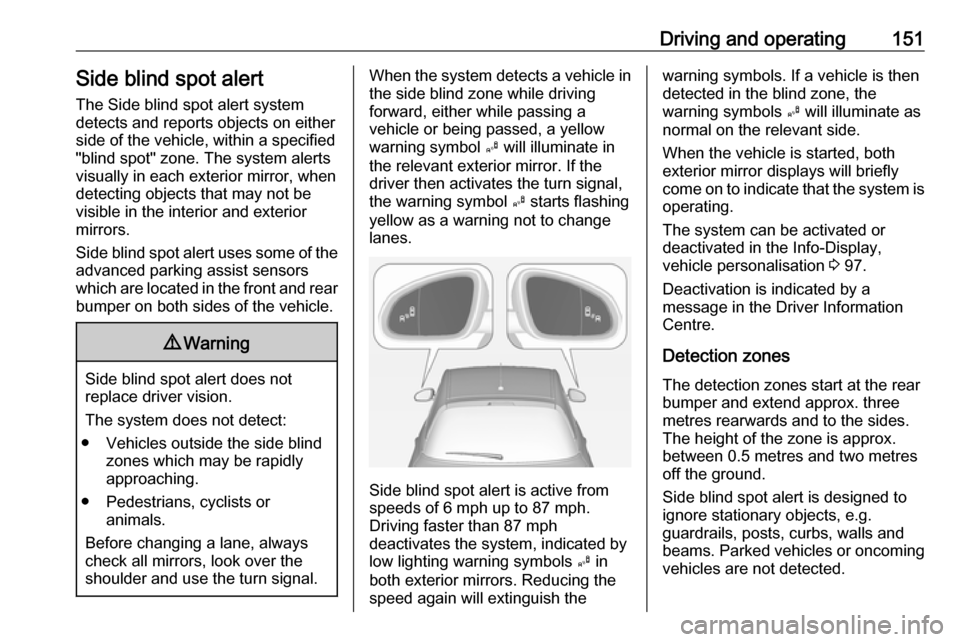
When the system detects a vehicle in the side blind zone while driving
forward, either while passing a
vehicle or being passed, a yellow warning symbol B will illuminate in
the relevant exterior mirror. If the
driver then activates the turn signal,
the warning symbol B starts flashing
yellow as a warning not to change
lanes.
Side blind spot alert is active from
speeds of 6 mph up to 87 mph.
Driving faster than 87 mph
deactivates the system, indicated by
low lighting warning symbols B in
both exterior mirrors. Reducing the speed again will extinguish the
warning symbols. If a vehicle is then
detected in the blind zone, the
warning symbols B will illuminate as
normal on the relevant side.
When the vehicle is started, both exterior mirror displays will briefly
come on to indicate that the system is operating.
The system can be activated or
deactivated in the Info-Display,
vehicle personalisation 3 97.
Deactivation is indicated by a
message in the Driver Information
Centre.
Detection zones The detection zones start at the rear
bumper and extend approx. three metres rearwards and to the sides.
The height of the zone is approx.
between 0.5 metres and two metres
off the ground.
Side blind spot alert is designed to
ignore stationary objects, e.g.
guardrails, posts, curbs, walls and
beams. Parked vehicles or oncoming
vehicles are not detected.
Page 155 of 237
Driving and operating153Full function of the LPG system can
only be guaranteed with liquid gas
which complies with the minimum
requirements of DIN EN 589.
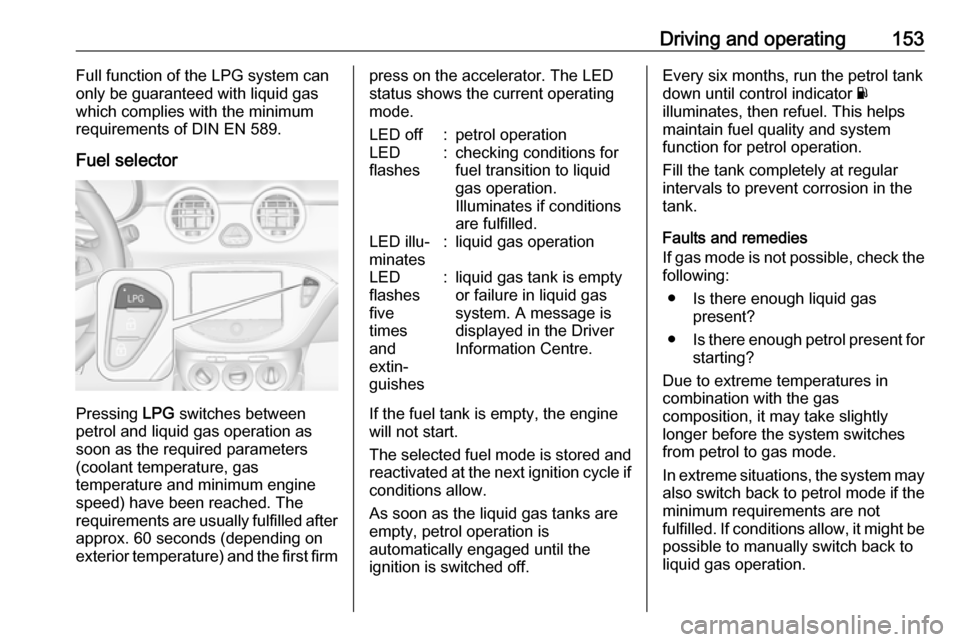
Fuel selector
Pressing LPG switches between
petrol and liquid gas operation as
soon as the required parameters (coolant temperature, gas
temperature and minimum engine
speed) have been reached. The
requirements are usually fulfilled after
approx. 60 seconds (depending on
exterior temperature) and the first firm
press on the accelerator. The LED
status shows the current operating
mode.LED off:petrol operationLED
flashes:checking conditions for
fuel transition to liquid
gas operation.
Illuminates if conditions
are fulfilled.LED illu‐
minates:liquid gas operationLED
flashes
five
times
and
extin‐
guishes:liquid gas tank is empty
or failure in liquid gas
system. A message is
displayed in the Driver
Information Centre.
If the fuel tank is empty, the engine
will not start.
The selected fuel mode is stored and reactivated at the next ignition cycle if
conditions allow.
As soon as the liquid gas tanks are
empty, petrol operation is
automatically engaged until the
ignition is switched off.
Every six months, run the petrol tank
down until control indicator Y
illuminates, then refuel. This helps
maintain fuel quality and system
function for petrol operation.
Fill the tank completely at regular
intervals to prevent corrosion in the
tank.
Faults and remedies
If gas mode is not possible, check the following:
● Is there enough liquid gas present?
● Is there enough petrol present for
starting?
Due to extreme temperatures in
combination with the gas
composition, it may take slightly
longer before the system switches
from petrol to gas mode.
In extreme situations, the system may
also switch back to petrol mode if the
minimum requirements are not
fulfilled. If conditions allow, it might be
possible to manually switch back to
liquid gas operation.
Page 156 of 237
154Driving and operatingSeek the assistance of a workshop in
the event of all other faults.Caution
Repairs and adjustments may only be made by trained specialists in
order to maintain the safety and
warranty on the LPG system.
Liquid gas is given a particular odour
(odorised) so that any leaks can be
detected easily.
9 Warning
If you smell gas in the vehicle or in
the immediate vicinity, switch to petrol mode immediately. No
smoking. No naked flames or
ignition sources.
If the gas odour persists, do not start
the engine. Have the cause of the
fault remedied by a workshop.
When using underground car parks,
follow the instructions of the operator
and local laws.
Notice
In the event of an accident, switch off
the ignition and lights.
Refuelling9 Danger
Before refuelling, switch off the
ignition.
Follow the operating and safety
instructions of the filling station
when refuelling.
9 Danger
Fuel is flammable and explosive.
No smoking. No naked flames or
sparks.
If you can smell fuel in your
vehicle, have the cause of this
remedied immediately by a
workshop.
Caution
In case of misfuelling, do not
switch on ignition.
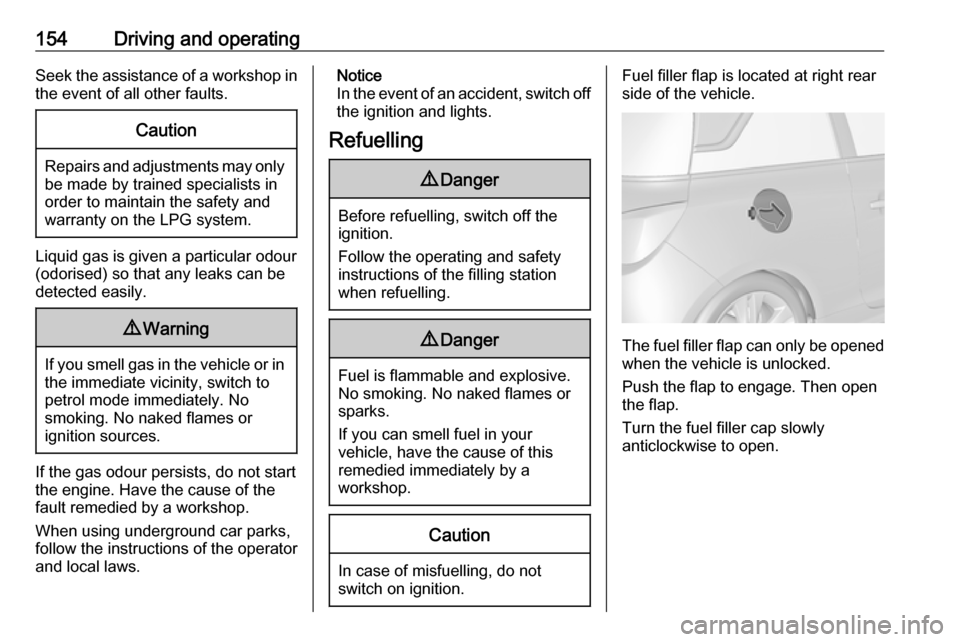
Fuel filler flap is located at right rear
side of the vehicle.
The fuel filler flap can only be opened
when the vehicle is unlocked.
Push the flap to engage. Then open
the flap.
Turn the fuel filler cap slowly
anticlockwise to open.
Page 159 of 237
Driving and operating157
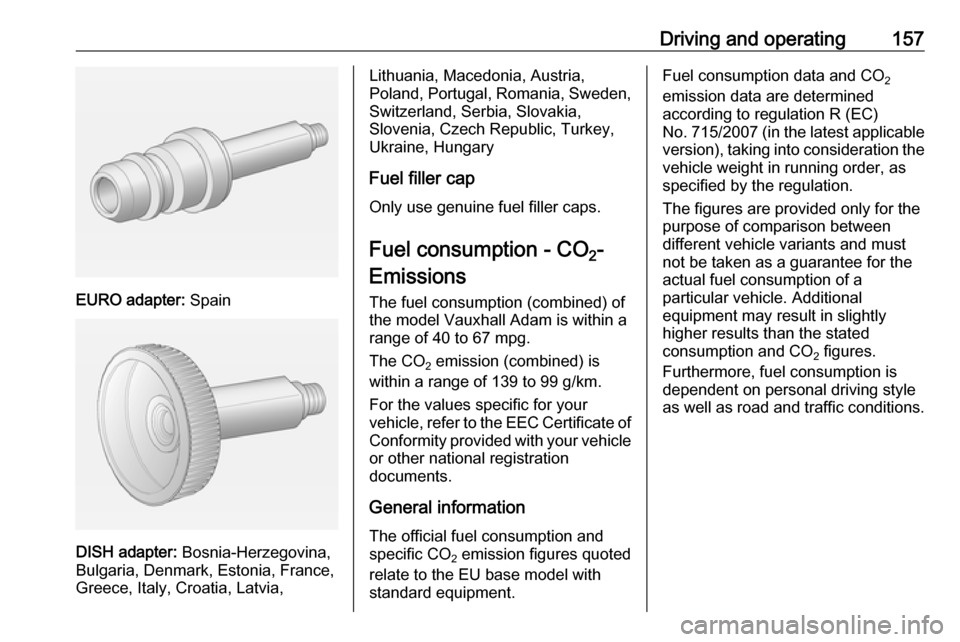
EURO adapter: Spain
DISH adapter: Bosnia-Herzegovina,
Bulgaria, Denmark, Estonia, France,
Greece, Italy, Croatia, Latvia,
Lithuania, Macedonia, Austria,
Poland, Portugal, Romania, Sweden,
Switzerland, Serbia, Slovakia,
Slovenia, Czech Republic, Turkey,
Ukraine, Hungary
Fuel filler cap
Only use genuine fuel filler caps.
Fuel consumption - CO 2-
Emissions
The fuel consumption (combined) of
the model Vauxhall Adam is within a
range of 40 to 67 mpg.
The CO 2 emission (combined) is
within a range of 139 to 99 g/km.
For the values specific for your
vehicle, refer to the EEC Certificate of Conformity provided with your vehicle
or other national registration
documents.
General information
The official fuel consumption and
specific CO 2 emission figures quoted
relate to the EU base model with
standard equipment.Fuel consumption data and CO 2
emission data are determined
according to regulation R (EC)
No. 715/2007 (in the latest applicable
version), taking into consideration the
vehicle weight in running order, as
specified by the regulation.
The figures are provided only for the
purpose of comparison between
different vehicle variants and must not be taken as a guarantee for the
actual fuel consumption of a
particular vehicle. Additional
equipment may result in slightly
higher results than the stated
consumption and CO 2 figures.
Furthermore, fuel consumption is dependent on personal driving style as well as road and traffic conditions.
Page 160 of 237

158Vehicle careVehicle careGeneral Information...................158
Accessories and vehicle modifications .......................... 158
Vehicle storage ........................159
End-of-life vehicle recovery .....159
Vehicle checks ........................... 160
Performing work ......................160
Bonnet ..................................... 160
Engine oil ................................. 161
Engine coolant ......................... 162
Washer fluid ............................ 162
Brakes ..................................... 163
Brake fluid ............................... 163
Vehicle battery ......................... 163
Wiper blade replacement ........165
Bulb replacement .......................166
Halogen headlights ..................166
Front turn signal lights .............168
Tail lights ................................. 170
Side turn signal lights ..............173
Number plate light ...................173
Interior lights ............................ 174
Instrument panel illumination ...174
Electrical system ........................175
Fuses ....................................... 175Engine compartment fuse box . 176
Instrument panel fuse box .......178
Vehicle tools .............................. 180
Tools ........................................ 180
Wheels and tyres .......................181
Winter tyres ............................. 181
Tyre designations ....................181
Tyre pressure .......................... 182
Tyre pressure monitoring system .................................... 183
Tread depth ............................. 186
Changing tyre and wheel size . 186
Wheel covers ........................... 187
Tyre chains .............................. 187
Tyre repair kit .......................... 188
Wheel changing .......................192
Spare wheel ............................ 194
Jump starting ............................. 199
Towing ....................................... 200
Towing the vehicle ...................200
Towing another vehicle ...........202
Appearance care .......................203
Exterior care ............................ 203
Interior care ............................. 205General Information
Accessories and vehicle modifications
We recommend the use of genuine
parts and accessories and factory approved parts specific for your
vehicle type. We cannot assess or guarantee reliability of other products
- even if they have a regulatory or
otherwise granted approval.
Do not make any modifications to the
electrical system, e.g. changes of
electronic control units (chip tuning).Caution
When transporting the vehicle on
a train or on a recovery vehicle, the
mud flaps might be damaged.
Page 167 of 237

Vehicle care165Meaning of symbols:● No sparks, naked flames or smoking.
● Always shield eyes. Explosive gases can cause blindness or
injury.
● Keep the vehicle battery out of the reach of children.
● The vehicle battery contains sulfuric acid which could cause
blindness or serious burn
injuries.
● See the Owner's manual for further information.
● Explosive gas may be present in the vicinity of the battery.Wiper blade replacement
Lift the wiper arm until it stays in the
raised position, press button to
disengage the wiper blade and
remove.
Attach the wiper blade slightly angled
to the wiper arm and push until it
engages.
Lower wiper arm carefully.
Wiper blade on the rear window
Lift wiper arm. Disengage wiper blade as shown in illustration and remove.
Attach the wiper blade slightly angled
to the wiper arm and push until it
engages.
Lower wiper arm carefully.
Page 168 of 237
166Vehicle careBulb replacement
Switch off the ignition and switch off
the relevant switch or close the doors.
Only hold a new bulb at the base! Do not touch the bulb glass with bare
hands.
Use only the same bulb type for
replacement.
Replace headlight bulbs from within
the engine compartment.
Bulb check After a bulb replacement switch on
the ignition, operate and check the
lights.
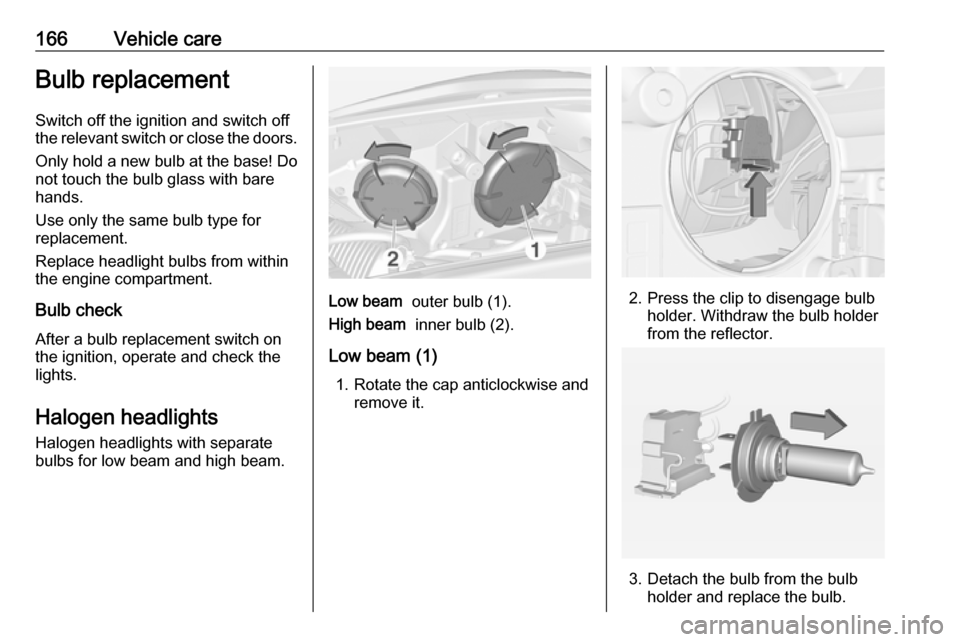
Halogen headlights
Halogen headlights with separate
bulbs for low beam and high beam.
Low beam outer bulb (1).
High beam inner bulb (2).
Low beam (1) 1. Rotate the cap anticlockwise and remove it.2. Press the clip to disengage bulb holder. Withdraw the bulb holder
from the reflector.
3. Detach the bulb from the bulb holder and replace the bulb.