warning VAUXHALL ADAM 2017.5 Manual Online
[x] Cancel search | Manufacturer: VAUXHALL, Model Year: 2017.5, Model line: ADAM, Model: VAUXHALL ADAM 2017.5Pages: 241, PDF Size: 7.33 MB
Page 192 of 241

190Vehicle careEach time the tyres are replaced, tyrepressure monitoring system sensors
must be dismounted and serviced. For the screwed sensor; replace
valve core and sealing ring. For the
clipped sensor; replace complete
valve stem.
Vehicle loading status
Adjust tyre pressure to load condition according to the tyre information labelor tyre pressure chart 3 226, and
select the appropriate setting in the menu Tyre Load in the Driver
Information Centre, Vehicle
Information Menu 3 89 . This setting is
the reference for the tyre pressure
warnings.
The Tyre Load menu only appears if
the vehicle is at a standstill and the
parking brake is applied. On vehicles
with automatic transmission the
selector lever has to be in P.
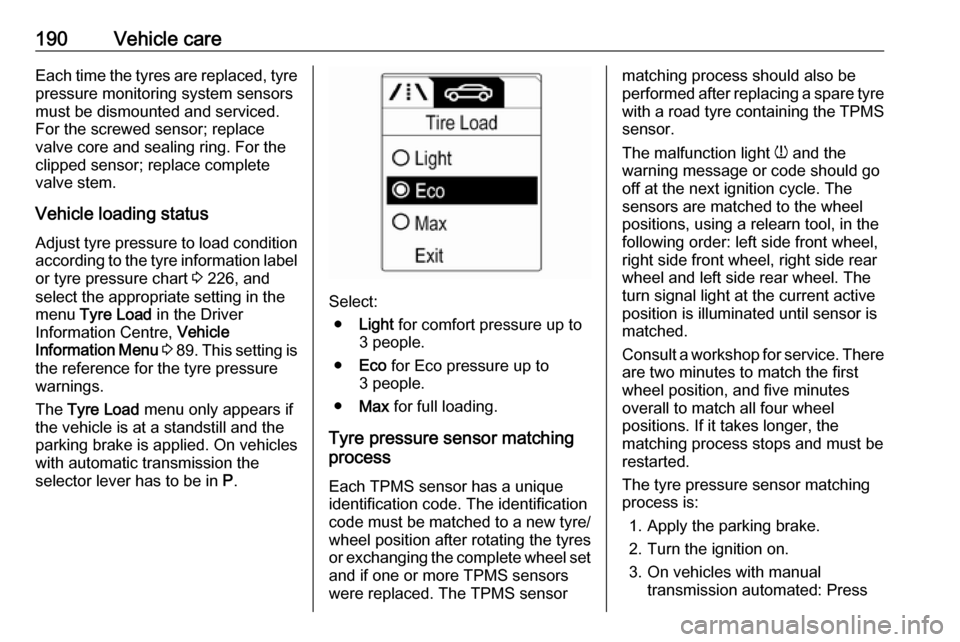
Select:
● Light for comfort pressure up to
3 people.
● Eco for Eco pressure up to
3 people.
● Max for full loading.
Tyre pressure sensor matching
process
Each TPMS sensor has a unique
identification code. The identification
code must be matched to a new tyre/ wheel position after rotating the tyres
or exchanging the complete wheel set
and if one or more TPMS sensors
were replaced. The TPMS sensor
matching process should also be
performed after replacing a spare tyre with a road tyre containing the TPMS
sensor.
The malfunction light w and the
warning message or code should go
off at the next ignition cycle. The
sensors are matched to the wheel
positions, using a relearn tool, in the
following order: left side front wheel,
right side front wheel, right side rear
wheel and left side rear wheel. The
turn signal light at the current active
position is illuminated until sensor is
matched.
Consult a workshop for service. There
are two minutes to match the first
wheel position, and five minutes
overall to match all four wheel
positions. If it takes longer, the
matching process stops and must be
restarted.
The tyre pressure sensor matching
process is:
1. Apply the parking brake.
2. Turn the ignition on.
3. On vehicles with manual transmission automated: Press
Page 194 of 241

192Vehicle careindicators (TWI). Their position is
indicated by markings on the
sidewall.
Tyres age, even if they are not used.
We recommend tyre replacement
every 6 years.
Changing tyre and wheel size
If tyres of a different size than those
fitted at the factory are used, it may be necessary to reprogramme the
speedometer as well as the nominal
tyre pressure and to make other
vehicle modifications.
After converting to a different tyre
size, have the label with tyre
pressures replaced.Caution
When converting to wheels with 14'', the ground clearance will be
reduced. This must be considered
when passing over obstacles.
9 Warning
Use of unsuitable tyres or wheels
may lead to accidents and will
invalidate the vehicle type
approval.
Wheel covers
Wheel covers and tyres that are
factory approved for the respective
vehicle and comply with all of the
relevant wheel and tyre combination
requirements must be used.
If the wheel covers and tyres used are
not factory approved, the tyres must
not have a rim protection ridge.
Wheel covers must not impair brake
cooling.
9 Warning
Use of unsuitable tyres or wheel
covers could lead to sudden
pressure loss and thereby
accidents.
Steel wheels: When using locking
wheel bolts, do not attach wheel
covers.
Tyre chains
Tyre chains are only permitted on the
front wheels.
Always use fine mesh chains that add no more than 10 mm to the tyre tread
and the inboard sides (including chain lock).
9 Warning
Damage may lead to tyre blowout.
Page 195 of 241

Vehicle care193Tyre chains are only permitted on
tyres of size 175/70 R 14,
185/70 R 14, 185/60 R 15, 185/65 R 15 and 195/55 R 16.
Tyre chains are not permitted on tyres
of size 215/45 R 17 and 225/35 R 18 .
The use of tyre chains is not permitted on the temporary spare wheel.
Tyre repair kit Minor damage to the tyre tread can be
repaired with the tyre repair kit.
Do not remove foreign bodies from
the tyres.
Tyre damage exceeding 4 mm or that
is at the tyre's sidewall cannot be
repaired with the tyre repair kit.9 Warning
Do not drive faster than 50 mph.
Do not use for a lengthy period.
Steering and handling may be
affected.
If you have a flat tyre:
Apply the parking brake and engage
first gear.
The tyre repair kit is in the tool box
under the floor cover in the load
compartment.
On versions with rear carrier system
or liquid gas engine, the tyre repair kit is located in a suitcase and fixed with a strap at the left sidewall in the load
compartment.
Page 199 of 241

Vehicle care197Wheel changing
Make the following preparations and observe the following information:
● Park the vehicle on a level, firm and non-skid surface. The front
wheels must be in the straight- ahead position.
● Apply the parking brake and engage first gear or reverse gear.
● Never change more than one wheel at once.
● Use the jack only to change wheels in case of puncture, not
for seasonal winter or summer
tyre change.
● The jack is maintenance-free.
● If the ground on which the vehicle
is standing is soft, a solid board
(max. 1 cm thick) should be
placed under the jack.
● Take heavy objects out of the vehicle before jacking up.
● No people or animals may be in the vehicle when it is jacked-up.
● Never crawl under a jacked-up vehicle.●Do not start the vehicle when it is
raised on the jack.
● Before screwing in the wheel bolts, clean them and lightly coat
the taper of each wheel bolt with
commercially available grease.9 Warning
Do not grease the thread of the
wheel bolt.
1. Steel wheels:
Pull off the wheel cover.
Alloy wheels with bolt caps Disengage wheel bolt caps with a
screwdriver and remove. To
protect the wheel, place a soft
cloth between the screwdriver
and the alloy wheel.
Alloy wheels with centre cap
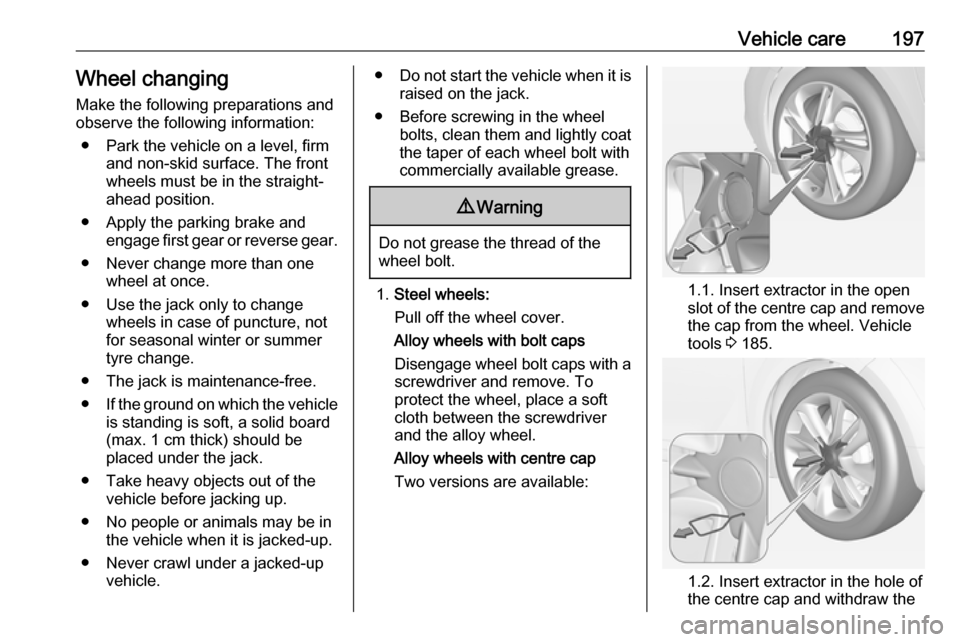
Two versions are available:1.1. Insert extractor in the open
slot of the centre cap and remove the cap from the wheel. Vehicle
tools 3 185.
1.2. Insert extractor in the hole of
the centre cap and withdraw the
Page 205 of 241

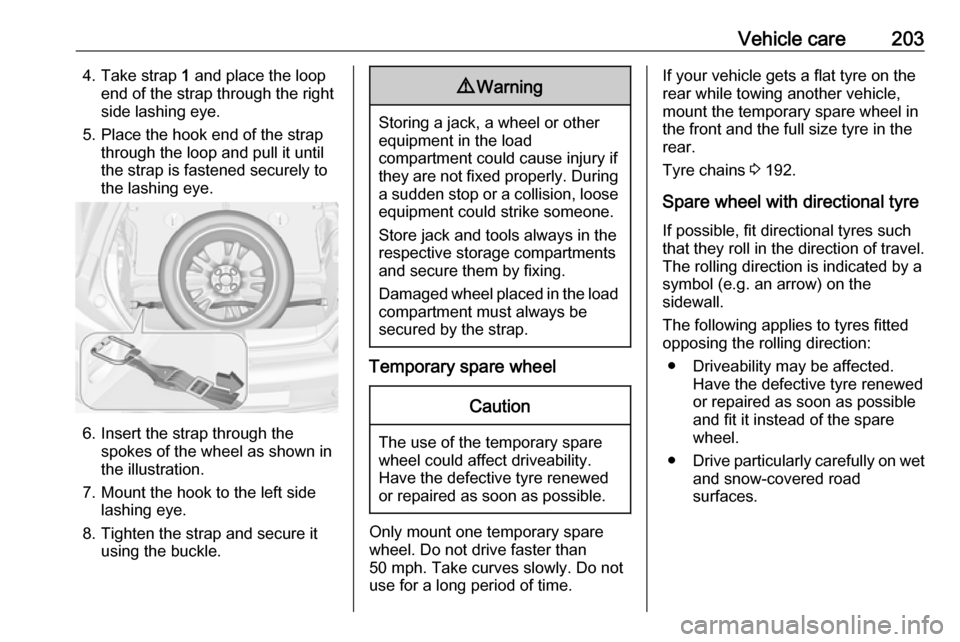
Vehicle care2034. Take strap 1 and place the loop
end of the strap through the right
side lashing eye.
5. Place the hook end of the strap through the loop and pull it until
the strap is fastened securely to
the lashing eye.
6. Insert the strap through the spokes of the wheel as shown in
the illustration.
7. Mount the hook to the left side lashing eye.
8. Tighten the strap and secure it using the buckle.
9 Warning
Storing a jack, a wheel or other
equipment in the load
compartment could cause injury if they are not fixed properly. During a sudden stop or a collision, looseequipment could strike someone.
Store jack and tools always in the
respective storage compartments
and secure them by fixing.
Damaged wheel placed in the load
compartment must always be
secured by the strap.
Temporary spare wheel
Caution
The use of the temporary spare
wheel could affect driveability.
Have the defective tyre renewed
or repaired as soon as possible.
Only mount one temporary spare
wheel. Do not drive faster than
50 mph. Take curves slowly. Do not
use for a long period of time.
If your vehicle gets a flat tyre on the
rear while towing another vehicle,
mount the temporary spare wheel in
the front and the full size tyre in the
rear.
Tyre chains 3 192.
Spare wheel with directional tyre If possible, fit directional tyres such
that they roll in the direction of travel.
The rolling direction is indicated by a
symbol (e.g. an arrow) on the
sidewall.
The following applies to tyres fitted
opposing the rolling direction:
● Driveability may be affected. Have the defective tyre renewed
or repaired as soon as possible
and fit it instead of the spare
wheel.
● Drive particularly carefully on wet
and snow-covered road
surfaces.
Page 206 of 241

204Vehicle careJump startingDo not start with a quick charger.
A vehicle with a discharged vehicle
battery can be started using jump
leads and the vehicle battery of
another vehicle.9 Warning
Be extremely careful when starting
with jump leads. Any deviation
from the following instructions can
lead to injuries or damage caused
by battery explosion or damage to the electrical systems of both
vehicles.
9 Warning
Avoid contact of the battery with
eyes, skin, fabrics and painted
surfaces. The fluid contains
sulphuric acid which can cause
injuries and damage in the event
of direct contact.
● Never expose the battery to naked flames or sparks.
● A discharged vehicle battery canalready freeze at a temperature
of 0 °C. Defrost the frozen battery
before connecting jump leads.
● Wear eye protection and protective clothing when
handling a battery.
● Use a booster battery with the same voltage (12 Volts). Its
capacity (Ah) must not be much less than that of the discharged
battery.
● Use jump leads with insulated terminals and a cross section of
at least 16 mm 2
(25 mm 2
for
diesel engines).
● Do not disconnect the discharged
vehicle battery from the vehicle.
● Switch off all unnecessary electrical consumers.
● Do not lean over the battery during jump starting.
● Do not allow the terminals of one
lead to touch those of the other
lead.
● The vehicles must not come into contact with each other during
the jump starting process.● Apply the parking brake, transmission in neutral.
● Open the positive terminal protection caps of both vehicle
batteries.
Lead connection order:
1. Connect the red lead to the positive terminal of the booster
battery.
2. Connect the other end of the red lead to the positive terminal of the
discharged battery.
Page 215 of 241

Service and maintenance213driving at high altitude and large
variations of temperature. Under
these severe operating conditions, certain service work may be required
more frequently than the regular service interval.
The international service intervals are
valid for the countries which are not
listed in the European service
intervals.
Service display 3 81.
Confirmations
Confirmation of service is recorded in the Service and Warranty Booklet.
The date and mileage is completed
with the stamp and signature of the
servicing workshop.
Make sure that the Service and
Warranty Booklet is completed
correctly as continuous proof of
service is essential if any warranty or
goodwill claims are to be met, and is
also a benefit when selling the
vehicle.Service interval with remaining
engine oil life duration
The service interval is based on
several parameters depending on
usage.
The service display lets you know when to change the engine oil.
Service display 3 81.Recommended fluids,
lubricants and parts
Recommended fluids andlubricants
Only use products that meet the
recommended specifications.9 Warning
Operating materials are
hazardous and could be
poisonous. Handle with care. Pay
attention to information given on
the containers.
Engine oil
Engine oil is identified by its quality
and its viscosity. Quality is more
important than viscosity when
selecting which engine oil to use. The oil quality ensures e.g. engine
cleanliness, wear protection and oil
aging control, whereas viscosity
grade gives information on the oil's
thickness over a temperature range.
Page 237 of 241

235Convex shape .............................. 27
Coolant and antifreeze ...............213
Cruise control ...................... 89, 142
Cupholders .................................. 51
Curtain airbag system .................. 44
D
Danger, Warnings and Cautions ...4
Daytime running lights ...............109
Declaration of conformity ............228
Door open .................................... 89
Doors ............................................ 24
Driver assistance systems ..........142
Driver Information Centre .............89
Driving hints ................................ 125
E Electric adjustment ......................27
Electrical system......................... 180
Electronic climate control system 118
Electronic driving programmes ..135
Electronic Stability Control.......... 139
Electronic Stability Control and Traction Control system ............87
Electronic Stability Control off....... 87 End-of-life vehicle recovery .......164
Engine compartment fuse box ...181
Engine coolant ........................... 167
Engine coolant temperature gauge ....................................... 80
Engine data ............................... 220Engine exhaust .......................... 131
Engine identification ...................216
Engine oil ................... 166, 213, 217
Engine oil pressure ......................88
Entry lighting .............................. 113
Event data recorders ..................232
Exit lighting ................................ 113
Exterior care .............................. 208
Exterior light ................................. 89
Exterior lighting ....................12, 107
Exterior mirrors ............................. 27
F Fault ........................................... 135
First aid ......................................... 67
First aid kit ................................... 67
Fixed air vents ........................... 123
Flex-Fix system ............................ 53
Folding mirrors ............................. 27
Front airbag system .....................42
Front seats.................................... 33 Front storage ................................ 52
Front turn signal lights ...............173
Fuel............................................. 155
Fuel consumption - CO 2-
Emissions ............................... 162
Fuel for liquid gas operation .......156
Fuel for petrol engines ...............155
Fuel gauge ................................... 79Fuel selector ................................ 80
Fuses ......................................... 180
G Gauges ......................................... 78
Glass panel .................................. 31
Glovebox ..................................... 51
Graphic-Info-Display .....................95
H Halogen headlights ....................171
Hand brake ......................... 136, 137
Hazard warning flashers ............109
Headlight flash ........................... 108
Headlight range adjustment ......109
Headlights................................... 107
Headlights when driving abroad 109
Head restraint adjustment .............8
Head restraints ............................ 32
Heated mirrors ............................. 28
Heated rear window ..................... 30
Heated steering wheel .................71
Heating ........................................ 36
Heating and ventilation system . 115
High beam ........................... 89, 108
Hill start assist ........................... 137
Horn ....................................... 13, 72
I
Identification plate .....................216
Ignition switch positions .............126
Page 239 of 241

237SSafety belts ................................... 37
Seat adjustment ....................... 7, 34 Seat belt ........................................ 8
Seat belt reminder .......................84
Seat belts ..................................... 37
Seat folding .................................. 35
Seat heating ................................. 36
Seat position ................................ 33
Selector lever ............................. 133
Service ....................................... 124
Service display ............................ 81
Service information ....................212
Service vehicle soon .................... 86
Side airbag system ......................43
Side blind spot alert ....................154
Sidelights .................................... 107
Side turn signal lights ................178
Software acknowledgement .......230
Spare wheel ............................... 199
Speed limiter............................... 143
Speedometer ............................... 78
Starting and operating ................126
Starting off ................................... 16
Starting the engine ............127, 133
Steering ...................................... 126
Steering wheel adjustment ......9, 71
Steering wheel controls ...............71
Stop-start system........................ 128
Storage ......................................... 51Storage compartments.................51
Sunroof ........................................ 31
Sun visors .................................... 30
Symbols ......................................... 4
T
Tachometer ................................. 79
Tail lights ................................... 175
Three-point seat belt .................... 38
Tools .......................................... 185
Top-tether fastening eyes ............50
Towing ........................................ 205
Towing another vehicle .............207
Towing the vehicle .....................205
Traction Control system ............. 138
Transmission ............................... 16
Transmission display .................133
Tread depth ............................... 191
Trip odometer .............................. 79
Turn and lane-change signals ...110
Turn signal ................................... 84
Tyre chains ................................ 192
Tyre designations ......................186
Tyre pressure ............................ 187
Tyre pressure monitoring system ............................... 88, 188
Tyre pressures ........................... 226
Tyre repair kit ............................. 193U
Ultrasonic parking assist ...... 87, 145
Upholstery .................................. 210
Uplevel-Display............................. 89
Upshift .......................................... 87
Using this manual ..........................3
V Vehicle battery ........................... 168
Vehicle checks............................ 165
Vehicle data ................................ 217
Vehicle data recording and privacy ..................................... 232
Vehicle dimensions .................... 224
Vehicle Identification Number ....215
Vehicle jack ................................ 185
Vehicle messages .......................96
Vehicle personalisation ...............99
Vehicle security ............................ 25
Vehicle specific data ......................3
Vehicle storage ........................... 164
Vehicle tools ............................... 185
Vehicle unlocking ........................... 6
Vehicle weight ........................... 223
Ventilation ................................... 115
W
Warning chimes ........................... 98
Warning lights ............................... 78
Warning triangle .......................... 66
Washer and wiper systems .........14