Instrument VAUXHALL ADAM 2019 Workshop Manual
[x] Cancel search | Manufacturer: VAUXHALL, Model Year: 2019, Model line: ADAM, Model: VAUXHALL ADAM 2019Pages: 223, PDF Size: 6.54 MB
Page 131 of 223
Driving and operating129Vehicle messages 3 87.
System calibration
If control indicators c and b
illuminate simultaneously, a
calibration of the power steering
system is necessary. This can occur
e.g. when turning the steering wheel
for one rotation with ignition switched
off. In this case, switch on ignition and turn steering wheel once from lock to
lock.
If control indicators c and b do not
extinguish after calibration, seek the
assistance of a workshop.Driver assistance
systems9 Warning
Driver assistance systems are
developed to support the driver
and not to replace the driver's
attention.
The driver accepts full
responsibility when driving the
vehicle.
When using driver assistance
systems, always take care
regarding the current traffic
situation.
Cruise control
The cruise control can store and
maintain speeds of approx. 20 mph to maximum vehicle speed. Deviations
from the stored speeds may occur
when driving uphill or downhill.
For safety reasons the cruise control
cannot be activated until the brake
pedal has been operated once.
Activating in first gear is not possible.
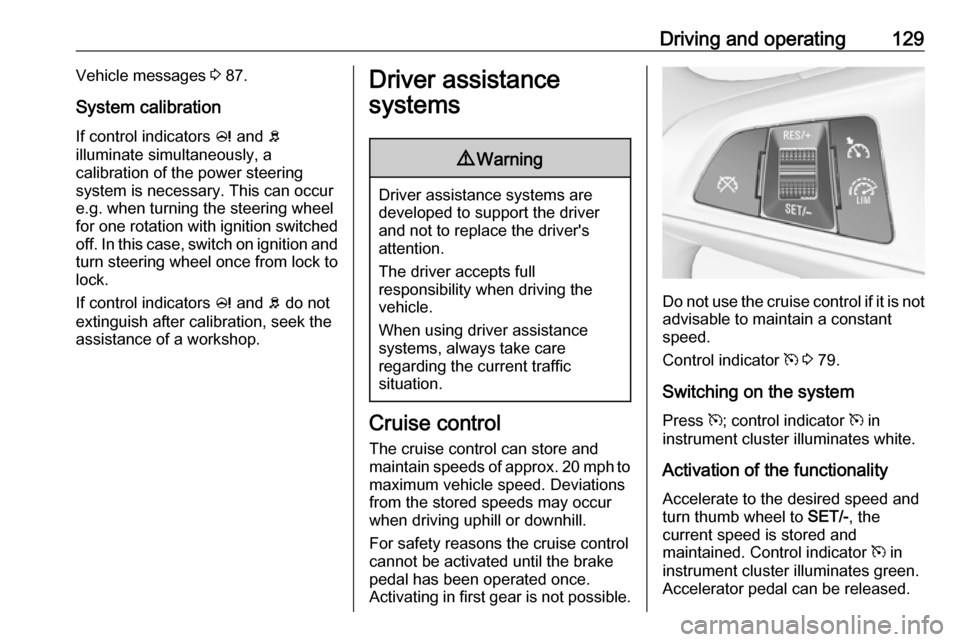
Do not use the cruise control if it is not advisable to maintain a constant
speed.
Control indicator m 3 79.
Switching on the system
Press m; control indicator m in
instrument cluster illuminates white.
Activation of the functionality Accelerate to the desired speed and
turn thumb wheel to SET/-, the
current speed is stored and
maintained. Control indicator m in
instrument cluster illuminates green. Accelerator pedal can be released.
Page 132 of 223
130Driving and operatingVehicle speed can be increased by
depressing the accelerator pedal.
When the accelerator pedal is
released, the previously stored speed
is resumed.
Cruise control remains activated
while gearshifting.
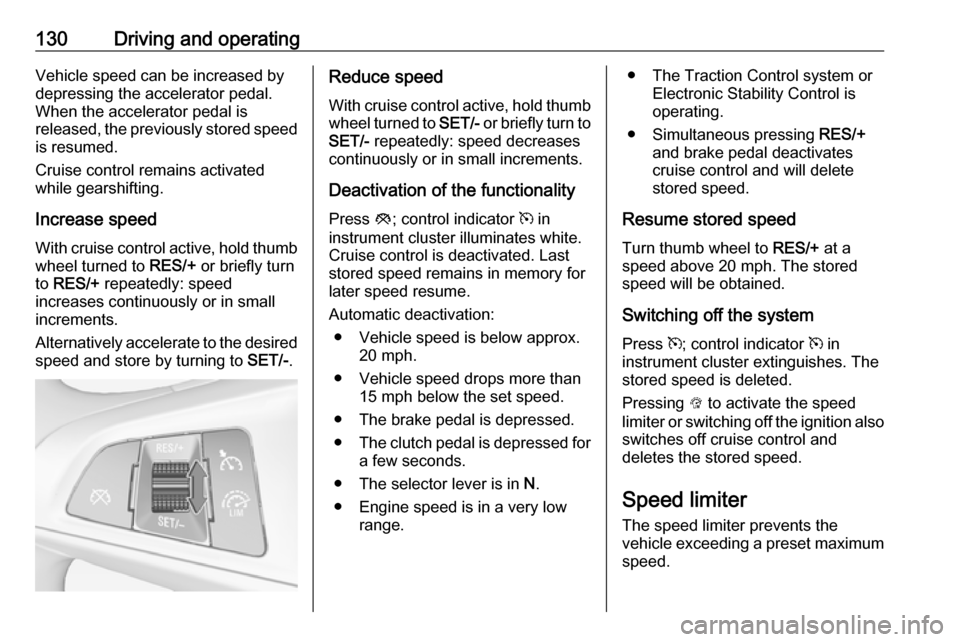
Increase speed With cruise control active, hold thumb
wheel turned to RES/+ or briefly turn
to RES/+ repeatedly: speed
increases continuously or in small
increments.
Alternatively accelerate to the desired speed and store by turning to SET/-.Reduce speed
With cruise control active, hold thumb
wheel turned to SET/- or briefly turn to
SET/- repeatedly: speed decreases
continuously or in small increments.
Deactivation of the functionality
Press y; control indicator m in
instrument cluster illuminates white.
Cruise control is deactivated. Last
stored speed remains in memory for
later speed resume.
Automatic deactivation: ● Vehicle speed is below approx. 20 mph.
● Vehicle speed drops more than 15 mph below the set speed.
● The brake pedal is depressed.
● The clutch pedal is depressed for
a few seconds.
● The selector lever is in N.
● Engine speed is in a very low range.● The Traction Control system or Electronic Stability Control is
operating.
● Simultaneous pressing RES/+
and brake pedal deactivates
cruise control and will delete
stored speed.
Resume stored speed
Turn thumb wheel to RES/+ at a
speed above 20 mph. The stored speed will be obtained.
Switching off the system
Press m; control indicator m in
instrument cluster extinguishes. The
stored speed is deleted.
Pressing L to activate the speed
limiter or switching off the ignition also switches off cruise control and
deletes the stored speed.
Speed limiter
The speed limiter prevents the
vehicle exceeding a preset maximum
speed.
Page 135 of 223

Driving and operating133sounds becomes shorter as the
vehicle gets closer to that obstacle.
When the distance is less than
approximately 30 cm, the sound is
continuous.
Additionally, the distance to rear
obstacles is displayed by changing
distance lines in the Driver
Information Centre with Uplevel
Display 3 80 or, depending on the
version, on the Colour Info Display
3 85.
Deactivation
The system automatically switches
off when reverse gear is disengaged.
Manual deactivation is also possible
by pressing r.
In both cases the LED in the button extinguishes.
Fault
In the event of a fault or if the system does not work temporarily, e.g.
because of high external noise level
or other interference factors, the LED
in the button flashes for 3 seconds
and then extinguishes. Control
indicator r illuminates in the
instrument cluster 3 77 and a
message pops-up in the Driver
Information Centre.
Front-rear parking assist9 Warning
The driver bears full responsibility
for the parking manoeuvre.
Always check the surrounding
area when driving backwards or
forwards while using parking
assist system.
The front-rear parking assist
measures the distance between the vehicle and obstacles in front and
behind the vehicle. It informs and
warns the driver via acoustic signals
and display indication.
The system has six ultrasonic parking
sensors in both the rear and front
bumper.
It uses two different acoustic warning
signals for the front and rear
monitoring areas, each with a
different tone frequency.
Page 150 of 223

148Vehicle careVehicle careGeneral Information...................148
Accessories and vehicle modifications .......................... 148
Vehicle storage ........................149
End-of-life vehicle recovery .....149
Vehicle checks ........................... 150
Performing work ......................150
Bonnet ..................................... 150
Engine oil ................................. 151
Engine coolant ......................... 152
Washer fluid ............................ 152
Brakes ..................................... 153
Brake fluid ............................... 153
Vehicle battery ......................... 153
Wiper blade replacement ........155
Bulb replacement .......................155
Halogen headlights ..................155
Front turn lights .......................158
Tail lights ................................. 159
Side turn lights ......................... 162
Number plate light ...................163
Interior lights ............................ 164
Electrical system ........................164
Fuses ....................................... 164Engine compartment fuse box . 165
Instrument panel fuse box .......167
Vehicle tools .............................. 169
Tools ........................................ 169
Wheels and tyres .......................170
Winter tyres ............................. 170
Tyre designations ....................171
Tyre pressure .......................... 171
Tyre pressure monitoring system .................................... 172
Tread depth ............................. 175
Changing tyre and wheel size . 176
Wheel covers ........................... 176
Tyre chains .............................. 176
Tyre repair kit .......................... 177
Wheel changing .......................181
Spare wheel ............................ 182
Jump starting ............................. 188
Towing ....................................... 190
Towing the vehicle ...................190
Appearance care .......................191
Exterior care ............................ 191
Interior care ............................. 194General Information
Accessories and vehiclemodifications
We recommend the use of genuine
parts and accessories and factory
approved parts specific for your
vehicle type. We cannot assess or
guarantee reliability of other products - even if they have a regulatory or
otherwise granted approval.
Any modification, conversion or other
changes made to standard vehicle
specifications (including, without
limitation, software modifications,
modifications of the electronic control units) may invalidate the warranty
offered by Vauxhall. Furthermore,
such changes may affect driver
assistance systems, fuel
consumption, CO 2 emissions and
other emissions of the vehicle. They
may also invalidate the vehicle
operating permit.
Page 166 of 223
164Vehicle care4. Pull bulb from bulb holder andreplace it.
5. Insert bulb holder into lamp housing and turn clockwise.
6. Insert lamp into bumper and allow
it to engage.
Interior lights
Have the following bulbs replaced by
a workshop:
● courtesy light, reading lights
● load compartment light
● dome light
● ambient light
● starlight panel
● instrument panel illuminationElectrical system
Fuses
Data on the replacement fuse must
match the data on the defective fuse.
There are two fuse boxes in the
vehicle:
● in the front left of the engine compartment,
● in left-hand drive vehicles behind
the light switch, or, in right-hand
drive vehicles, behind the
glovebox.
Before replacing a fuse, turn off the respective switch and the ignition.There are different kinds of fuses in
the vehicle.
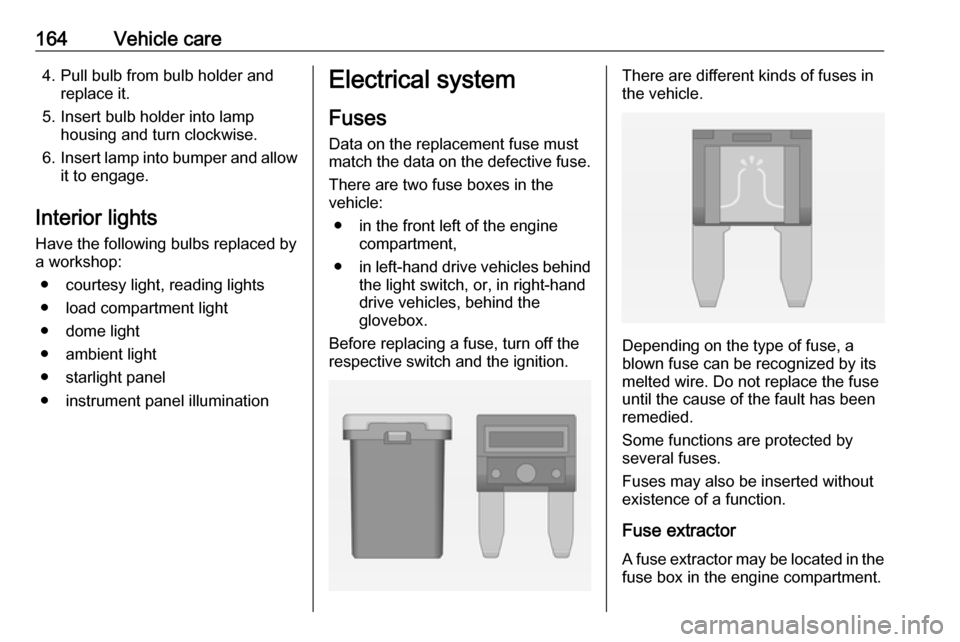
Depending on the type of fuse, a
blown fuse can be recognized by its
melted wire. Do not replace the fuse until the cause of the fault has been
remedied.
Some functions are protected by
several fuses.
Fuses may also be inserted without existence of a function.
Fuse extractorA fuse extractor may be located in the
fuse box in the engine compartment.
Page 169 of 223
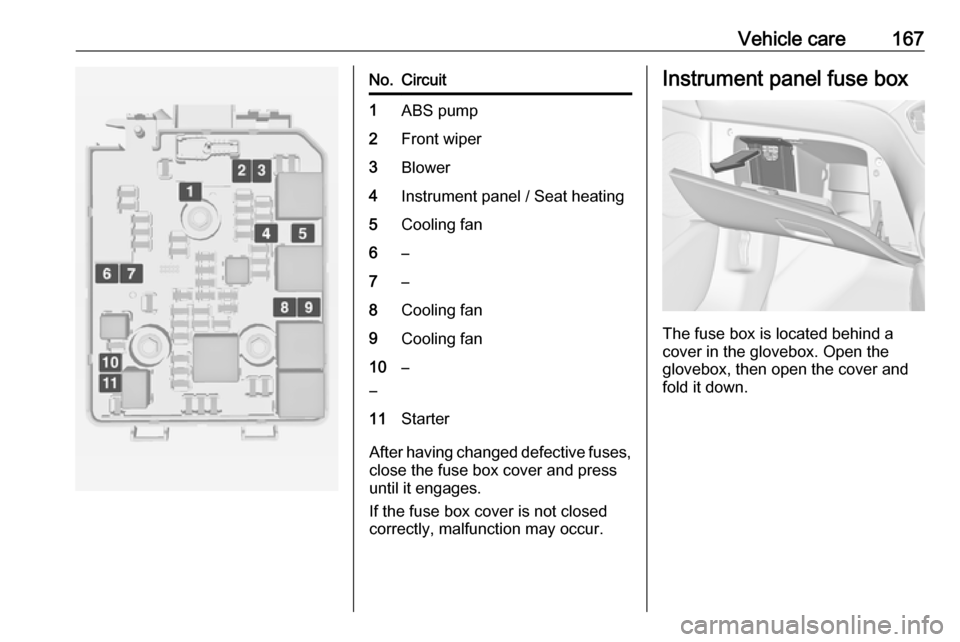
Vehicle care167No.Circuit1ABS pump2Front wiper3Blower4Instrument panel / Seat heating5Cooling fan6–7–8Cooling fan9Cooling fan10
––11Starter
After having changed defective fuses,
close the fuse box cover and press
until it engages.
If the fuse box cover is not closed
correctly, malfunction may occur.
Instrument panel fuse box
The fuse box is located behind a
cover in the glovebox. Open the
glovebox, then open the cover and
fold it down.
Page 170 of 223
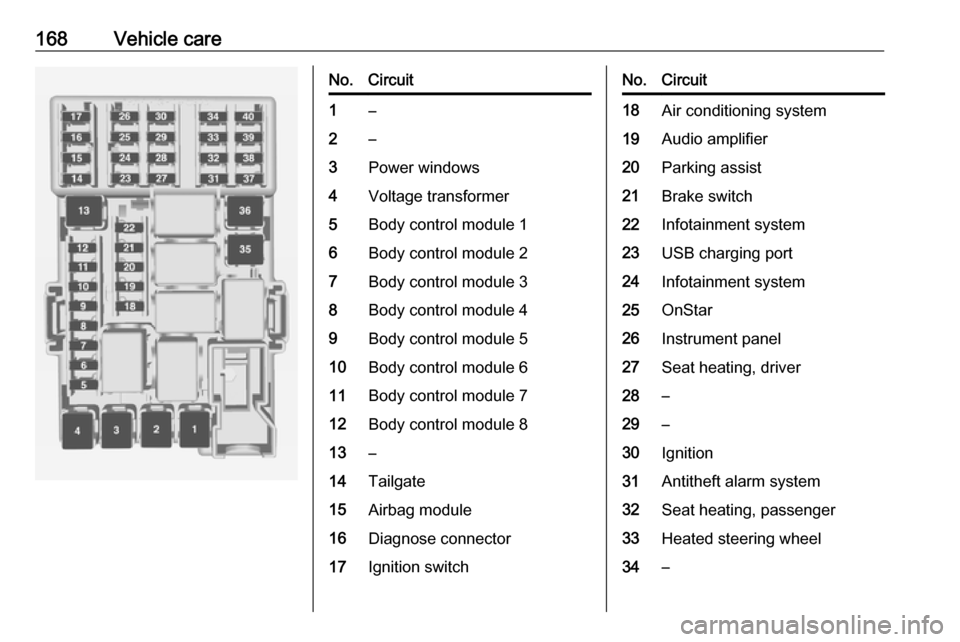
168Vehicle careNo.Circuit1–2–3Power windows4Voltage transformer5Body control module 16Body control module 27Body control module 38Body control module 49Body control module 510Body control module 611Body control module 712Body control module 813–14Tailgate15Airbag module16Diagnose connector17Ignition switchNo.Circuit18Air conditioning system19Audio amplifier20Parking assist21Brake switch22Infotainment system23USB charging port24Infotainment system25OnStar26Instrument panel27Seat heating, driver28–29–30Ignition31Antitheft alarm system32Seat heating, passenger33Heated steering wheel34–
Page 196 of 223
194Vehicle careAfter the underbody is washed, checkthe underbody and have it waxed if
necessary.
Bitumen / rubber materials could
damage the PVC coating. Have
underbody work carried out by a
workshop.
Before and after winter, wash the
underbody and have the protective
wax coating checked.
Liquid gas system9 Danger
Liquid gas is heavier than air and
can collect in sink points.
Take care when performing work
at the underbody in a pit.
For painting work and when using a
drying booth at a temperature above
60 °C, the liquid gas tank must be
removed.
Do not make any modifications to the
liquid gas system.
Rear carrier system
Clean the rear carrier system with a
steam-jet or high-pressure jet cleaner
at least once a year.
Operate the rear carrier system
periodically if not in regular use, in
particular during winter.
Interior care
Interior and upholstery
Only clean the vehicle interior,
including the instrument panel fascia
and panelling, with a dry cloth or
interior cleaner.
Clean the leather upholstery with
clear water and a soft cloth. In case of heavy soiling, use leather care.
The instrument cluster and the
displays should only be cleaned using
a soft damp cloth. If necessary use a
weak soap solution.
Clean fabric upholstery with a
vacuum cleaner and brush. Remove
stains with an upholstery cleaner.Clothing fabrics may not be
colourfast. This could cause visible
discolourations, especially on light- coloured upholstery. Removable
stains and discolourations should be
cleaned as soon as possible.
Clean seat belts with lukewarm water or interior cleaner.Caution
Close Velcro fasteners as open
Velcro fasteners on clothing could damage seat upholstery.
The same applies to clothing with
sharp-edged objects, like zips or
belts or studded jeans.
Plastic and rubber parts
Plastic and rubber parts can be
cleaned with the same cleaner as
used to clean the body. Use interior cleaner if necessary. Do not use any
other agent. Avoid solvents and petrol
in particular. Do not use high-
pressure jet cleaners.
Page 200 of 223

198Technical dataTechnical dataVehicle identification..................198
Vehicle Identification Number ..198
Identification plate ...................199
Engine identification ................199
Vehicle data ............................... 200
Recommended fluids and lubricants ................................ 200
Engine data ............................. 203
Vehicle dimensions .................205
Capacities ................................ 205
Tyre pressures ........................ 206Vehicle identification
Vehicle IdentificationNumber
The Vehicle Identification Number is
stamped on the identification plate
and on the floor pan, under the floor
covering, visible under a cover.
The Vehicle Identification Number
may be embossed on the instrument
panel visible through the windscreen, or in the engine compartment on theright body panel.
Page 219 of 223

217DDanger, Warnings and Cautions ...4
Daytime running lights ...............100
Declaration of conformity ............207
Door open .................................... 79
Doors ............................................ 24
Driver assistance systems ..........129
Driver Information Centre .............80
Driving hints ................................ 115
E Electric adjustment ......................26
Electrical system......................... 164
Electronic climate control system 109
Electronic Stability Control.......... 126
Electronic Stability Control and Traction Control system ............77
Electronic Stability Control off....... 77
End-of-life vehicle recovery .......149
Engine compartment fuse box ...165
Engine coolant ........................... 152
Engine coolant temperature gauge ....................................... 70
Engine data ............................... 203
Engine exhaust .......................... 121
Engine identification ...................199
Engine oil ...........151, 196, 200, 205
Engine oil pressure ......................78
Entry lighting .............................. 104
Event data recorders ..................212Exhaust filter ......................... 78, 121
Exit lighting ................................ 104
Exterior care .............................. 191
Exterior light ................................. 79
Exterior lighting ......................12, 98
Exterior mirrors ............................. 26
F First aid ......................................... 57
First aid kit ................................... 57
Fixed air vents ........................... 114
Folding mirrors ............................. 26
Front airbag system .....................42
Front seats.................................... 32
Front storage ................................ 52
Front turn lights .......................... 158
Fuel............................................. 142
Fuel for liquid gas operation .......144
Fuel for petrol engines ...............142
Fuel gauge ................................... 69 Fuel selector ................................ 69
Fuel tank ..................................... 205
Fuses ......................................... 164
G Gauges ......................................... 68
Gear shifting ................................. 77
Glass panel .................................. 30
Glovebox ..................................... 51H
Halogen headlights ....................155
Hand brake ......................... 123, 124
Hazard warning flashers ............100
Headlight flash ............................. 99
Headlight range adjustment ......100
Headlights..................................... 98
Headlights when driving abroad 100
Head restraint adjustment .............8
Head restraints ............................ 31
Heated mirrors ............................. 26
Heated rear window ..................... 29
Heated steering wheel .................61
Heating ........................................ 35
Heating and ventilation system . 106
High beam ............................. 79, 99
Hill start assist ........................... 125
Horn ....................................... 13, 62
I
Identification plate .....................199
Ignition switch positions .............116
Immobiliser ............................ 25, 79
Indicators ...................................... 68
Info Display ................................... 85
Information displays...................... 80
Instrument cluster ........................68
Instrument panel fuse box .........167
Instrument panel illumination control .................................... 102