belt VAUXHALL ANTARA 2014 Owner's Manual
[x] Cancel search | Manufacturer: VAUXHALL, Model Year: 2014, Model line: ANTARA, Model: VAUXHALL ANTARA 2014Pages: 217, PDF Size: 5.94 MB
Page 10 of 217

8In brief
Positioning=move front switch
forwards/backwardsHeight of
front part of
seat=move front part of
front switch
upwards/
downwardsHeight of
rear part of
seat=move rear part of
front switch
upwards/
downwardsHeight of
entire seat=move entire front
switch upwards/
downwardsBackrest=move upper part of
rear switch
forwards/backwards
Seat position 3 34, Power seat
adjustment 3 37.
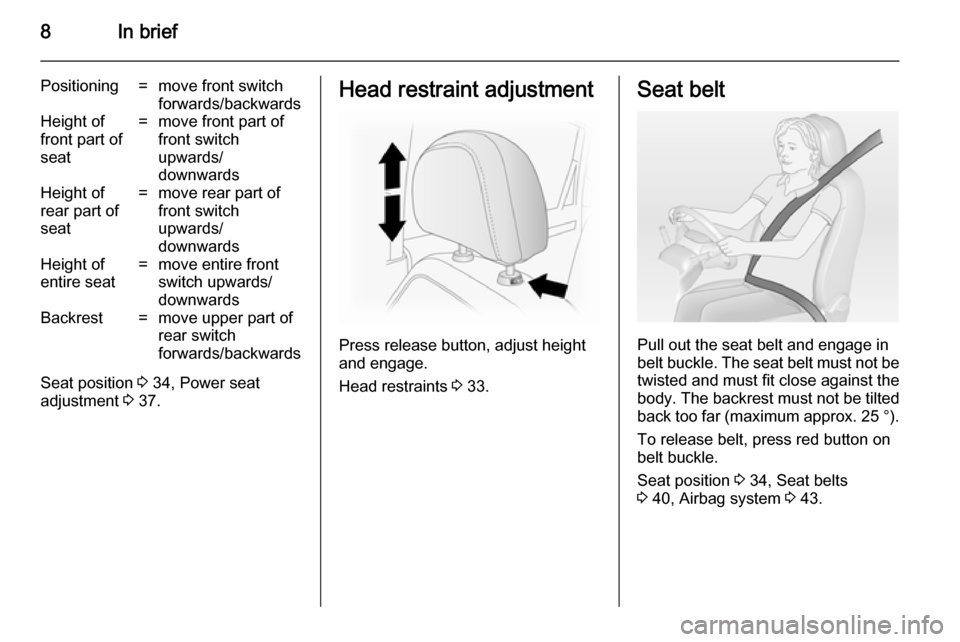
Head restraint adjustment
Press release button, adjust height
and engage.
Head restraints 3 33.
Seat belt
Pull out the seat belt and engage in
belt buckle. The seat belt must not be twisted and must fit close against the
body. The backrest must not be tilted
back too far (maximum approx. 25 ° ).
To release belt, press red button on belt buckle.
Seat position 3 34, Seat belts
3 40, Airbag system 3 43.
Page 13 of 217

In brief11
1Side air vents .....................119
2 Fixed air vents .................... 120
3 High beam .......................... 106
Headlight flash ...................106
Turn and lane-change
signals ................................ 108
Exit lighting ......................... 112
Parking lights .....................109
Cruise control ....................... 90
4 Remote control on
steering wheel ......................72
Trip computer .....................100
5 Horn ..................................... 73
6 Instruments .......................... 79
7 Windscreen wiper and
washer system, headlight
washer system .....................73
Rear window wiper and
washer system .....................758Info-Display .......................... 93
Check control, tyre
pressure monitoring
system ................................ 176
Trip computer .....................100
9 Centre air vents .................. 119
10 Hazard warning flashers ....107
Parking assist ..................... 141
Electronic Stability Control . 137
Descent control system ...... 138
Status LED for anti-theft
alarm system ........................ 24
Folding exterior mirrors ........27
Eco button for stop/start
system ................................. 124
11 Infotainment system .............10
12 Front passenger airbag ........46
13 Status LEDs for front
passenger airbag .................48
Control indicator for front
passenger seat belt .............41
14 Glovebox .............................. 5515Fuse box ............................ 170
16 Climate control system ....... 114
17 Ignition switch with
steering wheel lock ............123
18 Accelerator pedal ...............122
19 Driver airbag ........................ 46
20 Brake pedal ........................ 135
21 Clutch pedal ....................... 122
22 Steering wheel adjustment ..72
23 Bonnet release ...................152
24 Coin storage ......................... 56
25 Card holder .......................... 56
26 Light switch ........................ 105
Automatic light control .......105
Instrument illumination .......110
Rear fog light ...................... 109
Front fog lights ...................108
Headlight range
adjustment ......................... 106
Page 18 of 217
![VAUXHALL ANTARA 2014 Owners Manual 16In brief
Automatic transmissionP=parkR=reverseN=neutralD=drive
Manual mode: move selector lever
from D to the left.
<=higher gear]=lower gear
The selector lever can only be moved
out of P when the VAUXHALL ANTARA 2014 Owners Manual 16In brief
Automatic transmissionP=parkR=reverseN=neutralD=drive
Manual mode: move selector lever
from D to the left.
<=higher gear]=lower gear
The selector lever can only be moved
out of P when the](/img/38/19316/w960_19316-17.png)
16In brief
Automatic transmissionP=parkR=reverseN=neutralD=drive
Manual mode: move selector lever
from D to the left.
<=higher gear]=lower gear
The selector lever can only be moved
out of P when the ignition is on and
the foot brake is applied. To engage
P or R, push the release button.
Automatic transmission 3 128.
Starting off
Check before starting off ■ Tyre pressure and condition 3 176,
3 207.
■ Engine oil level and fluid levels 3 152.
■ All windows, mirrors, exterior lighting and number plates are free
from dirt, snow and ice and are
operational.
■ Proper position of mirrors, seats, and seat belts 3 27, 3 34,
3 41.
■ Brake function at low speed, particularly if the brakes are wet.Starting the engine
■ Turn key to position ACC
■ move the steering wheel slightly to release the steering wheel lock
■ manual transmission in neutral
■ operate clutch and brake pedals ■ automatic transmission in P or N
■ do not accelerate
■ diesel engines: turn key to ON for
preheating and wait until control
indicator ! extinguishes
■ turn key to START and release
Starting the engine 3 123.
Page 22 of 217

20Keys, doors and windows
Key with fixed key sectionOpen the unit with a small screwdriver in the notch on the cover. Replace the
battery (battery type CR2032), paying
attention to the installation position.
Close the unit.
Central locking system
Unlocks and locks doors, load
compartment and fuel filler flap.
A pull on an interior door handle
unlocks the respective door. Pulling the handle once more opens the door.
Notice
In the event of an accident in which
airbags or belt pretensioners are
deployed, the vehicle is
automatically unlocked.Unlocking
Press button q.
Notice
If no door is opened within
5 minutes after the vehicle has been unlocked, the vehicle is relocked
automatically (and the anti-theft
alarm is reactivated).
When button q is pressed, the
instrument panel illuminates for
approx. 30 seconds or until ignition
switch is turned to position ACC.
Locking
Close doors, load compartment, fuel
filler flap, bonnet, windows and
sunroof.
Press button p.
The central locking system can be
activated with the windows open.
Page 35 of 217

Seats, restraints33Seats, restraintsHead restraints............................ 33
Front seats ................................... 34
Rear seats ................................... 38
Seat belts ..................................... 40
Airbag system .............................. 43
Child restraints ............................. 50Head restraints
Position9 Warning
Only drive with the head restraint
set to the proper position.
The upper edge of the head restraint
should be at upper head level. If this
is not possible for extremely tall
people, set to highest position, and
set to lowest position for small people.
Height adjustment
Press release button, adjust height
and engage.
Pull head restraint up to raise. Push
head restraint down while pressing
the release button to lower the head
restraint.
Removal
Insert a suitable tool into the small
hole in the side of the guide sleeve
without the release button and
depress the lock. Press the release
button on the other guide sleeve and
pull up the head restraint.
Page 36 of 217

34Seats, restraints
Stow head restraints securely in load
compartment.
Active head restraintsIn the event of a rear-end impact, the
active head restraints automatically
tilt forwards. Thus the head is
supported so that the risk of whiplash injury is reduced.
Notice
Do not attach objects or components
that are not approved for your
vehicle to the head restraints. These
affect the protective effect of the
head restraints and can be propelled through the vehicle in an
uncontrolled manner if the driver
brakes hard or an accident occurs.
Notice
Approved accessories may only be
attached if the seat is not in use.Front seats
Seat position9 Warning
Only drive with the seat correctly
adjusted.
■ Sit with buttocks as far back against
the backrest as possible. Adjust the distance between the seat and the
pedals so that legs are slightly
angled when pressing the pedals.
Slide the front passenger seat as
far back as possible.
■ Sit with shoulders as far back against the backrest as possible.
Set the backrest rake so that it is possible to easily reach the
steering wheel with arms slightly bent. Maintain contact between
shoulders and the backrest when
turning the steering wheel. Do not
angle the backrest too far back. We recommend a maximum rake of
approximately 25°.
■ Adjust the steering wheel 3 72.
■ Set seat height high enough to have a clear field of vision on allsides and of all display instruments.
There should be at least one hand
of clearance between head and the
roof frame. Your thighs should rest
lightly on the seat without pressing
into it.
■ Adjust the head restraint 3 33.
■ Adjust the height of the seat belt 3 41.
■ Adjust the lumbar support so that it
supports the natural shape of the
spine.
Page 40 of 217

38Seats, restraintsHeating
Adjust heating to the desired setting
by pressing the ß button for the
respective seat one or more times
with the ignition switch set to ACC or
ON . The control indicator in the button
indicates the setting.
To deactivate heating, set the heating
level to its lowest setting and press
the ß button. The control indicator in
the button will extinguish.
Prolonged use of the highest setting
for people with sensitive skin is not
recommended.
If temperature continues to rise, turn
seat heating off and seek the
assistance of a workshop.Rear seats
Seat backrests
To adjust seat backrests, lift release
lever on top of backrest and move
backrest forwards/backwards to
desired position.
Do not lean on the backrest whilst
adjusting it.
When folding the backrests, ensure
the seat belts are unbuckled.
Page 41 of 217

Seats, restraints399Warning
Never adjust seats while driving as
they could move uncontrollably.
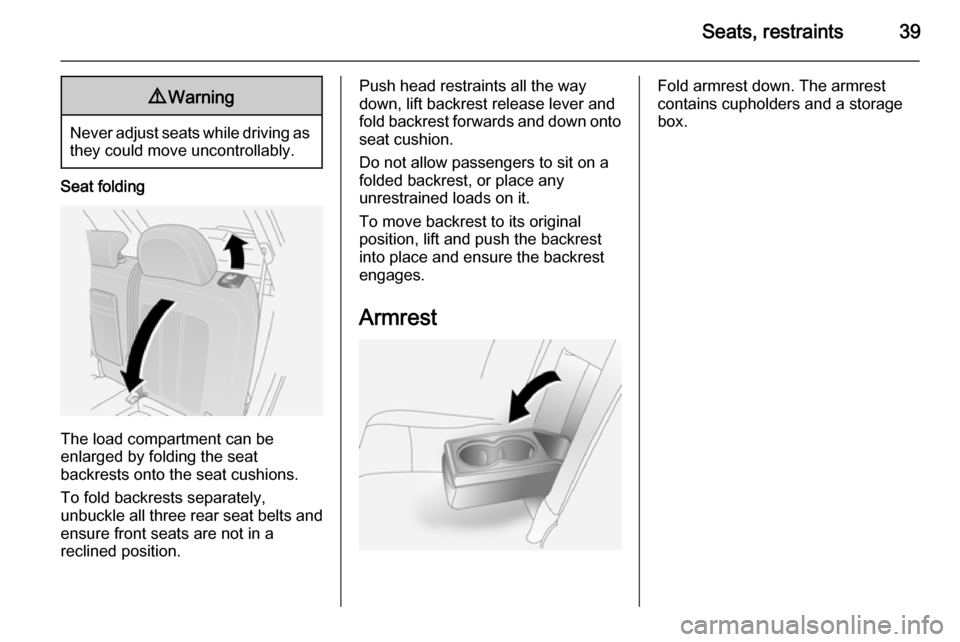
Seat folding
The load compartment can be
enlarged by folding the seat
backrests onto the seat cushions.
To fold backrests separately,
unbuckle all three rear seat belts and
ensure front seats are not in a
reclined position.
Push head restraints all the way
down, lift backrest release lever and fold backrest forwards and down onto seat cushion.
Do not allow passengers to sit on a
folded backrest, or place any
unrestrained loads on it.
To move backrest to its original
position, lift and push the backrest
into place and ensure the backrest
engages.
ArmrestFold armrest down. The armrest
contains cupholders and a storage
box.
Page 42 of 217

40Seats, restraintsSeat belts
The seat belts are locked during
heavy acceleration or deceleration of
the vehicle holding the occupants in
the seated position. Thereby the risk
of injury is considerably reduced.
9 Warning
Fasten seat belt before each trip.
In the event of an accident, people
not wearing seat belts endanger their fellow occupants and
themselves.
Seat belts are designed to be used by only one person at a time.
Child restraint system 3 50.
Periodically check all parts of the belt
system for damage and proper
functionality.
Have damaged components
replaced. After an accident, have the
belts and triggered belt pretensioners replaced by a workshop.
Notice
Make sure that the belts are not
damaged by shoes or sharp-edged
objects or are trapped. Prevent dirt
from getting into the belt retractors.
Seat belt reminder Front seats are equipped with a seat
belt reminder, indicated for driver seat
by control indicator X in the
instrument cluster 3 83 and for
passenger seat by control indicator
k on the passenger side of the
instrument panel 3 41.Belt force limiters
Located on the front seats. Stress on
the body is reduced by the gradual
release of the belt during a collision.
Belt pretensionersIn the event of a head-on collision or
side impact of a certain severity, the
front seat belts are tightened.9 Warning
Incorrect handling (e.g. removal or
fitting of belts) can trigger the belt
pretensioners.
Deployment of the belt pretensioners
is indicated by illumination of control
indicator v 3 83.
Triggered belt pretensioners must be
replaced by a workshop. Belt
pretensioners can only be triggered
once.
Notice
Do not affix or install accessories or
other objects that may interfere with
the operation of the belt
Page 43 of 217

Seats, restraints41
pretensioners. Do not make any
modifications to belt pretensioner components as this will invalidate
the vehicle type approval.
Three-point seat belt
Fastening
Withdraw the belt from the retractor,
guide it untwisted across the body
and insert the latch plate into the
buckle. Tighten the lap belt regularly
whilst driving by pulling the shoulder
belt.
Seat belt reminder X 3 83.
Loose or bulky clothing prevents the
belt from fitting snugly. Do not place
objects such as handbags or mobile
phones between the belt and your body.
9 Warning
The belt must not rest against hard
or fragile objects in the pockets of
your clothing.
Height adjustment
1. Squeeze release buttons together.
2. Slide adjuster up or down.
3. Ensure adjuster latches into position.