sensor VAUXHALL ANTARA 2015 User Guide
[x] Cancel search | Manufacturer: VAUXHALL, Model Year: 2015, Model line: ANTARA, Model: VAUXHALL ANTARA 2015Pages: 223, PDF Size: 6.07 MB
Page 127 of 223

Driving and operating125
Before restarting or to switch off the
engine, turn key back to LOCK.
Start attempts should not last longer than 15 seconds. If engine does not
start, wait 10 seconds before
repeating starting procedure.
The increased engine speed
automatically returns to normal idling
speed as the engine temperature
rises. Drive at a moderate speed,
especially in cold weather, until
normal engine operating
temperatures have been reached.
During an Autostop, the engine can
be started by depressing the clutch
pedal.
Stop-start system 3 125.
Starting the vehicle at low
temperatures In extremely cold temperatures, i.e.
below -20 °С, it may be necessary to
crank the engine for up to
30 seconds for it to start.
Turn key to position START and hold
until engine starts. Start attempts
should not last longer than30 seconds. If engine does not start,
wait 10 seconds before repeating starting procedure.
Ensure the engine oil is of the correct
viscosity, the correct fuel is used,
vehicle services are performed
regularly and the battery is sufficiently charged.
Turbo engine warm-up
Upon start-up, engine available
torque may be limited for a short time, especially when the engine
temperature is cold. The limitation is
to allow the lubrication system to fully
protect the engine.
Overrun cut-off
The fuel supply is automatically cut-
off during overrun, i.e. when the
vehicle is driven with a gear engaged but accelerator is released.Stop-start system
The stop-start system helps to save
fuel and to reduce the exhaust
emissions. When conditions allow, it
switches off the engine as soon as the
vehicle is at a low speed or at a
standstill, e.g. at a traffic light or in a
traffic jam. It starts the engine
automatically as soon as the clutch is
depressed. A vehicle battery sensor
ensures that an Autostop is only
performed if the vehicle battery is
sufficiently charged for a restart.
Activation
The stop-start system is available as
soon as the engine is started, the
vehicle starts-off and the conditions
as stated below in this section are
fulfilled.
Page 145 of 223

Driving and operating143Parking assist
The parking assist system makes
parking easier by measuring the
distance between the vehicle and obstacles to the front and rear, and
giving acoustic signals. It is the driver,
however, who bears full responsibility for the parking manoeuvre.
The system consists of four ultrasonic
parking sensors in both the front and
rear bumpers.
Control indicator r 3 87.
Activation
With the ignition on, the system must
be activated manually.
Press button r on the instrument
panel. The LED in the button will
illuminate and will activate when a
forward gear or reverse gear is
engaged and the electrical parking
brake is released.
An obstacle is indicated by an
acoustic signal. The interval between
the sounds becomes shorter as the
vehicle gets closer to the obstacle.
When the distance is less than
30 cm, the signal is continuous. The
acoustic signal may differ depending
on the type of object detected.
Deactivation
To deactivate, press the button again
and the LED in the button will
extinguish. The control indicator r
in the instrument cluster will illuminate
until the vehicle speed exceeds
18 mph.
The system is deactivated
automatically when the vehicle speed is above 5 mph or when selector leveris in neutral (automatic transmission
in N or P).
If the b button is pressed again, the
LED in the button will extinguish and the system will be reactivated as soon
as a forward gear or reverse gear is
engaged and the electrical parking
brake is released.
Fault
In the event of a fault in the system,
control indicator r illuminates in the
instrument cluster.
Page 146 of 223

144Driving and operating
If the acoustic signal sounds 3 times
continuously when there are no
obstacles near the front or rear
bumper, there is a fault in the system.
Have the cause of the fault remedied by a workshop.
Important hints for using theparking assist system9 Warning
Under certain circumstances,
various reflective surfaces on
objects or clothing as well as
external noise sources may cause the system to fail to detect
obstacles.
Special attention has to be paid to
low obstacles which can damage
the lower part of the bumper.
Caution
Performance of the system can be reduced when sensors are
covered, e.g. by ice or snow.
Performance of the parking assist
system can be reduced due to
heavy loading.
Special conditions apply if there
are taller vehicles in the vicinity
(e.g. off-road vehicles, mini vans,
vans). Object identification and correct distance indication in the
upper part of these vehicles
cannot be guaranteed.
Objects with a very small reflection
cross-section, e.g. objects of
narrow size or soft materials, may
not be detected by the system.
Parking assist systems do not
detect objects outside the
detection range.
Fuel
Fuel for petrol engines
Only use unleaded fuel that complies
with European standard EN 228 or
E DIN 51626-1 or equivalent.
Your engine is capable of running
with E10 fuel that fulfills these
standards. E10 fuel contains up to
10 % bioethanol.
Use fuel with the recommended
octane rating 3 205. Use of fuel with
too low an octane rating can reduce
engine power and torque and slightly
increases fuel consumption.Caution
Do not use fuel or fuel additives
that contain metallic compounds
such as manganese-based
additives. This may cause engine
damage.
Page 173 of 223

Vehicle care171
FuseCircuitABSAnti-lock Brake
SystemA/CClimate control,
air conditioning
systemBATT1Instrument panel
fuse boxBATT2Instrument panel
fuse boxBATT3Instrument panel
fuse boxBCMBody Control
ModuleECMEngine Control
ModuleECM PWR TRNEngine Control
Module, Power‐
trainENG SNSREngine sensorsEPBElectrical parking
brakeFuseCircuitFAN1Cooling fanFAN3Cooling fanFRT FOGFront fog lightsFRT WPRFront wiperFUEL/VACFuel pump,
vacuum pumpHDLP WASHERHeadlight washerHI BEAM LHHigh beam (left-
hand)HI BEAM RHHigh beam (right-
hand)HORNHornHTD WASH/MIRHeated washer
fluid, heated exte‐
rior mirrorsIGN COIL AIgnition coilIGN COIL BIgnition coilLO BEAM LHLow beam (left-
hand)FuseCircuitLO BEAM RHLow beam (right-
hand)PRK LP LHParking light (left-
hand)PRK LP RHParking light
(right-hand)PWM FANPulse width modu‐ lation fanREAR DEFOGHeated rear
windowREAR WPRRear wiperSPARE–STOP LAMPBrake lightsSTRTRStarterTCMTransmission
Control ModuleTRLR PRL LPTrailer parking
lights
Page 180 of 223

178Vehicle care
V=up to 150 mphW=up to 168 mph
Tyre pressureCheck the pressure of cold tyres at
least every 14 days and before any
long journey. Do not forget the spare
wheel. This also applies to vehicles
with tyre pressure monitoring system.
Use the valve cap key to make
unscrewing the valve caps easier.
The valve cap key is located on the
inside of the tank flap.
Tyre pressure 3 210.
The tyre pressure data refers to cold
tyres. It applies to summer and winter tyres.
Always inflate the spare tyre to the
pressure specified for full load.
The ECO tyre pressure serves to
achieve the smallest amount of fuel
consumption possible.
Incorrect tyre pressures will impair
safety, vehicle handling, comfort and
fuel economy and will increase tyre
wear.
Tyre pressures differ depending on
various options. For the correct tyre
pressure value, follow the procedure
below:
1. Identify the engine identifier code.
Engine data 3 205.
2. Identify the respective tyre.
The tyre pressure tables show all
possible tyre combinations 3 210.
For the tyres approved for your
vehicle, refer to the EEC Certificate of Conformity provided with your vehicle
or other national registration
documents.
The driver is responsible for correct
adjustment of tyre pressure.9 Warning
If the pressure is too low, this can
result in considerable tyre warm-
up and internal damage, leading to tread separation and even to tyre
blow-out at high speeds.
If the tyre pressure must be reduced
or increased on a vehicle with tyre
pressure monitoring system, switch
off ignition.
Tyre pressure monitoring system The tyre pressure monitoring system
checks the pressure of all four wheels
once per minute when vehicle speed
exceeds a certain limit.Caution
Tyre pressure monitoring system
warns only about low tyre pressure
condition and does not replace
regular tyre maintenance by the
driver.
All wheels must be equipped with pressure sensors and the tyres must
have the prescribed pressure. If
wheels without sensors are mounted,
the tyre pressure monitoring system
is not operational.
Page 181 of 223

Vehicle care179
Notice
In countries where the tyre pressure
monitoring system is legally
required, the use of wheels without
pressure sensors will invalidate the
vehicle type approval.
The TPMS sensors monitor the air
pressure in the tyres and transmit tyre pressure readings to a receiver
located in the vehicle.
Each tyre, including the spare, should be checked monthly when cold and
inflated to the recommended inflation
pressure 3 210.
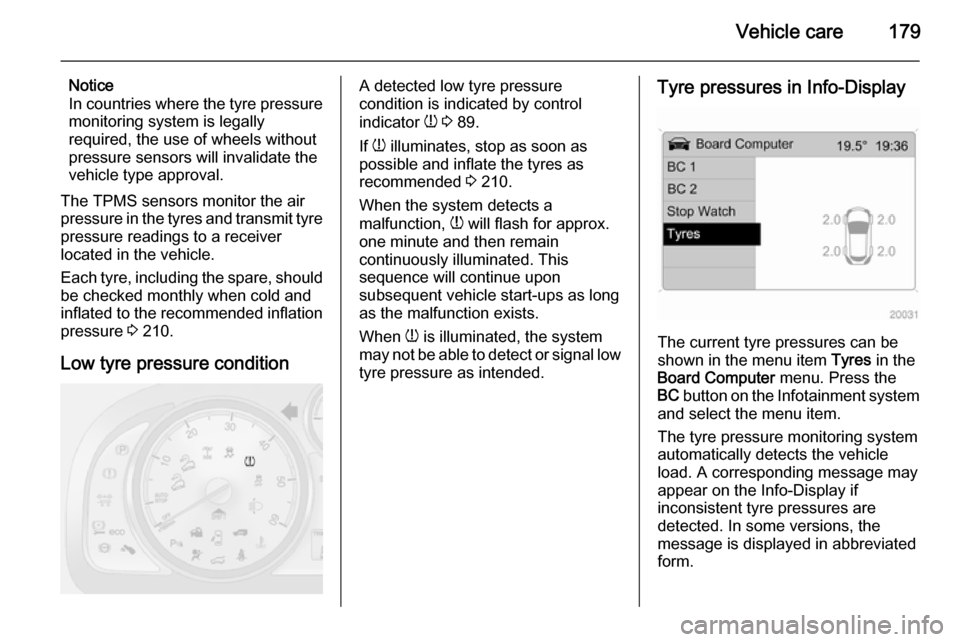
Low tyre pressure conditionA detected low tyre pressure
condition is indicated by control
indicator w 3 89.
If w illuminates, stop as soon as
possible and inflate the tyres as
recommended 3 210.
When the system detects a
malfunction, w will flash for approx.
one minute and then remain
continuously illuminated. This
sequence will continue upon
subsequent vehicle start-ups as long as the malfunction exists.
When w is illuminated, the system
may not be able to detect or signal low tyre pressure as intended.Tyre pressures in Info-Display
The current tyre pressures can be
shown in the menu item Tyres in the
Board Computer menu. Press the
BC button on the Infotainment system
and select the menu item.
The tyre pressure monitoring system
automatically detects the vehicle
load. A corresponding message may appear on the Info-Display if
inconsistent tyre pressures are
detected. In some versions, the
message is displayed in abbreviated
form.
Page 183 of 223

Vehicle care181
TPMS sensor matching process
Each TPMS sensor has a unique
identification code. The identification
code must be matched to a new tyre/ wheel position after rotating the tyres
or replacing one or more of the TPMS
sensors.
The TPMS sensor matching process
should also be performed after
replacing a spare tyre with a road tyre containing a TPMS sensor. The
control indicator w and the warning
message should extinguish at the
next ignition cycle.
The sensors are matched to the tyre/
wheel positions, using a TPMS
relearn tool, in the following order:
■ left front tyre
■ right front tyre
■ right rear tyre
■ left rear tyre
Consult your workshop for service or
to purchase a relearn tool.
There are two minutes to match the
first tyre/wheel position, and
five minutes overall to match all fourtyre/wheel positions. If it takes longer,
the matching process stops and must be restarted.
The TPMS sensor matching process
is as follows:
1. Apply the electrical parking brake 3 137 ; on vehicles with automatic
transmission move the selector
lever to position P.
2. Turn the ignition on 3 124.
3. Initiate the TPMS Learn Mode by simultaneously pressing buttons
p and q on the radio remote
control,
- or -
Press the INFO button on the
Infotainment system until a tyre
learn message appears on the
Info-display. Press and hold the
OK button.
The horn sounds twice and the left front turn signal also illuminates
as confirmation that Learn Mode
has been enabled.
4. Start with the left front tyre.5. Place the relearn tool against the tyre sidewall, near the valve stem.Then press the button to activatethe TPMS sensor. A horn chirp
confirms that the sensor
identification code has been
matched to this tyre and wheel
position. The next relevant turn
signal illuminates.
6. Proceed to the right front tyre, and
repeat the procedure in Step 5.
7. Proceed to the right rear tyre, and
repeat the procedure in Step 5.
8. Proceed to the left rear tyre, and repeat the procedure in Step 5.
The horn sounds twice to indicate
the sensor identification code has been matched, and the TPMS
sensor matching process is no
longer active.
9. Turn off the ignition.
10. Set all four tyres to the recommended inflation pressure
3 210.
Page 221 of 223

219
NNew vehicle running-in ..............124
Number plate light .....................166
O Object detection systems ...........143
Octane rating .............................. 205
Odometer ..................................... 80
Oil ............................................... 154
Oil, engine .......................... 198, 202
Oil life monitor............................... 89
Outside temperature ....................76
Overrun cut-off ........................... 125
P Parking ................................ 17, 127
Parking assist ............................ 143
Parking brake ....................... 86, 137
Parking lights ............................. 110
Particulate filter ........................... 128
Performance .............................. 206
Performing work ........................153
Pollen filter ................................. 121
Power outlets .......................... 58, 78
Power seat adjustment .................38
Power steering ............................. 87 Power steering fluid ....................156
Power windows ............................ 30
Preheating ................................... 88
Puncture ..................................... 186R
Radio Frequency Identification (RFID) ..................................... 214
Radio remote control ...................20
Rain sensor .................................. 74
Reading lights ............................ 112
Rear carrier system ......................58
Rear floor storage cover ..............69
Rear fog light ............................... 91
Rear fog lights ........................... 110
Rear seats ............................. 39, 40
Rear window wiper/washer .......... 76
Recommended fluids and lubricants ........................ 198, 202
Reduced engine power ................90
Refuelling ................................... 146
Remote control ............................. 20
Reversing lights .........................110
Roof .............................................. 32
Roof load ...................................... 71
Roof rack ..................................... 71
S
Safety belts ................................... 41
Seat adjustment ....................... 6, 36 Seat belt ........................................ 8
Seat belt reminder ..................42, 84
Seat belts ..................................... 41
Seat folding .................................. 37Seat heating ................................. 39
Seat position ................................ 35
Selector lever ............................. 130
Service ............................... 121, 197
Service display ......................81, 89
Service information ....................197
Service vehicle soon .................... 85
Side airbag system ......................48
Sidelights .................................... 106
Side turn signal lights ................166
Spare wheel ............................... 189
Speedometer ............................... 80
Speed warning.............................. 91
Starting and operating ................124
Starting off ................................... 16
Starting the engine ....................124
Steering ...................................... 123
Steering wheel adjustment ......9, 73
Steering wheel controls ...............73
Stop-start system........................ 125
Storage ......................................... 56
Storage compartments .................56
Sunglasses storage .....................57
Sunroof ........................................ 32
Sunvisor lights ........................... 113
Sun visors .................................... 32
Symbols ......................................... 4