ECU VAUXHALL ASTRA J 2015.75 Owner's Guide
[x] Cancel search | Manufacturer: VAUXHALL, Model Year: 2015.75, Model line: ASTRA J, Model: VAUXHALL ASTRA J 2015.75Pages: 337, PDF Size: 10.17 MB
Page 99 of 337
Storage97
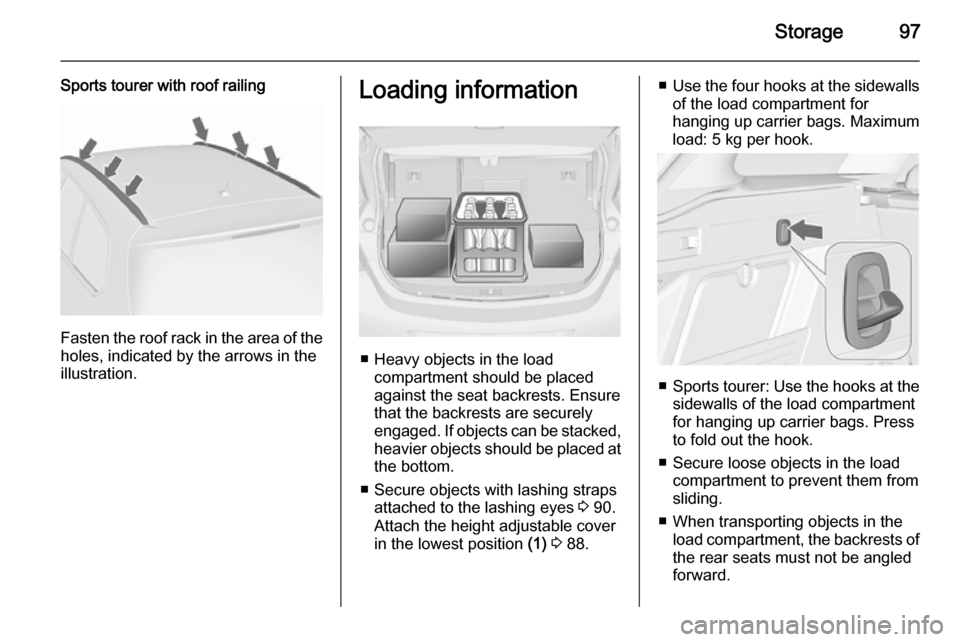
Sports tourer with roof railing
Fasten the roof rack in the area of the
holes, indicated by the arrows in the
illustration.
Loading information
■ Heavy objects in the load compartment should be placedagainst the seat backrests. Ensure
that the backrests are securely
engaged. If objects can be stacked, heavier objects should be placed at
the bottom.
■ Secure objects with lashing straps attached to the lashing eyes 3 90.
Attach the height adjustable cover
in the lowest position (1) 3 88.
■ Use the four hooks at the sidewalls
of the load compartment for
hanging up carrier bags. Maximum
load: 5 kg per hook.
■ Sports tourer: Use the hooks at the
sidewalls of the load compartment
for hanging up carrier bags. Press
to fold out the hook.
■ Secure loose objects in the load compartment to prevent them from
sliding.
■ When transporting objects in the load compartment, the backrests ofthe rear seats must not be angled
forward.
Page 100 of 337

98Storage
■ Do not allow the load to protrudeabove the upper edge of the
backrests.
■ Do not place any objects on the load compartment cover or the
instrument panel, and do not cover
the sensor on top of the instrument
panel.
■ The load must not obstruct the operation of the pedals, parking
brake and gear selector lever, or
hinder the freedom of movement of the driver. Do not place any
unsecured objects in the interior.
■ Do not drive with an open load compartment.9 Warning
Always make sure that the load in
the vehicle is securely stowed.
Otherwise objects can be thrown
around inside the vehicle and
cause personal injury or damage
to the load or car.
■ The payload is the difference between the permitted gross
vehicle weight (see identification
plate 3 287) and the EC kerb
weight.
To calculate the payload, enter the
data for your vehicle in the Weights
table at the front of this manual.
The EC kerb weight includes
weights for the driver (68 kg),
luggage (7 kg) and all fluids (tank
90 % full).
Optional equipment and
accessories increase the kerb
weight.
■ Driving with a roof load increases the sensitivity of the vehicle to
cross-winds and has a detrimental
effect on vehicle handling due to
the vehicle's higher centre of
gravity. Distribute the load evenly
and secure it properly with retaining
straps. Adjust the tyre pressure and vehicle speed according to the load
conditions. Check and retighten the straps frequently.
Do not drive faster than 75 mph.
The permissible roof load is 75 kg
for the 3-door / 5-door hatchbackand 4-door saloon, for the Sports
tourer it is 100 kg. The roof load is
the combined weight of the roof
rack and the load.
Page 130 of 337
128Instruments and controls
■ If a warning message or a warningcode appears in the Driver
Information Centre (DIC).
■ If the parking assist detects an object.
■ If an unintended lane change occurs.
■ If the reverse gear is engaged and the rear end carrier extended.
■ If the diesel particle filter has reached the maximum filling level.
When the vehicle is parked and/ or the driver's door is opened ■ When the key is in the ignition switch.
■ With exterior lights on.
During an Autostop ■ If the driver's door is opened.
Battery voltage When the vehicle battery voltage is
running low, a warning message or
warning code 174 will appear in the
Driver Information Centre.1. Switch off immediately any electric consumers which are not
required for a safe ride, e.g. seat
heating, heated rear window or
other main consumers.
2. Charge the vehicle battery by driving continuously for a while or
by using a charging device.
The warning message or warning
code will disappear after the engine
has been started twice consecutively
without a voltage drop.
If the vehicle battery cannot be
recharged, have the cause of the fault
remedied by a workshop.Trip computer
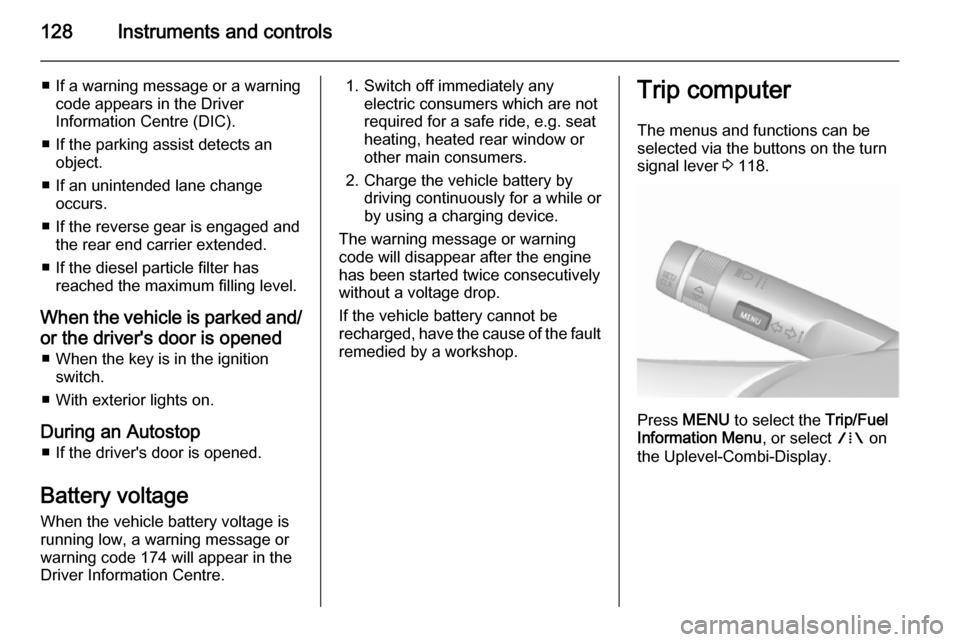
The menus and functions can beselected via the buttons on the turnsignal lever 3 118.
Press MENU to select the Trip/Fuel
Information Menu , or select W on
the Uplevel-Combi-Display.
Page 171 of 337

Driving and operating169
The selected gear is indicated in the
instrument cluster.
If a higher gear is selected when
vehicle speed is too low, or a lower
gear when vehicle speed is too high,
the shift is not executed. This can
cause a message in the Driver
Information Centre (DIC).
In manual mode, no automatic
shifting to a higher gear takes place
at high engine revolutions.
Electronic driving
programmes ■ Following a cold start, the operating
temperature programme increasesengine speed to quickly bring the
catalytic converter to the required
temperature.
■ The automatic neutral shift function
automatically shifts to idling when
the vehicle is stopped with a
forward gear engaged and the
brake pedal is pressed.■ When SPORT mode is engaged, the vehicle shifts at higher engine
speeds (unless cruise control is
on). SPORT mode 3 176.
■ Special programmes automatically adapt the shifting points when
driving up inclines or down hills.
■ When starting off in snowy or icy conditions or on other slippery
surfaces, the electronic
transmission control selects a
higher gear automatically.
Kickdown If the accelerator pedal is pressed
down completely in automatic mode, the transmission shifts to a lower gear
depending on engine speed.
Fault
In the event of a fault, control indicator g illuminates. Additionally, a code
number or a vehicle message is
displayed in the Driver Information
Centre (DIC). Vehicle messages
3 125.The transmission no longer shifts
automatically. Continued travel ispossible with manual shifting.
Only the highest gear is available.
Depending on the fault, 2nd gear may also be available in manual mode.
Shift only when vehicle is at a
standstill.
Have the cause of the fault remedied
by a workshop.
Interruption of power
supply
In the event of an interruption of
power supply, the selector lever
cannot be moved out of the P
position. The ignition key cannot be
removed from the ignition switch.
If the vehicle battery is discharged,
start the vehicle using jump leads
3 277.
If the vehicle battery is not the cause
of the fault, release the selector lever.
1. Apply the parking brake.
Page 186 of 337

184Driving and operating
The accelerator pedal can be
released. Adaptive cruise control
remains activated while gearshifting.
Overriding set speed It is always possible to drive faster
than the selected set speed by
depressing the accelerator pedal.
When the accelerator pedal is
released, the vehicle returns to the
desired distance if a slower vehicle is
ahead. Otherwise it returns to the
stored speed.
Once the system is activated,
adaptive cruise control decelerates or
brakes if it detects a vehicle ahead,
which is slower or closer than the
desired following distance.9 Warning
Accelerating by the driver
deactivates automatic braking by
the system. This is indicated as a
pop-up warning in the Driver
Information Centre (DIC).
Increase speed
With adaptive cruise control active,
hold thumb wheel turned to RES/+:
speed increases continuously in large increments, or activate repeatedly
RES/+ : speed increases in small
increments.
If the vehicle is driven with adaptive
cruise control active much faster than
the desired speed, e.g. after
depressing the accelerator pedal,
then the current speed can be stored
and maintained by turning the thumb
wheel to SET/-.
Reduce speed
With adaptive cruise control active, hold thumb wheel turned to SET/-:
speed decreases continuously in
large increments, or activate
repeatedly SET/-: speed decreases in
small increments.
If the vehicle is driven with adaptive
cruise control active much slower
than the desired speed, e.g. because
of a slower vehicle ahead, then thecurrent speed can be stored and
maintained by turning the thumb
wheel to SET/-.
Resume stored speed
If the system is switched on but
inactive, then turn thumb wheel to
RES/+ at a speed above 31 mph to
resume the stored speed.
Setting the following distance When adaptive cruise control detects
a slower moving vehicle in the driving path, it will adjust the vehicle speed to
maintain the following distance
selected by the driver.
The following distance can be set to
near, medium or far.
Page 221 of 337
Driving and operating219
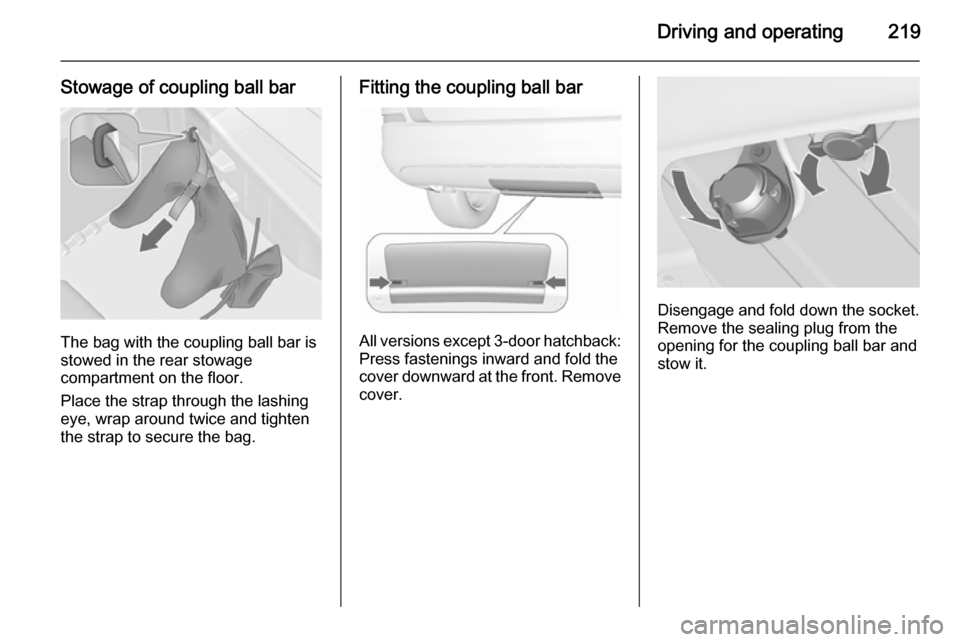
Stowage of coupling ball bar
The bag with the coupling ball bar is
stowed in the rear stowage
compartment on the floor.
Place the strap through the lashing
eye, wrap around twice and tighten
the strap to secure the bag.
Fitting the coupling ball bar
All versions except 3-door hatchback:
Press fastenings inward and fold the
cover downward at the front. Remove
cover.
Disengage and fold down the socket. Remove the sealing plug from the
opening for the coupling ball bar and
stow it.
Page 227 of 337
Vehicle care2259Danger
The ignition system and Xenon
headlights use extremely high
voltage. Do not touch.
Bonnet
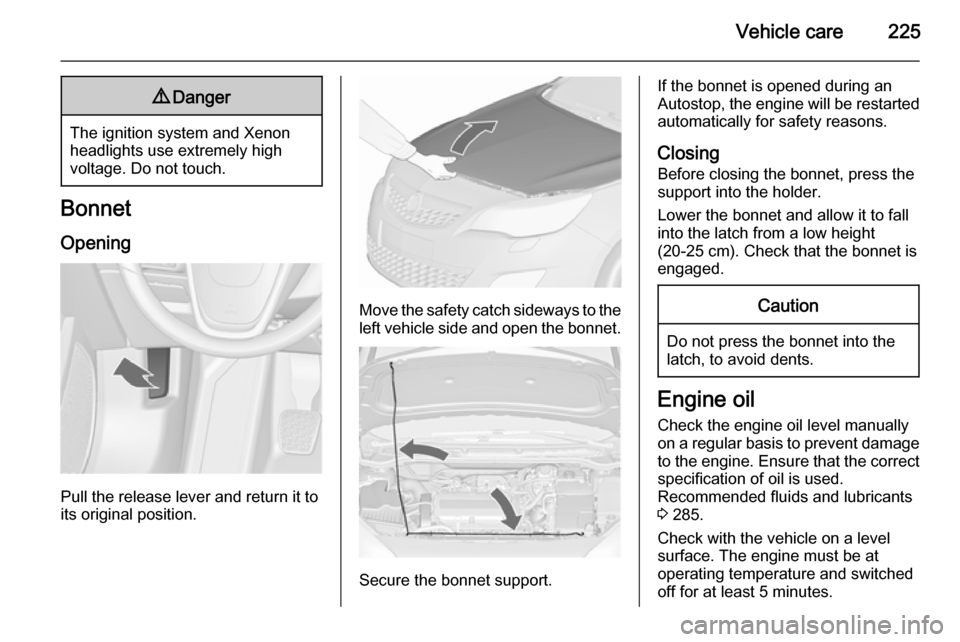
Opening
Pull the release lever and return it to
its original position.
Move the safety catch sideways to the left vehicle side and open the bonnet.
Secure the bonnet support.
If the bonnet is opened during an
Autostop, the engine will be restarted automatically for safety reasons.
Closing Before closing the bonnet, press the
support into the holder.
Lower the bonnet and allow it to fall
into the latch from a low height
(20-25 cm). Check that the bonnet is engaged.Caution
Do not press the bonnet into the
latch, to avoid dents.
Engine oil
Check the engine oil level manuallyon a regular basis to prevent damage
to the engine. Ensure that the correct specification of oil is used.
Recommended fluids and lubricants
3 285.
Check with the vehicle on a level
surface. The engine must be at
operating temperature and switched
off for at least 5 minutes.
Page 234 of 337
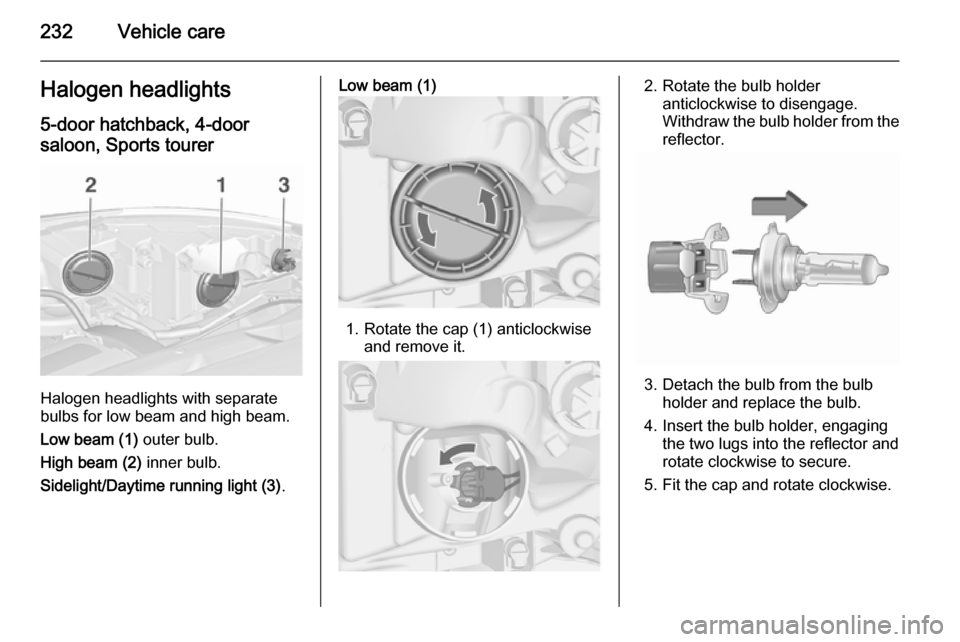
232Vehicle careHalogen headlights5-door hatchback, 4-door
saloon, Sports tourer
Halogen headlights with separate
bulbs for low beam and high beam.
Low beam (1) outer bulb.
High beam (2) inner bulb.
Sidelight/Daytime running light (3) .
Low beam (1)
1. Rotate the cap (1) anticlockwise
and remove it.
2. Rotate the bulb holderanticlockwise to disengage.
Withdraw the bulb holder from the
reflector.
3. Detach the bulb from the bulb holder and replace the bulb.
4. Insert the bulb holder, engaging the two lugs into the reflector androtate clockwise to secure.
5. Fit the cap and rotate clockwise.
Page 235 of 337
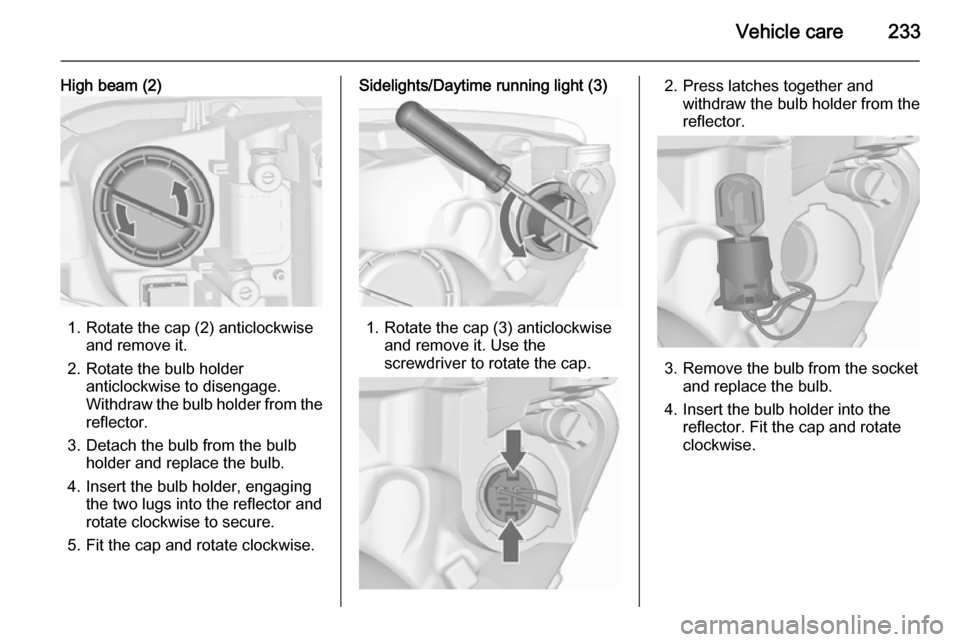
Vehicle care233
High beam (2)
1. Rotate the cap (2) anticlockwiseand remove it.
2. Rotate the bulb holder anticlockwise to disengage.
Withdraw the bulb holder from the
reflector.
3. Detach the bulb from the bulb holder and replace the bulb.
4. Insert the bulb holder, engaging the two lugs into the reflector and
rotate clockwise to secure.
5. Fit the cap and rotate clockwise.
Sidelights/Daytime running light (3)
1. Rotate the cap (3) anticlockwise and remove it. Use the
screwdriver to rotate the cap.
2. Press latches together and withdraw the bulb holder from the
reflector.
3. Remove the bulb from the socket and replace the bulb.
4. Insert the bulb holder into the reflector. Fit the cap and rotate
clockwise.
Page 236 of 337
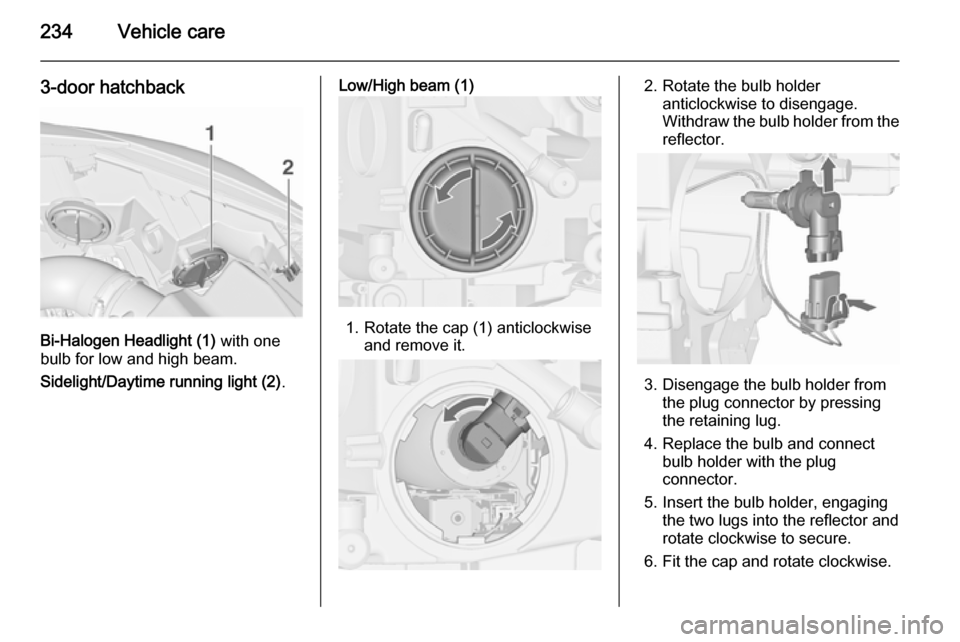
234Vehicle care
3-door hatchback
Bi-Halogen Headlight (1) with one
bulb for low and high beam.
Sidelight/Daytime running light (2) .
Low/High beam (1)
1. Rotate the cap (1) anticlockwise
and remove it.
2. Rotate the bulb holderanticlockwise to disengage.
Withdraw the bulb holder from the
reflector.
3. Disengage the bulb holder from the plug connector by pressing
the retaining lug.
4. Replace the bulb and connect bulb holder with the plug
connector.
5. Insert the bulb holder, engaging the two lugs into the reflector and
rotate clockwise to secure.
6. Fit the cap and rotate clockwise.