VAUXHALL ASTRA K 2020 Infotainment system
Manufacturer: VAUXHALL, Model Year: 2020, Model line: ASTRA K, Model: VAUXHALL ASTRA K 2020Pages: 85, PDF Size: 5.78 MB
Page 61 of 85
Navigation61Cancel screen button
During active route guidance, a
Cancel screen button is displayed on
the left side of the screen.
To cancel the active route guidance session, select Cancel.
For a few seconds, a Resume Trip
screen button is displayed on the map
screen. Select Resume Trip to restart
the cancelled guidance session.
Overview screen button
During active route guidance, an
Overview screen button is displayed
on the left side of the screen.
To display an overview of the route
currently active, select Overview. The
map changes to the desired route
overview.
To return to the normal view, select
Overview again.
f screen button
If route guidance is active, an
additional f screen button is
displayed on the bottom of the map if
the current street is a highway.
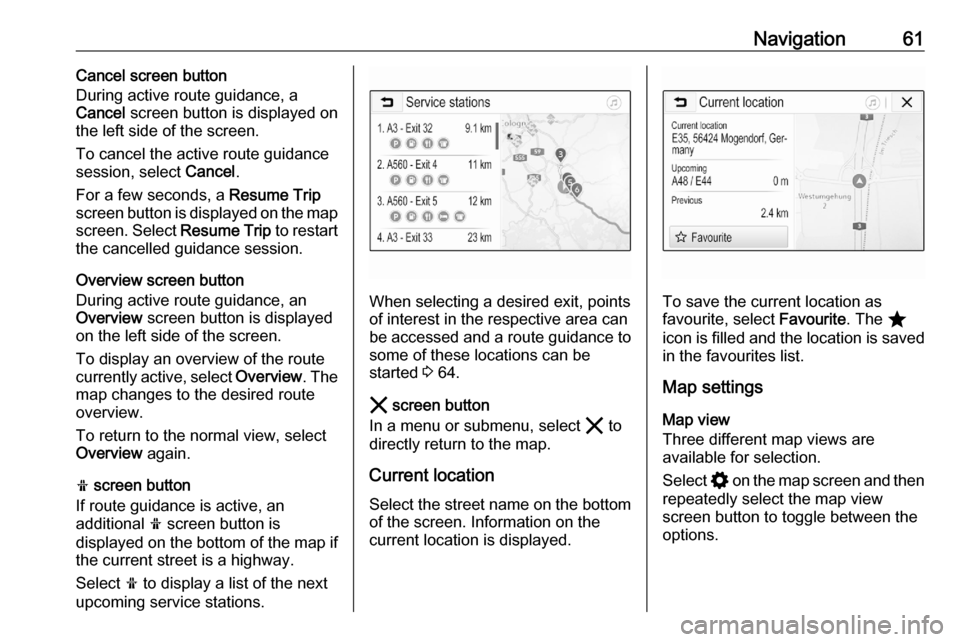
Select f to display a list of the next
upcoming service stations.
When selecting a desired exit, points
of interest in the respective area can
be accessed and a route guidance to some of these locations can be
started 3 64.
& screen button
In a menu or submenu, select & to
directly return to the map.
Current location
Select the street name on the bottom of the screen. Information on the
current location is displayed.To save the current location as
favourite, select Favourite. The ;
icon is filled and the location is saved
in the favourites list.
Map settings
Map view
Three different map views are
available for selection.
Select % on the map screen and then
repeatedly select the map view
screen button to toggle between the
options.
Page 62 of 85
62Navigation
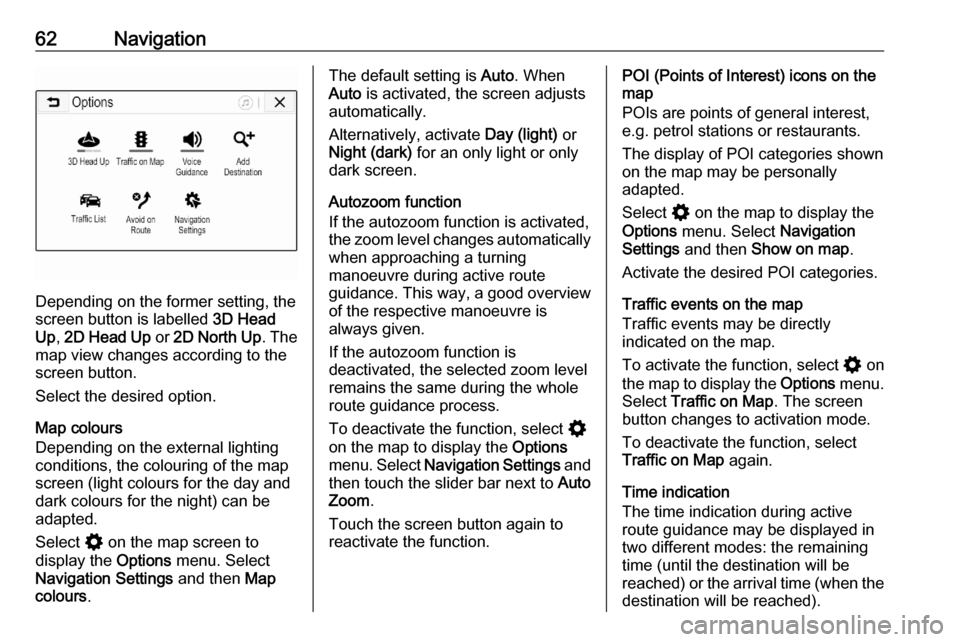
Depending on the former setting, the
screen button is labelled 3D Head
Up , 2D Head Up or 2D North Up . The
map view changes according to the
screen button.
Select the desired option.
Map colours
Depending on the external lighting
conditions, the colouring of the map
screen (light colours for the day and
dark colours for the night) can be
adapted.
Select % on the map screen to
display the Options menu. Select
Navigation Settings and then Map
colours .
The default setting is Auto. When
Auto is activated, the screen adjusts
automatically.
Alternatively, activate Day (light) or
Night (dark) for an only light or only
dark screen.
Autozoom function
If the autozoom function is activated,
the zoom level changes automatically
when approaching a turning
manoeuvre during active route
guidance. This way, a good overview
of the respective manoeuvre is
always given.
If the autozoom function is
deactivated, the selected zoom level
remains the same during the whole
route guidance process.
To deactivate the function, select %
on the map to display the Options
menu. Select Navigation Settings and
then touch the slider bar next to Auto
Zoom .
Touch the screen button again to
reactivate the function.POI (Points of Interest) icons on the
map
POIs are points of general interest,
e.g. petrol stations or restaurants.
The display of POI categories shown
on the map may be personally
adapted.
Select % on the map to display the
Options menu. Select Navigation
Settings and then Show on map .
Activate the desired POI categories.
Traffic events on the map
Traffic events may be directly
indicated on the map.
To activate the function, select % on
the map to display the Options menu.
Select Traffic on Map . The screen
button changes to activation mode.
To deactivate the function, select
Traffic on Map again.
Time indication
The time indication during active
route guidance may be displayed in two different modes: the remaining
time (until the destination will be
reached) or the arrival time (when the destination will be reached).
Page 63 of 85

Navigation63Select % on the map to display the
Options menu. Select Navigation
Settings and then Time to Destination
Format .
Activate the desired option in the
submenu.
Notice
During active route guidance, the
time indication can be changed by
simply tapping on the time indication
field on the screen.
Alert preferences
If desired, an additional notification in
specific traffic zones can be received.
Select % on the map to display the
Options menu. Select Navigation
Settings and then Alert Preferences .
If Safety camera is activated, a
warning will appear when
approaching a stationary speed
camera.
Notice
This function is only available if such an alert system corresponds to the
legal provisions applicable in the
country you are in.
Activate the desired option.Voice guidance
The route guidance process can be
supported by voice prompts given out by the system.
Notice
The navigation voice prompts
function is not supported for all
languages. If there are no voice
prompts available, the system
automatically plays a tone to
indicate a manoeuvre ahead.
Activation
The voice guidance function is
activated by default. To deactivate
the function, select % on the map to
display the Options menu and then
touch Voice Guidance . The screen
button changes.
Select the screen button again to
reactivate the function.
Voice guidance settings
To define which system outputs may assist during active route guidance,
select % on the map, Navigation
Settings and then Voice Guidance .If Normal voice guidance is activated,
a voice announces the next turning
manoeuvre to be taken.
If Beep only is activated, only beep
tones are given out for notification.
In the submenu of Prompts during
Phone Call , the possible voice
outputs during a phone call can be
set.
Activate the desired options.
Notice
Voice guidance prompts are only
given out if Voice Guidance is
activated in the Options menu, see
above.
Information
Select % on the map to display the
Options menu. Select Navigation
Settings and then About.
The texts of the manufacturer's terms and conditions or privacy statement
can be accessed via the respective
menu items.
The navigation map version is
displayed.
Page 64 of 85
64NavigationDestination input
The navigation application provides
different options to set a destination
for route guidance.
Destination input via map
It is possible to directly enter
destinations from the map screen.
Personal addresses on the map
Two address shortcuts (e.g. Home
and Work) to easily start route
guidance to these two places can be
predefined. The addresses can be
defined in the settings menu and be
labelled individually. Then, they can
be directly selected from the map.
To save the addresses, select % on
the map, Navigation Settings and
then Set up My Places .
Select one of the menu items ( Home
and Work by default). Use the
keyboard to enter the required data in the address field. For a detailed
description of the keyboard, see
below.To change the name of the personal
address, select c to hide the
keyboard and select one of the items in the list. Alternatively, enter a newname in the first entry field.
If necessary, tap within one of the
entry fields to redisplay the keyboard
and select Done. The location is
saved as shortcut.
To start route guidance to one of
these locations, select the ═ screen
button on the map. The two
destinations are displayed.
Select one of the screen buttons. The Routes menu is displayed.
Activate the desired route and then
select Go to start route guidance.
Destination selection via map
Scroll to the desired map section.
Touch and hold the desired location
on the screen. The map centres
around this location.
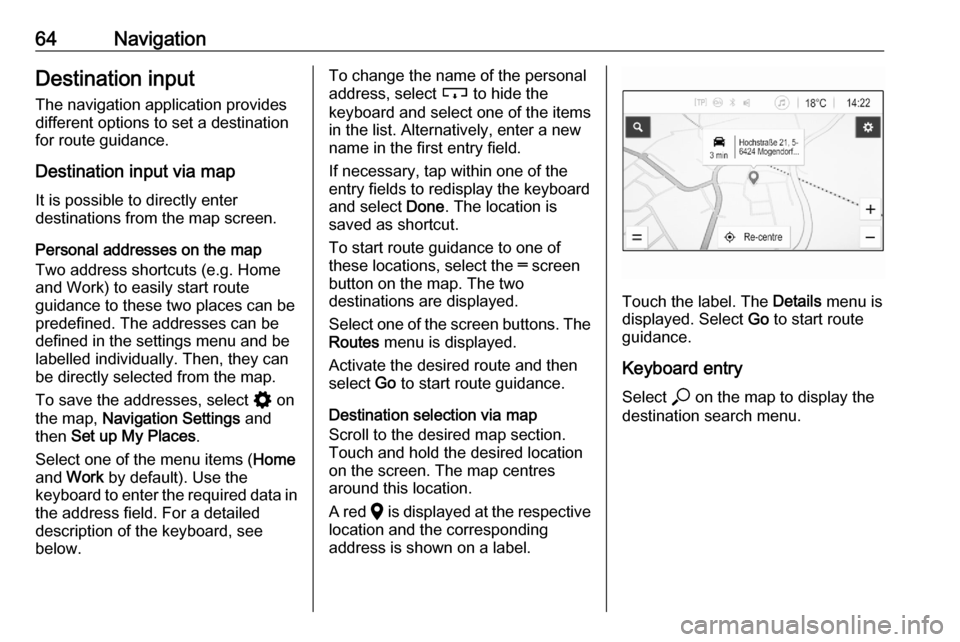
A red K is displayed at the respective
location and the corresponding
address is shown on a label.
Touch the label. The Details menu is
displayed. Select Go to start route
guidance.
Keyboard entry
Select * on the map to display the
destination search menu.
Page 65 of 85
Navigation65
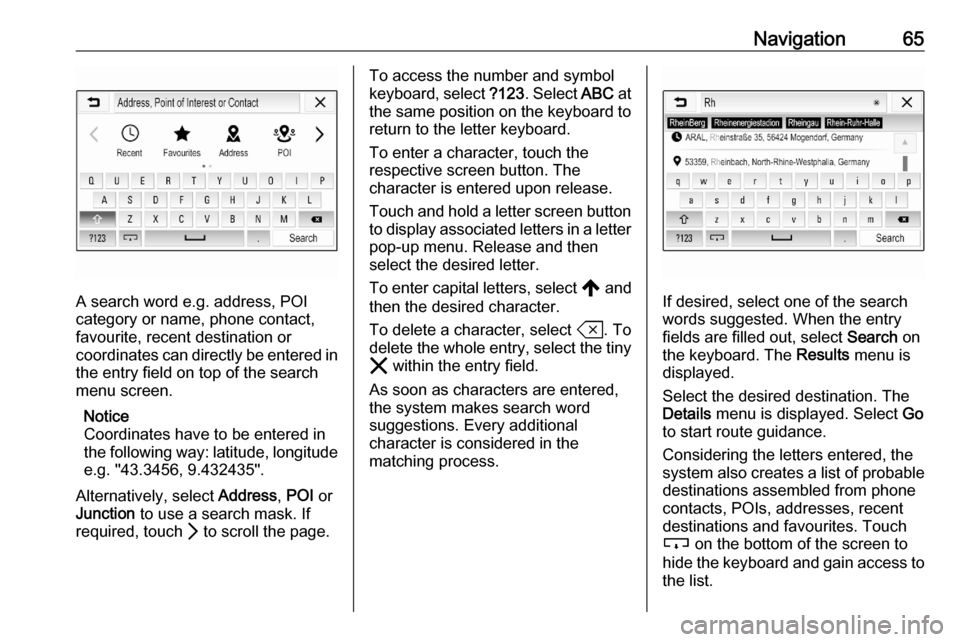
A search word e.g. address, POI
category or name, phone contact,
favourite, recent destination or
coordinates can directly be entered in
the entry field on top of the search
menu screen.
Notice
Coordinates have to be entered in the following way: latitude, longitude e.g. "43.3456, 9.432435".
Alternatively, select Address, POI or
Junction to use a search mask. If
required, touch Q to scroll the page.
To access the number and symbol
keyboard, select ?123. Select ABC at
the same position on the keyboard to
return to the letter keyboard.
To enter a character, touch the
respective screen button. The
character is entered upon release.
Touch and hold a letter screen button to display associated letters in a letter
pop-up menu. Release and then
select the desired letter.
To enter capital letters, select , and
then the desired character.
To delete a character, select T. To
delete the whole entry, select the tiny
& within the entry field.
As soon as characters are entered,
the system makes search word
suggestions. Every additional
character is considered in the
matching process.
If desired, select one of the search words suggested. When the entry
fields are filled out, select Search on
the keyboard. The Results menu is
displayed.
Select the desired destination. The
Details menu is displayed. Select Go
to start route guidance.
Considering the letters entered, the
system also creates a list of probable
destinations assembled from phone
contacts, POIs, addresses, recent
destinations and favourites. Touch
c on the bottom of the screen to
hide the keyboard and gain access to the list.
Page 66 of 85

66NavigationTo redisplay the keyboard, tap within
the entry field.
If desired, select a destination from
the list. The Details menu is
displayed. Select Go to start route
guidance.
Lists with selectable destinations
To access the lists, select * on the
map and, if required, touch Q to scroll
the page.
Select one of the options:
● Recent : list of destinations
recently used
● Favourites : list of destinations
stored as favourites
● Contacts : list of addresses stored
in the phone book of the mobile
phone currently connected via
Bluetooth
To choose a destination from one of
the lists, scroll through the respective
list and select the desired destination. The Details menu is displayed. Select
Go to start route guidance.Recent destinations
The recent destinations list is
automatically filled with destinations
used in route guidance.
The addresses in the recent
destinations list can be stored as
favourites. Enter the recent
destinations list, select n next to the
desired address to display additional
function buttons and then select ;. If
the icon is filled, the address is saved
in the favourites list.
Addresses can be deleted from the
recent destinations list. Enter the
recent destinations list, select n next
to the desired address and then
select f to delete the respective
address.
Favourites
Favourites can be added when a ;
icon is displayed next to an address.
When the star icon is filled, the
respective address is stored as a
favourite.The position of a favourite in the list can be changed. Enter the favouriteslist, select n next to the desired
favourite to display additional function buttons and then select S or R.
The name of a favourite can be
changed. Enter the favourites list,
select n next to the desired favourite
to display additional function buttons
and then select >. A keyboard is
displayed. Enter the desired name
and then select Done.
Favourites can be deleted. Enter the
favourites list, select n next to the
desired favourite to display additional
function buttons and then select ;.
The favourite is deactivated (unfilled
star). If the icon is selected again, the favourite is reactivated (filled star).
When leaving the favourites list while
favourites are deactivated, they are
deleted from the list.
Contacts
The keyboard can be used to search
for addresses within the list. Enter the first letters of the desired word (name
Page 67 of 85
Navigation67or address) and all entries containing
a word starting with these letters are
displayed.
For a detailed description of the
keyboard, see above.
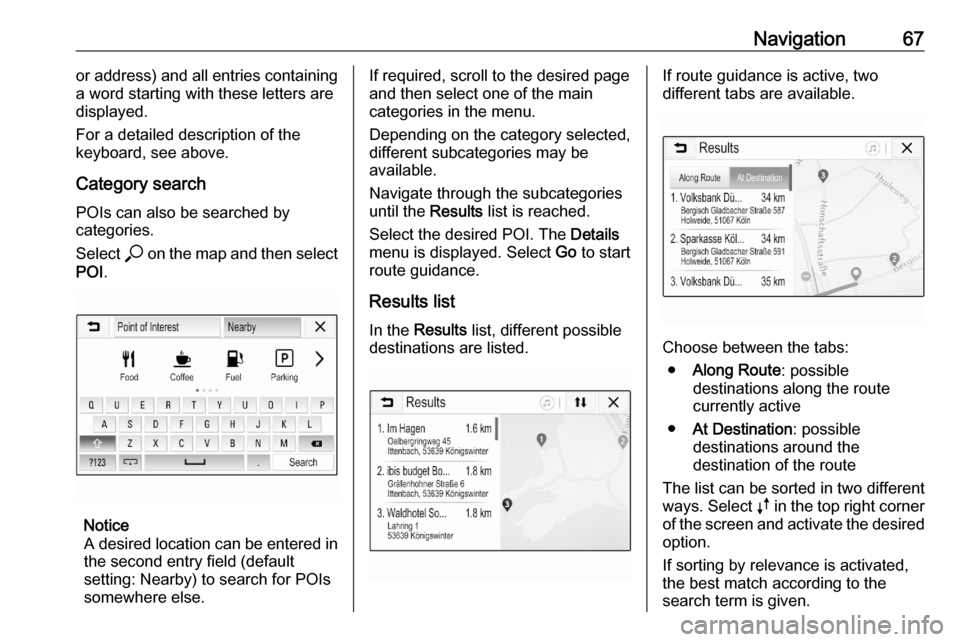
Category search POIs can also be searched by
categories.
Select * on the map and then select
POI .
Notice
A desired location can be entered in
the second entry field (default
setting: Nearby) to search for POIs
somewhere else.
If required, scroll to the desired page
and then select one of the main
categories in the menu.
Depending on the category selected,
different subcategories may be
available.
Navigate through the subcategories until the Results list is reached.
Select the desired POI. The Details
menu is displayed. Select Go to start
route guidance.
Results list In the Results list, different possible
destinations are listed.If route guidance is active, two
different tabs are available.
Choose between the tabs:
● Along Route : possible
destinations along the route
currently active
● At Destination : possible
destinations around the
destination of the route
The list can be sorted in two different
ways. Select k in the top right corner
of the screen and activate the desired
option.
If sorting by relevance is activated,
the best match according to the
search term is given.
Page 68 of 85
68NavigationIf sorting by distance is activated, thedestinations are given accordingly to
their distance to the current location.
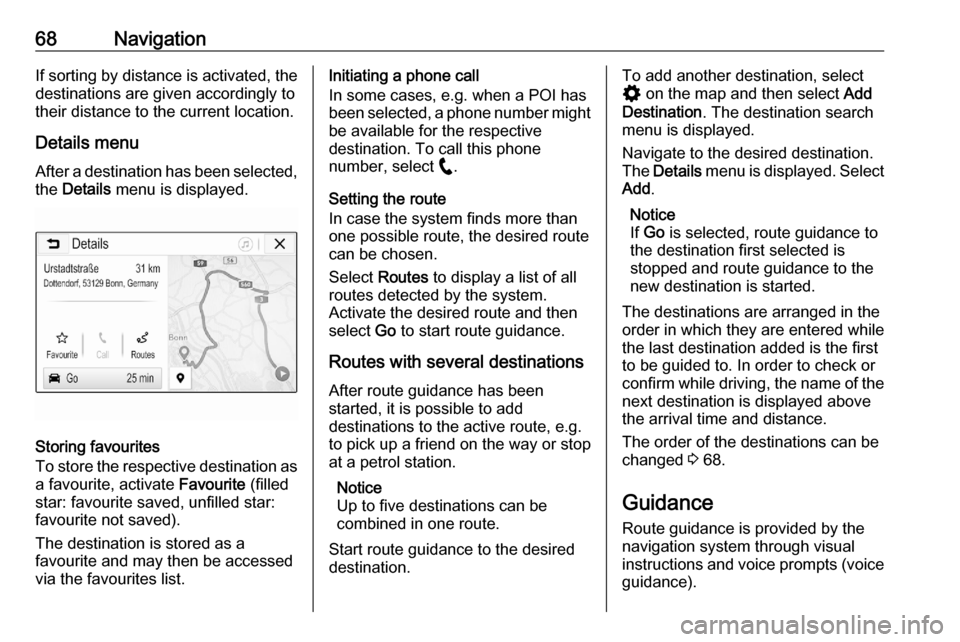
Details menu
After a destination has been selected, the Details menu is displayed.
Storing favourites
To store the respective destination as
a favourite, activate Favourite (filled
star: favourite saved, unfilled star:
favourite not saved).
The destination is stored as a
favourite and may then be accessed
via the favourites list.
Initiating a phone call
In some cases, e.g. when a POI has
been selected, a phone number might
be available for the respective
destination. To call this phone
number, select w.
Setting the route
In case the system finds more than
one possible route, the desired route
can be chosen.
Select Routes to display a list of all
routes detected by the system.
Activate the desired route and then
select Go to start route guidance.
Routes with several destinations After route guidance has been
started, it is possible to add
destinations to the active route, e.g.
to pick up a friend on the way or stop
at a petrol station.
Notice
Up to five destinations can be
combined in one route.
Start route guidance to the desired destination.To add another destination, select
% on the map and then select Add
Destination . The destination search
menu is displayed.
Navigate to the desired destination.
The Details menu is displayed. Select
Add .
Notice
If Go is selected, route guidance to
the destination first selected is
stopped and route guidance to the
new destination is started.
The destinations are arranged in the
order in which they are entered while
the last destination added is the first
to be guided to. In order to check or
confirm while driving, the name of the next destination is displayed above
the arrival time and distance.
The order of the destinations can be
changed 3 68.
Guidance Route guidance is provided by the
navigation system through visual
instructions and voice prompts (voice guidance).
Page 69 of 85
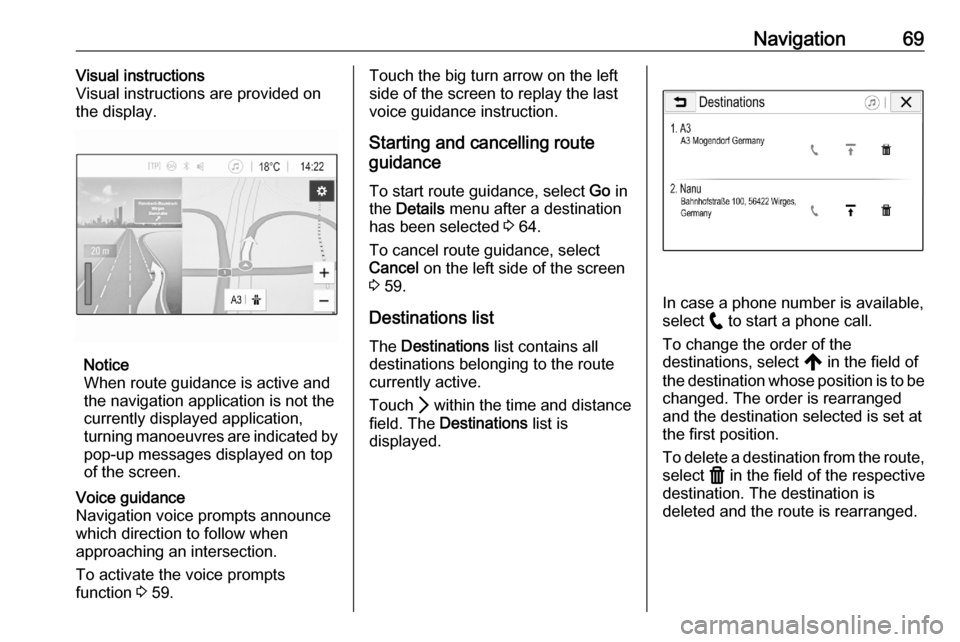
Navigation69Visual instructions
Visual instructions are provided on
the display.
Notice
When route guidance is active and
the navigation application is not the
currently displayed application,
turning manoeuvres are indicated by
pop-up messages displayed on top
of the screen.
Voice guidance
Navigation voice prompts announce
which direction to follow when
approaching an intersection.
To activate the voice prompts
function 3 59.Touch the big turn arrow on the left
side of the screen to replay the last voice guidance instruction.
Starting and cancelling route
guidance
To start route guidance, select Go in
the Details menu after a destination
has been selected 3 64.
To cancel route guidance, select
Cancel on the left side of the screen
3 59.
Destinations list
The Destinations list contains all
destinations belonging to the route
currently active.
Touch Q within the time and distance
field. The Destinations list is
displayed.
In case a phone number is available,
select w to start a phone call.
To change the order of the
destinations, select , in the field of
the destination whose position is to be changed. The order is rearranged
and the destination selected is set at
the first position.
To delete a destination from the route,
select f in the field of the respective
destination. The destination is
deleted and the route is rearranged.
Page 70 of 85
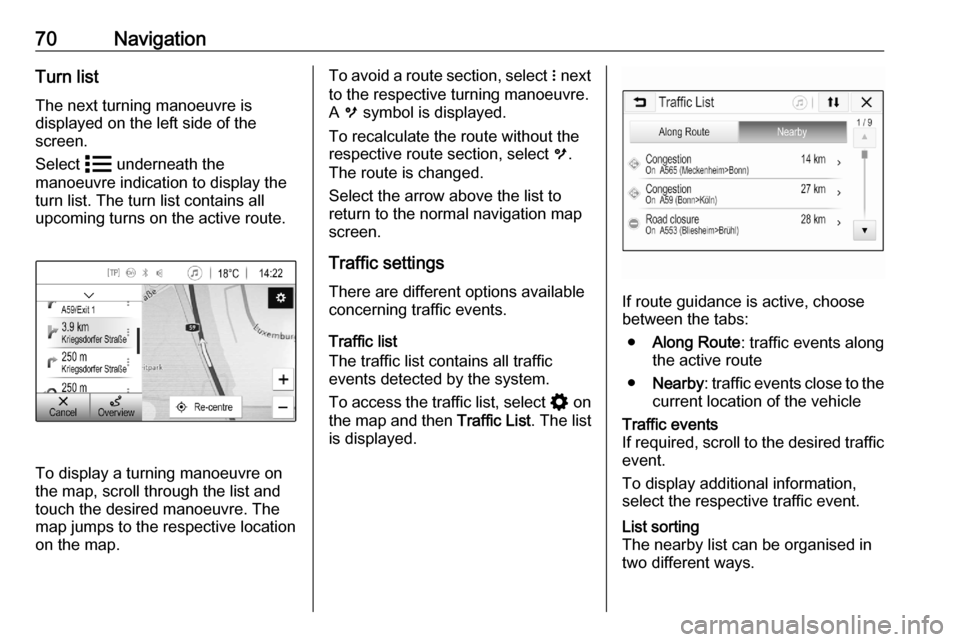
70NavigationTurn list
The next turning manoeuvre is
displayed on the left side of the
screen.
Select n underneath the
manoeuvre indication to display the
turn list. The turn list contains all
upcoming turns on the active route.
To display a turning manoeuvre on
the map, scroll through the list and
touch the desired manoeuvre. The map jumps to the respective location
on the map.
To avoid a route section, select n next
to the respective turning manoeuvre.
A m symbol is displayed.
To recalculate the route without the
respective route section, select m.
The route is changed.
Select the arrow above the list to
return to the normal navigation map
screen.
Traffic settings There are different options available
concerning traffic events.
Traffic list
The traffic list contains all traffic
events detected by the system.
To access the traffic list, select % on
the map and then Traffic List. The list
is displayed.
If route guidance is active, choose
between the tabs:
● Along Route : traffic events along
the active route
● Nearby : traffic events close to the
current location of the vehicle
Traffic events
If required, scroll to the desired traffic event.
To display additional information,
select the respective traffic event.List sorting
The nearby list can be organised in
two different ways.