check engine VAUXHALL COMBO D 2018 User Guide
[x] Cancel search | Manufacturer: VAUXHALL, Model Year: 2018, Model line: COMBO D, Model: VAUXHALL COMBO D 2018Pages: 203, PDF Size: 4.76 MB
Page 119 of 203

Driving and operating117Deactivation
Deactivate the stop-start system
manually by pressing ^ in the centre
console. LED in the button illuminates
to confirm deactivation.
Depending on version, a
corresponding message, e.g.
Start&Stop disconnected , may also
be displayed in the Driver Information
Centre 3 90.
Autostop
If the vehicle is at a low speed or at a standstill, activate an Autostop as
follows:
● depress the clutch pedal
● set the lever to neutral
● release the clutch pedal
The engine will be switched off while the ignition stays on.
An Autostop is indicated when control
indicator ^ flashes in the Driver
Information Centre 3 90.
During an Autostop, the heating,
power steering and brake
performance will be maintained.
Caution
The power steering assist may be
reduced during an Autostop.
Conditions for an Autostop
The stop-start system checks if each
of the following conditions is fulfilled.
Otherwise an Autostop will be
inhibited.
● the stop-start system is not manually deactivated
● the bonnet is fully closed
● the driver's door is closed and the
driver's seat belt is fastened
● the vehicle battery is sufficiently charged and in good condition
● the engine is warmed up
● the engine coolant temperature is
not too high
● the engine exhaust temperature is not too high, e.g. after driving
with high engine load
● the ambient temperature is not too low
● the climate control system allows
an Autostop
Page 142 of 203

140Vehicle careVehicle careGeneral Information...................140
Accessories and vehicle modifications .......................... 140
Vehicle storage ........................141
End-of-life vehicle recovery .....141
Vehicle checks ........................... 142
Performing work ......................142
Bonnet ..................................... 142
Engine oil ................................. 143
Engine coolant ......................... 144
Power steering fluid .................145
Washer fluid ............................ 145
Brakes ..................................... 145
Brake fluid ............................... 146
Vehicle battery ......................... 146
Wiper blade replacement ........148
Bulb replacement .......................149
Halogen headlights ..................149
Fog lights ................................. 151
Tail lights ................................. 151
Side turn signal lights ..............152
Centre high-mounted brake light ......................................... 152
Number plate light ...................152Interior lights ............................ 153
Instrument panel illumination ...154
Electrical system ........................155
Fuses ....................................... 155
Engine compartment fuse box . 156
Instrument panel fuse box .......157
Vehicle tools .............................. 159
Tools ........................................ 159
Wheels and tyres .......................159
Winter tyres ............................. 159
Tyre designations ....................160
Tyre pressure .......................... 160
Tyre pressure monitoring
system .................................... 161
Tread depth ............................. 162
Changing tyre and wheel size . 163 Wheel covers ........................... 163
Tyre chains .............................. 163
Tyre repair kit .......................... 164
Wheel changing .......................166
Spare wheel ............................ 168
Jump starting ............................. 170
Towing ....................................... 172
Towing the vehicle ...................172
Towing another vehicle ...........172
Appearance care .......................173
Exterior care ............................ 173
Interior care ............................. 175General Information
Accessories and vehiclemodifications
We recommend the use of genuine
parts and accessories and factory
approved parts specific for your
vehicle type. We cannot assess or guarantee reliability of other products
- even if they have a regulatory or
otherwise granted approval.
Any modification, conversion or other
changes made to standard vehicle
specifications (including, without
limitation, software modifications,
modifications of the electronic control units) may invalidate the warrantyoffered by Vauxhall. Furthermore,
such changes may affect driver
assistance systems, may impact fuel
consumption, CO 2 emissions and
other emissions of the vehicle and
cause the vehicle to no longer
conform to the operating permit,
impacting the validity of your vehicle
registration.
Page 143 of 203

Vehicle care141Caution
When transporting the vehicle on
a train or on a recovery vehicle, the
mud flaps might be damaged.
Vehicle storage
Storage for a long period of time
If the vehicle is to be stored for several months:
● Wash and wax the vehicle.
● Have the wax in the engine compartment and underbody
checked.
● Clean and preserve the rubber seals.
● Fill up fuel tank completely.
● Change the engine oil.
● Drain the washer fluid reservoir.
● Check the coolant antifreeze and
corrosion protection.
● Adjust tyre pressure to the value specified for full load.
● Park the vehicle in a dry, wellventilated place. Engage first or
reverse gear to prevent the
vehicle from rolling.
● Do not apply the parking brake.
● Open the bonnet, close all doors and lock the vehicle.
● Disconnect the clamp from the negative terminal of the vehicle
battery. Beware that all systems
are not functional, e.g. anti-theft
locking system.
Putting back into operation
When the vehicle is to be put back into operation:
● Connect the clamp to the negative terminal of the vehicle
battery. Activate the electronics
of the power windows.
● Check tyre pressure.
● Fill up the washer fluid reservoir.
● Check the engine oil level.
● Check the coolant level.
● Fit the number plates if necessary.End-of-life vehicle recovery
Information on end-of-life vehicle
recovery centres and the recycling of
end-of-life vehicles is available on our website. Only entrust this work to an
authorised recycling centre.
Natural gas vehicles must be recycled by a service centre authorised for
natural gas vehicles.
Page 144 of 203

142Vehicle careVehicle checks
Performing work9 Warning
Only perform engine compartment
checks when the ignition is off.
The cooling fan may start
operating even if the ignition is off.
9 Danger
The ignition system use extremely
high voltage. Do not touch.
Bonnet
Opening
Pull the release lever (located on the
lower left side of the instrument panel) and return it to its original position.
Move the safety catch sideways and
open the bonnet.
Secure the bonnet support.
Page 145 of 203

Vehicle care143If the bonnet is opened during an
Autostop, the engine will be restarted
automatically for safety reasons.
Stop-start system 3 116.
Closing Before closing the bonnet, press the
support into the holder.
Lower the bonnet and allow it to fall
into the latch from a low height
(20-25 cm). Check that the bonnet is
engaged.Caution
Do not press the bonnet into the
latch, to avoid dents.
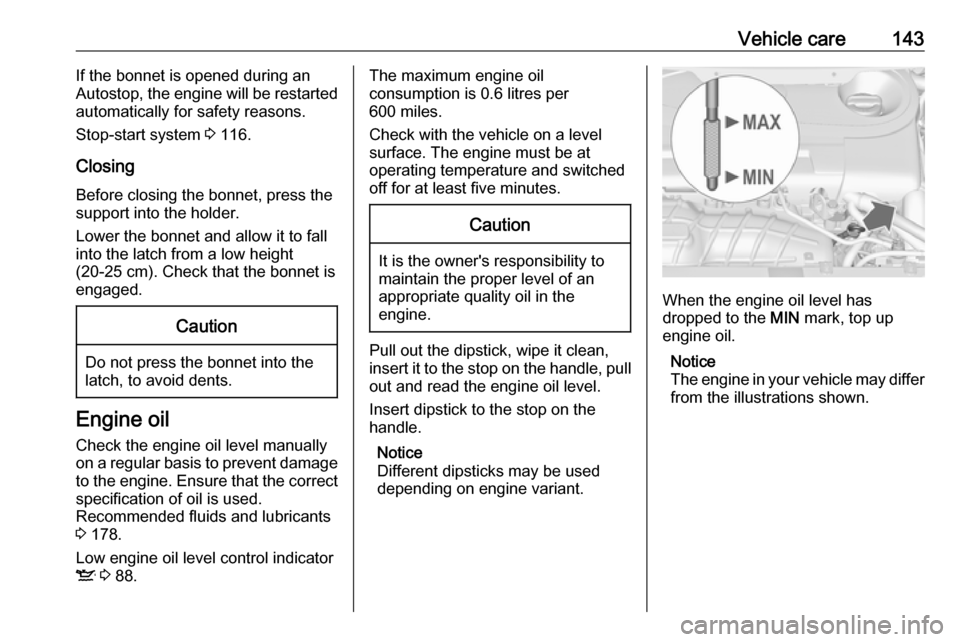
Engine oil
Check the engine oil level manually
on a regular basis to prevent damage
to the engine. Ensure that the correct specification of oil is used.
Recommended fluids and lubricants
3 178.
Low engine oil level control indicator
S 3 88.
The maximum engine oil
consumption is 0.6 litres per
600 miles.
Check with the vehicle on a level
surface. The engine must be at
operating temperature and switched
off for at least five minutes.Caution
It is the owner's responsibility to
maintain the proper level of an
appropriate quality oil in the
engine.
Pull out the dipstick, wipe it clean,
insert it to the stop on the handle, pull
out and read the engine oil level.
Insert dipstick to the stop on the
handle.
Notice
Different dipsticks may be used
depending on engine variant.
When the engine oil level has
dropped to the MIN mark, top up
engine oil.
Notice
The engine in your vehicle may differ from the illustrations shown.
Page 151 of 203

Vehicle care149Bulb replacement
Switch off the ignition and switch off
the relevant switch or close the doors.
Only hold a new bulb at the base! Do
not touch the bulb glass with bare
hands.
Use only the same bulb type for
replacement.
Replace headlight bulbs from within
the engine compartment.
Bulb check After a bulb replacement, switch on
the ignition, operate and check the
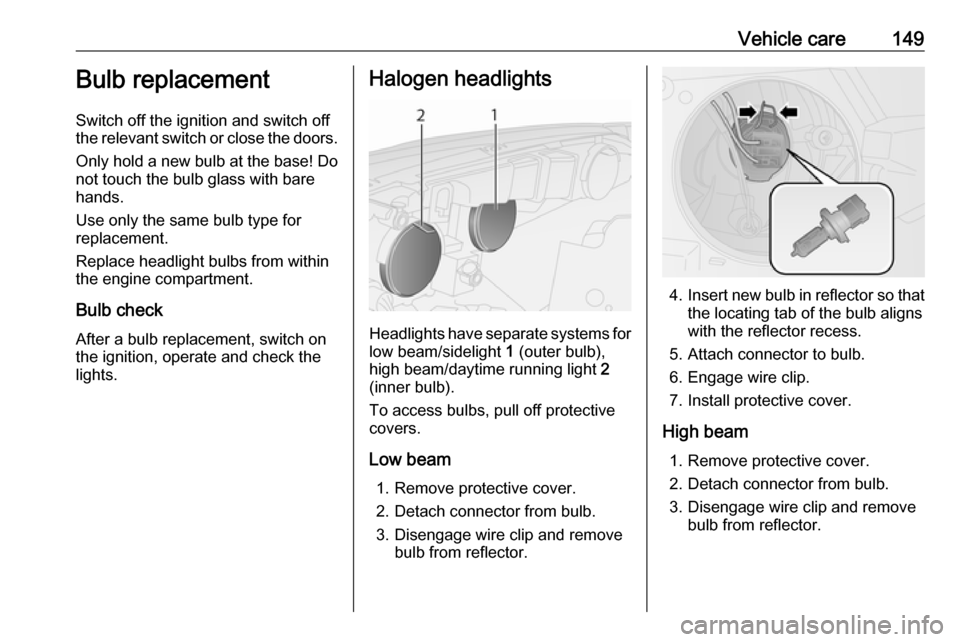
lights.Halogen headlights
Headlights have separate systems for low beam/sidelight 1 (outer bulb),
high beam/daytime running light 2
(inner bulb).
To access bulbs, pull off protective
covers.
Low beam 1. Remove protective cover.
2. Detach connector from bulb.
3. Disengage wire clip and remove bulb from reflector.
4.Insert new bulb in reflector so that
the locating tab of the bulb aligns
with the reflector recess.
5. Attach connector to bulb.
6. Engage wire clip.
7. Install protective cover.
High beam 1. Remove protective cover.
2. Detach connector from bulb.
3. Disengage wire clip and remove bulb from reflector.
Page 162 of 203

160Vehicle careTyre designationsE.g. 215/60 R 16 95 H215:tyre width, mm60:cross-section ratio (tyre height
to tyre width), %R:belt type: RadialRF:type: RunFlatC:cargo or commercial use16:wheel diameter, inches95:load index e.g. 95 is equivalent
to 690 kgH:speed code letter
Speed code letter:
Q:up to 100 mphS:up to 112 mphT:up to 118 mphH:up to 130 mphV:up to 150 mphW:up to 168 mph
Choose a tyre appropriate for the
maximum speed of your vehicle.
The maximum speed is achievable at kerb weight with driver (75 kg) plus
125 kg payload. Optional equipment
could reduce the maximum speed of
the vehicle.
Performance 3 186.
Directional tyres
Directional tyres must be mounted so that they rotate in the correct
direction. The proper rotation
direction is indicated by a symbol
(e.g. an arrow) on the sidewall.
Tyre pressure
Check the pressure of cold tyres at
least every 14 days and before any
long journey. Do not forget the spare
wheel. This also applies to vehicles
with tyre pressure monitoring system.
Tyre pressure 3 191.
The tyre pressure information label
on the door frame (if fitted) indicates
the original equipment tyres and the
correspondent tyre pressures.
Always inflate tyres to the pressures
shown on the label.
The tyre pressure data refers to cold
tyres. It applies to summer and winter tyres.
Incorrect tyre pressures will impair
safety, vehicle handling, comfort and
fuel economy and will increase tyre
wear.Tyre pressures differ depending on
various options. For the correct tyre
pressure value, follow the procedure
below:
1. Identify the engine identifier code.
Engine data 3 183.
2. Identify the respective tyre.
The tyre pressure tables show all
possible tyre combinations 3 191.
For the tyres approved for your
vehicle, refer to the EEC Certificate of Conformity provided with your vehicle
or other national registration
documents.
The driver is responsible for correct
adjustment of tyre pressures.9 Warning
If the pressure is too low, this can
result in considerable tyre warm-
up and internal damage, leading to tread separation and even to tyre
blow-out at high speeds.
Page 177 of 203

Vehicle care175Paintwork damageRectify minor paintwork damage witha touch-up pen before rust forms.
Have more extensive damage or rust areas repaired by a workshop.
Underbody
Some areas of the vehicle underbody
have a PVC undercoating while other critical areas have a durable
protective wax coating.
After the underbody is washed, check
the underbody and have it waxed if
necessary.
Bitumen/rubber materials could
damage the PVC coating. Have
underbody work carried out by a
workshop.
Before and after winter, wash the
underbody and have the protective
wax coating checked.
Natural gas system
Do not direct the steam jet or high-
pressure jet towards natural gas
system components. It is particularly
important to protect the natural gastank and the pressure valves on the
vehicle underbody and the bulkhead in the engine compartment.
These components must not be
treated using chemical cleaners or
preservatives.
Have components of the natural gas
system cleaned by a workshop
authorised to carry out maintenance
of natural gas vehicles.
Towing equipment
Do not clean the coupling ball bar with a steam-jet or high-pressure jet
cleaner.
Interior care
Interior and upholstery
Only clean the vehicle interior,
including the instrument panel fascia
and panelling, with a dry cloth or
interior cleaner.
Clean the leather upholstery with
clear water and a soft cloth. In case of heavy soiling, use leather care.The instrument cluster and the
displays should only be cleaned using
a soft damp cloth. If necessary, use a
weak soap solution.
Clean fabric upholstery with a
vacuum cleaner and brush. Remove
stains with an upholstery cleaner.
Clothing fabrics may not be
colourfast. This could cause visible
discolourations, especially on light-
coloured upholstery. Removable
stains and discolourations should be
cleaned as soon as possible.
Clean seat belts with lukewarm water or interior cleaner.Caution
Close Velcro fasteners as open
Velcro fasteners on clothing could damage seat upholstery.
The same applies to clothing with
sharp-edged objects, like zips or
belts or studded jeans.