remove VAUXHALL COMBO E 2019 User Guide
[x] Cancel search | Manufacturer: VAUXHALL, Model Year: 2019, Model line: COMBO E, Model: VAUXHALL COMBO E 2019Pages: 281, PDF Size: 10.33 MB
Page 54 of 281

52Seats, restraints9Warning
Always make sure that the load in
the vehicle is securely stowed.
Otherwise objects can be thrown
around inside the vehicle and
cause personal injury or damage
to the load or vehicle.
Depending on version, the load
compartment area can be increased
by folding up or removing the third row
seats.
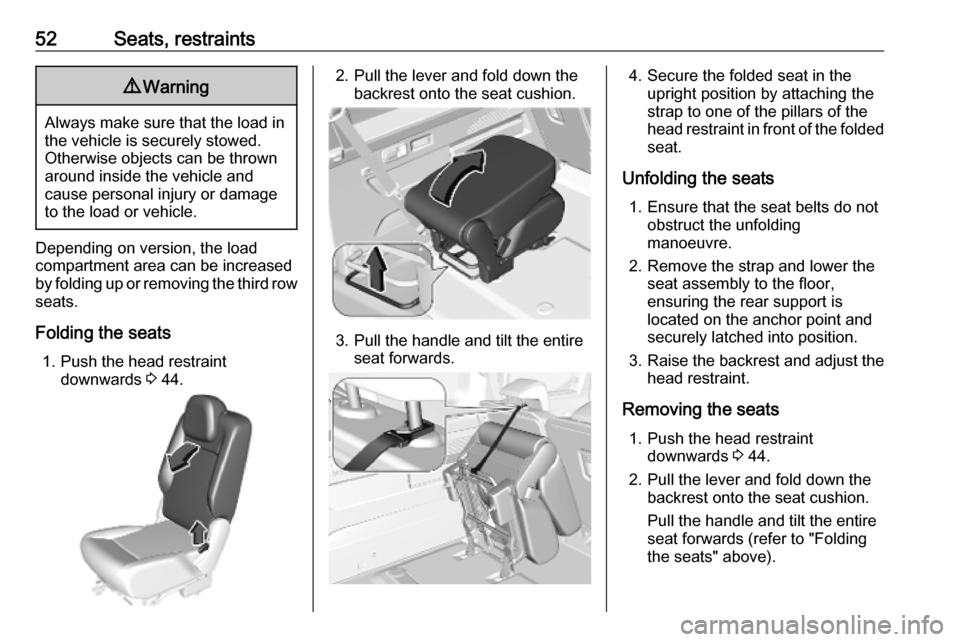
Folding the seats 1. Push the head restraint downwards 3 44.
2. Pull the lever and fold down the
backrest onto the seat cushion.
3. Pull the handle and tilt the entire seat forwards.
4. Secure the folded seat in theupright position by attaching the
strap to one of the pillars of the
head restraint in front of the folded seat.
Unfolding the seats 1. Ensure that the seat belts do not obstruct the unfolding
manoeuvre.
2. Remove the strap and lower the seat assembly to the floor,
ensuring the rear support is
located on the anchor point and
securely latched into position.
3. Raise the backrest and adjust the
head restraint.
Removing the seats 1. Push the head restraint downwards 3 44.
2. Pull the lever and fold down the backrest onto the seat cushion.
Pull the handle and tilt the entire
seat forwards (refer to "Folding
the seats" above).
Page 55 of 281

Seats, restraints53
3. Pull the loop to disengage thelocks and remove the seat
assembly from the floor anchor
points.
Installing the seats
1. Pull the loop and attach the seat assembly front supports to the
front anchor points.
2. Fold the seat backwards to the floor to fix its rear anchor point.
3. Raise the backrest and adjust the
head restraint.
Longitudinal seat adjustment
Pull the handle, slide the seat, then
release the handle. Try to move the seat back and forth to ensure that the
seat is locked in place.
Page 58 of 281

56Seats, restraints
Pull latch plates with the belt out of
belt holder in the roof.
Insert lower latch plate into left-hand
buckle ( 1) at the centre seat. Guide
the upper latch plate with the belt over
the lap area and the shoulder (do not twist) and insert it into right-hand
buckle ( 2) at centre seat.
To unfasten the seat belt, first press the button on the right-hand buckle
( 2 ) and remove upper latch plate.
Then press the button on the left-
hand buckle ( 1) and remove lower
latch plate. The seat belt retracts
automatically.
Using seat belts while pregnant9 Warning
The lap belt must be positioned as
low as possible across the pelvis
to prevent pressure on the
abdomen.
Page 67 of 281

Seats, restraints65child's backbone, which is still very
weak, is under less strain in the event
of an accident.
Suitable are child restraint systems
that comply with valid UN ECE
regulations. Check local laws and
regulations for mandatory use of child restraint systems.
The following child restraints are
recommended for the following
weight classes:
● Group 0+ :
Römer Baby-Safe Plus with
ISOFIX base for children up to
13 kg
● Group I :
Römer Duo Plus ISOFIX with
ISOFIX and Top-tether for
children from 9 kg to 18 kg
● Group II, Group III :
Römer Kidfix XP with or without
ISOFIX for children from 15 kg to
36 kg
● Group III : Graco Booster for
children from 22 kg to 36 kg
Ensure that the child restraint system to be installed is compatible with the
vehicle type.Ensure that the mounting location of
the child restraint system within the
vehicle is correct, see following
tables.
Allow children to enter and exit the
vehicle only on the side facing away
from the traffic.
When the child restraint system is not in use, secure the seat with a seat belt
or remove it from the vehicle.
Notice
Do not affix anything on the child
restraint systems and do not cover
them with any other materials.
A child restraint system which has
been subjected to stress in an
accident must be replaced.
Page 68 of 281

66Seats, restraintsChild restraint installation locations
Permissible options for fastening a child restraint system with a three-point seat belt
Weight class
On front passenger seatOn outboard
seats in the
second rowOn centre seat
in the second
rowOn seats in
the third rowactivated airbagdeactivated airbagGroup 0, Group 0+: up to 13 kgXU 1,2U 3UU3Group I: 9 to 18 kgUFU1,2U3,4UU 3,4Group II: 15 to 25 kgUFU1,2U 3,4UU3,4Group III: 22 to 36 kgUFU1,2U3,4UU3,4U:universal suitability for forward-facing or rearward-facing child restraint systems in conjunction with three-point seat
beltUF:universal suitability for forward-facing child restraint systems in conjunction with three-point seat beltX:no child restraint system permitted in this weight class1:move seat forwards as far as necessary and adjust seat backrest inclination as far as necessary to a vertical position
to ensure that the belt runs forwards from the upper anchorage point2:adjust seat backrest inclination as far as necessary to a vertical position to ensure that the belt is tight on the buckle
side3:move the respective front seat ahead of the child restraint system forwards as far as necessary4:adjust the respective headrest as necessary or remove if required
Page 69 of 281

Seats, restraints67Permissible options for fitting an ISOFIX child restraint system with ISOFIX bracketsWeight classSize classFixtureOn front passenger seatOn the seats in the second
rowOn the seats in the
third rowGroup 0: up to 10 kgG
FISO/L2
ISO/L1
ISO/R1X
X
XX
X
IL 3X
X
XGroup 0+: up to 13 kgEISO/R1XIL 3XDISO/R2XIL3XCISO/R3XIL3XGroup I: 9 to 18 kgDISO/R2XIL3,4XCISO/R3XIL3,4XBISO/F2XIL, IUF 3,4XB1ISO/F2XXIL, IUF3,4XAISO/F3XIL, IUF 3,4XIL:suitable for particular ISOFIX restraint systems of the 'specific-vehicle', 'restricted' or 'semi-universal' categories.
The ISOFIX restraint system must be approved for the specific vehicle type (refer to the vehicle type list of the child restraint system)IUF:suitable for ISOFIX forward-facing child restraint systems of universal category approved for use in this weight classX:no ISOFIX child restraint system approved in this weight class3:move the respective front seat ahead of the child restraint system forwards as far as necessary4:adjust the respective headrest as necessary or remove if required
Page 78 of 281

76StorageOpening the cover
Remove load compartment cover
from side brackets. Guide the cover
until it is fully rolled up.
Removing the cover
Open the load compartment cover.
Compress the load compartment
cover at one side and lift it up.
Remove the load compartment cover.
Stowing in the load compartment
If the load compartment cover is not
used, stow it in the load compartment. It can be stowed behind the second or
third row seats.
Fitting the cover
Insert the load compartment cover
into the recess at one side. Compress the cover at the other side and
engage it in the recess.
Page 80 of 281

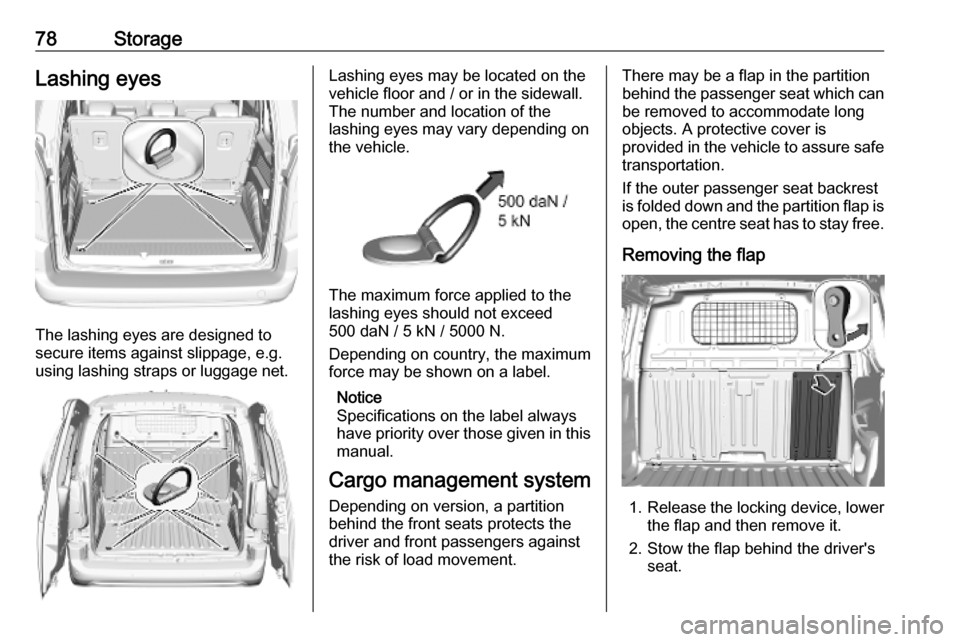
78StorageLashing eyes
The lashing eyes are designed to
secure items against slippage, e.g.
using lashing straps or luggage net.
Lashing eyes may be located on the
vehicle floor and / or in the sidewall.
The number and location of the
lashing eyes may vary depending on
the vehicle.
The maximum force applied to the
lashing eyes should not exceed
500 daN / 5 kN / 5000 N.
Depending on country, the maximum
force may be shown on a label.
Notice
Specifications on the label always
have priority over those given in this manual.
Cargo management system
Depending on version, a partition
behind the front seats protects the
driver and front passengers against
the risk of load movement.
There may be a flap in the partition
behind the passenger seat which can
be removed to accommodate long
objects. A protective cover is
provided in the vehicle to assure safe transportation.
If the outer passenger seat backrest
is folded down and the partition flap is open, the centre seat has to stay free.
Removing the flap
1. Release the locking device, lower
the flap and then remove it.
2. Stow the flap behind the driver's seat.
Page 86 of 281

84Storageside pass one strap on each head
restraint.
With fitted protective cover the
maximum load on each of the folded
backrests is 100 kg.
Warning triangle
Depending on version, the warning
triangle can be stowed in the load
compartment. Secure it with the
elastic straps.
First aid kit
Depending on version, the first aid kit can be stowed in the load
compartment.
Roof rack system
Roof rack
For safety reasons and to avoid
damage to the roof, the vehicle
approved roof rack system is
recommended. For further
information contact your workshop.
Follow the installation instructions
and remove the roof rack when not in use.
Mounting roof rack
Vehicles with roof railing
Page 96 of 281

94Instruments and controls9Warning
Remove any metal objects from
the charging device before
charging a mobile device, as these objects could become very hot.
The portable device to be charged
must be compatible with the Qi
standard, either by design or by using a compatible holder or shell. The
charging zone is identified by the Qi
symbol.
To charge a device, the ignition must
be switched on.
To charge a mobile device:
1. Remove all objects from the charging device.
2. Place the mobile device with the display facing upwards on the
charging device in the storage.
Charging status is indicated in the
LED: illuminates green, when mobile
device is charging.
Protective cover for the mobile device
could have impact on the inductive
charging.
In the event that the mobile device is
not charging properly, rotate it 180°
and place it on the charging device
again.Cigarette lighter
The cigarette lighter is freely
accessible.
Depending on version, the cigarette
lighter may be located behind the storage cover. Press cover to open.
Press in cigarette lighter. It switches
off automatically once the element is
glowing. Pull out cigarette lighter.