warning VAUXHALL COMBO E 2020 User Guide
[x] Cancel search | Manufacturer: VAUXHALL, Model Year: 2020, Model line: COMBO E, Model: VAUXHALL COMBO E 2020Pages: 279, PDF Size: 28.6 MB
Page 36 of 279

34Keys, doors and windowsVehicle security
Anti-theft locking system9 Warning
Do not use the system if there are
people in the vehicle! The doorscannot be unlocked from the
inside.
The system deadlocks all the doors. All doors must be closed otherwise
the system cannot be activated.
Unlocking the vehicle disables the
mechanical anti-theft locking system.
This is not possible with the central
locking button.
Activating
Simple key: Insert the key and turn it
clockwise twice within 5 seconds.
Remote control: Press N on the radio
remote control twice within five
seconds.
Electronic key: Press twice with a
finger or thumb on one of the door
handles (at the markings) within five seconds
Anti-theft alarm system The anti-theft alarm system is
combined with the central locking
system.
It monitors: ● doors, tailgate, bonnet
● passenger compartment including adjoining load
compartment
Activation
Ignition must be switched off. All
doors must be closed and the
electronic key must not remain in the
vehicle. Otherwise the system cannot
be activated.
● Radio remote control: Monitoring
of doors, tailgate and bonnet is
activated 5 seconds after locking
the vehicle by pressing e.
Monitoring of passenger
compartment including adjoiningload compartment is activated
45 seconds after locking the
vehicle by pressing e.
● Electronic key system: Monitoring of doors, tailgate and
bonnet is activated 5 seconds
after locking the vehicle by
pressing with a finger or thumb
on one of the front door handles
at the markings. Monitoring of
passenger compartment
including adjoining load
compartment is activated
45 seconds after locking the
vehicle by pressing with a finger
or thumb on one of the front door handles at the markings.
Activation is confirmed by the flashing of the status LED and coming on of
the turn lights for a short time.
If a door or the tailgate is not correctly
closed and the vehicle is locked via
remote control or electronic key
system, the vehicle remains
unlocked. However, the anti-theft
alarm system will be activated after
45 seconds.
Page 38 of 279

36Keys, doors and windowsNotice
If the vehicle is unlocked and no door is opened, the vehicle is
automatically relocked after 30
seconds. In this case, the anti-theft
alarm will be reactivated, too.
Alarm
When triggered, the alarm horn
sounds and the hazard warning lights flash simultaneously. The number
and duration of alarm signals are
stipulated by legislation.
The anti-theft alarm system can be
deactivated by pressing c, by
pressing on one of the front door
handles at the markings with
electronic key system. The LED of the
U button will extinguish and the turn
lights flash for a short time.
A triggered alarm, which has not been interrupted by the driver, will be
indicated by the rapid flashing of the
LED of the U button. If the ignition is
switched on, the flashing stops
immediately
If the vehicle's battery is to be
disconnected (e.g. for maintenance
work), the alarm siren must bedeactivated as follows: switch the
ignition on then off, then disconnect
the vehicle's battery within 15 s
If the battery has been reconnected
(e.g. after maintenance work), wait for 10 minutes to restart the engine.
Locking the vehicle without
activation of the anti-theft alarm
Lock the vehicle by inserting and
turning the integrated key of the
remote control or the electronic key
system in the lock cylinder of the
driver's door.
Malfunction of the remote control Unlock the vehicle by inserting and
turning the integrated key of the
remote control or the electronic key
system in the lock cylinder of the
driver's door.
Open the driver's door.
The horn of the anti-theft alarm will
sound.
Switch on ignition.
The horn will stop sounding and the
status LED extinguishes.Immobiliser
The system is part of the ignition
switch and checks whether the
vehicle is allowed to be started with
the key being used.
The immobiliser is activated
automatically after the key has been
removed from the ignition switch.
Notice
Radio Frequency Identification
(RFID) tags may cause interference
with the key. Do not have it placed
near the key when starting the
vehicle.
Notice
The immobiliser does not lock the
doors. Always lock the vehicle after
leaving it 3 24.
Switch on the anti-theft alarm
system 3 34.
Emergency operation of electronic
key 3 144.
Page 42 of 279
40Keys, doors and windows
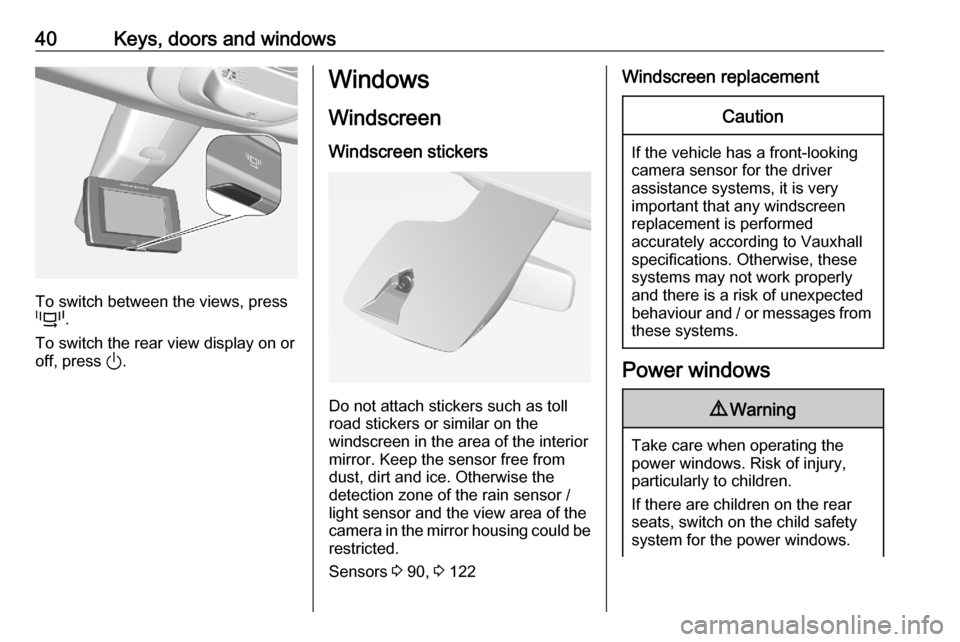
To switch between the views, press
p .
To switch the rear view display on or off, press ).
Windows
Windscreen Windscreen stickers
Do not attach stickers such as toll
road stickers or similar on the
windscreen in the area of the interior
mirror. Keep the sensor free from
dust, dirt and ice. Otherwise the
detection zone of the rain sensor /
light sensor and the view area of the
camera in the mirror housing could be
restricted.
Sensors 3 90, 3 122
Windscreen replacementCaution
If the vehicle has a front-looking
camera sensor for the driver
assistance systems, it is very
important that any windscreen
replacement is performed
accurately according to Vauxhall
specifications. Otherwise, these systems may not work properly
and there is a risk of unexpected
behaviour and / or messages from these systems.
Power windows
9 Warning
Take care when operating the
power windows. Risk of injury,
particularly to children.
If there are children on the rear seats, switch on the child safety
system for the power windows.
Page 44 of 279
42Keys, doors and windows
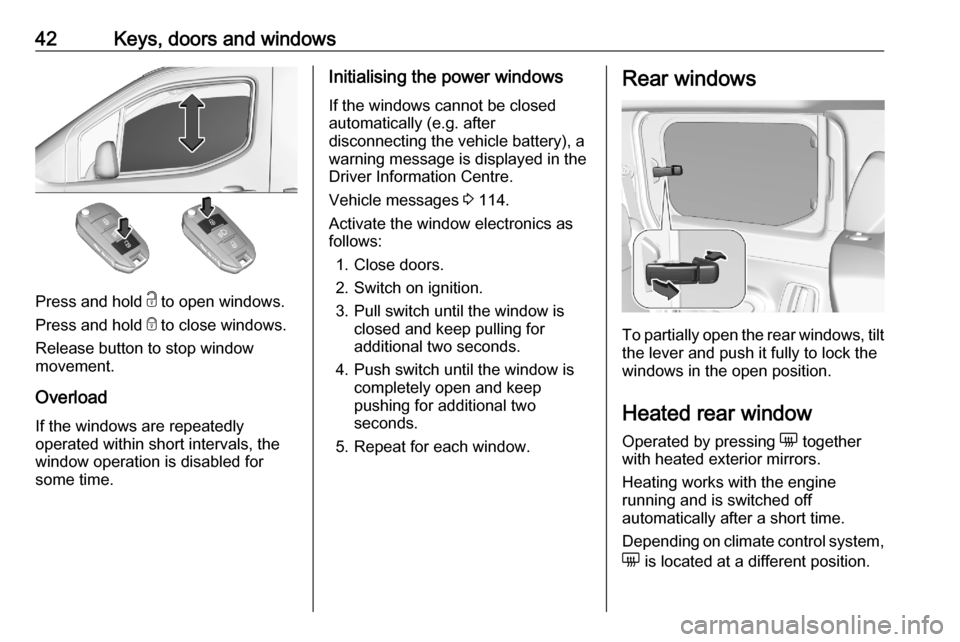
Press and hold c to open windows.
Press and hold e to close windows.
Release button to stop window
movement.
Overload
If the windows are repeatedly
operated within short intervals, the
window operation is disabled for
some time.
Initialising the power windows
If the windows cannot be closed
automatically (e.g. after
disconnecting the vehicle battery), a
warning message is displayed in the
Driver Information Centre.
Vehicle messages 3 114.
Activate the window electronics as
follows:
1. Close doors.
2. Switch on ignition.
3. Pull switch until the window is closed and keep pulling for
additional two seconds.
4. Push switch until the window is completely open and keep
pushing for additional two
seconds.
5. Repeat for each window.Rear windows
To partially open the rear windows, tilt the lever and push it fully to lock the
windows in the open position.
Heated rear window Operated by pressing e together
with heated exterior mirrors.
Heating works with the engine
running and is switched off
automatically after a short time.
Depending on climate control system, e is located at a different position.
Page 46 of 279
44Seats, restraintsSeats, restraintsHead restraints............................ 44
Front seats ................................... 45
Seat position .............................. 45
Seat adjustment ........................46
Seat folding ............................... 47
Armrest ...................................... 49
Heating ...................................... 49
Rear seats ................................... 50
Second row seats ......................50
Third row seats .......................... 51
Seat belts ..................................... 54
Three-point seat belt .................55
Airbag system .............................. 57
Front airbag system ...................60
Side airbag system ....................60
Curtain airbag system ...............61
Airbag deactivation ....................62
Child restraints ............................. 63
Child restraint systems ..............63
Child restraint installation locations ................................... 66Head restraints
Position9 Warning
Only drive with the head restraint
set to the proper position.
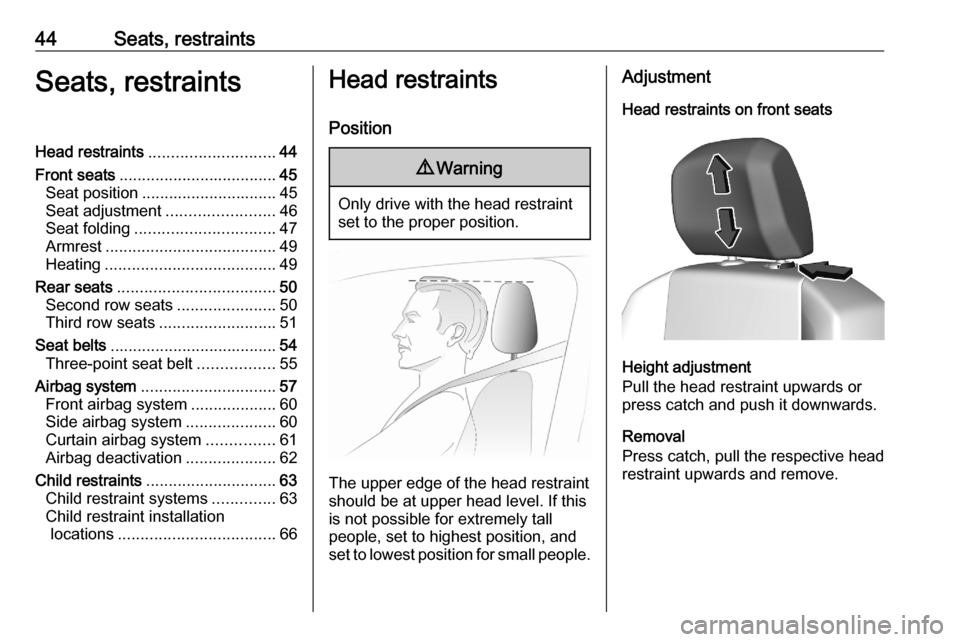
The upper edge of the head restraint
should be at upper head level. If this
is not possible for extremely tall
people, set to highest position, and
set to lowest position for small people.
Adjustment
Head restraints on front seats
Height adjustment
Pull the head restraint upwards or
press catch and push it downwards.
Removal
Press catch, pull the respective head
restraint upwards and remove.
Page 47 of 279
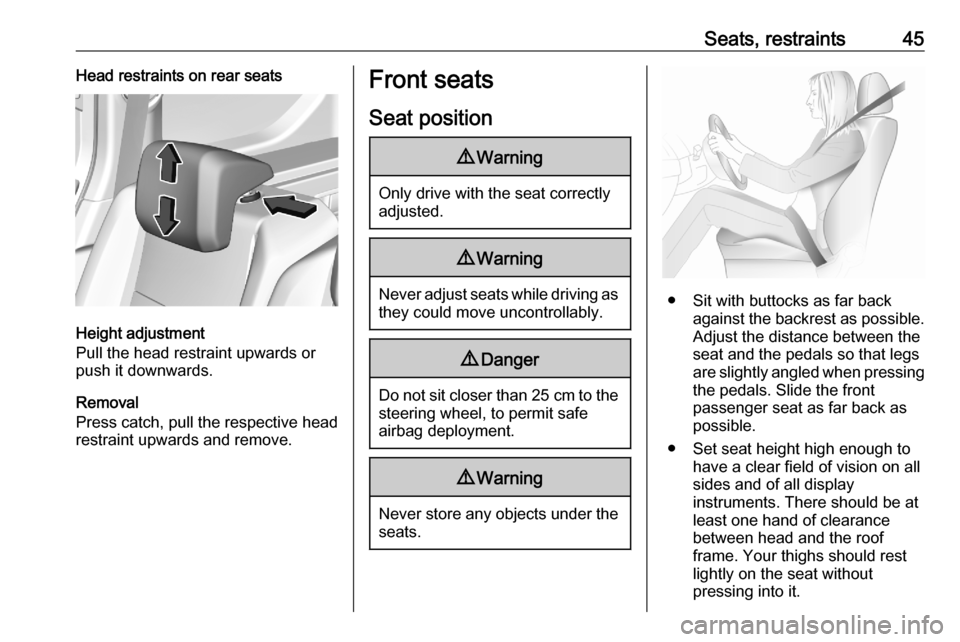
Seats, restraints45Head restraints on rear seats
Height adjustment
Pull the head restraint upwards or
push it downwards.
Removal
Press catch, pull the respective head
restraint upwards and remove.
Front seats
Seat position9 Warning
Only drive with the seat correctly
adjusted.
9 Warning
Never adjust seats while driving as
they could move uncontrollably.
9 Danger
Do not sit closer than 25 cm to the
steering wheel, to permit safe
airbag deployment.
9 Warning
Never store any objects under the
seats.
● Sit with buttocks as far back against the backrest as possible.
Adjust the distance between the
seat and the pedals so that legs
are slightly angled when pressing the pedals. Slide the front
passenger seat as far back as
possible.
● Set seat height high enough to have a clear field of vision on allsides and of all display
instruments. There should be at
least one hand of clearance
between head and the roof
frame. Your thighs should rest
lightly on the seat without
pressing into it.
Page 51 of 279
Seats, restraints49To restore the seat cushion to the
original position, push the lever and
lower the seat cushion till it is
engaged.9 Warning
When the front passenger seat is
in the folded position, the front
passenger airbag system must be deactivated.
Airbag deactivation 3 62.
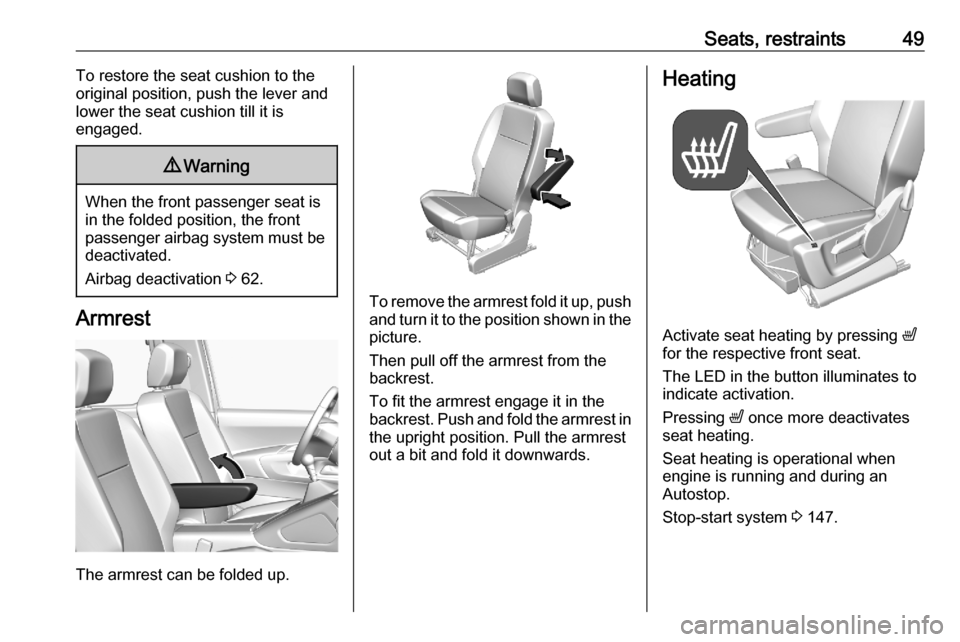
Armrest
The armrest can be folded up.
To remove the armrest fold it up, push
and turn it to the position shown in the
picture.
Then pull off the armrest from the
backrest.
To fit the armrest engage it in the
backrest. Push and fold the armrest in the upright position. Pull the armrest
out a bit and fold it downwards.
Heating
Activate seat heating by pressing ß
for the respective front seat.
The LED in the button illuminates to
indicate activation.
Pressing ß once more deactivates
seat heating.
Seat heating is operational when
engine is running and during an
Autostop.
Stop-start system 3 147.
Page 52 of 279
50Seats, restraintsRear seats
Second row seats Depending on the equipment, the
rear seat backrest is divided into two or three parts. All parts can be folded
down.
Before folding rear seat backrests,
execute the following if necessary:
● Move front seats forward.
● Remove the load compartment cover 3 75.
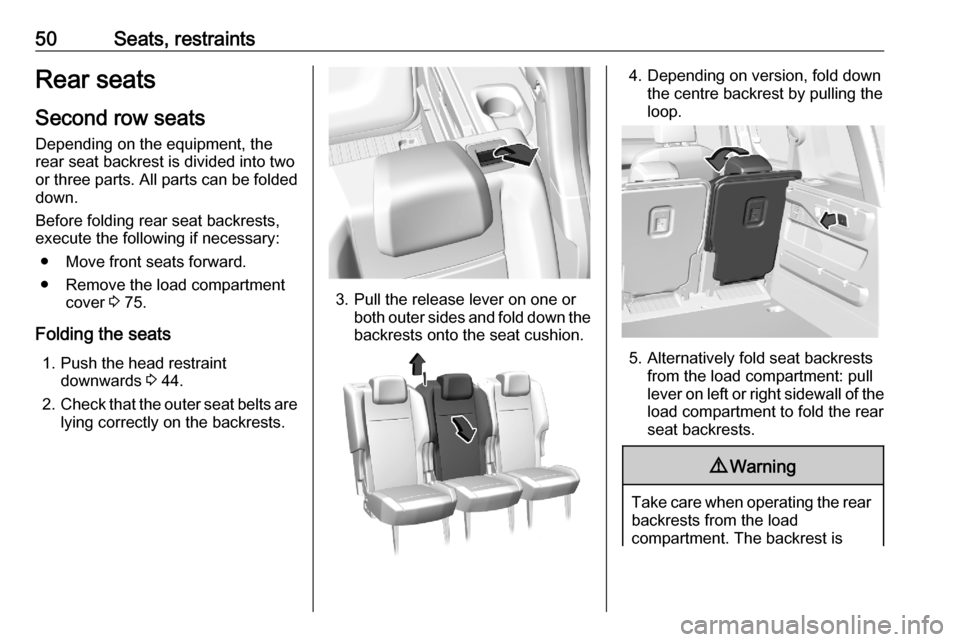
Folding the seats 1. Push the head restraint downwards 3 44.
2. Check that the outer seat belts are
lying correctly on the backrests.
3. Pull the release lever on one or both outer sides and fold down thebackrests onto the seat cushion.
4. Depending on version, fold down the centre backrest by pulling the
loop.
5. Alternatively fold seat backrests from the load compartment: pull
lever on left or right sidewall of the
load compartment to fold the rear
seat backrests.
9 Warning
Take care when operating the rear
backrests from the load
compartment. The backrest is
Page 53 of 279
Seats, restraints51folded with considerable power.
Risk of injury, particularly to
children.
Ensure that nothing is attached to
the rear seats or located on the
seat cushion.9 Warning
Always make sure that the load in
the vehicle is securely stowed.
Otherwise objects can be thrown
around inside the vehicle and
cause personal injury or damage
to the load or vehicle.
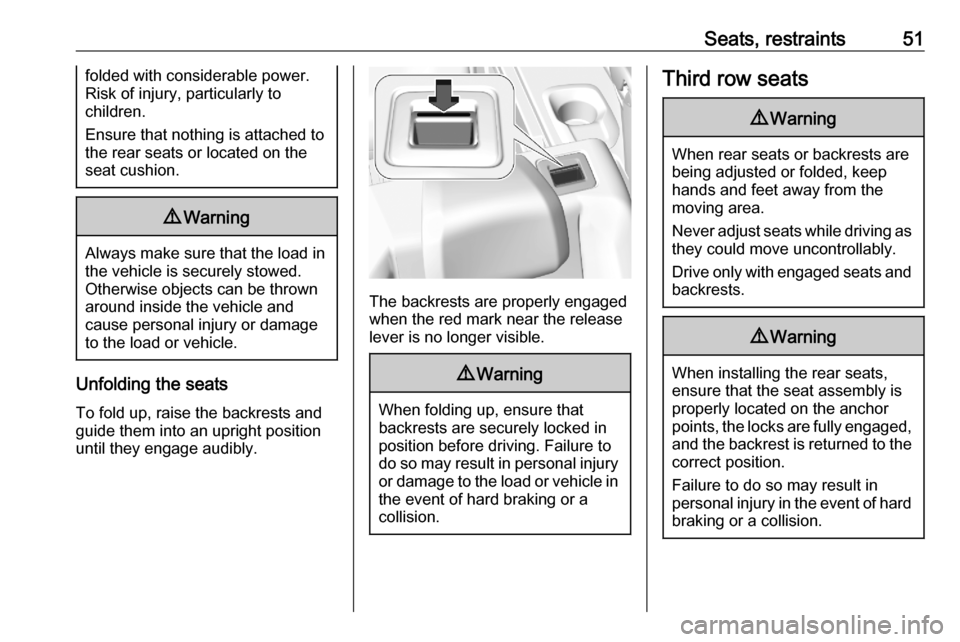
Unfolding the seats
To fold up, raise the backrests and
guide them into an upright position
until they engage audibly.
The backrests are properly engaged
when the red mark near the release
lever is no longer visible.
9 Warning
When folding up, ensure that
backrests are securely locked in
position before driving. Failure to
do so may result in personal injury or damage to the load or vehicle in the event of hard braking or a
collision.
Third row seats9 Warning
When rear seats or backrests are
being adjusted or folded, keep
hands and feet away from the
moving area.
Never adjust seats while driving as they could move uncontrollably.
Drive only with engaged seats and
backrests.
9 Warning
When installing the rear seats,
ensure that the seat assembly is
properly located on the anchor
points, the locks are fully engaged, and the backrest is returned to the
correct position.
Failure to do so may result in
personal injury in the event of hard braking or a collision.
Page 54 of 279
52Seats, restraints9Warning
Always make sure that the load in
the vehicle is securely stowed.
Otherwise objects can be thrown
around inside the vehicle and
cause personal injury or damage
to the load or vehicle.
Depending on version, the load
compartment area can be increased
by folding up or removing the third row
seats.
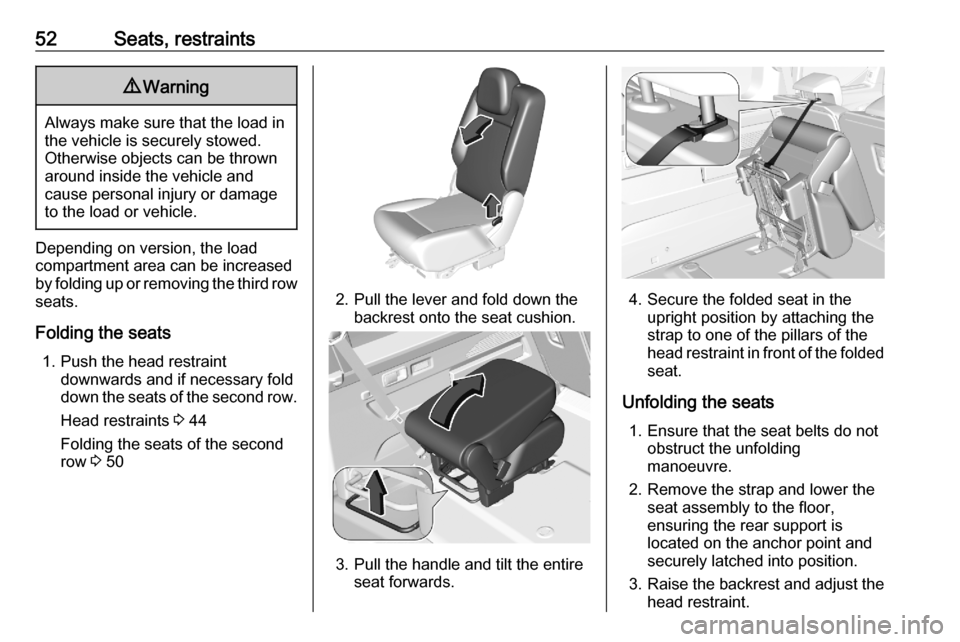
Folding the seats 1. Push the head restraint downwards and if necessary fold
down the seats of the second row.
Head restraints 3 44
Folding the seats of the second
row 3 50
2. Pull the lever and fold down the
backrest onto the seat cushion.
3. Pull the handle and tilt the entire seat forwards.
4. Secure the folded seat in theupright position by attaching the
strap to one of the pillars of the
head restraint in front of the folded seat.
Unfolding the seats 1. Ensure that the seat belts do not obstruct the unfolding
manoeuvre.
2. Remove the strap and lower the seat assembly to the floor,
ensuring the rear support is
located on the anchor point and
securely latched into position.
3. Raise the backrest and adjust the
head restraint.