Automatic VAUXHALL CORSA 2016 Manual PDF
[x] Cancel search | Manufacturer: VAUXHALL, Model Year: 2016, Model line: CORSA, Model: VAUXHALL CORSA 2016Pages: 267, PDF Size: 7.79 MB
Page 166 of 267

164Driving and operatingWhen the system is deactivated, the
LED in the button extinguishes and
Park Assist Off pops-up in the Driver
Information Centre.
Indication
The system warns the driver with
acoustic signals against potentially
hazardous obstacles behind the
vehicle in a distance range up to
1.5 metres and in front up to
1.2 metres . Depending on which side
of the vehicle is closer to an obstacle,
you will hear acoustic warning signals
in the vehicle on the respective side.
The interval between the sounds
becomes shorter as the vehicle gets
closer to that obstacle. When the
distance is less than approx. 30 cm,
the sound is continuous.
Additionally, the distance to rear and
front obstacles is displayed by
changing distance lines in the Driver
Information Centre 3 96 or,
depending on the version, on the Colour-Info-Display 3 101.
The distance to rear and front
obstacles is displayed by changing
distance lines in the Driver
Information Centre 3 96.
The distance indication can be
inhibited by vehicle messages with a
higher priority. After approving the
message by pressing SET/CLR on
the turn signal lever, distance
indication appears again.The distance to obstacles is shown on
the Colour-Info-Display by coloured
zones in front of or behind the vehicle 3 101.
Deactivation
The system is deactivated
automatically when vehicle speed
exceeds 16 mph.
Manual deactivation is also possible by pressing the parking assist button
r .
When the system is deactivated, the LED in the button extinguishes and
Park Assist Off pops-up in the Driver
Information Centre.
Page 167 of 267
Driving and operating165Fault
In the event of a fault or if the system
does not work temporarily, e.g.
because of high external noise level
or other interference factors, a
message pops-up in the Driver
Information Centre.
Vehicle messages 3 103.
Advanced parking assist9 Warning
The driver bears full responsibility
for accepting the parking slot
suggested by the system and the
parking manoeuvre.
Always check the surrounding
area in all directions when using
the advanced parking assist.
The advanced parking assist
measures a suitable parking slot
while passing, calculates the
trajectory and automatically steers
the vehicle into a parallel or
perpendicular parking slot.
Instructions are given in the Driver
Information Centre 3 96 or,
depending on the version, on the
Colour-Info-Display 3 101 , supported
by acoustic signals.
The driver must control acceleration,
braking and gear shifting, while
steering is done automatically.
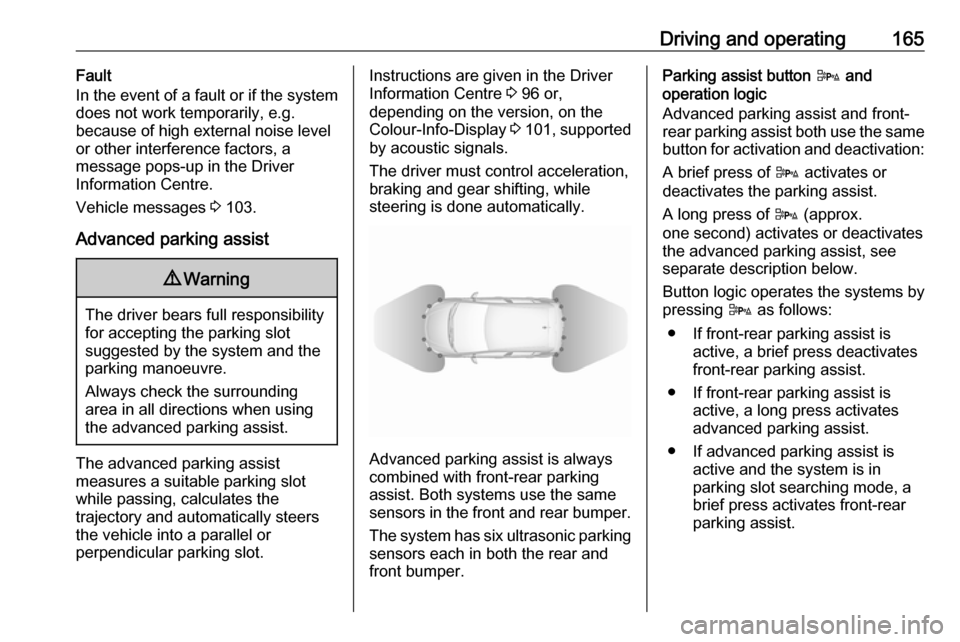
Advanced parking assist is always
combined with front-rear parking
assist. Both systems use the same
sensors in the front and rear bumper.
The system has six ultrasonic parking sensors each in both the rear and
front bumper.
Parking assist button D
and
operation logic
Advanced parking assist and front-
rear parking assist both use the same
button for activation and deactivation:
A brief press of D activates or
deactivates the parking assist.
A long press of D (approx.
one second) activates or deactivates
the advanced parking assist, see
separate description below.
Button logic operates the systems by
pressing D as follows:
● If front-rear parking assist is active, a brief press deactivates
front-rear parking assist.
● If front-rear parking assist is active, a long press activates
advanced parking assist.
● If advanced parking assist is active and the system is in
parking slot searching mode, a brief press activates front-rear
parking assist.
Page 171 of 267

Driving and operating169When a slot is detected, a visual
feedback on the Colour-Info-Display
and an acoustic signal is given.
If the driver does not stop the vehicle
within ten metres for parallel parking
slots or six metres for perpendicular parking slots after a parking slot is
proposed, the system starts to search
for another suitable parking slot.Park guiding mode
The parking slot suggestion of the
system is accepted when the vehicle
is stopped by the driver within ten
metres for parallel parking slots or six metres for perpendicular parking slots
after the Stop message is given. The
system calculates the optimal path
into the parking slot.
A brief vibration in the steering wheel
after engaging reverse gear indicates
that the steering is controlled by the
system. Then the vehicle is steered
into the slot automatically by giving
the driver detailed instructions for braking, accelerating and gear
shifting. The driver must keep hands
away from the steering wheel.Always pay attention to the sound of
the front-rear parking assist.
Continuous sound indicates that the
distance to an obstacle is less than
approx. 30 cm.
If, for any reason, the driver must take over control of the steering, hold the
steering wheel only at the outer edge. Automatic steering is cancelled in thisevent.Changing the parking side
The system is configured to detect
parking slots by default on the
passenger side. To detect parking
slots on the driver side, switch on turn
signal indicator on the driver side for
the duration of the search.
As soon as the turn signal indicator is
switched off, the system searches for
parking slots on the passenger side
again.Display indication
The instructions on the display show:
● General hints and warning messages.
● A hint when driving faster than 18 mph during parking slot
searching mode, or 5 mph in
guiding mode.
● The demand to stop the vehicle, when a parking slot is detected.
● The direction of driving during the
parking manoeuvre.
● The demand to shift into reverse or first gear.
● The demand to accelerate or brake.
● For some of the instructions a progress bar is shown in the
Driver Information Centre.
● The successful completion of the
parking manoeuvre indicated by
a pop-up symbol and a chime.
● The cancelling of a parking manoeuvre.
Page 175 of 267
Driving and operating1739Warning
The rear view camera does not
replace driver vision. Note that
objects that are outside the
camera's field of view and the
advanced parking assist sensors,
e.g. below the bumper or
underneath the vehicle, are not
displayed.
Do not reverse the vehicle by only looking at the Info-Display and
check the surrounding area
behind and around the vehicle
before reversing.
Activation
Rear view camera is automatically
activated when reverse gear is
engaged.
Functionality
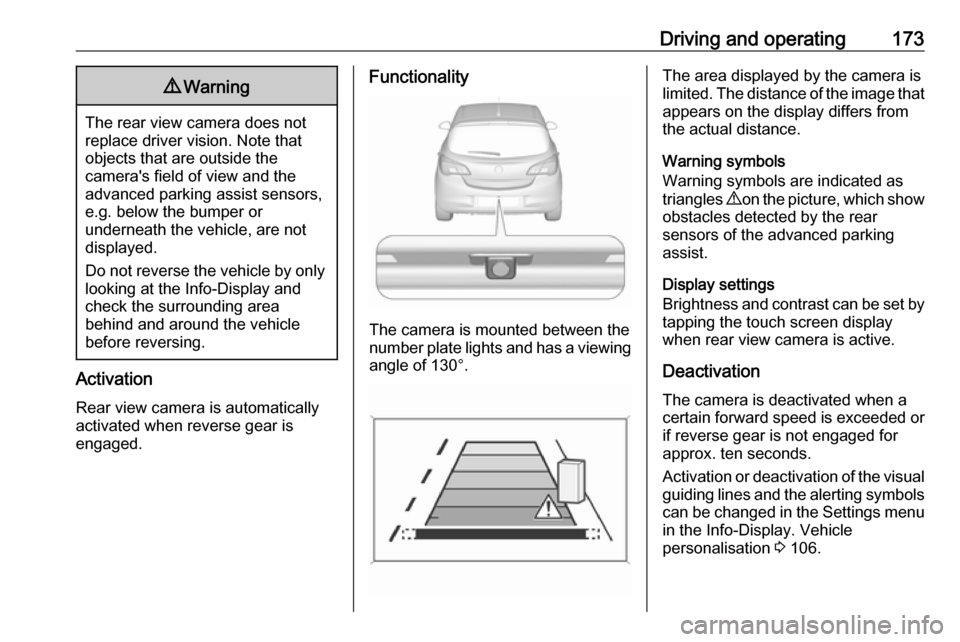
The camera is mounted between the
number plate lights and has a viewing angle of 130°.
The area displayed by the camera is
limited. The distance of the image that
appears on the display differs from
the actual distance.
Warning symbols
Warning symbols are indicated as
triangles 9 on the picture, which show
obstacles detected by the rear
sensors of the advanced parking
assist.
Display settings
Brightness and contrast can be set by
tapping the touch screen display
when rear view camera is active.
Deactivation The camera is deactivated when a
certain forward speed is exceeded or
if reverse gear is not engaged for
approx. ten seconds.
Activation or deactivation of the visual
guiding lines and the alerting symbols can be changed in the Settings menu in the Info-Display. Vehicle
personalisation 3 106.
Page 178 of 267

176Driving and operating
The alert function can be activated or
deactivated in the setting menu of the
traffic sign assistant page by pressing SET/CLR on the turn signal lever.
Once setting page is displayed, select
Alerts ON to activate pop-up alert.
Deactivate by selecting Alerts OFF.
When switching on the ignition, alert
function is deactivated.
Pop-up alert is displayed for approx.
eight seconds in the Driver
Information Centre.
System reset
The content of the traffic sign memory
can be cleared in the setting menu of the traffic sign assistant page by
selecting Reset Scores and confirm
by pressing SET/CLR on the turn
signal lever. Upon successful reset, a chime will sound and the following
symbol is indicated until the next
traffic sign is detected.
In some cases, traffic sign assistant is
cleared up automatically by the
system.
Fault
The traffic sign assistant system may
not operate correctly when:
● The area of the windscreen, where the front camera is
located, is not clean.
● Traffic signs are completely or partially covered or difficult to
discern.
● There are adverse environmental
conditions, e.g. heavy rain, snow, direct sunlight or shadows. In this
event, No Traffic Sign Detection
due to Weather is indicated on
the display.
● Traffic signs are incorrectly mounted or damaged.
● Traffic signs do not comply with the Vienna Convention on traffic
signs (Wiener Übereinkommen
über Straßenverkehrszeichen).Caution
The system is intended to help the driver within a defined speed
range to discern certain traffic
Page 181 of 267
Driving and operating179Fuel for liquid gas operation
Liquid gas is known as LPG
(Liquefied Petroleum Gas) or under
its French name GPL (Gaz de Pétrole Liquéfié). LPG is also known as
Autogas.
LPG consists mainly of propane and
butane. The octane rating is between 105 and 115, depending on the
butane proportion. LPG is stored
liquid at around five to ten bar
pressure.
The boiling point depends on the
pressure and mixing ratio. At ambient
pressure, it is between -42 °C (pure
propane) and -0.5 °C (pure butane).Caution
The system works at an ambient
temperature of approx. -8 °C to
100 °C.
Full function of the LPG system can
only be guaranteed with liquid gas
which complies with the minimum
requirements of DIN EN 589.
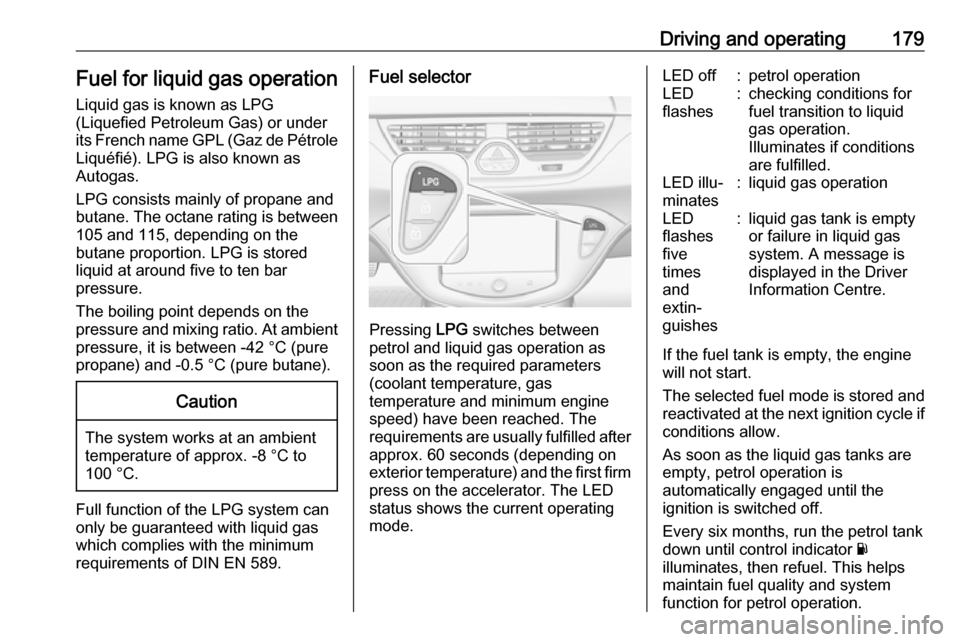
Fuel selector
Pressing LPG switches between
petrol and liquid gas operation as
soon as the required parameters (coolant temperature, gas
temperature and minimum engine
speed) have been reached. The
requirements are usually fulfilled after
approx. 60 seconds (depending on
exterior temperature) and the first firm press on the accelerator. The LED
status shows the current operating
mode.
LED off:petrol operationLED
flashes:checking conditions for
fuel transition to liquid
gas operation.
Illuminates if conditions
are fulfilled.LED illu‐
minates:liquid gas operationLED
flashes
five
times
and
extin‐
guishes:liquid gas tank is empty
or failure in liquid gas
system. A message is
displayed in the Driver
Information Centre.
If the fuel tank is empty, the engine
will not start.
The selected fuel mode is stored and reactivated at the next ignition cycle if
conditions allow.
As soon as the liquid gas tanks are
empty, petrol operation is
automatically engaged until the
ignition is switched off.
Every six months, run the petrol tank down until control indicator Y
illuminates, then refuel. This helps
maintain fuel quality and system
function for petrol operation.
Page 183 of 267
Driving and operating1819Danger
Fuel is flammable and explosive.
No smoking. No naked flames or
sparks.
If you can smell fuel in your
vehicle, have the cause of this
remedied immediately by a
workshop.
Caution
In case of misfuelling, do not
switch on ignition.
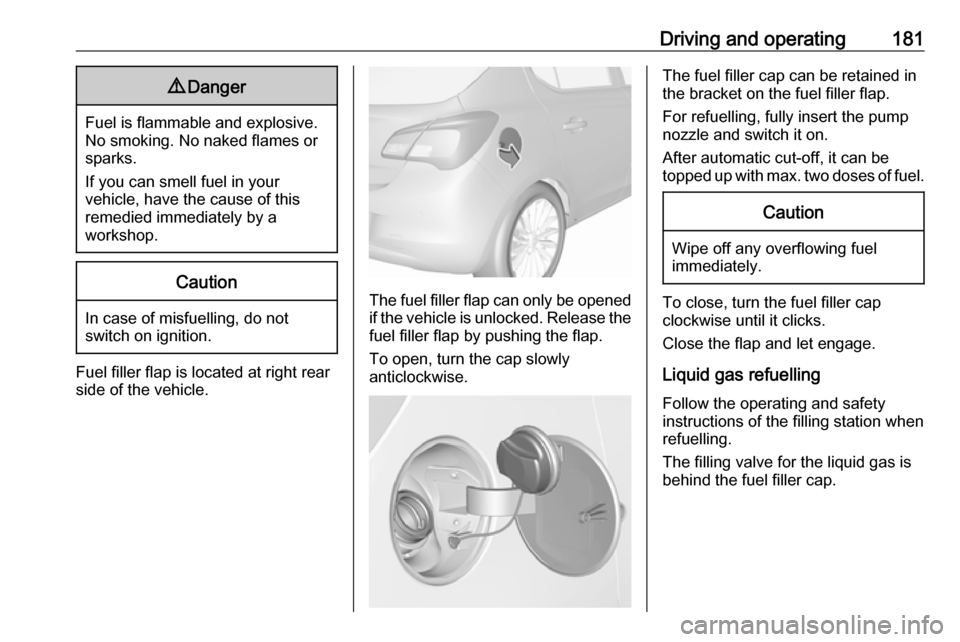
Fuel filler flap is located at right rear
side of the vehicle.
The fuel filler flap can only be opened
if the vehicle is unlocked. Release the
fuel filler flap by pushing the flap.
To open, turn the cap slowly
anticlockwise.
The fuel filler cap can be retained in
the bracket on the fuel filler flap.
For refuelling, fully insert the pump
nozzle and switch it on.
After automatic cut-off, it can be
topped up with max. two doses of fuel.Caution
Wipe off any overflowing fuel
immediately.
To close, turn the fuel filler cap
clockwise until it clicks.
Close the flap and let engage.
Liquid gas refuelling
Follow the operating and safety
instructions of the filling station when
refuelling.
The filling valve for the liquid gas is
behind the fuel filler cap.
Page 184 of 267

182Driving and operating
Unscrew protective cap from the filler
neck.
Screw the required adapter hand-
tight onto the filler neck.
ACME Adapter: Screw the nut of the
filling nozzle onto the adapter. Press
locking lever on filler nozzle down.
DISH filler neck: Place the filler nozzle
into the adapter. Press locking lever
on filler nozzle down.
Bayonet filler neck: Place filler nozzle
on the adapter and turn to the left or
right through one quarter turn. Pull
locking lever of filler nozzle fully.
EURO filler neck: Press the filler
nozzle onto the adapter until it
engages.
Press the button of the liquid gas supply point. The filling system stops
or begins to run slowly when 80% of
the tank volume is reached
(maximum fill level).
Release button on filling system and
the filling process stops. Release the
locking lever and remove the filler
nozzle. A small quantity of liquid gas
can escape.
Remove adapter and stow in vehicle. Fit protective cap to prevent the
penetration of foreign bodies into the
filler opening and the system.9 Warning
Due to the system design, an
escape of liquid gas after
releasing the locking lever is
unavoidable. Avoid inhaling.
9 Warning
The liquid gas tank may only be
filled to 80% for safety reasons.
The multivalve on the liquid gas tank
automatically limits the fill quantity. If
a larger quantity is added, we
recommend not exposing the vehicle
to the sun until the excess amount
has been used up.
Filling adapter
As filling systems are not
standardised, different adapters are
required which are available from
Vauxhall Distributors and from
Vauxhall Authorised Repairers.
Page 194 of 267
192Vehicle care
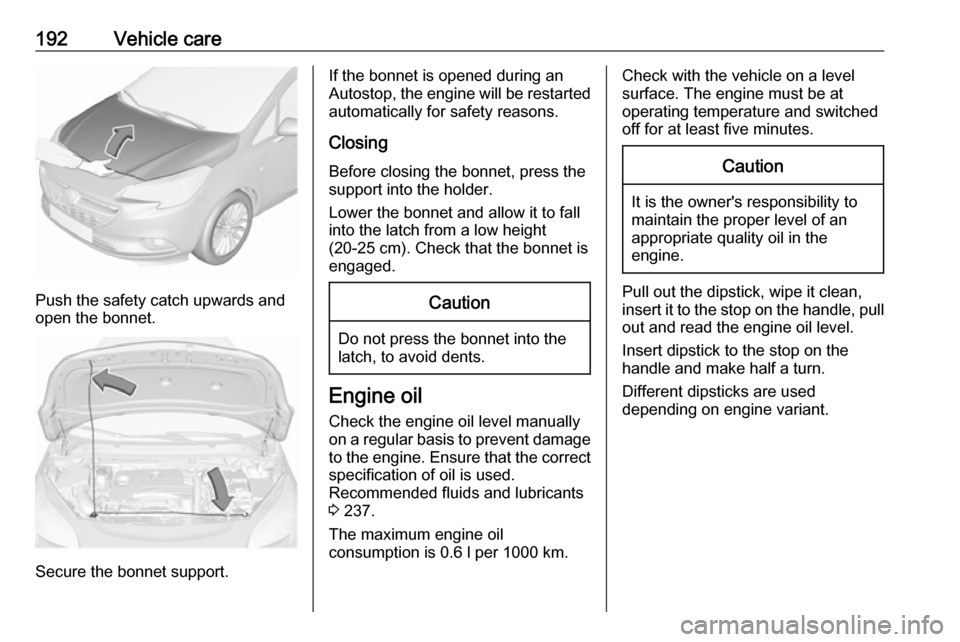
Push the safety catch upwards and
open the bonnet.
Secure the bonnet support.
If the bonnet is opened during an
Autostop, the engine will be restarted automatically for safety reasons.
Closing
Before closing the bonnet, press the
support into the holder.
Lower the bonnet and allow it to fall
into the latch from a low height
(20-25 cm). Check that the bonnet is engaged.Caution
Do not press the bonnet into the
latch, to avoid dents.
Engine oil
Check the engine oil level manually
on a regular basis to prevent damage
to the engine. Ensure that the correct specification of oil is used.
Recommended fluids and lubricants
3 237.
The maximum engine oil
consumption is 0.6 l per 1000 km.
Check with the vehicle on a level
surface. The engine must be at
operating temperature and switched
off for at least five minutes.Caution
It is the owner's responsibility to
maintain the proper level of an
appropriate quality oil in the
engine.
Pull out the dipstick, wipe it clean,
insert it to the stop on the handle, pull
out and read the engine oil level.
Insert dipstick to the stop on the
handle and make half a turn.
Different dipsticks are used
depending on engine variant.
Page 217 of 267

Vehicle care215A detected low tyre pressure
condition is indicated by the control
indicator w 3 94.
If w illuminates, stop as soon as
possible and inflate the tyres as
recommended 3 252.
If w flashes for 60-90 seconds then
illuminates continuously, there is a
fault in the system. Consult a
workshop.
After inflating, some driving may be
required to update the tyre pressure
values in the Driver Information
Centre. During this time w may
illuminate.
If w illuminates at lower temperatures
and extinguishes after driving, this
could be an indicator for approaching
a low tyre pressure condition. Check
tyre pressure.
Vehicle messages 3 103.
If the tyre pressure must be reduced
or increased, switch off ignition.
Only mount wheels with pressure
sensors, otherwise the tyre pressure
will not be displayed and w
illuminates continuously.A spare wheel or temporary spare
wheel is not equipped with pressure
sensors. The tyre pressure
monitoring system is not operational
for these tyres. Control indicator w
illuminates. For the further three
tyres, the system remains
operational.
The use of commercially-available
liquid tyre repair kits can impair the
function of the system. Factory-
approved repair kits can be used.
Operating electronic devices or being close to facilities using similar wave
frequencies could disrupt the tyre
pressure monitoring system.
Each time the tyres are replaced, tyre pressure monitoring system sensors
must be dismounted and serviced.
For the screwed sensor; replace
valve core and sealing ring. For the
clipped sensor; replace complete
valve stem.
Vehicle loading status Adjust tyre pressure to load condition
according to the tyre information label or tyre pressure chart 3 252, and
select the appropriate setting in themenu Tyre Load in the Driver
Information Centre, Vehicle
Information Menu ? 3 96. This
setting is the reference for the tyre
pressure warnings.
The menu Tyre Load only appears if
the vehicle is in a standstill and the
parking brake is applied. On vehicles
with automatic transmission the
selector lever must be in P.
Baselevel display and Midlevel
display: