Automatic VAUXHALL CORSA 2016 Manual Online
[x] Cancel search | Manufacturer: VAUXHALL, Model Year: 2016, Model line: CORSA, Model: VAUXHALL CORSA 2016Pages: 267, PDF Size: 7.79 MB
Page 218 of 267

216Vehicle careSelect● LO for comfort pressure up to
three people.
● ECO for Eco pressure up to
three people.
● Hi for full loading.
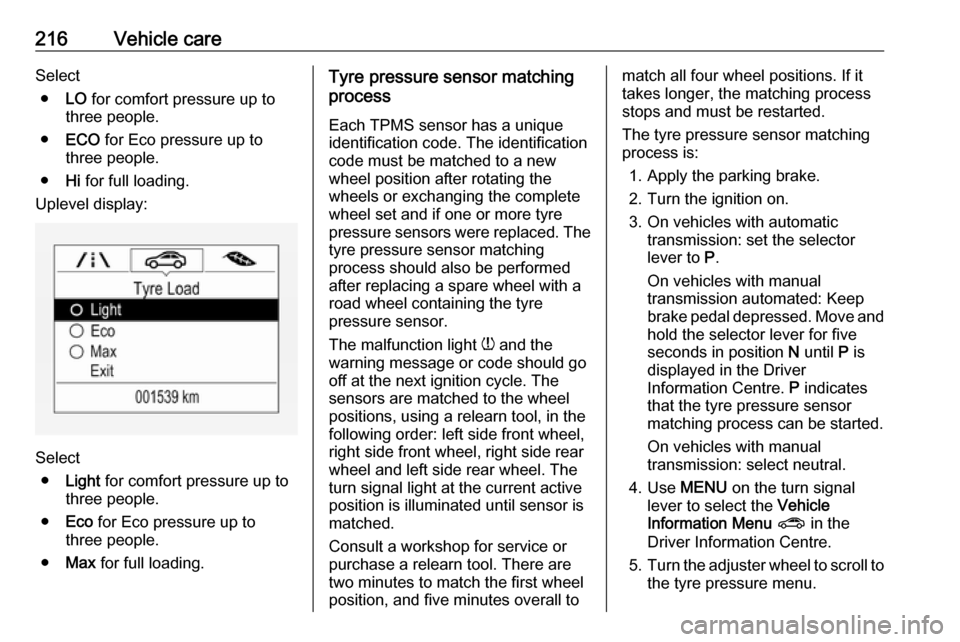
Uplevel display:
Select ● Light for comfort pressure up to
three people.
● Eco for Eco pressure up to
three people.
● Max for full loading.
Tyre pressure sensor matching
process
Each TPMS sensor has a unique
identification code. The identification
code must be matched to a new
wheel position after rotating the
wheels or exchanging the complete
wheel set and if one or more tyre
pressure sensors were replaced. The tyre pressure sensor matching
process should also be performed
after replacing a spare wheel with a
road wheel containing the tyre
pressure sensor.
The malfunction light w and the
warning message or code should go
off at the next ignition cycle. The
sensors are matched to the wheel
positions, using a relearn tool, in the
following order: left side front wheel,
right side front wheel, right side rear
wheel and left side rear wheel. The
turn signal light at the current active
position is illuminated until sensor is
matched.
Consult a workshop for service or
purchase a relearn tool. There are
two minutes to match the first wheel
position, and five minutes overall tomatch all four wheel positions. If it
takes longer, the matching process stops and must be restarted.
The tyre pressure sensor matching
process is:
1. Apply the parking brake.
2. Turn the ignition on.
3. On vehicles with automatic transmission: set the selector
lever to P.
On vehicles with manual
transmission automated: Keep
brake pedal depressed. Move and hold the selector lever for five
seconds in position N until P is
displayed in the Driver
Information Centre. P indicates
that the tyre pressure sensor
matching process can be started.
On vehicles with manual
transmission: select neutral.
4. Use MENU on the turn signal
lever to select the Vehicle
Information Menu ? in the
Driver Information Centre.
5. Turn the adjuster wheel to scroll to
the tyre pressure menu.
Page 231 of 267

Vehicle care229● A discharged vehicle battery canalready freeze at a temperature
of 0 °C. Defrost the frozen battery before connecting jump leads.
● Wear eye protection and protective clothing when
handling a battery.
● Use a booster battery with the same voltage (12 Volts). Its
capacity (Ah) must not be much
less than that of the discharged
vehicle battery.
● Use jump leads with insulated terminals and a cross section of
at least 16 mm 2
(25 mm 2
for
diesel engines).
● Do not disconnect the discharged
vehicle battery from the vehicle.
● Switch off all unnecessary electrical consumers.
● Do not lean over the battery during jump starting.
● Do not allow the terminals of one
lead to touch those of the other
lead.
● The vehicles must not come into contact with each other during
the jump starting process.● Apply the parking brake, transmission in neutral,
automatic transmission in P.
● Open the positive terminal protection caps of both vehiclebatteries.
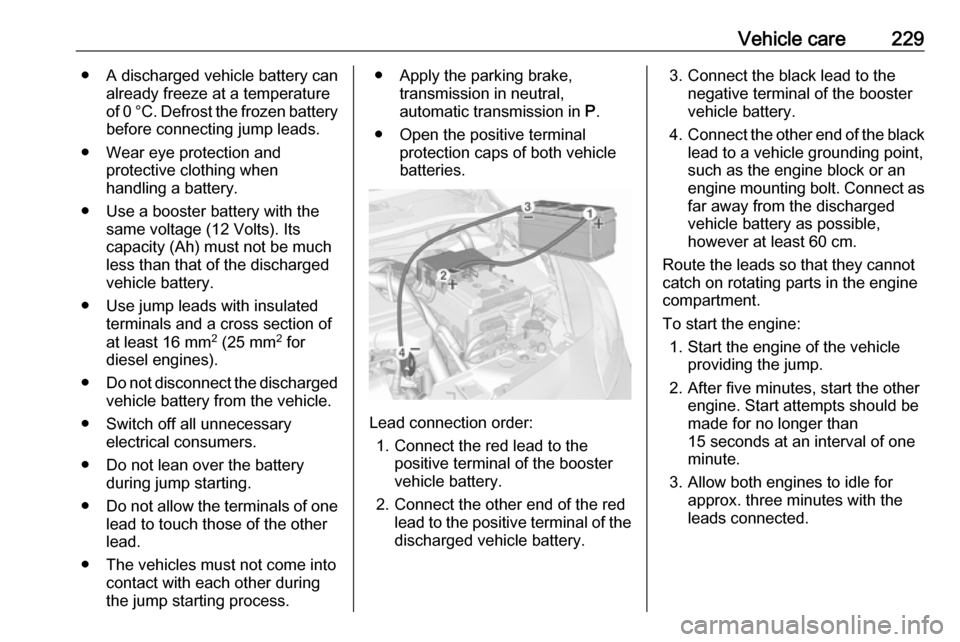
Lead connection order:
1. Connect the red lead to the positive terminal of the booster
vehicle battery.
2. Connect the other end of the red lead to the positive terminal of the
discharged vehicle battery.
3. Connect the black lead to the negative terminal of the booster
vehicle battery.
4. Connect the other end of the black
lead to a vehicle grounding point,
such as the engine block or an
engine mounting bolt. Connect as far away from the discharged
vehicle battery as possible,
however at least 60 cm.
Route the leads so that they cannot
catch on rotating parts in the engine
compartment.
To start the engine: 1. Start the engine of the vehicle providing the jump.
2. After five minutes, start the other engine. Start attempts should be
made for no longer than
15 seconds at an interval of one
minute.
3. Allow both engines to idle for approx. three minutes with the
leads connected.
Page 233 of 267

Vehicle care231Caution
Drive slowly. Do not drive jerkily.
Excessive tractive force can
damage the vehicle.
When the engine is not running,
considerably more force is needed to
brake and steer.
To prevent the entry of exhaust gases from the towing vehicle, switch on the
air recirculation and close the
windows.
Vehicles with automatic transmission: the vehicle must be towed facing
forwards, not faster than 50 mph nor
further than 60 miles. In all other
cases and when the transmission is
defective, the front axle must be
raised off the ground.
Vehicles with manual transmission
automated: the vehicle must only be
towed facing forwards with the front
axle raised off the ground.
Seek the assistance of a workshop. After towing, unscrew the towing eye.
Insert cap at the top and engage
downwards.
Towing another vehicle
Insert a screwdriver in the slot at the
lower bend of the cap. Release the
cap by carefully moving the
screwdriver downwards.
The towing eye is stowed with the
vehicle tools 3 211.
Screw in the towing eye as far as it will
go until it stops in a horizontal
position.
The lashing eye at the rear
underneath the vehicle must never be used as a towing eye.
Attach a tow rope – or even better a
tow bar – to the towing eye.
The towing eye must only be used for
towing and not for recovering a
vehicle.
Page 234 of 267

232Vehicle careCaution
Drive slowly. Do not drive jerkily.
Excessive tractive force can
damage the vehicle.
After towing, unscrew the towing eye.
Insert cap at the top and engage
downwards.
Appearance care
Exterior care Locks
The locks are lubricated at the factory using a high quality lock cylinder
grease. Use a de-icing agent only
when absolutely necessary, as this
has a degreasing effect and impairs
lock function. After using a de-icing
agent, have the locks regreased by a workshop.
Washing
The paintwork of your vehicle is
exposed to environmental influences. Wash and wax your vehicle regularly.
When using automatic vehicle
washes, select a programme that
includes waxing. Restrictions for
filmed or matt painted body parts or
decor tapes, see "Polishing and
waxing".
Bird droppings, dead insects, resin,
pollen and the like should be cleaned
off immediately, as they contain
aggressive constituents which can
cause paint damage.If using a car wash, comply with the
car wash manufacturer's instructions.
The windscreen wiper and rear
window wiper must be switched off.
Remove antenna and external
accessories such as roof racks etc.
If you wash your vehicle by hand,
make sure that the insides of the
wheel housings are also thoroughly
rinsed out.
Clean edges and folds on opened
doors and the bonnet as well as the
areas they cover.
Clean bright metal mouldings with a
cleaning solution approved for
aluminium to avoid damages.Caution
Always use a cleaning agent with
a pH value of four to nine.
Do not use cleaning agents on hot surfaces.
Have the door hinges of all doors
greased by a workshop.
Do not clean the engine compartment with a steam-jet or high-pressure jet
cleaner.
Page 235 of 267

Vehicle care233Thoroughly rinse and leather-off the
vehicle. Rinse leather frequently. Use
separate leathers for painted and
glass surfaces: remnants of wax on the windows will impair vision.
Exterior lights
Headlight and other light covers are
made of plastic. Do not use any
abrasive or caustic agents, do not use
an ice scraper, and do not clean them
dry.
Polishing and waxing
Wax painted parts of the vehicle
regularly (at the latest when water no longer beads). Otherwise, the
paintwork will dry out.
Polishing is necessary only if the paint
has become dull or if solid deposits
have become attached to it.
Paintwork polish with silicone forms a
protective film, making waxing
unnecessary.
Unpainted plastic body parts must not be treated with wax or polishing
agents.Matt filmed body parts or decor tapes must not be polished, to avoid
gleaming. Do not use hot wax
programmes in automatic car washes
if the vehicle is equipped with these parts.
Matt painted decor parts, e.g. mirror
housing cover, must not be polished.
Otherwise these parts would become agleam or the colour would be
dissolved.
Windows and windscreen wiper
blades
Use a soft lint-free cloth or chamois
leather together with window cleaner
and insect remover.
When cleaning the rear window from
inside, always wipe in parallel to the
heating element to prevent damage.
For mechanical removal of ice, use a
sharp-edged ice scraper. Press the
scraper firmly against the glass so
that no dirt can get under it and
scratch the glass.
Clean smearing wiper blades with a
soft cloth and window cleaner.Remove dirt residues from smearing
wiper blades by using a soft cloth and window cleaner. Also make sure to
remove any residues such as wax,
insect residues and similar from the
window.
Ice residues, pollution and continuous wiping on dry windows will damage or
even destroy the wiper blades.
Sunroof Never clean with solvents or abrasive
agents, fuels, aggressive media (e.g.
paint cleaner, acetone-containing
solutions etc.), acidic or highly
alkaline media or abrasive pads. Do
not apply wax or polishing agents to
the sunroof.
Wheels and tyres Do not use high-pressure jet
cleaners.
Clean rims with a pH-neutral wheel
cleaner.
Rims are painted and can be treated
with the same agents as the body.
Page 248 of 267
![VAUXHALL CORSA 2016 Manual Online 246Technical dataEngine identifier codeB13DTCB13DTEB13DTEB13DTRSales designation1.31.31.31.3Engineering codeB13DTCB13DTEB13DTEB13DTRPiston displacement [cm3
]1248124812481248Engine power [kW]55557070a VAUXHALL CORSA 2016 Manual Online 246Technical dataEngine identifier codeB13DTCB13DTEB13DTEB13DTRSales designation1.31.31.31.3Engineering codeB13DTCB13DTEB13DTEB13DTRPiston displacement [cm3
]1248124812481248Engine power [kW]55557070a](/img/38/19428/w960_19428-247.png)
246Technical dataEngine identifier codeB13DTCB13DTEB13DTEB13DTRSales designation1.31.31.31.3Engineering codeB13DTCB13DTEB13DTEB13DTRPiston displacement [cm3
]1248124812481248Engine power [kW]55557070at rpm3750375037503750Torque [Nm]190190190210at rpm1500 - 25001500 - 25001500 - 35001500 - 3000Fuel typeDieselDieselDieselDieselGas––––PerformanceEngineB10XFLB10XFTB12XELB14XEJB14XELB14NEJMaximum speed [mph]Manual transmission112122101104109115Manual transmission automated––––109–Automatic transmission––––106–
Page 249 of 267
![VAUXHALL CORSA 2016 Manual Online Technical data247EngineB14XEL LPGB14NEHB16LERMaximum speed [mph]Manual transmission109129143Manual transmission automated–––Automatic transmission–––
Engine
B13DTCB13DTE
55kWB13DTE
70kWB13 VAUXHALL CORSA 2016 Manual Online Technical data247EngineB14XEL LPGB14NEHB16LERMaximum speed [mph]Manual transmission109129143Manual transmission automated–––Automatic transmission–––
Engine
B13DTCB13DTE
55kWB13DTE
70kWB13](/img/38/19428/w960_19428-248.png)
Technical data247EngineB14XEL LPGB14NEHB16LERMaximum speed [mph]Manual transmission109129143Manual transmission automated–––Automatic transmission–––
Engine
B13DTCB13DTE
55kWB13DTE
70kWB13DTRMaximum speed [mph]Manual transmission102113113110Manual transmission automated–113113–Automatic transmission––––
Page 250 of 267

248Technical dataVehicle weight
Kerb weight, 5-door vehicle, basic model without any optional equipmentEngineManual transmissionManual transmission automatedAutomatic transmissionwithout / with air conditioning
[kg]B10XFL1199 / 1214––B10XFT1199 / 1214––B12XEL1163 / 1178––B14XEJ1163 / 1178––B14XEL1163 / 11781163 / 11781199 / 1214B14XEL LPG1237 / 1252––B14NEJ1237 / 1252––B14NEH1259 / 1274––without / with air conditioning
[kg]B13DTC1237 / 1252––B13DTE1237 / 13311237 / 1331–B13DTR1259 / 1274––
Optional equipment and accessories increase the kerb weight.
Loading information 3 73.
Page 251 of 267

Technical data249Kerb weight, 3-door vehicle and van, basic model without any optional equipmentEngineManual transmissionManual transmissionautomatedAutomatic transmissionwithout / with air conditioning
[kg]B10XFL1163 / 1178––B10XFT1163 / 1178––B12XEL1120 / 1135––B14XEJ1141 / 1156––B14XEL1141 / 11561141 / 11561163 / 1178B14XEL LPG1199 / 1214––B14NEJ1199 / 1214––B14NEH1199 / 1214––B16LER1278 / 1293––without/with air conditioning
[kg]B13DTC1199 / 1214––B13DTE1199 / 12141199 / 1214–B13DTR1237 / 1252––
Optional equipment and accessories increase the kerb weight.
Loading information 3 73.
Page 262 of 267

260IndexAAccessories and vehicle modifications .......................... 190
Adjustable air vents ...................133
Airbag and belt tensioners ...........90
Airbag deactivation ................48, 91
Airbag label................................... 43 Airbag system .............................. 43
Air conditioning regular operation ................................ 134
Air conditioning system .............. 126
Air intake .................................... 133
Air vents...................................... 133
Antilock brake system ................ 151
Antilock brake system (ABS) .......92
Anti-theft alarm system ................27
Anti-theft locking system .............. 26
Appearance care ........................232
Ashtrays ....................................... 83
Automatic anti-dazzle ..................30
Automatic light control ...............115
Automatic locking ........................24
Automatic transmission .............143
Autostop ....................................... 95
B Battery discharge protection ......123
Battery voltage ........................... 106 Belts.............................................. 40
Bicycle rack .................................. 59Bonnet ....................................... 191
Brake and clutch fluid .................237
Brake and clutch system .............92
Brake assist ............................... 152
Brake fluid .................................. 195
Brakes ............................... 151, 195
Breakdown.................................. 230
Bulb replacement ....................... 198
C Capacities .................................. 251
Car Pass ...................................... 21
Catalytic converter .....................143
Central locking system ................22
Centre high-mounted brake light 205
Changing tyre and wheel size ...218
Charging system .......................... 91
Child locks ................................... 25
Child restraint installation locations ................................... 51
Child restraints.............................. 49
Child restraint systems ................49
Cigarette lighter ........................... 82
City mode ................................... 155
Climate control ............................. 15 Climate control systems .............125
Clock ............................................ 80
Code ........................................... 103
Collision damage repair ..............256
Colour-Info-Display .....................101