locking VAUXHALL CORSA 2017 Owner's Guide
[x] Cancel search | Manufacturer: VAUXHALL, Model Year: 2017, Model line: CORSA, Model: VAUXHALL CORSA 2017Pages: 267, PDF Size: 7.82 MB
Page 182 of 267

180Driving and operatingThe fuel filler cap can be retained in
the bracket on the fuel filler flap.
To refuel, fully insert the pump nozzle
and switch it on.
After the automatic cut-off, the tank can be topped up by operating the
pump nozzle a maximum of two more
times.Caution
Wipe off any overflowing fuel
immediately.
To close, turn the fuel filler cap
clockwise until it clicks.
Close the flap and allow it to engage.
Liquid gas refuellingFollow the operating and safety
instructions of the filling station when
refuelling.
The filling valve for the liquid gas is
behind the fuel filler cap.
Unscrew protective cap from the filler
neck.
Screw the required adapter hand-
tight onto the filler neck.
ACME Adapter: Screw the nut of the
filling nozzle onto the adapter. Press
locking lever on filler nozzle down.
DISH filler neck: Place the filler nozzle
into the adapter. Press locking lever
on filler nozzle down.
Bayonet filler neck: Place filler nozzle
on the adapter and turn clockwise or
anticlockwise through one quarter
turn. Pull locking lever of filler nozzle
fully.
EURO filler neck: Press the filler
nozzle onto the adapter until it
engages.
Press the button at the liquid gas
supply point. The filling system stops
or begins to run slowly when 80% of
the tank volume is reached
(maximum fill level).
Release button on filling system and
the filling process stops. Release the
locking lever and remove the filler
nozzle. A small quantity of liquid gas
may escape.
Remove adapter and stow securely in vehicle.
Page 183 of 267
Driving and operating181Fit protective cap to prevent the
penetration of foreign bodies into the
filler opening and the system.9 Warning
Due to the system design, an
escape of liquid gas after
releasing the locking lever is
unavoidable. Avoid inhaling.
9 Warning
The liquid gas tank should only be
filled to 80% capacity, for safety
reasons.
The multivalve on the liquid gas tank
automatically limits the fill quantity. If
a larger quantity is added, we
recommend not exposing the vehicle
to the sun until the excess amount
has been used up.
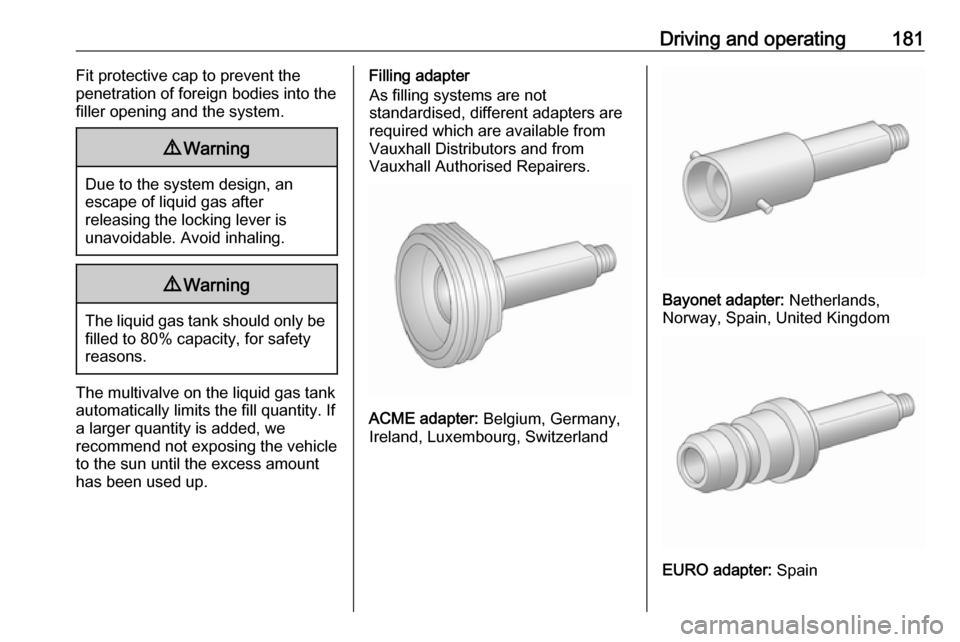
Filling adapter
As filling systems are not
standardised, different adapters are
required which are available from
Vauxhall Distributors and from
Vauxhall Authorised Repairers.
ACME adapter: Belgium, Germany,
Ireland, Luxembourg, Switzerland
Bayonet adapter: Netherlands,
Norway, Spain, United Kingdom
EURO adapter: Spain
Page 187 of 267
Driving and operating185
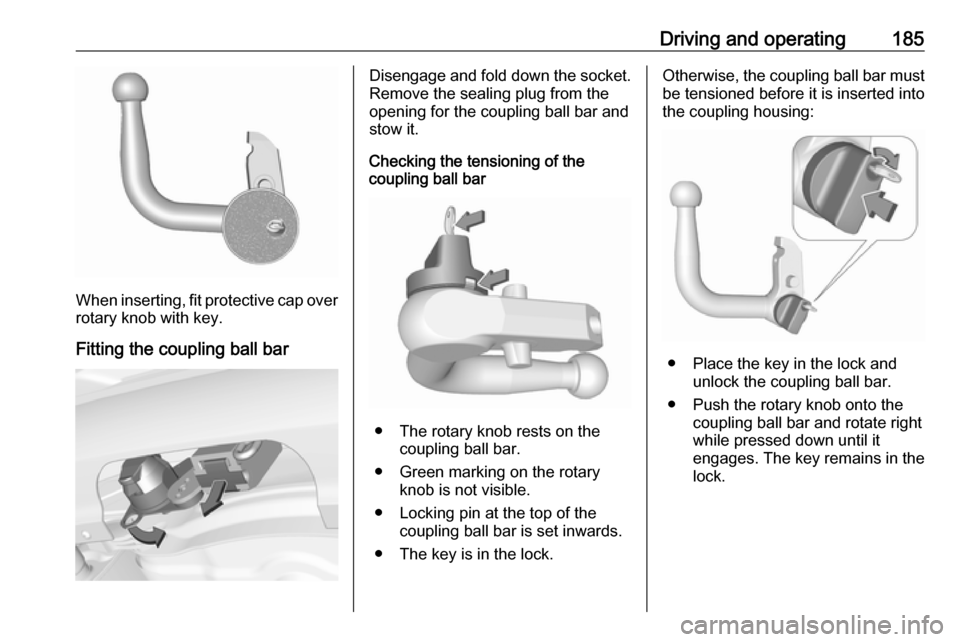
When inserting, fit protective cap over
rotary knob with key.
Fitting the coupling ball bar
Disengage and fold down the socket. Remove the sealing plug from the
opening for the coupling ball bar and
stow it.
Checking the tensioning of the
coupling ball bar
● The rotary knob rests on the
coupling ball bar.
● Green marking on the rotary knob is not visible.
● Locking pin at the top of the coupling ball bar is set inwards.
● The key is in the lock.
Otherwise, the coupling ball bar must be tensioned before it is inserted into
the coupling housing:
● Place the key in the lock and unlock the coupling ball bar.
● Push the rotary knob onto the coupling ball bar and rotate right
while pressed down until it
engages. The key remains in the
lock.
Page 220 of 267
218Vehicle carespeedometer as well as the nominaltyre pressure and to make other
vehicle modifications.
After converting to a different tyre
size, have the label with tyre
pressures replaced.Caution
When converting to wheels with 14 inch diameter, the ground
clearance will be reduced. This
must be considered when passing
over obstacles.
9 Warning
Use of unsuitable tyres or wheels
may lead to accidents and will
invalidate the vehicle type
approval.
Wheel covers
Wheel covers and tyres that are
factory approved for the respective
vehicle and comply with all of the
relevant wheel and tyre combination requirements must be used.
If the wheel covers and tyres used are
not factory approved, the tyres must
not have a rim protection ridge.
Wheel covers must not impair brake
cooling.9 Warning
Use of unsuitable tyres or wheel
covers could lead to sudden
pressure loss and thereby
accidents.
Steel wheels: When using locking
wheel nuts don't attach wheel covers.
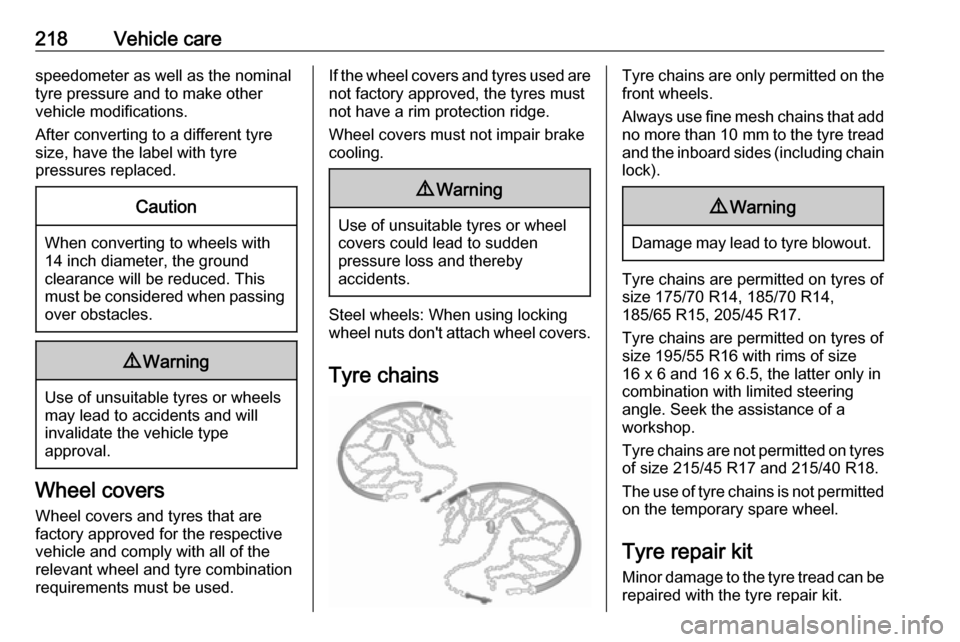
Tyre chains
Tyre chains are only permitted on the
front wheels.
Always use fine mesh chains that add no more than 10 mm to the tyre tread
and the inboard sides (including chain lock).9 Warning
Damage may lead to tyre blowout.
Tyre chains are permitted on tyres of
size 175/70 R14, 185/70 R14,
185/65 R15, 205/45 R17.
Tyre chains are permitted on tyres of
size 195/55 R16 with rims of size
16 x 6 and 16 x 6.5, the latter only in combination with limited steering
angle. Seek the assistance of a
workshop.
Tyre chains are not permitted on tyres of size 215/45 R17 and 215/40 R18.
The use of tyre chains is not permitted on the temporary spare wheel.
Tyre repair kit Minor damage to the tyre tread can be
repaired with the tyre repair kit.
Page 227 of 267
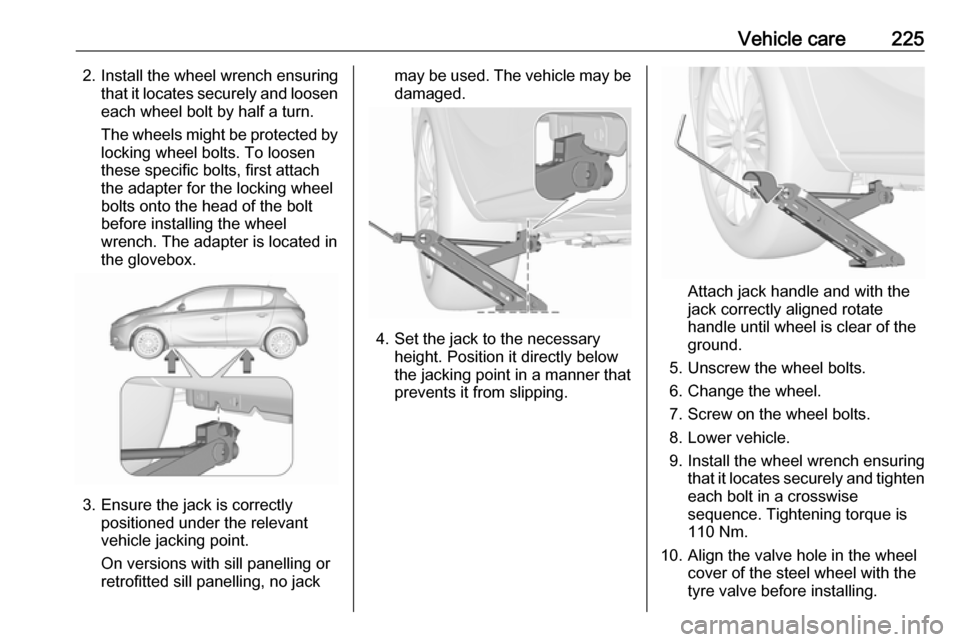
Vehicle care2252. Install the wheel wrench ensuringthat it locates securely and looseneach wheel bolt by half a turn.
The wheels might be protected by
locking wheel bolts. To loosen
these specific bolts, first attach
the adapter for the locking wheel
bolts onto the head of the bolt
before installing the wheel
wrench. The adapter is located in
the glovebox.
3. Ensure the jack is correctly positioned under the relevant
vehicle jacking point.
On versions with sill panelling or
retrofitted sill panelling, no jack
may be used. The vehicle may be
damaged.
4. Set the jack to the necessary height. Position it directly below
the jacking point in a manner that
prevents it from slipping.
Attach jack handle and with the
jack correctly aligned rotate handle until wheel is clear of theground.
5. Unscrew the wheel bolts.
6. Change the wheel.
7. Screw on the wheel bolts.
8. Lower vehicle.
9. Install the wheel wrench ensuring that it locates securely and tighten
each bolt in a crosswise
sequence. Tightening torque is
110 Nm.
10. Align the valve hole in the wheel cover of the steel wheel with the
tyre valve before installing.
Page 228 of 267
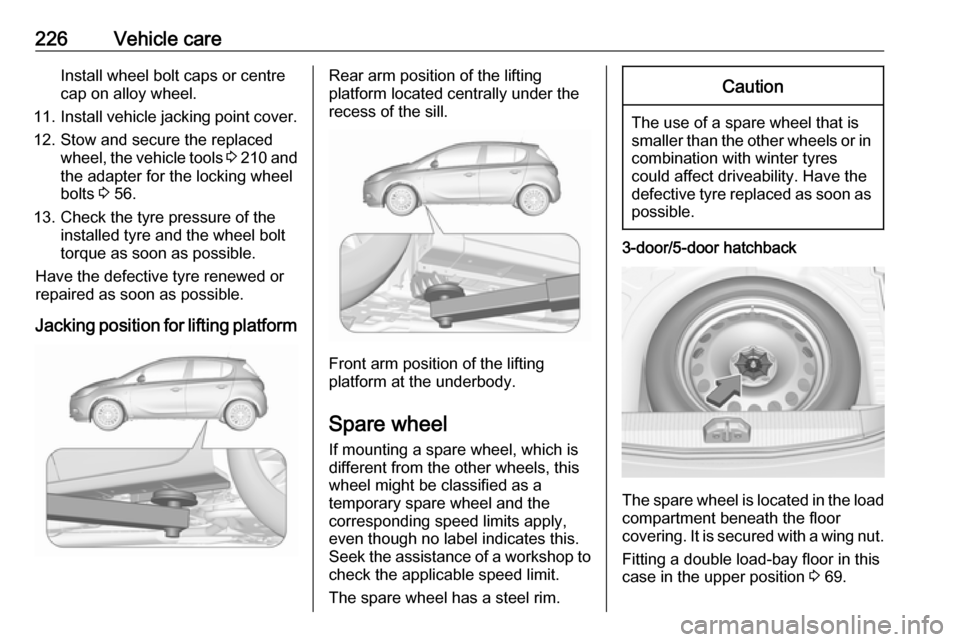
226Vehicle careInstall wheel bolt caps or centre
cap on alloy wheel.
11. Install vehicle jacking point cover.
12. Stow and secure the replaced wheel, the vehicle tools 3 210 and
the adapter for the locking wheel
bolts 3 56.
13. Check the tyre pressure of the installed tyre and the wheel bolt
torque as soon as possible.
Have the defective tyre renewed or
repaired as soon as possible.
Jacking position for lifting platformRear arm position of the lifting
platform located centrally under the
recess of the sill.
Front arm position of the lifting
platform at the underbody.
Spare wheel If mounting a spare wheel, which is
different from the other wheels, this
wheel might be classified as a
temporary spare wheel and the
corresponding speed limits apply,
even though no label indicates this.
Seek the assistance of a workshop to
check the applicable speed limit.
The spare wheel has a steel rim.
Caution
The use of a spare wheel that is smaller than the other wheels or in combination with winter tyres
could affect driveability. Have the defective tyre replaced as soon as
possible.
3-door/5-door hatchback
The spare wheel is located in the load
compartment beneath the floor
covering. It is secured with a wing nut.
Fitting a double load-bay floor in this
case in the upper position 3 69.
Page 260 of 267

258Customer information● Vehicle reactions in particulardriving situations ( e.g. inflation of
an airbag, activation of the
stability regulation system).
● Environmental conditions (e.g. temperature).
These data are exclusively technical
and help identifying and correcting
errors as well as optimizing vehicle
functions.
Motion profiles indicating travelled
routes cannot be created with these
data.
If services are used (e.g. repair
works, service processes, warranty
cases, quality assurance),
employees of the service network
(manufacturer included) are able to
read out this technical information
from the event and error data storage
modules applying special diagnostic
devices. If required, you will receive
further information at these
workshops. After an error has been
corrected, the data are deleted from
the error storage module or they are
constantly overwritten.When using the vehicle, situations
may occur in which these technical
data related to other information
(accident report, damages on the
vehicle, witness statements etc.) may be associated with a specific person -possibly, with the assistance of an
expert.
Additional functions contractually
agreed upon with the client (e.g.
vehicle location in emergency cases)
allow the transmission of particular
vehicle data from the vehicle.
Radio Frequency
Identification (RFID)
RFID technology is used in some
vehicles for functions such as tyre
pressure monitoring and ignition
system security. It is also used in
connection with conveniences such
as radio remote controls for door
locking/unlocking and starting, and in-
vehicle transmitters for garage door
openers. RFID technology in
Vauxhall vehicles does not use or
record personal information or link
with any other Vauxhall system
containing personal information.
Page 262 of 267

260IndexAAccessories and vehicle modifications .......................... 189
Adjustable air vents ...................130
Airbag and belt tensioners ...........90
Airbag deactivation ................48, 91
Airbag label................................... 43 Airbag system .............................. 43
Air conditioning regular operation ................................ 131
Air conditioning system .............. 123
Air intake .................................... 130
Air vents...................................... 130
Antilock brake system ................ 148
Antilock brake system (ABS) .......92
Anti-theft alarm system ................27
Anti-theft locking system .............. 26
Appearance care ........................232
Ashtrays ....................................... 82
Automatic anti-dazzle ..................30
Automatic light control ...............113
Automatic locking ........................24
Automatic transmission .............140
Autostop ............................... 95, 135
B Battery discharge protection ......121
Battery voltage ........................... 104
Belts.............................................. 40
Bicycle rack .................................. 58Bonnet ....................................... 190
Brake and clutch fluid .................236
Brake and clutch system .............92
Brake assist ............................... 149
Brake fluid .................................. 194
Brakes ............................... 148, 194
Breakdown.................................. 230
Bulb replacement ....................... 197
C Capacities .................................. 250
Car Pass ...................................... 21
Catalytic converter .....................140
Central locking system ................22
Centre high-mounted brake light 204
Changing tyre and wheel size ...217
Charging system .......................... 91
Child locks ................................... 25
Child restraint installation locations ................................... 51
Child restraints.............................. 49
Child restraint systems ................49
Cigarette lighter ........................... 82
City mode ................................... 152
Climate control ............................. 15
Climate control systems .............122
Clock ............................................ 79
Code ........................................... 102
Collision damage repair ..............255
Colour-Info-Display .....................100
Page 266 of 267

264Upholstery.................................. 234
Using this manual ..........................3
V Vehicle battery ........................... 194
Vehicle checks............................ 190 Vehicle data ................................ 240
Vehicle data recording and privacy ..................................... 257
Vehicle detected ahead ................95
Vehicle dimensions .................... 249
Vehicle Identification Number ....238
Vehicle jack ................................ 210
Vehicle messages .....................102
Vehicle personalisation .............105
Vehicle security ............................ 26
Vehicle specific data ......................3
Vehicle storage ........................... 189
Vehicle tools ............................... 210
Vehicle unlocking ........................... 6
Vehicle weight ........................... 247
Ventilation ................................... 122
W
Warning chimes .........................104
Warning lights ............................... 83
Warning triangle .......................... 71
Washer and wiper systems .........14
Washer fluid ............................... 194
Wheel changing .........................224
Wheel covers ............................. 218Wheels and tyres .......................211
Windows ....................................... 30
Windscreen................................... 30 Windscreen wiper/washer ...........76
Winter tyres ............................... 211
Wiper blade replacement ..........196
X Xenon headlights .......................200
Xenon lighting system ................115