clock VAUXHALL CROSSLAND X 2018 User Guide
[x] Cancel search | Manufacturer: VAUXHALL, Model Year: 2018, Model line: CROSSLAND X, Model: VAUXHALL CROSSLAND X 2018Pages: 255, PDF Size: 7.57 MB
Page 195 of 255
Vehicle care193
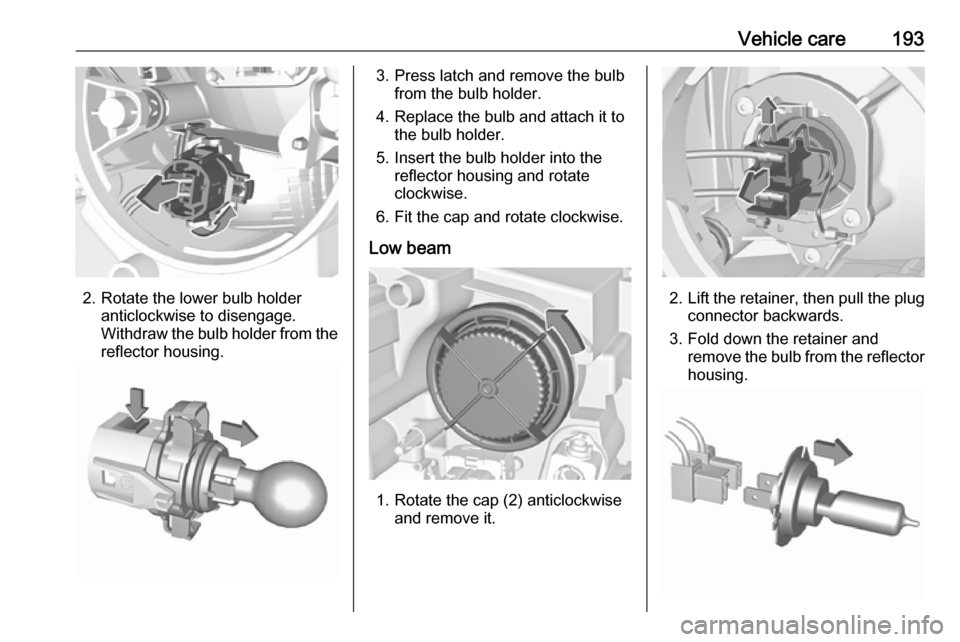
2. Rotate the lower bulb holderanticlockwise to disengage.
Withdraw the bulb holder from the
reflector housing.
3. Press latch and remove the bulb from the bulb holder.
4. Replace the bulb and attach it to the bulb holder.
5. Insert the bulb holder into the reflector housing and rotate
clockwise.
6. Fit the cap and rotate clockwise.
Low beam
1. Rotate the cap (2) anticlockwise and remove it.
2.Lift the retainer, then pull the plug
connector backwards.
3. Fold down the retainer and remove the bulb from the reflectorhousing.
Page 196 of 255
194Vehicle care4. Replace the bulb and push it intothe reflector housing by setting
the lug into position.
5. Fold up the retainer and hold in position.
6. Attach the plug connector to the bulb and fix it with the retainer.
7. Fit the cap and rotate clockwise.
Sidelight/Daytime running light In case of defective LEDs, have them
replaced by a workshop.
LED headlights
Headlights for low and high beam,
sidelights, daytime running lights and turn signal lights are designed as
LEDs and can not be changed.
Have lights repaired by a workshop in
case of failure.
Fog lights
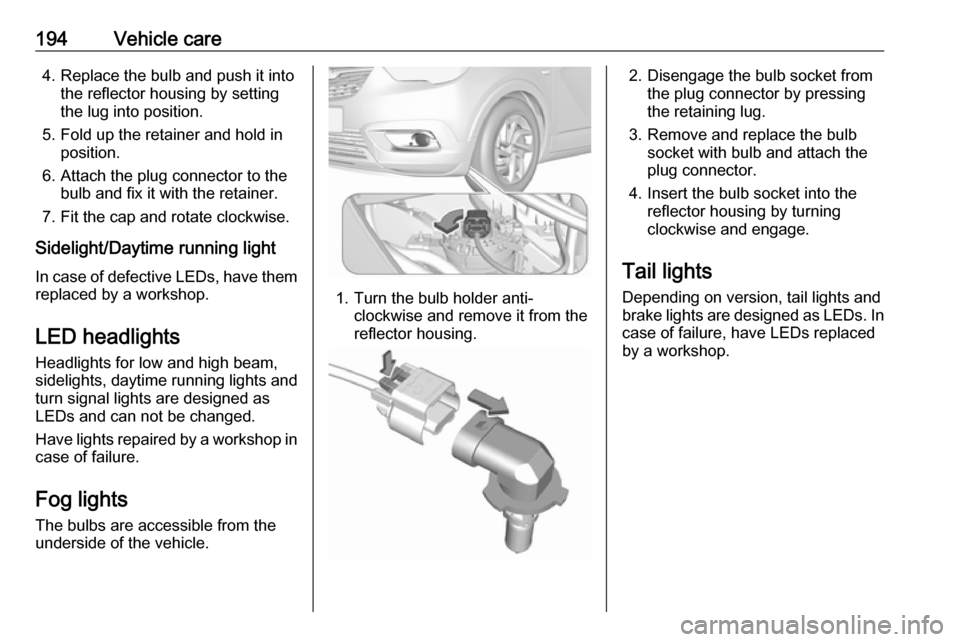
The bulbs are accessible from the
underside of the vehicle.
1. Turn the bulb holder anti- clockwise and remove it from the
reflector housing.
2. Disengage the bulb socket from the plug connector by pressing
the retaining lug.
3. Remove and replace the bulb socket with bulb and attach the
plug connector.
4. Insert the bulb socket into the reflector housing by turning
clockwise and engage.
Tail lights
Depending on version, tail lights and
brake lights are designed as LEDs. In case of failure, have LEDs replaced
by a workshop.
Page 197 of 255
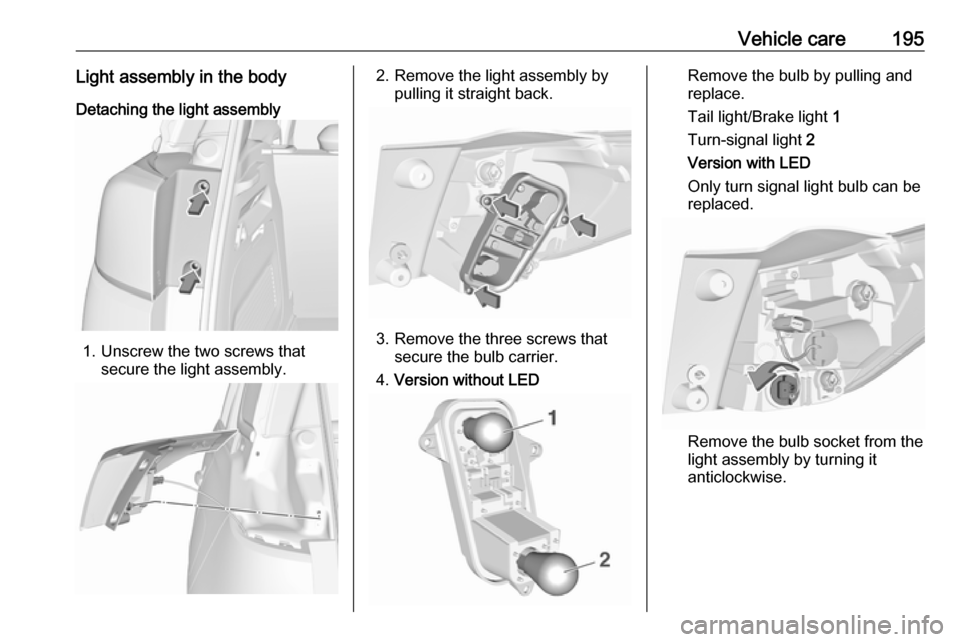
Vehicle care195Light assembly in the bodyDetaching the light assembly
1. Unscrew the two screws that secure the light assembly.
2. Remove the light assembly bypulling it straight back.
3. Remove the three screws thatsecure the bulb carrier.
4. Version without LED
Remove the bulb by pulling and
replace.
Tail light/Brake light 1
Turn-signal light 2
Version with LED
Only turn signal light bulb can be
replaced.
Remove the bulb socket from the light assembly by turning it
anticlockwise.
Page 199 of 255
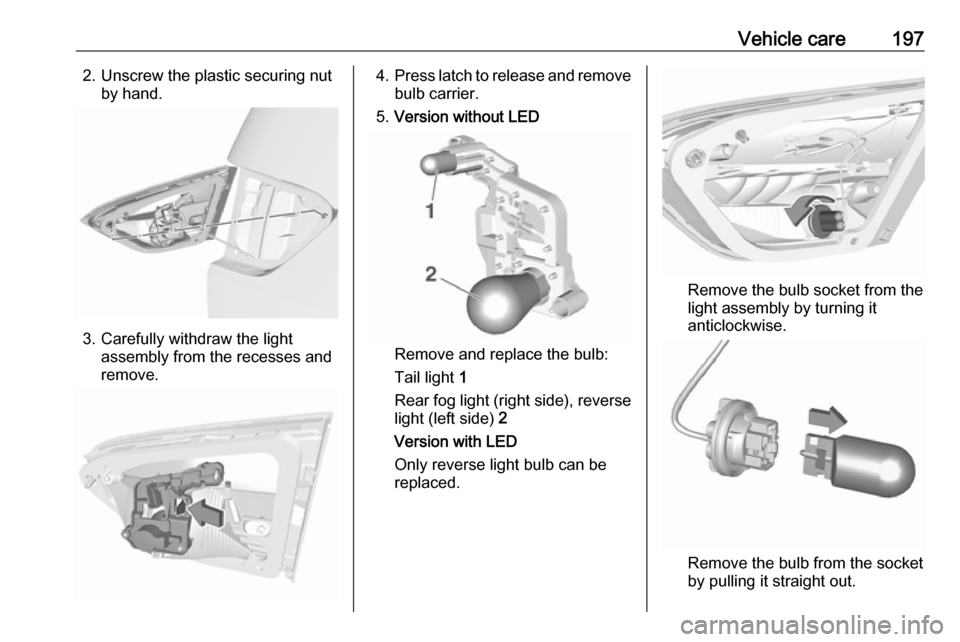
Vehicle care1972. Unscrew the plastic securing nutby hand.
3. Carefully withdraw the lightassembly from the recesses and
remove.
4. Press latch to release and remove
bulb carrier.
5. Version without LED
Remove and replace the bulb:
Tail light 1
Rear fog light (right side), reverse
light (left side) 2
Version with LED
Only reverse light bulb can be
replaced.
Remove the bulb socket from the
light assembly by turning it
anticlockwise.
Remove the bulb from the socket by pulling it straight out.
Page 200 of 255
198Vehicle careReplace bulb.
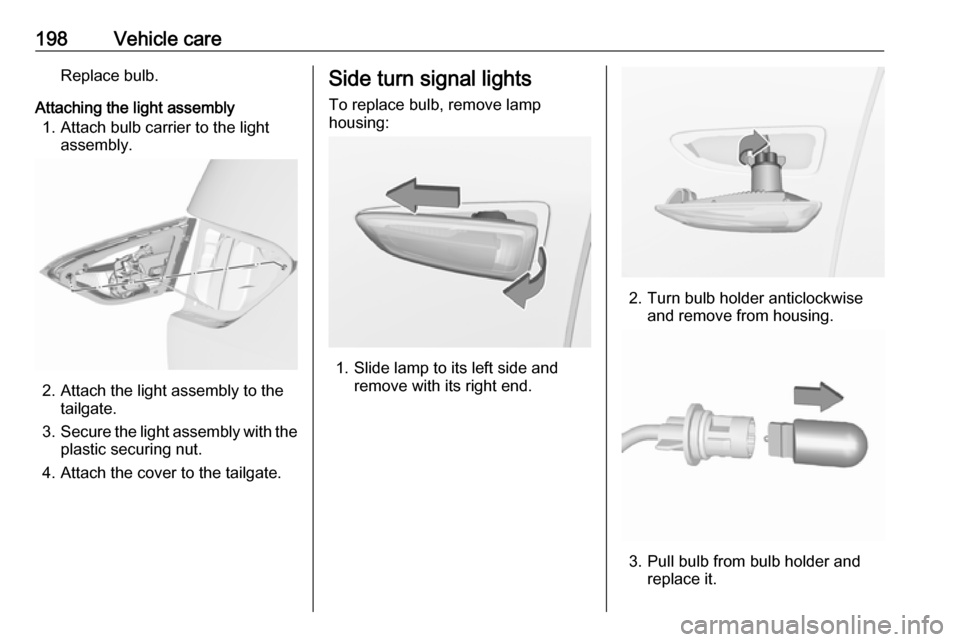
Attaching the light assembly 1. Attach bulb carrier to the light assembly.
2. Attach the light assembly to thetailgate.
3. Secure the light assembly with the
plastic securing nut.
4. Attach the cover to the tailgate.
Side turn signal lights
To replace bulb, remove lamp
housing:
1. Slide lamp to its left side and remove with its right end.
2. Turn bulb holder anticlockwiseand remove from housing.
3. Pull bulb from bulb holder and replace it.
Page 201 of 255
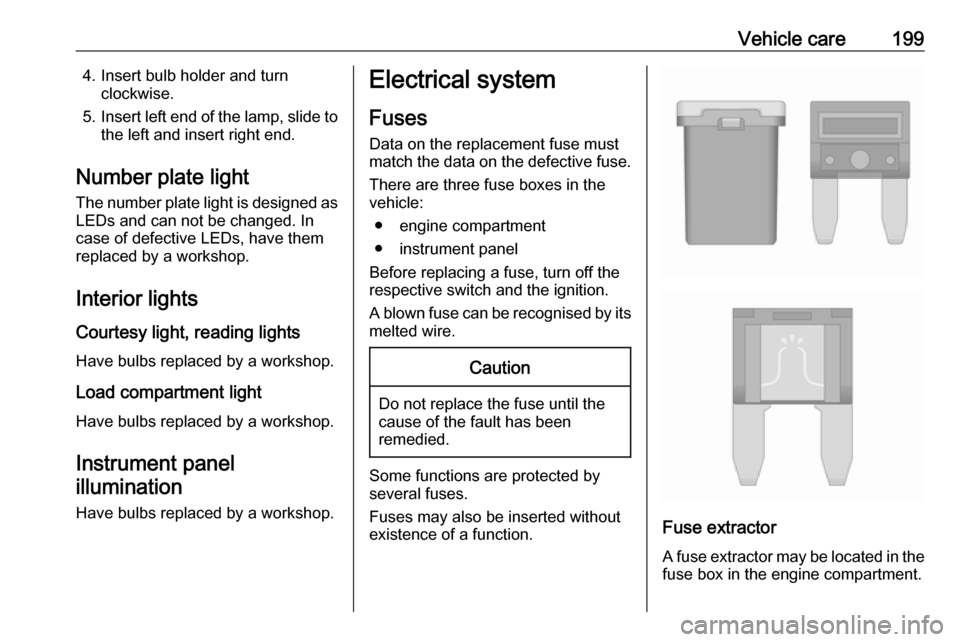
Vehicle care1994. Insert bulb holder and turnclockwise.
5. Insert left end of the lamp, slide to
the left and insert right end.
Number plate light
The number plate light is designed as LEDs and can not be changed. Incase of defective LEDs, have them
replaced by a workshop.
Interior lights
Courtesy light, reading lights Have bulbs replaced by a workshop.
Load compartment light
Have bulbs replaced by a workshop.
Instrument panelillumination
Have bulbs replaced by a workshop.Electrical system
Fuses Data on the replacement fuse mustmatch the data on the defective fuse.
There are three fuse boxes in the
vehicle:
● engine compartment
● instrument panel
Before replacing a fuse, turn off the
respective switch and the ignition.
A blown fuse can be recognised by its melted wire.Caution
Do not replace the fuse until the
cause of the fault has been
remedied.
Some functions are protected by
several fuses.
Fuses may also be inserted without
existence of a function.
Fuse extractor
A fuse extractor may be located in the
fuse box in the engine compartment.
Page 217 of 255
Vehicle care215Caution
The use of a spare wheel that issmaller than the other wheels or in combination with winter tyres
could affect driveability. Have the defective tyre replaced as soon as
possible.
The temporary spare wheel has a
steel rim.
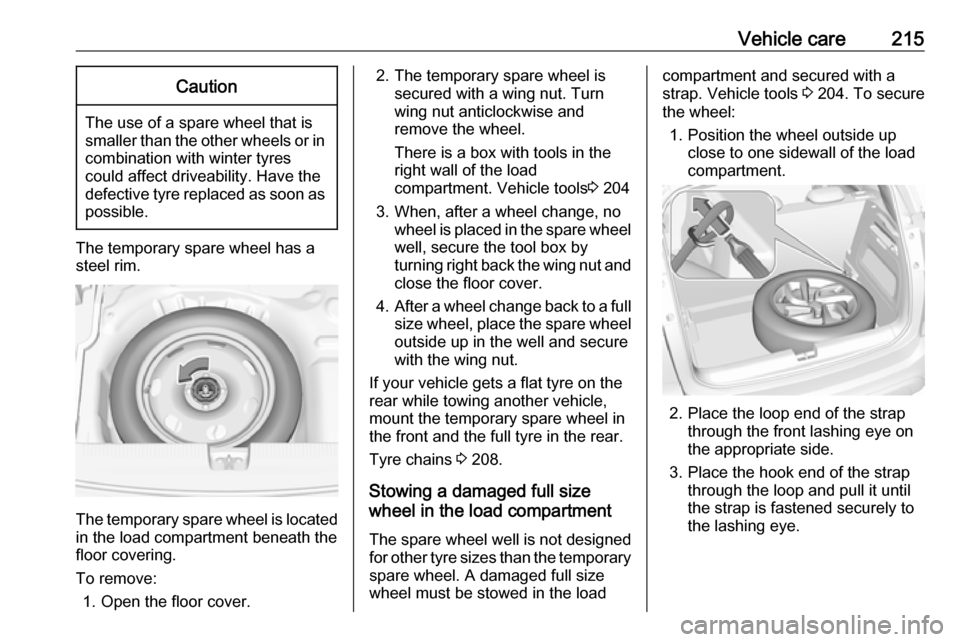
The temporary spare wheel is located in the load compartment beneath the
floor covering.
To remove: 1. Open the floor cover.
2. The temporary spare wheel is secured with a wing nut. Turn
wing nut anticlockwise and
remove the wheel.
There is a box with tools in the
right wall of the load
compartment. Vehicle tools 3 204
3. When, after a wheel change, no wheel is placed in the spare wheel
well, secure the tool box by
turning right back the wing nut and close the floor cover.
4. After a wheel change back to a full
size wheel, place the spare wheel outside up in the well and secure
with the wing nut.
If your vehicle gets a flat tyre on the
rear while towing another vehicle,
mount the temporary spare wheel in
the front and the full tyre in the rear.
Tyre chains 3 208.
Stowing a damaged full size
wheel in the load compartment
The spare wheel well is not designed
for other tyre sizes than the temporary spare wheel. A damaged full size
wheel must be stowed in the loadcompartment and secured with a
strap. Vehicle tools 3 204. To secure
the wheel:
1. Position the wheel outside up close to one sidewall of the load
compartment.
2. Place the loop end of the strap through the front lashing eye on
the appropriate side.
3. Place the hook end of the strap through the loop and pull it until
the strap is fastened securely to
the lashing eye.
Page 251 of 255

249Clock............................................. 78
Collision damage repair ..............243
Control indicators.......................... 89
Control of the vehicle .................132
Controls ........................................ 74
Convex shape .............................. 34
Coolant and antifreeze ...............225
Cruise control ...................... 94, 151
Cupholders .................................. 64
Curtain airbag system .................. 55
D
Danger, Warnings and Cautions ...4
Daytime running lights ...............112
Declaration of conformity ............240
DEF ............................................ 141
Deflation detection system ...........93
Diesel exhaust fluid ....................141
Diesel fuel system bleeding .......190
Diesel particle filter ...............93, 140
Door open .................................... 95
Doors ............................................ 30
Driver alert .................................. 175
Driver assistance systems ..........151
Driver Information Centre .............95
Driving characteristics and towing tips .............................. 180
Driving hints ................................ 132E
Electric adjustment ......................34
Electrical system......................... 199
Electronic climate control system 123
Electronic driving programmes ..145
Electronic key system ...................23
Electronic Stability Control and Traction Control system ....92, 149
Electronic Stability Control and Traction Control system off .......92
End-of-life vehicle recovery .......185
Engine compartment fuse box ...200
Engine coolant ........................... 188
Engine coolant temperature ........92
Engine coolant temperature gauge ....................................... 87
Engine data ............................... 232
Engine exhaust .......................... 140
Engine identification ...................228
Engine oil ................... 187, 225, 229
Engine oil level monitor ................88
Engine oil pressure ......................93
Entry lighting .............................. 117
Event data recorders ..................246
Exit lighting ................................ 117
Exterior care .............................. 219
Exterior light ................................. 94
Exterior lighting ....................12, 110
Exterior mirrors ............................. 34F
Fault ........................................... 146
First aid ......................................... 70
First aid kit ................................... 70
Fixed air vents ........................... 129
Fog light ....................................... 94
Fog lights ................................... 194
Folding mirrors ............................. 35
Forward collision alert................. 155 Front airbag system .....................54
Front fog lights ........................... 114
Front pedestrian protection ........158
Front seats.................................... 43
Fuel............................................. 176
Fuel for diesel engines ..............177
Fuel for liquid gas operation .......177
Fuel for petrol engines ...............176
Fuel gauge ................................... 86
Fuel selector ................................ 86
Fuses ......................................... 199
G
Gauges ......................................... 84
Gear shifting ................................. 92
General information ...................180
Glass panel .................................. 40
Glovebox ..................................... 64
H Halogen headlights ....................191
Hand brake ................................. 148