instrument panel VAUXHALL CROSSLAND X 2019.75 User Guide
[x] Cancel search | Manufacturer: VAUXHALL, Model Year: 2019.75, Model line: CROSSLAND X, Model: VAUXHALL CROSSLAND X 2019.75Pages: 247, PDF Size: 7.77 MB
Page 107 of 247
Lighting105Interior lighting
Instrument panel
illumination control
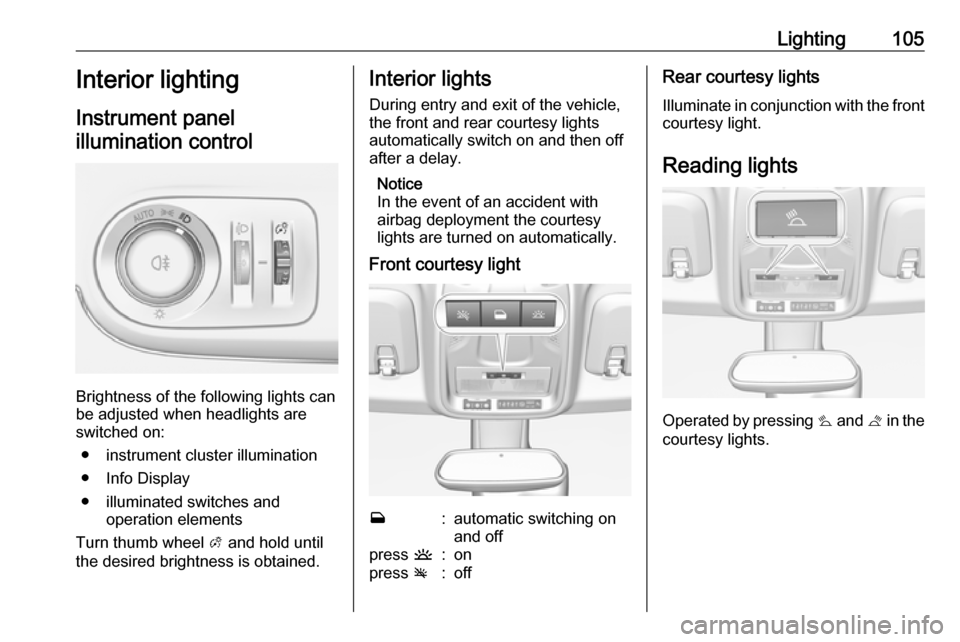
Brightness of the following lights can
be adjusted when headlights are
switched on:
● instrument cluster illumination
● Info Display
● illuminated switches and operation elements
Turn thumb wheel A and hold until
the desired brightness is obtained.
Interior lights
During entry and exit of the vehicle,
the front and rear courtesy lights
automatically switch on and then off
after a delay.
Notice
In the event of an accident with
airbag deployment the courtesy
lights are turned on automatically.
Front courtesy lightw:automatic switching on
and offpress u:onpress v:offRear courtesy lights
Illuminate in conjunction with the front courtesy light.
Reading lights
Operated by pressing s and t in the
courtesy lights.
Page 108 of 247

106Lighting
Illustration shows rear reading lights.Sun visor lights
Illuminates when the cover is opened.
Lighting features
Centre console lighting A spotlight integrated in the overheadconsole illuminates the centre
console when headlights are
switched on.
Entry lighting Welcome lighting
Some or all of the following lights are
switched on for a short time by
unlocking the vehicle:
● headlights
● tail lights
● number plate lights
● instrument panel light
● interior lights
The number of activated lights
depends on the surrounding light
conditions.
The lighting switches off immediately
when the ignition is switched on.This function can be activated or
deactivated in the vehicle
personalisation.
Vehicle personalisation 3 94.
The following lights will additionally
switch on when the driver's door is
opened:
● illumination of some switches
● Driver Information Centre
● door pocket lights
Exit lighting The following lights are switched on if
the ignition is switched off:
● interior lights
● instrument panel light
They will switch off automatically after
a delay. This function works only in
the dark.
Page 119 of 247
Climate control117Air vents
Adjustable air vents At least two air vents must be open
while cooling is on.9 Warning
Do not attach any objects to the
slats of the air vents. Risk of
damage and injury in case of an
accident.
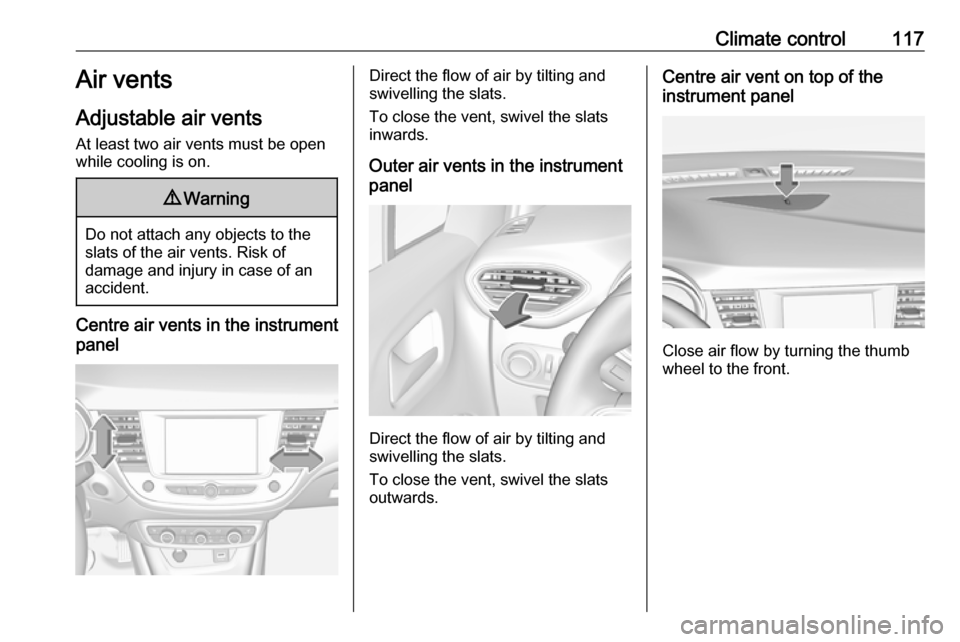
Centre air vents in the instrument
panel
Direct the flow of air by tilting and
swivelling the slats.
To close the vent, swivel the slats
inwards.
Outer air vents in the instrument
panel
Direct the flow of air by tilting and
swivelling the slats.
To close the vent, swivel the slats
outwards.
Centre air vent on top of the
instrument panel
Close air flow by turning the thumb
wheel to the front.
Page 158 of 247

156Driving and operatingThe system is switched off
automatically when attaching a trailer
or bike carrier to the trailer hitch.
Contact your dealer to switch off the
system for a prolonged period.
Fault
In the event of a fault, $ flashes for a
few seconds, accompanied by an acoustic signal. If the fault occurs
during the use of the system, $
extinguishes.
In the event of a fault in the power
steering, c flashes in the instrument
panel, accompanied by a message.
Notice
It is possible that the sensor detects a non-existing object caused by
echo disturbance from external
acoustic noise or mechanical
misalignments (sporadic false
warnings may occur).
Advanced parking assist system
may not respond to changes in the
available parking space after
initiating a parking manoeuvre. The
system may recognise an entry, a
gateway, a courtyard or even acrossing as a parking slot. After
selecting reverse gear the system
will start a parking manoeuvre. Take
care regarding the availability of the
suggested parking slot.
Low curbs and surface irregularities,
e.g. on construction zones, are not
detected by the system. The driver
accepts responsibility.
Side blind spot alert
The side blind spot alert system
detects and reports objects on either
side of the vehicle, within a specified
blind spot zone. The system displays
a visual alert in each exterior mirror,
when detecting objects that may not
be visible in the interior and exterior
mirrors.
Side blind spot alert uses some of the
parking assist sensors.9 Warning
Side blind spot alert does not
replace driver vision.
The system does not detect:
● vehicles outside the side blind zones which may be rapidly
approaching
● pedestrians, cyclists or animals
Before changing a lane, always
check all mirrors, look over the
shoulder and use the turn light.
Activation
7'' Colour Info Display: select Blind
spot monitoring on the Info Display
and activate the function.
8'' Colour Info Display: press Í.
Select Driving functions on the Info
Display and then Blind spot
monitoring . Activate the function.
B illuminates continously green in the
instrument cluster to confirm the
function.
Page 174 of 247

172Vehicle careVehicle careGeneral Information...................172
Accessories and vehicle modifications .......................... 172
Vehicle storage ........................173
End-of-life vehicle recovery .....173
Vehicle checks ........................... 174
Performing work ......................174
Bonnet ..................................... 174
Engine oil ................................. 175
Engine coolant ......................... 176
Washer fluid ............................ 176
Brakes ..................................... 177
Brake fluid ............................... 177
Vehicle battery ......................... 177
Diesel fuel system bleeding .....179
Wiper blade replacement ........179
Bulb replacement .......................180
Halogen headlights ..................180
LED headlights ........................ 183
Front fog lights ......................... 183
Tail lights ................................. 183
Side turn lights ......................... 187
Number plate light ...................188
Interior lights ............................ 188Electrical system........................188
Fuses ....................................... 188
Engine compartment fuse box . 189
Instrument panel fuse box .......190
Vehicle tools .............................. 192
Tools ........................................ 192
Wheels and tyres .......................193
Winter tyres ............................. 193
Tyre designations ....................193
Tyre pressure .......................... 194
Tyre deflation detection system .................................... 195
Tread depth ............................. 196
Changing tyre and wheel size . 196
Wheel covers ........................... 196
Tyre chains .............................. 197
Tyre repair kit .......................... 197
Wheel changing .......................200
Spare wheel ............................ 201
Jump starting ............................. 205
Towing ....................................... 206
Towing the vehicle ...................206
Towing another vehicle ...........207
Appearance care .......................208
Exterior care ............................ 208
Interior care ............................. 210
Floor mats ............................... 211General Information
Accessories and vehicle modifications
We recommend the use of genuine parts and accessories and factory
approved parts specific for this
vehicle type. We cannot assess or
guarantee reliability of other products - even if they have a regulatory or
otherwise granted approval.
Any modification, conversion or other
changes made to standard vehicle
specifications (including, without
limitation, software modifications,
modifications of the electronic control units) may invalidate the warranty
offered by Vauxhall.
Furthermore, such changes may
affect driver assistance systems, may
impact fuel consumption, CO 2
emissions and other emissions of the
vehicle and cause the vehicle to no
longer conform to the operating
permit, impacting the validity of your
vehicle registration.
Page 190 of 247
188Vehicle care4. Insert bulb holder and turnclockwise.
5. Insert left end of the lamp, slide to
the left and insert right end.
Number plate light
The number plate light is designed as
LEDs and cannot be changed. In
case of defective LEDs, have them
replaced by a workshop.
Interior lights
Have the following bulbs replaced by
a workshop:
● courtesy light, reading lights
● load compartment light
● instrument panel illuminationElectrical system
Fuses Data on the replacement fuse mustmatch the data on the defective fuse.
The three fuse boxes are located in: ● engine compartment
● instrument panel
Before replacing a fuse, turn off the
respective switch and the ignition.
A blown fuse can be recognised by its melted wire.Caution
Do not replace the fuse until the
cause of the fault has been
remedied.
Some functions are protected by
several fuses.
Fuses may also be inserted without
existence of a function.
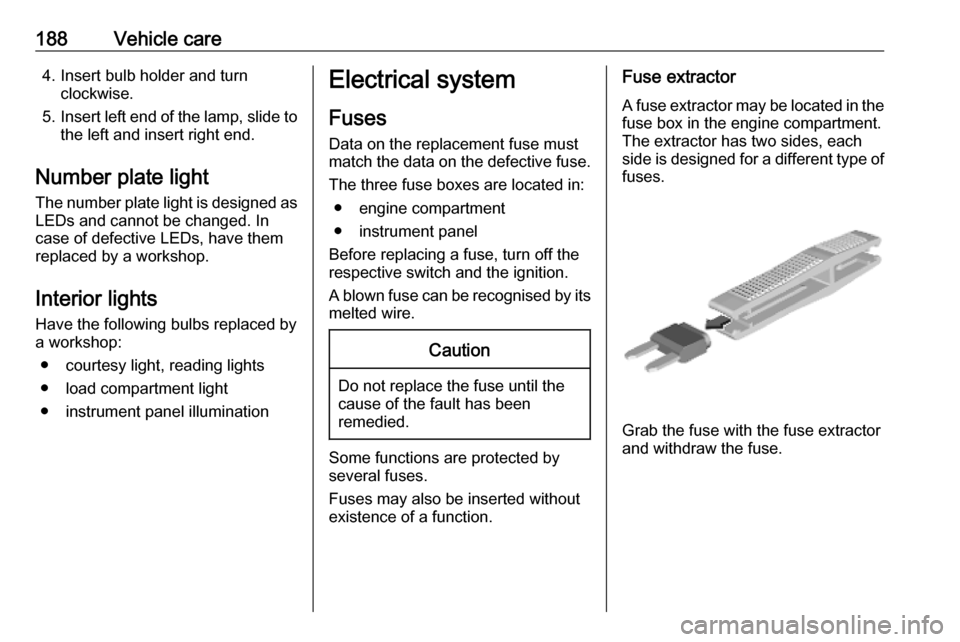
Fuse extractor
A fuse extractor may be located in the
fuse box in the engine compartment.
The extractor has two sides, each
side is designed for a different type of fuses.
Grab the fuse with the fuse extractor
and withdraw the fuse.
Page 191 of 247
Vehicle care189Engine compartment fusebox
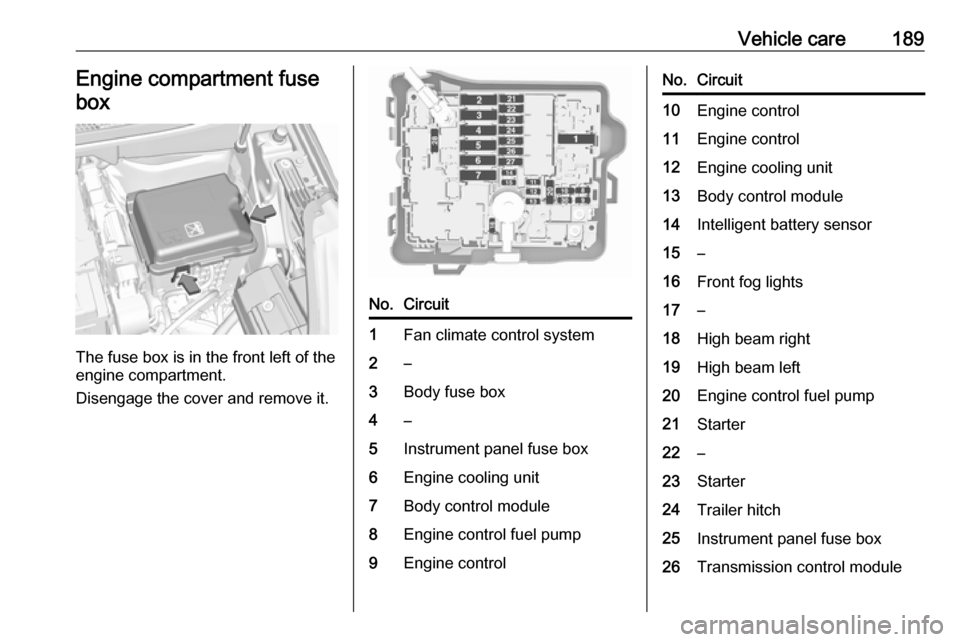
The fuse box is in the front left of the
engine compartment.
Disengage the cover and remove it.
No.Circuit1Fan climate control system2–3Body fuse box4–5Instrument panel fuse box6Engine cooling unit7Body control module8Engine control fuel pump9Engine controlNo.Circuit10Engine control11Engine control12Engine cooling unit13Body control module14Intelligent battery sensor15–16Front fog lights17–18High beam right19High beam left20Engine control fuel pump21Starter22–23Starter24Trailer hitch25Instrument panel fuse box26Transmission control module
Page 192 of 247
190Vehicle careNo.Circuit27Body control module28Engine control module29Front wiper30Body control module
After having changed defective fuses,
close the fuse box cover and press
until it engages.
If the fuse box cover is not closed
correctly, malfunction may occur.
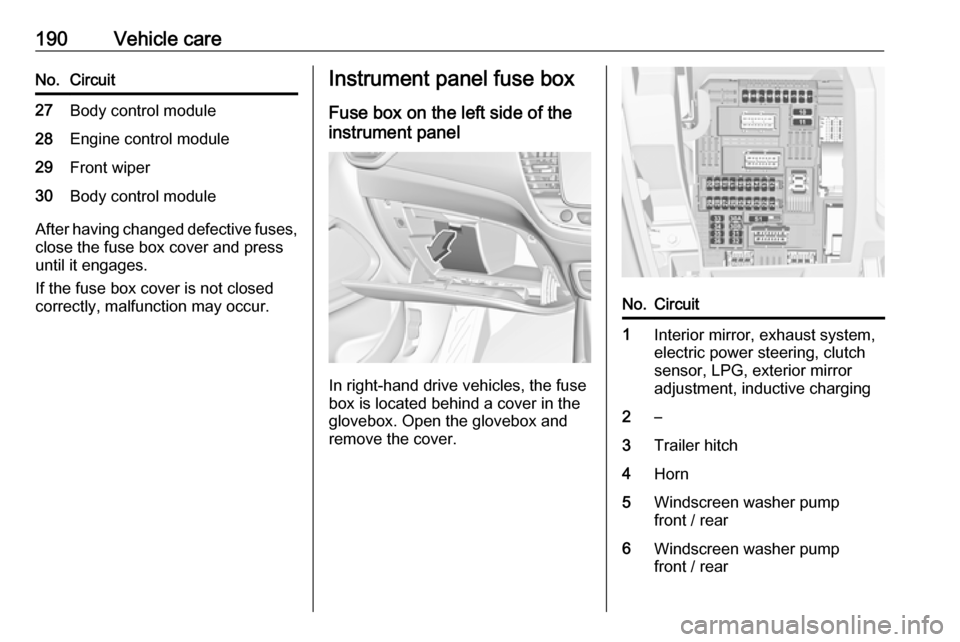
Instrument panel fuse box
Fuse box on the left side of the
instrument panel
In right-hand drive vehicles, the fuse
box is located behind a cover in the
glovebox. Open the glovebox and
remove the cover.
No.Circuit1Interior mirror, exhaust system,
electric power steering, clutch
sensor, LPG, exterior mirror
adjustment, inductive charging2–3Trailer hitch4Horn5Windscreen washer pump
front / rear6Windscreen washer pump
front / rear
Page 193 of 247

Vehicle care191No.Circuit7Heated steering wheel8Rear wiper9–10Central locking system11Central locking system12Instrument cluster13Climate control system, USB14OnStar15Instrument cluster, climate
control system16Brake, starter, retained power
off17Instrument cluster18Advanced parking assist19Top column module, trailer
control module20–21Anti-theft alarm system, start
buttonNo.Circuit22Rain sensor, front camera23Door module24Advanced parking assist,
camera, Infotainment25Airbag26Top column module27Anti-theft alarm system28–29Infotainment30–31Infotainment32Power outlet front33–34Heated exterior mirrors, door
moduleNo.Circuit35Instrument cluster, light switch,
advanced parking assist, trans‐
mission control module36Courtesy lights, sun visor lights,
glovebox light
Fuse box on the right side of the
instrument panel
In right-hand drive vehicles, the fuse
box is behind a cover in the
instrument panel. Disengage cover at
the side and remove.
Page 212 of 247

210Vehicle careIce residues, pollution and continuouswiping on dry windows will damage or
even destroy the wiper blades.
Glass panel
Never clean with solvents or abrasive agents, fuels, aggressive media
(e.g. paint cleaner, acetone-
containing solutions etc.), acidic or
highly alkaline media or abrasive
pads.
Wheels and tyres Do not use high-pressure jet
cleaners.
Clean rims with a pH-neutral wheel
cleaner.
Rims are painted and can be treated
with the same agents as the body.
Paintwork damage Rectify minor paintwork damage witha touch-up pen before rust forms.
Have more extensive damage or rust areas repaired by a workshop.Underbody
Some areas of the vehicle underbody
have a PVC undercoating while other critical areas have a durable
protective wax coating.
After the underbody is washed, check
the underbody and have it waxed if
necessary.
Bitumen / rubber materials could damage the PVC coating. Have
underbody work carried out by a
workshop.
Before and after winter, wash the
underbody and have the protective
wax coating checked.
Towing equipment
Do not clean the coupling ball bar with a steam-jet or high-pressure jet
cleaner.Interior care
Interior and upholstery Only clean the vehicle interior,
including the instrument panel fascia
and panelling, with a dry cloth or
interior cleaner.
Clean the leather upholstery with
clear water and a soft cloth. In case of
heavy soiling, use leather care.
The instrument cluster and the
displays should only be cleaned using
a soft damp cloth. If necessary use a weak soap solution.
Clean fabric upholstery with a
vacuum cleaner and brush. Remove
stains with an upholstery cleaner.
Clothing fabrics may not be
colourfast. This could cause visible
discolourations, especially on light-
coloured upholstery. Removable
stains and discolourations should be
cleaned as soon as possible.
Clean seat belts with lukewarm water or interior cleaner.