VAUXHALL CROSSLAND X 2020 Owner's Manual
Manufacturer: VAUXHALL, Model Year: 2020, Model line: CROSSLAND X, Model: VAUXHALL CROSSLAND X 2020Pages: 245, PDF Size: 21.85 MB
Page 191 of 245
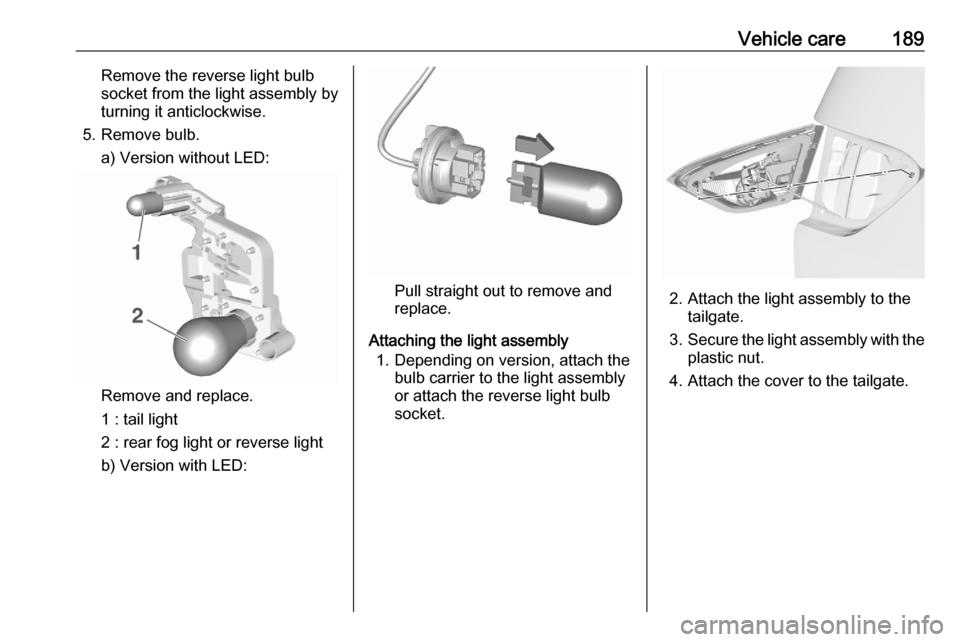
Vehicle care189Remove the reverse light bulb
socket from the light assembly by
turning it anticlockwise.
5. Remove bulb. a) Version without LED:
Remove and replace.
1 : tail light
2 : rear fog light or reverse light
b) Version with LED:
Pull straight out to remove and
replace.
Attaching the light assembly 1. Depending on version, attach the bulb carrier to the light assembly
or attach the reverse light bulb
socket.2. Attach the light assembly to the tailgate.
3. Secure the light assembly with the
plastic nut.
4. Attach the cover to the tailgate.
Page 192 of 245
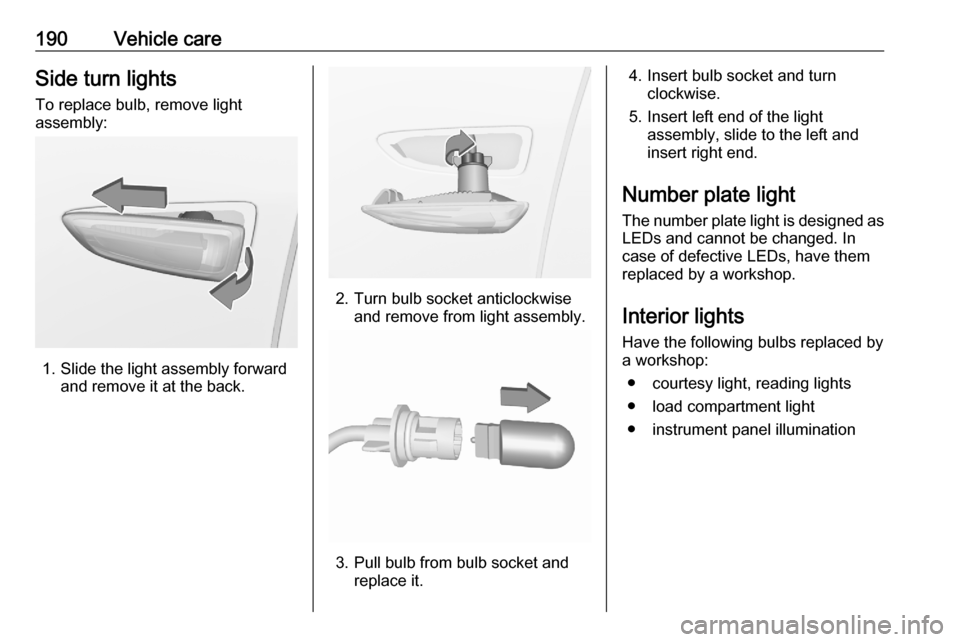
190Vehicle careSide turn lightsTo replace bulb, remove light
assembly:
1. Slide the light assembly forward and remove it at the back.
2. Turn bulb socket anticlockwiseand remove from light assembly.
3. Pull bulb from bulb socket andreplace it.
4. Insert bulb socket and turn clockwise.
5. Insert left end of the light assembly, slide to the left and
insert right end.
Number plate light
The number plate light is designed as
LEDs and cannot be changed. In
case of defective LEDs, have them
replaced by a workshop.
Interior lights
Have the following bulbs replaced by
a workshop:
● courtesy light, reading lights
● load compartment light
● instrument panel illumination
Page 193 of 245
Vehicle care191Electrical system
Fuses Data on the replacement fuse must
match the data on the defective fuse.
The three fuse boxes are located in: ● engine compartment
● instrument panel
Before replacing a fuse, turn off the
respective switch and the ignition.
A blown fuse can be recognised by its melted wire.Caution
Do not replace the fuse until the
cause of the fault has been
remedied.
Some functions are protected by
several fuses.
Fuses may also be inserted without
existence of a function.
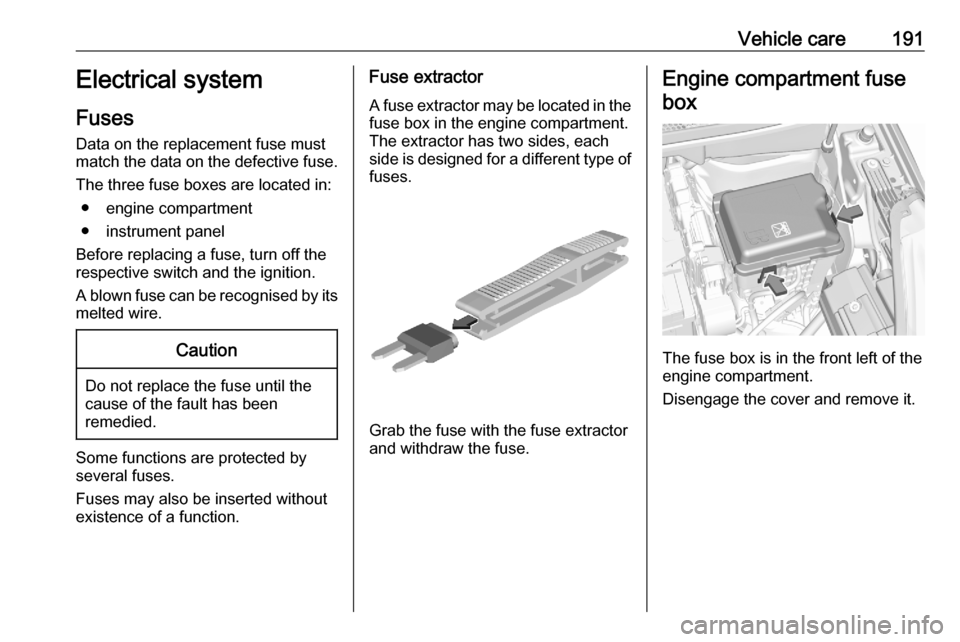
Fuse extractor
A fuse extractor may be located in the
fuse box in the engine compartment.
The extractor has two sides, each
side is designed for a different type of fuses.
Grab the fuse with the fuse extractor
and withdraw the fuse.
Engine compartment fuse
box
The fuse box is in the front left of the
engine compartment.
Disengage the cover and remove it.
Page 194 of 245
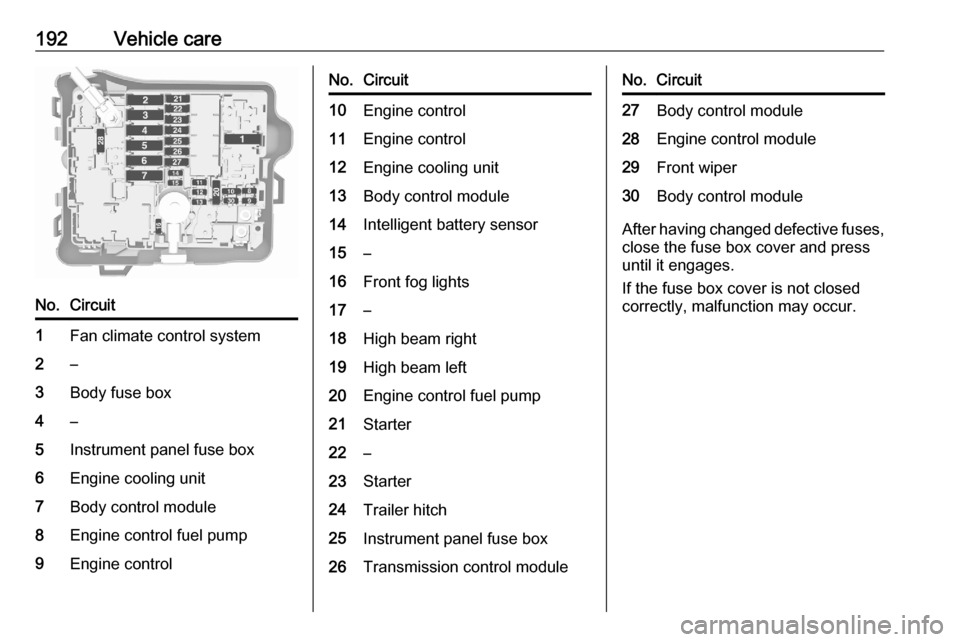
192Vehicle careNo.Circuit1Fan climate control system2–3Body fuse box4–5Instrument panel fuse box6Engine cooling unit7Body control module8Engine control fuel pump9Engine controlNo.Circuit10Engine control11Engine control12Engine cooling unit13Body control module14Intelligent battery sensor15–16Front fog lights17–18High beam right19High beam left20Engine control fuel pump21Starter22–23Starter24Trailer hitch25Instrument panel fuse box26Transmission control moduleNo.Circuit27Body control module28Engine control module29Front wiper30Body control module
After having changed defective fuses,
close the fuse box cover and press
until it engages.
If the fuse box cover is not closed
correctly, malfunction may occur.
Page 195 of 245
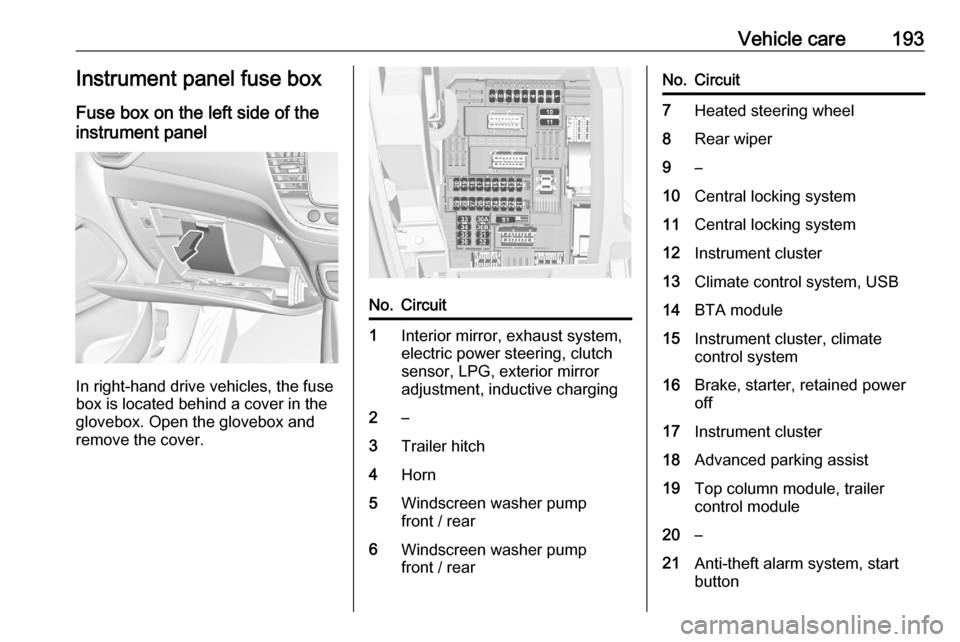
Vehicle care193Instrument panel fuse boxFuse box on the left side of the
instrument panel
In right-hand drive vehicles, the fuse
box is located behind a cover in the
glovebox. Open the glovebox and
remove the cover.
No.Circuit1Interior mirror, exhaust system,
electric power steering, clutch
sensor, LPG, exterior mirror
adjustment, inductive charging2–3Trailer hitch4Horn5Windscreen washer pump
front / rear6Windscreen washer pump
front / rearNo.Circuit7Heated steering wheel8Rear wiper9–10Central locking system11Central locking system12Instrument cluster13Climate control system, USB14BTA module15Instrument cluster, climate
control system16Brake, starter, retained power
off17Instrument cluster18Advanced parking assist19Top column module, trailer
control module20–21Anti-theft alarm system, start
button
Page 196 of 245
194Vehicle careNo.Circuit22Rain sensor, front camera23Door module24Advanced parking assist,
camera, Infotainment25Airbag26Top column module27Anti-theft alarm system28–29Infotainment30–31Infotainment32Power outlet front33–34Heated exterior mirrors, door
moduleNo.Circuit35Instrument cluster, light switch,
advanced parking assist, trans‐
mission control module36Courtesy lights, sun visor lights,
glovebox light
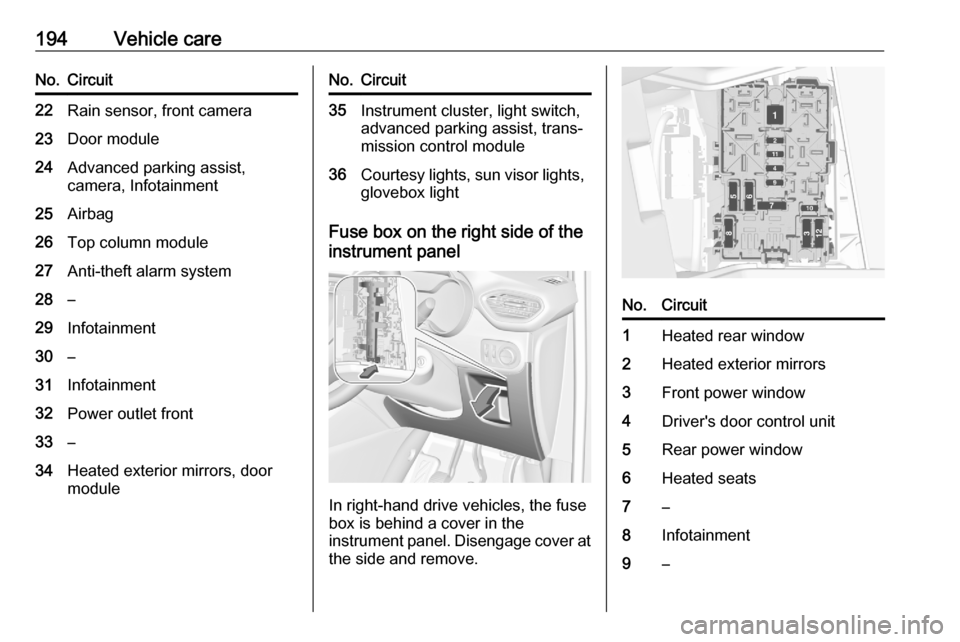
Fuse box on the right side of the
instrument panel
In right-hand drive vehicles, the fuse
box is behind a cover in the
instrument panel. Disengage cover at
the side and remove.
No.Circuit1Heated rear window2Heated exterior mirrors3Front power window4Driver's door control unit5Rear power window6Heated seats7–8Infotainment9–
Page 197 of 245
Vehicle care195No.Circuit10Power outlet rear11–12–Vehicle tools
Tools
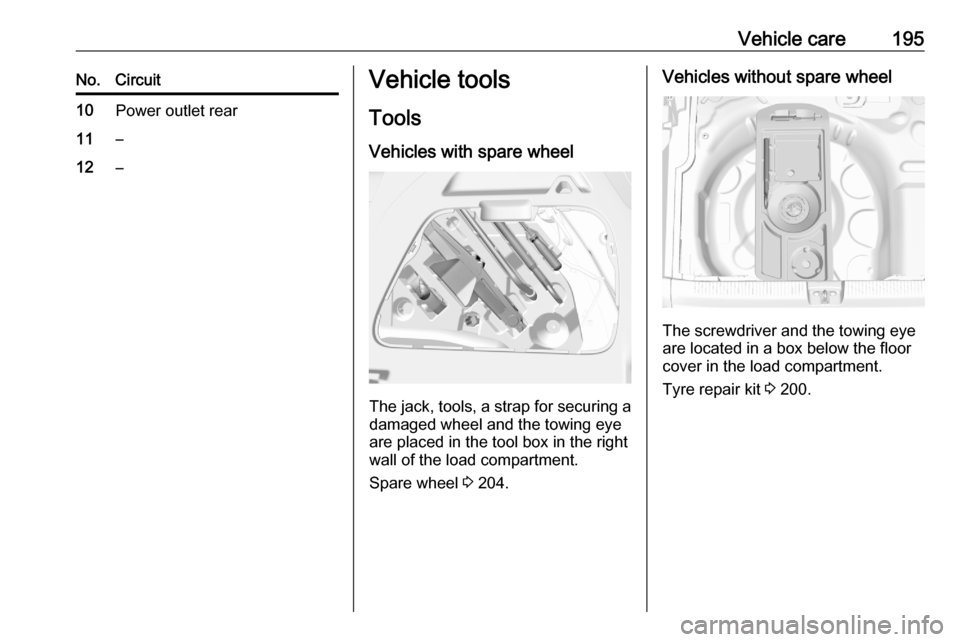
Vehicles with spare wheel
The jack, tools, a strap for securing a damaged wheel and the towing eye
are placed in the tool box in the right
wall of the load compartment.
Spare wheel 3 204.
Vehicles without spare wheel
The screwdriver and the towing eye
are located in a box below the floor
cover in the load compartment.
Tyre repair kit 3 200.
Page 198 of 245
196Vehicle careWheels and tyres
Tyre condition, wheel condition Drive over edges slowly and at right
angles if possible. Driving over sharp
edges can cause tyre and wheel
damage. Do not trap tyres on the kerb when parking.
Regularly check the wheels for
damage. Seek the assistance of a
workshop in the event of damage or
unusual wear.
Winter tyres
Winter tyres improve driving safety at temperatures below 7 °C and shouldtherefore be fitted on all wheels.
In accordance with country-specific
regulations, affix the speed sticker in
the driver's field of view.
All tyre sizes are permitted as winter
tyres 3 229.Tyre designations
E.g. 195/65 R 15 91 T195:tyre width, mm65:cross-section ratio (tyre height
to tyre width), %R:belt type: RadialRF:type: RunFlat15:wheel diameter, inches91:load index e.g. 95 is equivalent
to 615 kgT:speed code letter
Speed code letter:
Q:up to 100 mphS:up to 112 mphT:up to 118 mphH:up to 130 mphV:up to 150 mphW:up to 168 mph
Choose a tyre appropriate for the
maximum speed of this vehicle. Refer
to the EEC Certificate of Conformity
provided with the vehicle or other
national registration documents.
Optional equipment could reduce the
maximum speed of the vehicle.
Directional tyres
Directional tyres should be mounted so that they rotate in the correct
direction. The proper rotation
direction is indicated by a symbol
(e.g. an arrow) on the sidewall.
Tyre pressure
Check the pressure of cold tyres at
least every 14 days and before any
long journey.
Do not forget the spare wheel.
Page 199 of 245
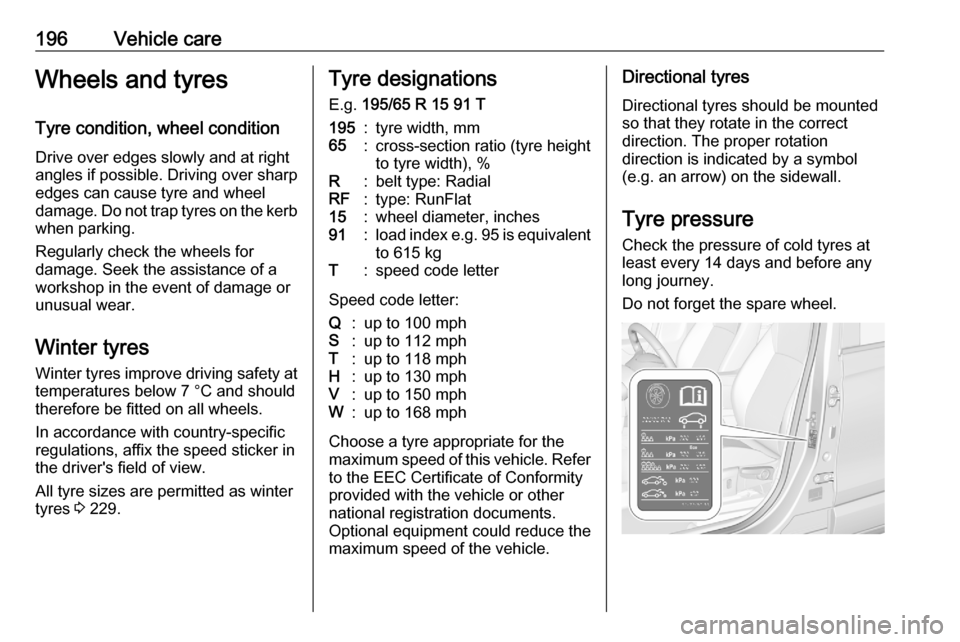
Vehicle care197The tyre pressure information label
on the left door frame indicates the
original equipment tyres and the
correspondent tyre pressures.
The tyre pressure data refers to cold
tyres. It applies to summer and winter
tyres.
Always inflate the spare tyre to the
pressure specified for full load.
The ECO tyre pressure serves to
achieve the smallest amount of fuel
consumption possible.
Incorrect tyre pressures will impair
safety, vehicle handling, comfort and fuel economy and will increase tyre
wear.
The tyre pressure table indicates the
required pressure for a specific tyre
size only and shows all possible tyre
combinations 3 229.
For the tyres approved for this
vehicle, refer to the EEC Certificate of Conformity provided with the vehicle
or other national registration
documents.
The driver is responsible for correct adjustment of tyre pressure.9 Warning
If the pressure is too low, this can
result in considerable tyre warm-
up and internal damage, leading to tread separation and even to tyre
blow-out at high speeds.
9 Warning
For specific tyres the
recommended tyre pressure as
shown in the tyre pressure table may exceed the maximum tyre
pressure as indicated on the tyre.
Never exceed the maximum tyre
pressure as indicated on the tyre.
Temperature dependency
The tyre pressure depends on the
temperature of the tyre. During
driving, tyre temperature and
pressure increase. Tyre pressure
values provided on the tyre
information label and tyre pressure
chart are valid for cold tyres, which means at 20 °C.
The pressure increases by nearly
1.5 psi for a 10 °C temperature
increase. This must be considered
when warm tyres are checked.
Tyre deflation detectionsystem
The tyre deflation detection system
continually checks the rotation speed
of all four wheels and warns on low
tyre pressure condition once vehicle
is driving. This is achieved by
comparing tyre rolling circumference
with reference values and further
signals.
If a tyre loses pressure the control
indicator w illuminates and a warning
message is displayed in the Driver Information Centre.
In this case reduce speed, avoid
sharp cornering and strong braking.
Stop at next safe opportunity and
check tyre pressure.
Control indicator w 3 86.
After adjusting tyre pressure initialise
system to extinguish the control
indicator and restart system.
Page 200 of 245
198Vehicle careCaution
Deflation detection system warns
just about low tyre pressure
condition and does not replace
regular tyre maintenance by the
driver.
In case of a system malfunction a
message is displayed in the Driver
Information Centre. Set correct tyre
pressure and reinitialise system. If the
failure continues to be displayed,
contact a workshop. The system is
inoperable when ABS or ESC has a
malfunction or a temporary spare
wheel is used.
In case of a system malfunction a
message is displayed in the Driver
Information Centre. Set correct tyre
pressure and reinitialise system. If the
failure continues to be displayed,
contact a workshop. The system is
inoperable when ABS or ESC has a
malfunction.
Once the road tyre has been refitted,
check the tyre pressure with cold
tyres and initialise the system.
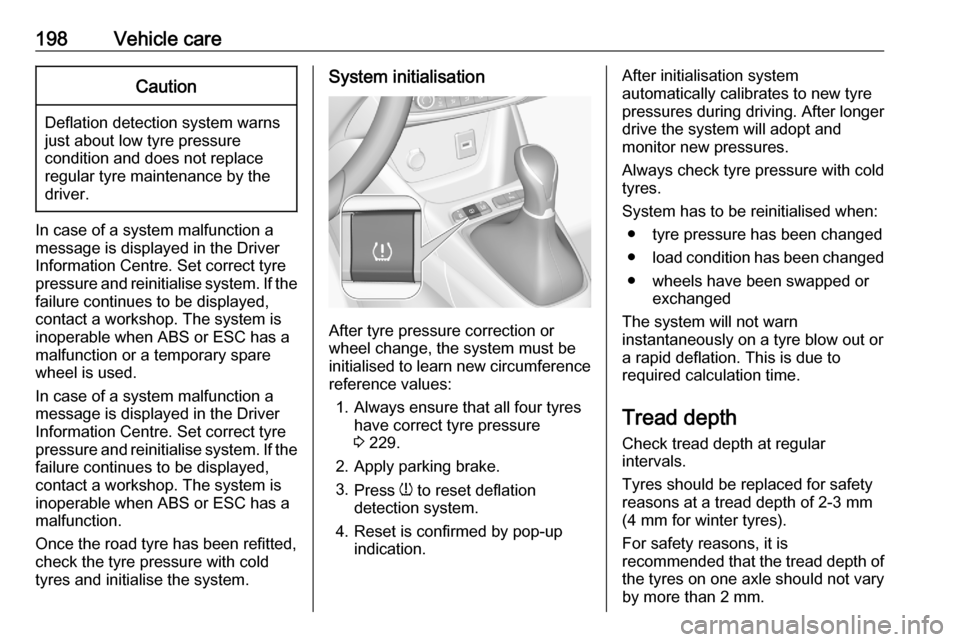
System initialisation
After tyre pressure correction or
wheel change, the system must be
initialised to learn new circumference reference values:
1. Always ensure that all four tyres have correct tyre pressure3 229.
2. Apply parking brake. 3. Press w to reset deflation
detection system.
4. Reset is confirmed by pop-up indication.
After initialisation system
automatically calibrates to new tyre
pressures during driving. After longer
drive the system will adopt and
monitor new pressures.
Always check tyre pressure with cold
tyres.
System has to be reinitialised when: ● tyre pressure has been changed
● load condition has been changed
● wheels have been swapped or exchanged
The system will not warn
instantaneously on a tyre blow out or
a rapid deflation. This is due to
required calculation time.
Tread depthCheck tread depth at regular
intervals.
Tyres should be replaced for safety
reasons at a tread depth of 2-3 mm
(4 mm for winter tyres).
For safety reasons, it is
recommended that the tread depth of the tyres on one axle should not vary
by more than 2 mm.