trim VAUXHALL GRANDLAND X 2020 Owner's Manual
[x] Cancel search | Manufacturer: VAUXHALL, Model Year: 2020, Model line: GRANDLAND X, Model: VAUXHALL GRANDLAND X 2020Pages: 283, PDF Size: 21.87 MB
Page 57 of 283
Seats, restraints55airbag sensing and diagnostic
module, steering wheel,
instrument panel, inner door seals including the speakers, any of the
airbag modules, ceiling or pillar
trim, front sensors, side impact
sensors or airbag wiring.
Notice
The airbag systems and belt
pretensioner control electronics are
located in the centre console. Do not put any magnetic objects in this
area.
Do not affix any objects onto the airbag covers and do not cover them with other materials. Have damaged
covers replaced by a workshop.
Each airbag is triggered only once.
Have deployed airbags replaced by
a workshop. Furthermore, it may be
necessary to have the steering
wheel, the instrument panel, parts of the panelling, the door seals,
handles and the seats replaced.
Do not make any modifications to
the airbag system as this will
invalidate the vehicle operating
permit.
Control indicator v for airbag systems
3 93.
Child restraint systems on front
passenger seat with airbag
systems
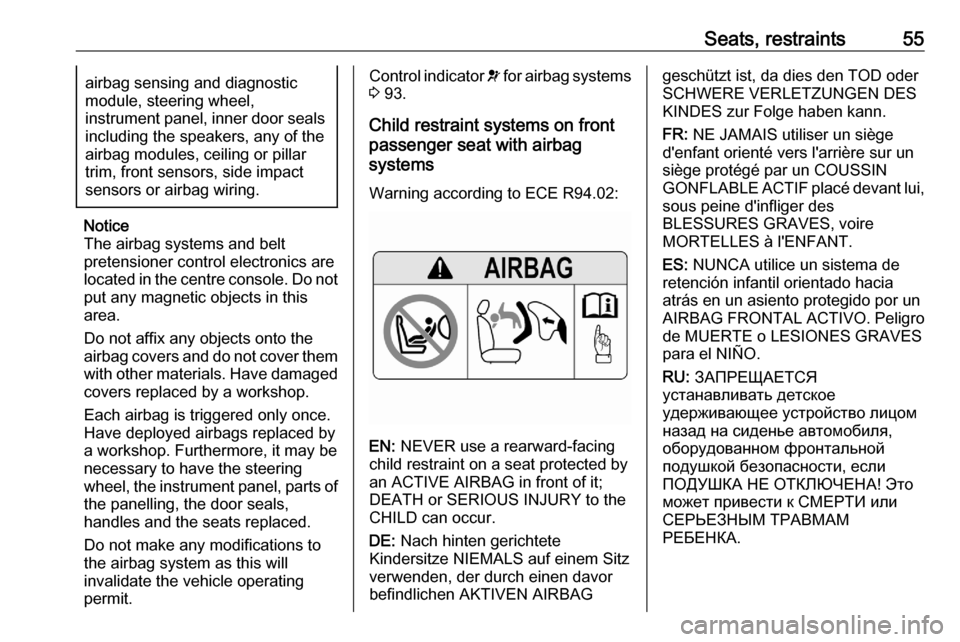
Warning according to ECE R94.02:
EN: NEVER use a rearward-facing
child restraint on a seat protected by
an ACTIVE AIRBAG in front of it;
DEATH or SERIOUS INJURY to the
CHILD can occur.
DE: Nach hinten gerichtete
Kindersitze NIEMALS auf einem Sitz
verwenden, der durch einen davor
befindlichen AKTIVEN AIRBAG
geschützt ist, da dies den TOD oder
SCHWERE VERLETZUNGEN DES
KINDES zur Folge haben kann.
FR: NE JAMAIS utiliser un siège
d'enfant orienté vers l'arrière sur un
siège protégé par un COUSSIN
GONFLABLE ACTIF placé devant lui,
sous peine d'infliger des
BLESSURES GRAVES, voire
MORTELLES à l'ENFANT.
ES: NUNCA utilice un sistema de
retención infantil orientado hacia
atrás en un asiento protegido por un
AIRBAG FRONTAL ACTIVO. Peligro de MUERTE o LESIONES GRAVES
para el NIÑO.
RU: ЗАПРЕЩАЕТСЯ
устанавливать детское
удерживающее устройство лицом
назад на сиденье автомобиля,
оборудованном фронтальной
подушкой безопасности, если
ПОДУШКА НЕ ОТКЛЮЧЕНА! Это
может привести к СМЕРТИ или
СЕРЬЕЗНЫМ ТРАВМАМ
РЕБЕНКА.
Page 74 of 283

72StorageRear floor storage cover
The rear floor cover can be lifted and
removed. Raise cover at the loop and remove.
To hold the load compartment cover
in an upright positon, lift it up past the
retractable stops.
Double load floor
The double load floor can be inserted
in the load compartment in two
positions:
● lower position above the spare wheel well cover
● upper position interlocked with the grab handle into back panel
trim
To remove, press the handle to
unlock the load floor and lift it up while
using the handle.
If mounted in the upper position, the
space between the load floor and the spare wheel well cover can be used
as a storage compartment.
In this position, if the rear seat
backrests are folded forwards, an
almost completely flat load bay is
created.
In the upper position, the double load
floor is able to withstand a maximum
load of 100 kg. In the lower position,
the double load floor is able to
withstand the maximum load of
150 kg.
Page 79 of 283
Storage77To calculate the payload, enter
the data for your vehicle in the
weights table at the front of this
manual.
The EC kerb weight includes
weights for the driver (68 kg),
luggage (7 kg) and all fluids (fuel
tank 90% full).
Optional equipment and
accessories increase the kerb
weight.
● Driving with a roof load increases
the sensitivity of the vehicle to
cross-winds and has a
detrimental effect on vehicle
handling due to the vehicle's
higher centre of gravity.
Distribute the load evenly and secure it properly with retaining
straps. Adjust the tyre pressure
and vehicle speed according to
the load conditions. Check and
retighten the straps frequently.
Do not drive faster than 75 mph.
The permissible roof load is
85 kg. The roof load is the
combined weight of the roof rack and the load.
Page 151 of 283

Driving and operating149In manual mode, no automatic
shifting to a higher gear takes place
at high engine revolutions.
Gear shift indication
The symbol R or S with a number
beside it is indicated when
gearshifting is recommended for fuel
saving reasons.
Shift indication appears only in
manual mode.
Electronic driving programmes
● Following a cold start, the operating temperature
programme increases engine
speed to quickly bring the
catalytic converter to the required
temperature.
● Special programmes automatically adapt the shifting
points when driving up inclines or
down hills.
● In snowy or icy conditions or on other slippery surfaces, the
electronic transmission controlenables the driver to select
manually first, second or third gear for starting off.
Kickdown
Pressing down the accelerator pedal
beyond the kickdown detent will lead to maximum acceleration
independent of selected driving
mode. The transmission shifts to a
lower gear depending on engine speed.
Fault
In the event of a fault a message is
displayed in the Driver Information
Centre.
Vehicle messages 3 106.
Electronic transmission control
enables only third gear. The
transmission no longer shifts
automatically.
Do not drive faster than 62 mph.
Have the cause of the fault remedied by a workshop.Interruption of power supply
In the event of an interruption of
power supply, the selector lever
cannot be moved out of the P
position.
If the vehicle battery is discharged,
start the vehicle using jump leads
3 242.
If the vehicle battery is not the cause
of the fault, release the selector lever.
1. Apply the parking brake.
2. Release the selector lever trim from the centre console. Poke
with a finger into the leather
socket below the selector lever
and push the trim upwards.
Page 152 of 283

150Driving and operating3. Push down the button and movethe selector lever out of P. Have
the cause of the power supply
interruption remedied by a
workshop.
4. Mount the selector lever trim onto
the centre console and refit.Manual transmission
To engage reverse on 6-speed
transmission, depress the clutch
pedal, pull the ring under the selector
lever and move the selector lever
quite to the left and front.
If the gear does not engage, set the
selector lever to neutral, release the
clutch pedal and depress again. Then
repeat gear selection.
Do not slip the clutch unnecessarily.
When operating, depress the clutch
pedal completely. Do not use the
pedal as a foot rest.
When clutch slip is detected for a specific time, the engine power will be reduced. A warning is displayed in the
Driver Information Centre. Release
the clutch.Caution
It is not advisable to drive with the hand resting on the selector lever.
Gear shift indication 3 96.
Stop-start system 3 138.
Page 224 of 283
222Vehicle care
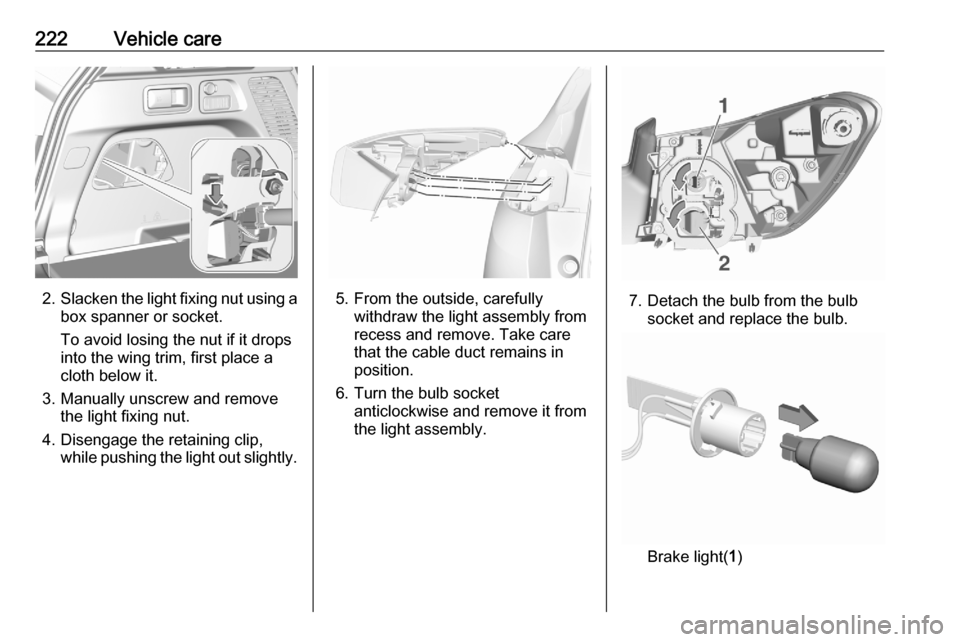
2.Slacken the light fixing nut using a
box spanner or socket.
To avoid losing the nut if it drops
into the wing trim, first place a
cloth below it.
3. Manually unscrew and remove the light fixing nut.
4. Disengage the retaining clip, while pushing the light out slightly.5. From the outside, carefullywithdraw the light assembly from
recess and remove. Take care
that the cable duct remains in
position.
6. Turn the bulb socket anticlockwise and remove it from
the light assembly.7. Detach the bulb from the bulb socket and replace the bulb.
Brake light( 1)