tow VAUXHALL INSIGNIA 2015.5 Owner's Manual
[x] Cancel search | Manufacturer: VAUXHALL, Model Year: 2015.5, Model line: INSIGNIA, Model: VAUXHALL INSIGNIA 2015.5Pages: 331, PDF Size: 9.08 MB
Page 20 of 331
18In brief
To restart the engine, depress the
clutch pedal again.
Stop-start system 3 157.
Parking9 Warning
■ Do not park the vehicle on an
easily ignitable surface. The
high temperature of the exhaust system could ignite the surface.
■ Always apply the parking brake.
Activate the manual parking
brake without pressing the
release button. Apply as firmly
as possible on a downhill slope
or uphill slope. Depress foot
brake at the same time to
reduce operating force.
For vehicles with electric
parking brake, pull switch m for
approx. one second.
The electric parking brake is
applied when control indicator
m illuminates 3 106.
■ Switch off the engine. ■ If the vehicle is on a level surface or uphill slope, engage
first gear or set the selector lever
to position P before removing
the ignition key. On an uphill
slope, turn the front wheels
away from the kerb.
If the vehicle is on a downhill
slope, engage reverse gear or
set the selector lever to position P before removing the ignition
key. Turn the front wheels
towards the kerb.
■ Close the windows and the sunroof.
■ Remove the ignition key. Turn the steering wheel until the
steering wheel lock is felt to
engage.
For vehicles with automatic
transmission, the key can only
be removed when the selector
lever is in position P.
■
Lock the vehicle with button e on
the radio remote control.
Page 34 of 331

32Keys, doors and windows
Notice
Adjusting opening height should be programmed at ground level.
A chime sound indicates the new
setting and the outer rear lights will
flash if the tailgate is below an
opening angel of 30°.
When turning the adjuster wheel in
the driver's door to intermediate mode 3/4 , the power tailgate will stop
opening at the newly set position.
The tailgate can only be held open ifa minimum height is exceeded
(minimum opening angle from 30°).
The opening height cannot be
programmed below that height.
Safety function
If the power tailgate encounters an obstacle during opening or closing,
the direction of movement will
automatically be reversed slightly.
Multiple obstacles in one power cycle
will deactivate the function. In this
case, close or open the tailgate
manually.The power tailgate has pinch sensors
on the side edges. If the sensors
detect obstacles between tailgate and chassis, the tailgate will open, until it
is activated again or closed manually.
The safety function is indicated by a
warning chime.
Remove all obstacles before
resuming normal power operation.
If the vehicle is equipped with factory-
fitted towing equipment and a trailer
is electrically connected, the power
tailgate can only be opened with the
touchpad switch or closed with G in
the open tailgate. Ensure that there
are no obstacles in the moving area.
General hints for operatingtailgate9 Danger
Do not drive with the tailgate open
or ajar, e.g. when transporting
bulky objects, since toxic exhaust
gases, which cannot be seen or
smelled, could enter the vehicle.
This can cause unconsciousness
and even death.Caution
Before opening the tailgate, check overhead obstructions, such as a
garage door, to avoid damage to
the tailgate. Always check the
moving area above and behind the
tailgate.
Notice
Power tailgate: If the lifters of the
open tailgate lose pressure, the
tailgate falls a bit and will then be
stopped by the system. Following
the tailgate will be power opened
and closed. During this the tail lights will flash and a chime will sound.
After closing, the tailgate may not be operated until it has been serviced
by a workshop.
Page 61 of 331

Seats, restraints59
sous peine d'infliger des
BLESSURES GRAVES, voire
MORTELLES à l'ENFANT.
ES: NUNCA utilice un sistema de
retención infantil orientado hacia
atrás en un asiento protegido por un
AIRBAG FRONTAL ACTIVO. Peligro de MUERTE o LESIONES GRAVES
para el NIÑO.
RU: ЗАПРЕЩАЕТСЯ
устанавливать детское
удерживающее устройство лицом
назад на сиденье автомобиля,
оборудованном фронтальной
подушкой безопасности, если
ПОДУШКА НЕ ОТКЛЮЧЕНА! Это
может привести к СМЕРТИ или
СЕРЬЕЗНЫМ ТРАВМАМ
РЕБЕНКА.
NL: Gebruik NOOIT een achterwaarts
gericht kinderzitje op een stoel met een ACTIEVE AIRBAG ervoor, om
DODELIJK of ERNSTIG LETSEL van het KIND te voorkomen.DA: Brug ALDRIG en bagudvendt
autostol på et forsæde med AKTIV
AIRBAG, BARNET kan komme i
LIVSFARE eller komme ALVORLIGT
TIL SKADE.
SV: Använd ALDRIG en bakåtvänd
barnstol på ett säte som skyddas med en framförvarande AKTIV AIRBAG.
DÖDSFALL eller ALLVARLIGA
SKADOR kan drabba BARNET.
FI: ÄLÄ KOSKAAN sijoita taaksepäin
suunnattua lasten turvaistuinta
istuimelle, jonka edessä on
AKTIIVINEN TURVATYYNY, LAPSI
VOI KUOLLA tai VAMMAUTUA
VAKAVASTI.
NO: Bakovervendt
barnesikringsutstyr må ALDRI brukes
på et sete med AKTIV
KOLLISJONSPUTE foran, da det kan føre til at BARNET utsettes for
LIVSFARE og fare for ALVORLIGE
SKADER.
PT: NUNCA use um sistema de
retenção para crianças voltado para
trás num banco protegido com um AIRBAG ACTIVO na frente domesmo, poderá ocorrer a PERDA DE
VIDA ou FERIMENTOS GRAVES na CRIANÇA.
IT: Non usare mai un sistema di
sicurezza per bambini rivolto
all'indietro su un sedile protetto da
AIRBAG ATTIVO di fronte ad esso:
pericolo di MORTE o LESIONI
GRAVI per il BAMBINO!
EL: ΠΟΤΕ μη χρησιμοποιείτε παιδικό
κάθισμα ασφαλείας με φορά προς τα
πίσω σε κάθισμα που προστατεύεται
από μετωπικό ΕΝΕΡΓΟ ΑΕΡΟΣΑΚΟ,
διότι το παιδί μπορεί να υποστεί
ΘΑΝΑΣΙΜΟ ή ΣΟΒΑΡΟ
ΤΡΑΥΜΑΤΙΣΜΟ.
PL: NIE WOLNO montować fotelika
dziecięcego zwróconego tyłem do
kierunku jazdy na fotelu, przed
którym znajduje się WŁĄCZONA
PODUSZKA POWIETRZNA.
Niezastosowanie się do tego
zalecenia może być przyczyną
ŚMIERCI lub POWAŻNYCH
OBRAŻEŃ u DZIECKA.
Page 77 of 331
Storage75
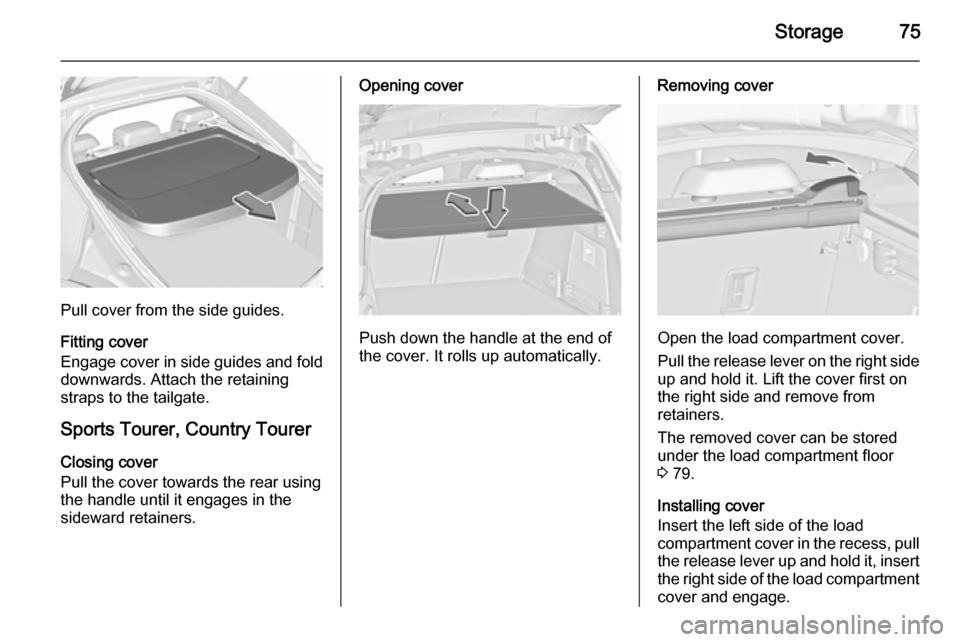
Pull cover from the side guides.
Fitting cover
Engage cover in side guides and fold
downwards. Attach the retaining
straps to the tailgate.
Sports Tourer, Country Tourer
Closing cover
Pull the cover towards the rear using
the handle until it engages in the
sideward retainers.
Opening cover
Push down the handle at the end of
the cover. It rolls up automatically.
Removing cover
Open the load compartment cover.
Pull the release lever on the right side
up and hold it. Lift the cover first on
the right side and remove from
retainers.
The removed cover can be stored
under the load compartment floor 3 79.
Installing cover
Insert the left side of the load
compartment cover in the recess, pull
the release lever up and hold it, insert the right side of the load compartment
cover and engage.
Page 83 of 331

Storage81
To unlock, turn cassette slightly
backwards and remove it upwards from the retainers.
Installation of the cassette
Remove load compartment cover.Insert the cassette into the retainers
on left and right side. Note the signs
L (left side) and R (right side) on the
cassette as an installation hint.
Turn cassette slightly forwards to
lock.
Stowage of safety nets and load
compartment cover Rear safety net cassette can be
placed, together with the load
compartment cover and the coiled up safety net, under the load
compartment floor.Open the load compartment floor by
pulling the handle. Fold and place the
floor behind the rear seats.
Page 84 of 331

82Storage
Put the load compartment cover into
the hollow with the upper side
downwards and with the release lever
in the front right edge.
Warning triangle
5-door Hatchback/4-door
Saloon
Stow the warning triangle in the space
behind the strap on the right side of
the load compartment.
Sports Tourer, Country Tourer
Stow the warning triangle in the space
behind the straps on the inside of the
tailgate.
First aid kit
5-door Hatchback/4-door
Saloon
Stow the first aid kit in the space
behind the mesh net on the left side
of the load compartment.
Page 85 of 331

Storage83
Sports Tourer, Country Tourer
Stow the first aid kit in the space
behind a strap on the inside of the
tailgate.
Roof rack system
Roof rack For safety reasons and to avoid
damage to the roof, the vehicle-
approved roof rack system is
recommended.
Follow the installation instructions
and remove the roof rack when not in
use.
Mounting roof rack 5-door Hatchback/4-door Saloon
Open all doors.
Mounting points are located in each
door frame of the vehicle body.
Detach the cover from each mounting
point and fasten the roof rack with the attached screws.
Sports Tourer/Country Tourer with roof railing
To fasten the roof rack, insert the
mounting bolts in the holes indicated
in the figure.
Page 86 of 331
84StorageLoading information
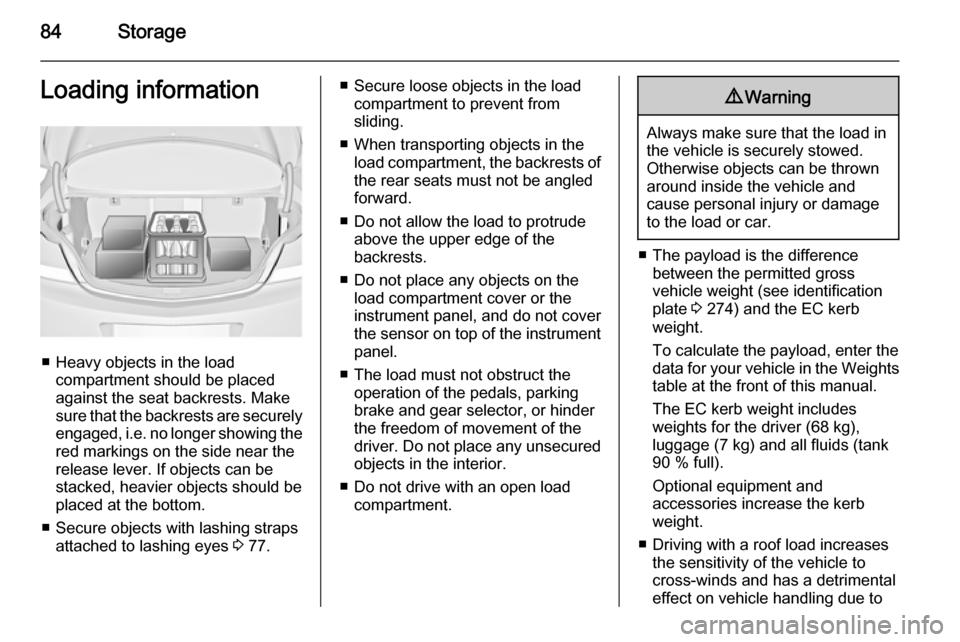
■ Heavy objects in the loadcompartment should be placedagainst the seat backrests. Make
sure that the backrests are securely engaged, i.e. no longer showing the
red markings on the side near the release lever. If objects can be
stacked, heavier objects should be
placed at the bottom.
■ Secure objects with lashing straps attached to lashing eyes 3 77.
■ Secure loose objects in the load
compartment to prevent from
sliding.
■ When transporting objects in the load compartment, the backrests of
the rear seats must not be angled
forward.
■ Do not allow the load to protrude above the upper edge of the
backrests.
■ Do not place any objects on the load compartment cover or theinstrument panel, and do not cover
the sensor on top of the instrument panel.
■ The load must not obstruct the operation of the pedals, parking
brake and gear selector, or hinder
the freedom of movement of the
driver. Do not place any unsecured objects in the interior.
■ Do not drive with an open load compartment.9 Warning
Always make sure that the load in
the vehicle is securely stowed.
Otherwise objects can be thrown
around inside the vehicle and
cause personal injury or damage
to the load or car.
■ The payload is the difference between the permitted gross
vehicle weight (see identification
plate 3 274) and the EC kerb
weight.
To calculate the payload, enter the
data for your vehicle in the Weights
table at the front of this manual.
The EC kerb weight includes
weights for the driver (68 kg),
luggage (7 kg) and all fluids (tank
90 % full).
Optional equipment and
accessories increase the kerb
weight.
■ Driving with a roof load increases the sensitivity of the vehicle to
cross-winds and has a detrimental
effect on vehicle handling due to
Page 132 of 331
130Lighting
Playstreet lightingActivated automatically at low speed
up to approx. 20 mph. The light beam
is turned at an angle of 8° to the
roadside.
Town lighting
Activated automatically at a speed
range between approx. 25 and
34 mph and when street lights are
detected by the light sensor. The light
range is reduced by an extended light
distribution.
Country lighting
Activated automatically at a speed
range between approx. 34 and
70 mph. The beam of light and the
brightness is different between the left and the right side.
Motorway lighting
Activated automatically at a speed
above approx. 70 mph and minimal
steering movements. It switches on
after a delay or immediately when the vehicle is powerfully accelerated. The
light beam is longer and brighter.Adverse weather lighting
Activated automatically up to a speed of approx. 43 mph, when the rain
sensor recognizes condensation or
the wiper operates continuously. The
range, distribution and light intensity
is regulated variably depending on visibility.
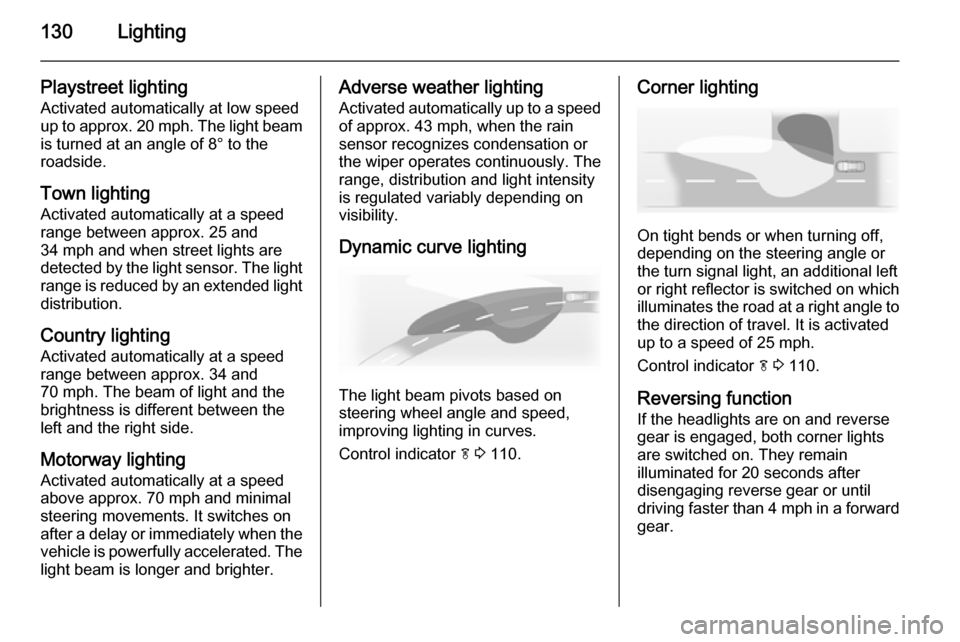
Dynamic curve lighting
The light beam pivots based on
steering wheel angle and speed,
improving lighting in curves.
Control indicator f 3 110.
Corner lighting
On tight bends or when turning off,
depending on the steering angle or
the turn signal light, an additional left
or right reflector is switched on which illuminates the road at a right angle to
the direction of travel. It is activated
up to a speed of 25 mph.
Control indicator f 3 110.
Reversing function If the headlights are on and reverse
gear is engaged, both corner lights
are switched on. They remain
illuminated for 20 seconds after disengaging reverse gear or until
driving faster than 4 mph in a forward
gear.
Page 135 of 331
Lighting133
Light switch in position AUTO:
switching on front fog lights will switch headlights on automatically.
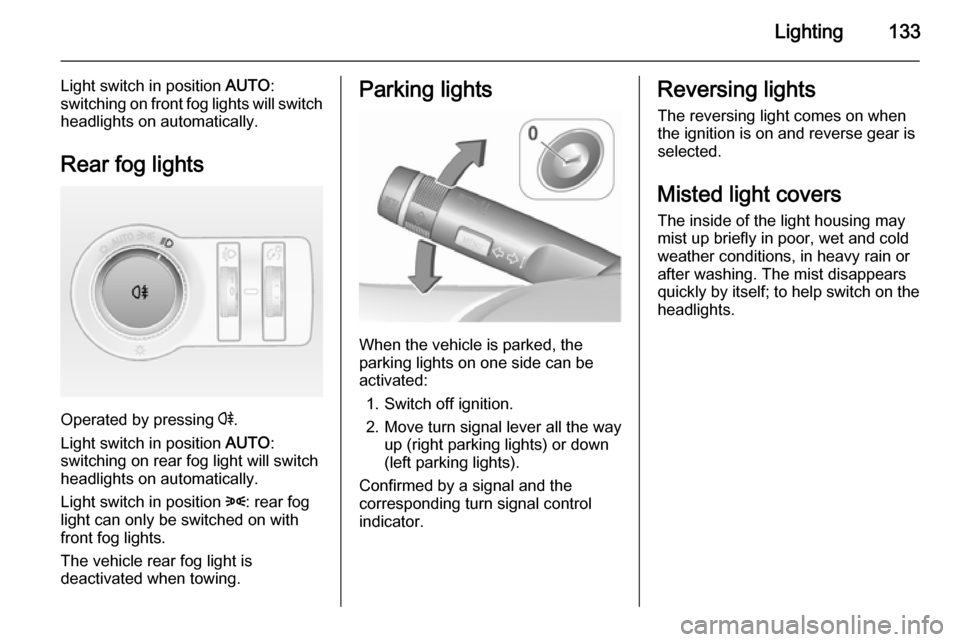
Rear fog lights
Operated by pressing r.
Light switch in position AUTO:
switching on rear fog light will switch
headlights on automatically.
Light switch in position 8: rear fog
light can only be switched on with
front fog lights.
The vehicle rear fog light is
deactivated when towing.
Parking lights
When the vehicle is parked, the
parking lights on one side can be
activated:
1. Switch off ignition.
2. Move turn signal lever all the way up (right parking lights) or down
(left parking lights).
Confirmed by a signal and the
corresponding turn signal control
indicator.
Reversing lights
The reversing light comes on when
the ignition is on and reverse gear is
selected.
Misted light covers The inside of the light housing may
mist up briefly in poor, wet and cold weather conditions, in heavy rain or
after washing. The mist disappears
quickly by itself; to help switch on the
headlights.