turn signal VAUXHALL INSIGNIA 2015.5 Owner's Manual
[x] Cancel search | Manufacturer: VAUXHALL, Model Year: 2015.5, Model line: INSIGNIA, Model: VAUXHALL INSIGNIA 2015.5Pages: 331, PDF Size: 9.08 MB
Page 13 of 331

In brief11
1Power windows .....................39
2 Central locking system ..........23
3 Exterior mirrors .....................36
4 Light switch ........................ 126
Headlight range
adjustment ......................... 128
Front/rear fog lights ............132
Instrument illumination .......134
5 Side air vents ...................... 149
6 Turn and lane-change
signals, headlight flash,
low/high beam, high beam
assist ................................... 132
Exit lighting ......................... 136
Parking lights ...................... 133
Buttons for Driver
Information Centre ..............111
7 Cruise control .....................177
Speed limiter ....................... 179
Adaptive cruise control .......180
Forward collision alert .........1878Instruments ........................ 100
Driver Information Centre .... 111
9 Buttons for Driver
Information Centre ..............111
10 Windscreen wiper and
washer, headlight washer,
rear wiper and washer .........88
11 Centre air vents .................. 149
12 Sport/Tour mode ................174
Traction Control system .....172
Electronic Stability Control . 173
Hazard warning flashers ....132
Parking assist/Advanced
parking aid ......................... 193
Lane departure warning .....209
13 Anti-theft alarm system
status LED ........................... 33
14 Colour-Info-Display ............118
15 Glovebox .............................. 70
Fuse box ............................ 24516Control indicator for airbag
activation/deactivation .......105
Control indicator for front
passenger seat belt ...........104
17 Controls for Colour-Info-
Display operation ................118
18 CD-slot
19 Climate control system ........ 138
20 Electric parking brake .........170
21 Touchpad ............................ 118
22 Manual transmission ..........168
Automatic transmission ......164
23 Storage ................................. 70
24 Eco button for stop-start
system ................................. 157
Fuel selector button ............102
25 Ignition/Power switch ..........153
26 Horn ..................................... 87
27 Steering wheel adjustment ..86
28 Bonnet release lever ..........224
29 Storage compartment ...........71
Page 14 of 331
12In briefExterior lighting
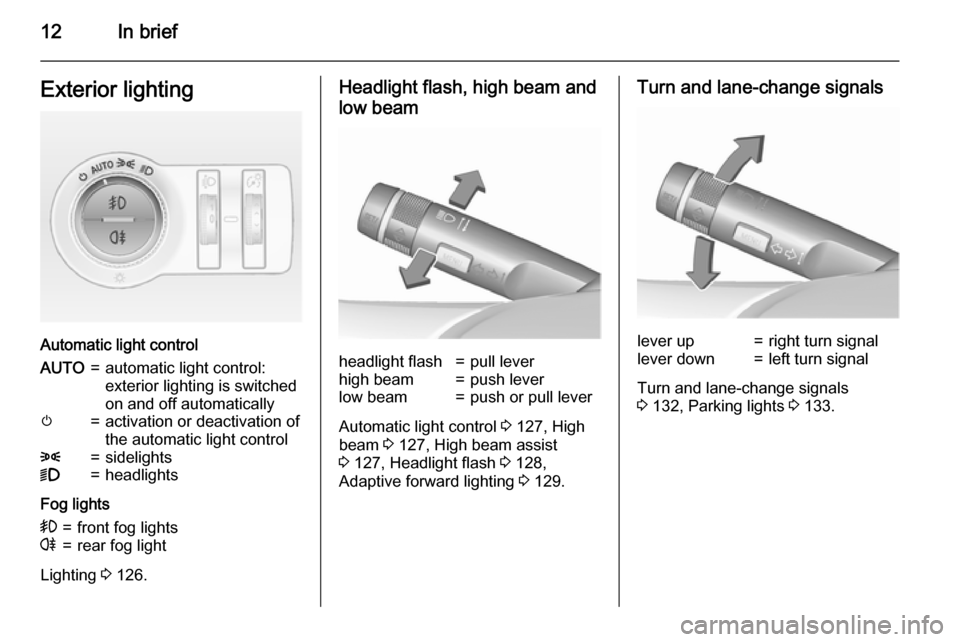
Automatic light control
AUTO=automatic light control:
exterior lighting is switched
on and off automaticallym=activation or deactivation of
the automatic light control8=sidelights9=headlights
Fog lights
>=front fog lightsr=rear fog light
Lighting 3 126.
Headlight flash, high beam and
low beamheadlight flash=pull leverhigh beam=push leverlow beam=push or pull lever
Automatic light control 3 127, High
beam 3 127, High beam assist
3 127, Headlight flash 3 128,
Adaptive forward lighting 3 129.
Turn and lane-change signalslever up=right turn signallever down=left turn signal
Turn and lane-change signals
3 132, Parking lights 3 133.
Page 93 of 331

Instruments and controls91
If outside temperature drops to 3 °C,
a warning message is displayed in the Driver Information Centre.
9 Warning
The road surface may already be
icy even though the display
indicates a few degrees above 0
°C.
Clock
Time is shown in the
4.2" Colour-Info-Display.
Date and time are shown in the
8" Colour-Info-Display.
Colour-Info-Display operation 3 118
4.2'' Display
Operate the display by the buttons
below the display.
Press ; and then select the
Settings icon by turning and pressing
MENU .
Select Time menu page.
Set time
Select the 'Set Time' menu item to
enter the respective submenu.
Select the 'Auto Set' screen button at the bottom of the screen. Activate
either 'On - RDS' mode or 'Off -
Manual' mode.
If 'Off - Manual' mode is selected,
adjust hours and minutes by turning
and pressing MENU.
Repeatedly select the 12-24 Hr
screen button at the bottom of the
screen to choose a time mode.
If 12-hour mode is selected, a third
column for AM and PM setting is
displayed. Select the desired option.In 'On - RDS Mode' the RDS signal of
most VHF transmitters automatically
sets the time. RDS time
synchronisation can take a few
minutes. Some transmitters do not
send a correct time signal. In such
cases, it is recommended to switch off automatic time synchronisation.
Return to homepage by pressing ;.
For further information, see Infotainment system manual
8'' Display
Press ; and then select the
Settings icon. Inputs can be done
directly by the finger on the touch screen icons.
Select 'Time and Date' menu page.
Set time
Select the 'Set Time' menu item to
enter the respective submenu.
Page 94 of 331
92Instruments and controls
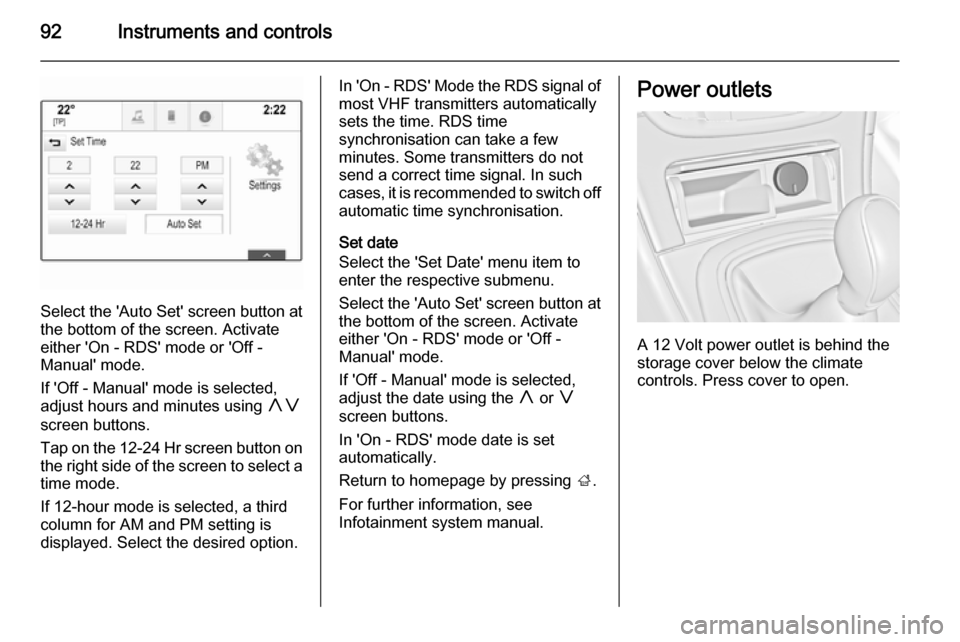
Select the 'Auto Set' screen button at
the bottom of the screen. Activate
either 'On - RDS' mode or 'Off -
Manual' mode.
If 'Off - Manual' mode is selected,
adjust hours and minutes using hg
screen buttons.
Tap on the 12-24 Hr screen button on
the right side of the screen to select a time mode.
If 12-hour mode is selected, a third
column for AM and PM setting is
displayed. Select the desired option.
In 'On - RDS' Mode the RDS signal of
most VHF transmitters automatically
sets the time. RDS time
synchronisation can take a few
minutes. Some transmitters do not send a correct time signal. In suchcases, it is recommended to switch off
automatic time synchronisation.
Set date
Select the 'Set Date' menu item to
enter the respective submenu.
Select the 'Auto Set' screen button at the bottom of the screen. Activate
either 'On - RDS' mode or 'Off -
Manual' mode.
If 'Off - Manual' mode is selected,
adjust the date using the h or g
screen buttons.
In 'On - RDS' mode date is set
automatically.
Return to homepage by pressing ;.
For further information, see
Infotainment system manual.Power outlets
A 12 Volt power outlet is behind the
storage cover below the climate
controls. Press cover to open.
Page 102 of 331
100Instruments and controlsSpeedometer
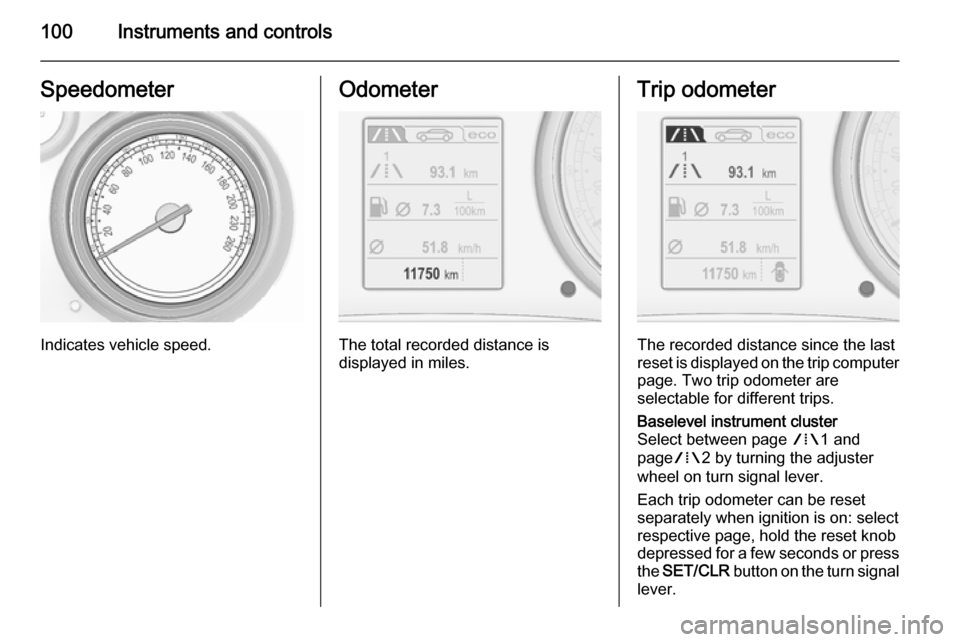
Indicates vehicle speed.
Odometer
The total recorded distance is
displayed in miles.
Trip odometer
The recorded distance since the last
reset is displayed on the trip computer page. Two trip odometer are
selectable for different trips.
Baselevel instrument cluster
Select between page W1 and
page W2 by turning the adjuster
wheel on turn signal lever.
Each trip odometer can be reset
separately when ignition is on: select
respective page, hold the reset knob
depressed for a few seconds or press
the SET/CLR button on the turn signal
lever.
Page 105 of 331
Instruments and controls103
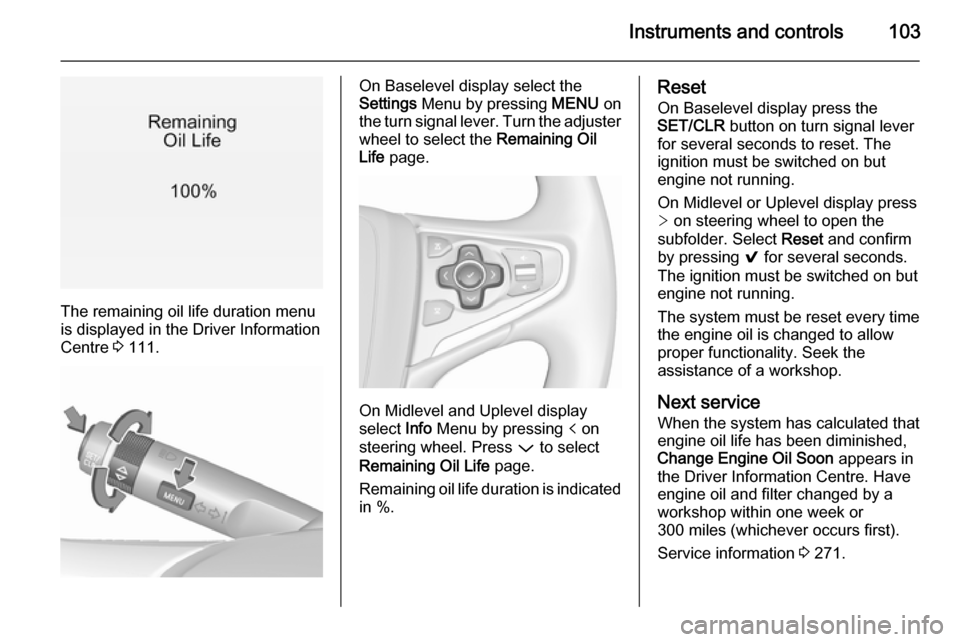
The remaining oil life duration menu
is displayed in the Driver Information
Centre 3 111.
On Baselevel display select the
Settings Menu by pressing MENU on
the turn signal lever. Turn the adjuster wheel to select the Remaining Oil
Life page.
On Midlevel and Uplevel display
select Info Menu by pressing p on
steering wheel. Press P to select
Remaining Oil Life page.
Remaining oil life duration is indicated
in %.
Reset
On Baselevel display press the
SET/CLR button on turn signal lever
for several seconds to reset. The
ignition must be switched on but
engine not running.
On Midlevel or Uplevel display press
> on steering wheel to open the
subfolder. Select Reset and confirm
by pressing 9 for several seconds.
The ignition must be switched on but
engine not running.
The system must be reset every time
the engine oil is changed to allow
proper functionality. Seek the
assistance of a workshop.
Next service
When the system has calculated that
engine oil life has been diminished,
Change Engine Oil Soon appears in
the Driver Information Centre. Have engine oil and filter changed by a
workshop within one week or
300 miles (whichever occurs first).
Service information 3 271.
Page 106 of 331

104Instruments and controlsControl indicators
The control indicators described are
not present in all vehicles. The
description applies to all instrument
versions. Depending on the
equipment, the position of the control indicators may vary. When the
ignition is switched on, most control
indicators will illuminate briefly as a functionality test.
The control indicator colours mean:red=danger, important reminderyellow=warning, information, faultgreen=confirmation of activationblue=confirmation of activationwhite=confirmation of activation
See all control indicators on different
instrument clusters 3 95.
Turn signal
O illuminates or flashes green.
Illuminates briefly
The parking lights are switched on.
Flashes
A turn signal or the hazard warningflashers are activated.
Rapid flashing: failure of a turn signal
light or associated fuse, failure of turn
signal light on trailer.
Bulb replacement 3 232, Fuses
3 242.
Turn signals 3 132.
Seat belt reminder Seat belt reminder on frontseats X for driver's seat illuminates or
flashes red in the instrument cluster.
k for front passenger seat illuminates
or flashes red in the centre console,
when seat is occupied.
Illuminates
After the ignition has been switched
on until the seat belt has been
fastened.Flashes
After having started the engine for a
maximum of 100 seconds until the
seat belt has been fastened.
Seat belt status on rear seats,
base level instrument cluster
X flashes or illuminates in the Driver
Information Centre.
Illuminates
After having started the engine when
the seat belt has been fastened.
Flashes
After starting off when the seat belt is unfastened.
Fastening the seat belt 3 55.
Seat belt status on rear seats,
midlevel and uplevel instrument cluster X illuminates red or green or grey in
the instrument cluster, after having
started the engine.
Illuminates red
Seat occupied and the seat belt is
unfastened.
Page 114 of 331
112Instruments and controls
Baselevel display
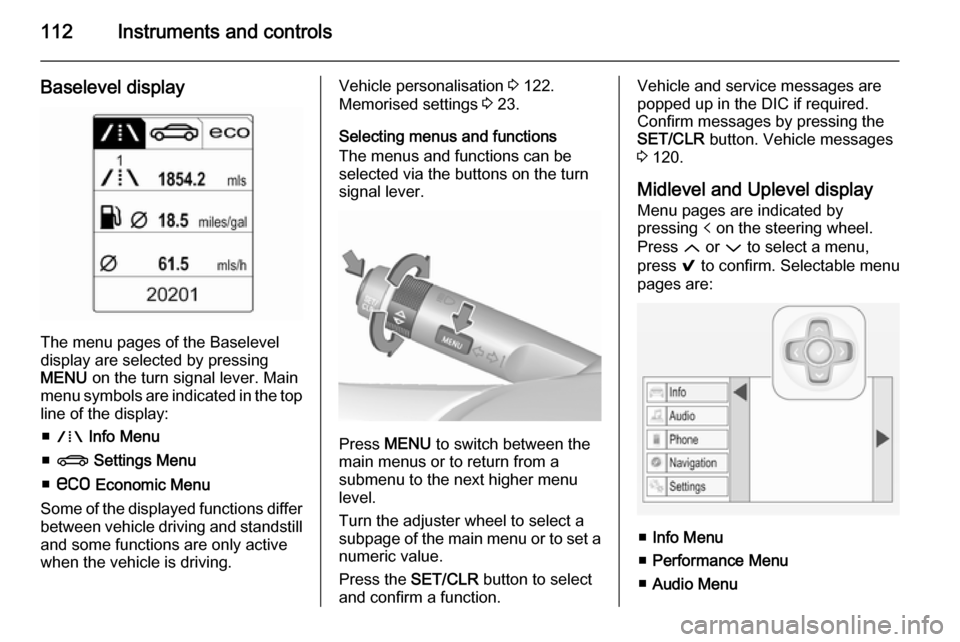
The menu pages of the Baselevel
display are selected by pressing
MENU on the turn signal lever. Main
menu symbols are indicated in the top line of the display:
■ W Info Menu
■ X Settings Menu
■ s Economic Menu
Some of the displayed functions differ
between vehicle driving and standstill and some functions are only active
when the vehicle is driving.
Vehicle personalisation 3 122.
Memorised settings 3 23.
Selecting menus and functions
The menus and functions can be
selected via the buttons on the turn signal lever.
Press MENU to switch between the
main menus or to return from a
submenu to the next higher menu
level.
Turn the adjuster wheel to select a
subpage of the main menu or to set a
numeric value.
Press the SET/CLR button to select
and confirm a function.
Vehicle and service messages are
popped up in the DIC if required.
Confirm messages by pressing the SET/CLR button. Vehicle messages
3 120.
Midlevel and Uplevel display Menu pages are indicated by
pressing p on the steering wheel.
Press Q or P to select a menu,
press 9 to confirm. Selectable menu
pages are:
■ Info Menu
■ Performance Menu
■ Audio Menu
Page 122 of 331
120Instruments and controls
For further information, see
Infotainment system manual.
Vehicle personalisation 3 122.
Valet mode
Some functions of the Driver
Information Centre and the Colour-
Info-Display can be limited for some
drivers.
Activation or deactivation of valet
mode can be set in the menu
Settings in the vehicle personalisation
menu.
Vehicle personalisation 3 122.
For more information see
Infotainment system manual.
Smartphone controller
The smartphone controller allows a
smartphone to access vehicle data
via WLAN or Bluetooth connection.
This data can then be displayed and analysed on the smartphone.Vehicle messages
Messages are indicated in the Driver
Information Centre (DIC), in some
cases together with a warning and
signal buzzer.
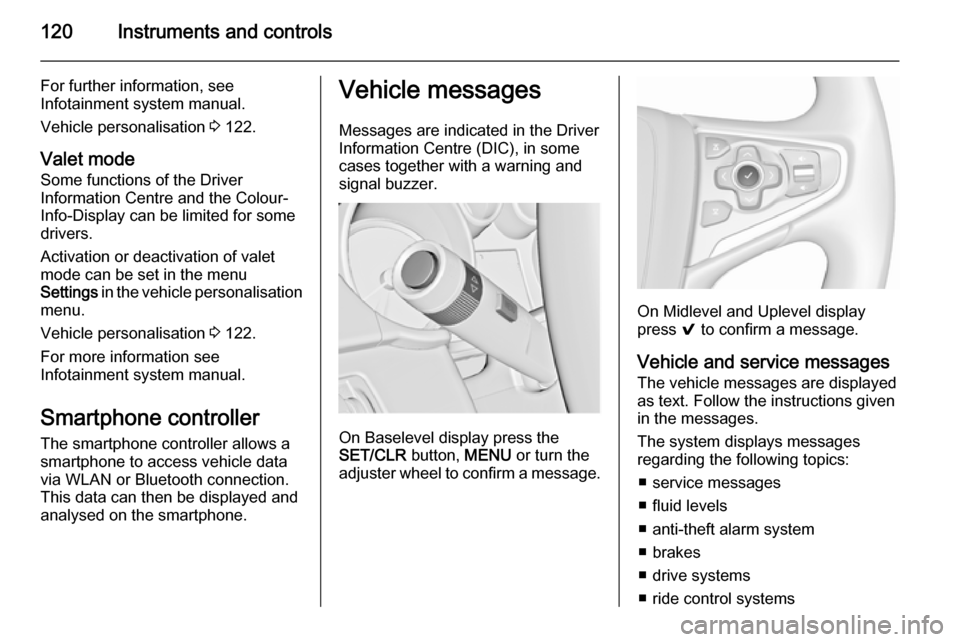
On Baselevel display press the
SET/CLR button, MENU or turn the
adjuster wheel to confirm a message.
On Midlevel and Uplevel display
press 9 to confirm a message.
Vehicle and service messages
The vehicle messages are displayed
as text. Follow the instructions given
in the messages.
The system displays messages
regarding the following topics:
■ service messages
■ fluid levels
■ anti-theft alarm system
■ brakes
■ drive systems
■ ride control systems
Page 132 of 331
130Lighting
Playstreet lightingActivated automatically at low speed
up to approx. 20 mph. The light beam
is turned at an angle of 8° to the
roadside.
Town lighting
Activated automatically at a speed
range between approx. 25 and
34 mph and when street lights are
detected by the light sensor. The light
range is reduced by an extended light
distribution.
Country lighting
Activated automatically at a speed
range between approx. 34 and
70 mph. The beam of light and the
brightness is different between the left and the right side.
Motorway lighting
Activated automatically at a speed
above approx. 70 mph and minimal
steering movements. It switches on
after a delay or immediately when the vehicle is powerfully accelerated. The
light beam is longer and brighter.Adverse weather lighting
Activated automatically up to a speed of approx. 43 mph, when the rain
sensor recognizes condensation or
the wiper operates continuously. The
range, distribution and light intensity
is regulated variably depending on visibility.
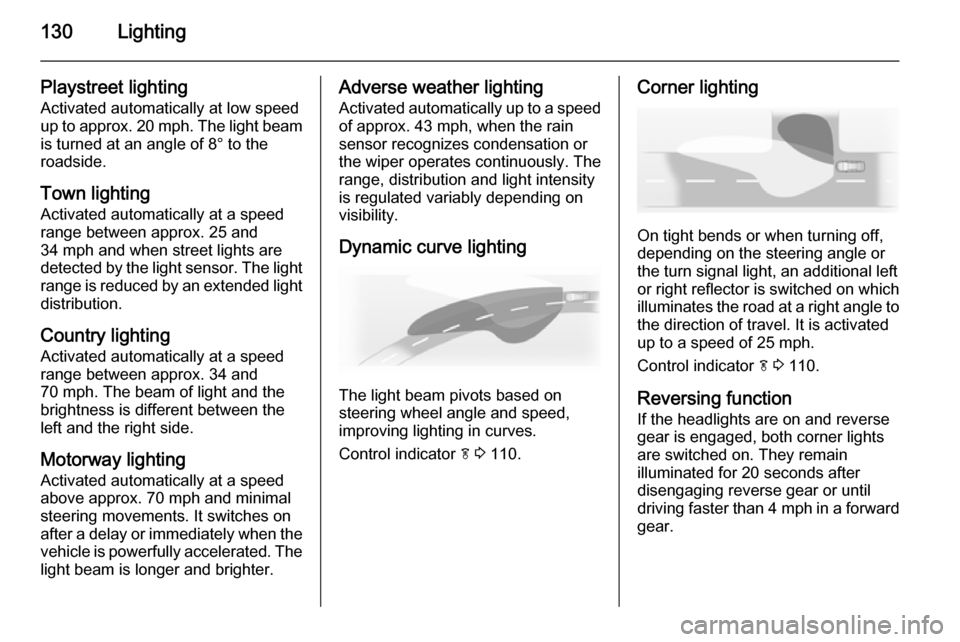
Dynamic curve lighting
The light beam pivots based on
steering wheel angle and speed,
improving lighting in curves.
Control indicator f 3 110.
Corner lighting
On tight bends or when turning off,
depending on the steering angle or
the turn signal light, an additional left
or right reflector is switched on which illuminates the road at a right angle to
the direction of travel. It is activated
up to a speed of 25 mph.
Control indicator f 3 110.
Reversing function If the headlights are on and reverse
gear is engaged, both corner lights
are switched on. They remain
illuminated for 20 seconds after disengaging reverse gear or until
driving faster than 4 mph in a forward
gear.