brake light VAUXHALL MERIVA 2015 Owner's Manual
[x] Cancel search | Manufacturer: VAUXHALL, Model Year: 2015, Model line: MERIVA, Model: VAUXHALL MERIVA 2015Pages: 245, PDF Size: 7.76 MB
Page 13 of 245

In brief11
1Power windows .....................30
2 Exterior mirrors .....................28
3 Cruise control .....................149
4 Side air vents ...................... 131
5 Turn and lane-change
signals, headlight flash,
low beam and high beam ...119
Exit lighting ......................... 122
Parking lights ...................... 120
Driver Information Centre ...... 99
6 Instruments .......................... 88
7 Steering wheel controls .......81
8 Driver Information Centre ...... 99
9 Windscreen wiper,
windscreen washer
system, rear wiper, rear
washer system .....................83
10 Centre air vents .................. 131
11 Central locking system ..........21
Hazard warning flashers ....119
Control indicator for airbag
deactivation .......................... 94
12 Info-Display ......................... 10213Sensor for electronic
climate control system .......126
14 Glovebox .............................. 61
Fuse box ............................ 188
15 Traction Control system .....148
Electronic Stability Control . 148
Ultrasonic parking assist ....151
Eco button ........................... 137
Fuel selector ......................... 90
16 Climate control system ........ 124
17 Selector lever, manual
transmission ....................... 144
Automatic transmission ......141
18 Electrical parking brake ......146
19 Ignition switch with
steering wheel lock ............135
20 Horn ..................................... 82
Driver airbag ........................ 51
21 Bonnet release lever ..........169
22 Storage compartment ...........61
23 Steering wheel adjustment ..8124 Light switch ........................ 115
Headlight range
adjustment ......................... 117
Front fog lights ...................119
Rear fog light ...................... 120
Instrument illumination .......121
Page 18 of 245
16In briefTransmission
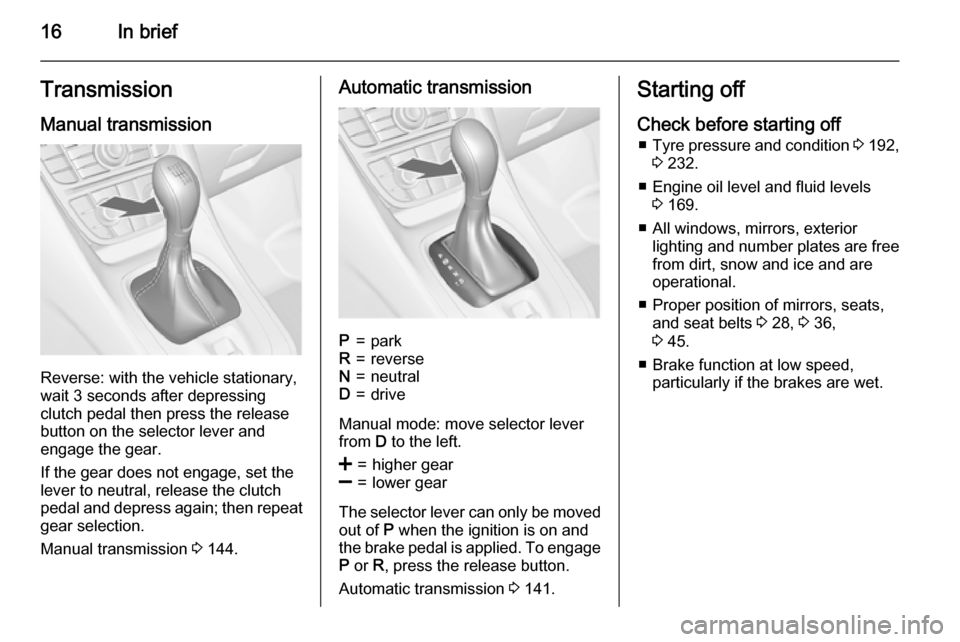
Manual transmission
Reverse: with the vehicle stationary,
wait 3 seconds after depressing
clutch pedal then press the release button on the selector lever and
engage the gear.
If the gear does not engage, set the
lever to neutral, release the clutch
pedal and depress again; then repeat
gear selection.
Manual transmission 3 144.
Automatic transmissionP=parkR=reverseN=neutralD=drive
Manual mode: move selector lever
from D to the left.
<=higher gear]=lower gear
The selector lever can only be moved
out of P when the ignition is on and
the brake pedal is applied. To engage
P or R, press the release button.
Automatic transmission 3 141.
Starting off
Check before starting off ■ Tyre pressure and condition 3 192,
3 232.
■ Engine oil level and fluid levels 3 169.
■ All windows, mirrors, exterior lighting and number plates are free
from dirt, snow and ice and are
operational.
■ Proper position of mirrors, seats, and seat belts 3 28, 3 36,
3 45.
■ Brake function at low speed, particularly if the brakes are wet.
Page 19 of 245
In brief17
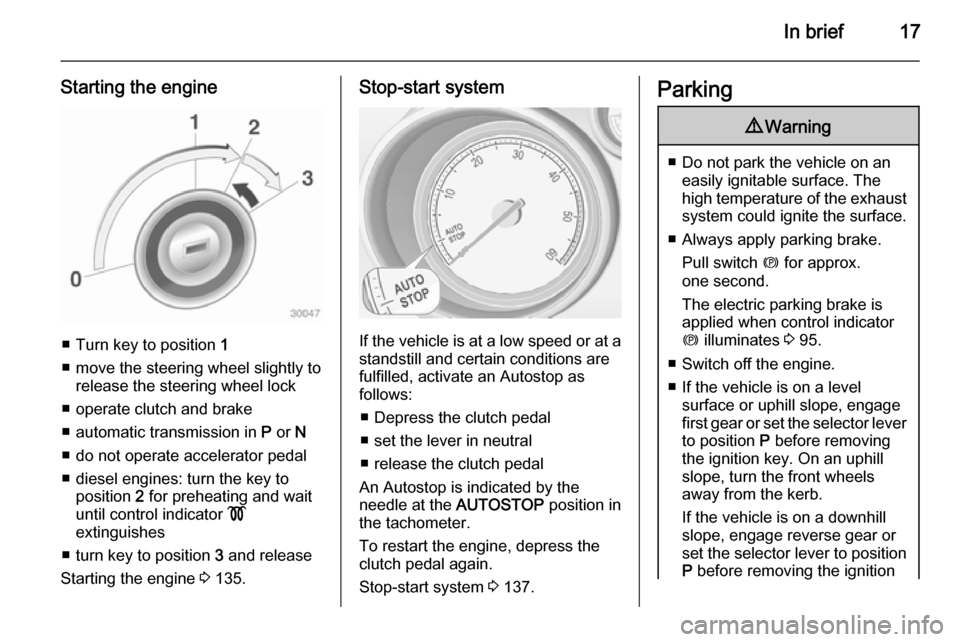
Starting the engine
■ Turn key to position 1
■ move the steering wheel slightly to release the steering wheel lock
■ operate clutch and brake
■ automatic transmission in P or N
■ do not operate accelerator pedal
■ diesel engines: turn the key to position 2 for preheating and wait
until control indicator !
extinguishes
■ turn key to position 3 and release
Starting the engine 3 135.
Stop-start system
If the vehicle is at a low speed or at a
standstill and certain conditions are
fulfilled, activate an Autostop as
follows:
■ Depress the clutch pedal
■ set the lever in neutral
■ release the clutch pedal
An Autostop is indicated by the
needle at the AUTOSTOP position in
the tachometer.
To restart the engine, depress the
clutch pedal again.
Stop-start system 3 137.
Parking9 Warning
■ Do not park the vehicle on an
easily ignitable surface. The
high temperature of the exhaust system could ignite the surface.
■ Always apply parking brake. Pull switch m for approx.
one second.
The electric parking brake is
applied when control indicator
m illuminates 3 95.
■ Switch off the engine.
■ If the vehicle is on a level surface or uphill slope, engage
first gear or set the selector lever to position P before removing
the ignition key. On an uphill
slope, turn the front wheels
away from the kerb.
If the vehicle is on a downhill
slope, engage reverse gear or
set the selector lever to position
P before removing the ignition
Page 96 of 245

94Instruments and controls9Warning
Have the cause of the fault
remedied immediately by a
workshop.
Belt pretensioners, airbag system
3 44, 3 48.
Airbag deactivation
V illuminates yellow.
Illuminates for approx. 60 seconds
after the ignition is switched on. The
front passenger airbag is activated.
* illuminates yellow.
The front passenger airbag is
deactivated 3 53.
9 Danger
Risk of fatal injury for a child using
a child restraint system together
with activated front passenger
airbag.
Risk of fatal injury for an adult
person with deactivated front
passenger airbag.
Charging system
p illuminates red.
Illuminates when the ignition is
switched on and extinguishes shortly
after the engine starts.
Illuminates when the engine is
running
Stop, switch off engine. Vehicle
battery is not charging. Engine
cooling may be interrupted. The
brake servo unit may cease to be
effective. Seek the assistance of a
workshop.
Malfunction indicator light
Z illuminates or flashes yellow.
Illuminates when the ignition is
switched on and extinguishes shortly
after the engine starts.
Illuminates when the engine is
running
Fault in the emission control system. The permitted emission limits may be
exceeded. Seek the assistance of a
workshop immediately.
Flashes when the engine isrunning
Fault that could lead to catalytic
converter damage. Ease up on the
accelerator until the flashing stops.
Seek the assistance of a workshop
immediately.
Service vehicle soon g illuminates yellow.
Additionally a warning message or a
warning code is displayed.
The vehicle needs a service.
Seek the assistance of a workshop.
Vehicle messages 3 104.
Page 107 of 245

Instruments and controls105
No.Vehicle message6Depress brake pedal to release
electrical parking brake7Turn steering wheel, switch
ignition off and then on9Turn steering wheel, start
engine again12Vehicle overloaded13Compressor overheated15Centre high-mounted brake
light failure16Brake light failure17Headlight levelling malfunction18Left low beam failure19Rear fog light failure20Right low beam failure21Left sidelight failure22Right sidelight failure23Reversing light failureNo.Vehicle message24Number plate light failure25Left front turn signal failure26Left rear turn signal failure27Right front turn signal failure28Right rear turn signal failure29Check trailer brake light30Check trailer reversing light31Check left trailer turn signal32Check right trailer turn signal33Check trailer rear fog light34Check trailer rear light35Replace battery in radio remote
control48Clean side blind zone alert
system53Tighten gas cap54Water in diesel fuel filterNo.Vehicle message55Diesel particle filter is full
3 14056Tyre pressure imbalance on
front axle57Tyre pressure imbalance on
rear axle58Tyres without TPMS sensors
detected59Open and then close driver
window60Open and then close front
passenger window61Open and then close rear left
window62Open and then close rear right
window65Theft attempted66Service theft alarm system67Service steering wheel lock68Service power steering
Page 108 of 245
106Instruments and controls
No.Vehicle message69Service suspension system70Service level control system71Service rear axle74Service AFL75Service air conditioning76Service side blind zone alert
system79Top up engine oil81Service transmission82Change engine oil soon83Service adaptive cruise control84Engine power is reduced89Service vehicle soon94Shift to park before exiting95Service airbag128Bonnet open134Park assist fault, clean bumperNo.Vehicle message136Service parking assist174Low vehicle battery258Park assist off
Vehicle messages on the
Uplevel-Display or Uplevel-Combi-Display
The vehicle messages are displayed
as text. Follow the instructions given
in the messages.
The system displays messages
regarding the following topics:
■ Fluid levels
■ Anti-theft alarm system
■ Brakes
■ Drive systems
■ Ride control systems
■ Cruise control
■ Object detection systems
■ Lighting, bulb replacement
■ Wiper/washer system
■ Doors, windows
■ Radio remote control
■ Seat belts
■ Airbag systems
■ Engine and transmission
■ Tyre pressure
■ Diesel particle filter
Page 109 of 245

Instruments and controls107
Vehicle messages on the
Colour-Info-Display Some important messages appear
additionally in the
Colour-Info-Display. Press the
multifunction knob to confirm a
message. Some messages only pop- up for a few seconds.
Warning chimes Only one warning chime will sound at
a time.
The warning chime regarding
unfastened seat belts has priority
over any other warning chime.
When starting the engine or
whilst driving ■ If seat belt is not fastened.
■ If a door or the tailgate is not fully closed when starting-off.
■ If a certain speed is exceeded with parking brake applied.
■ If a programmed speed is exceeded.■ If a warning message or a warningcode appears in the Driver
Information Centre.
■ If the parking assist detects an object.
■ If reverse gear is engaged and the rear end carrier is extended.
■ If a fault in the automatic locking system is detected.
■ If the diesel particle filter has reached the maximum filling level.
When the vehicle is parked and/ or the driver's door is opened ■ When the key is in the ignition switch.
■ With exterior lights on.
During an Autostop ■ If the driver's door is opened.
Battery voltage
When the vehicle battery voltage is
running low, a warning message or
warning code 174 will appear in the
Driver Information Centre.1. Switch off immediately any electrical consumers which are
not required for a safe ride, e.g.
seat heating, heated rear window
or other main consumers.
2. Charge the vehicle battery by driving continuously for a while or
by using a charging device.
The warning message or warning
code will disappear after the engine
has been started twice consecutively
without a voltage drop.
If the vehicle battery cannot be
recharged, have the cause of the fault
remedied by a workshop.
Page 139 of 245
Driving and operating137Stop-start system
The stop-start system helps to save
fuel and to reduce the exhaust
emissions. When conditions allow, it
switches off the engine as soon as the vehicle is at a low speed or at a
standstill, e.g. at a traffic light or in a
traffic jam. It starts the engine
automatically as soon as the clutch is
depressed. A vehicle battery sensor
ensures that an Autostop is only performed if the vehicle battery is
sufficiently charged for a restart.
Activation
The stop-start system is available as soon as the engine is started, the
vehicle starts-off and the conditions
as stated below in this section are
fulfilled.Deactivation
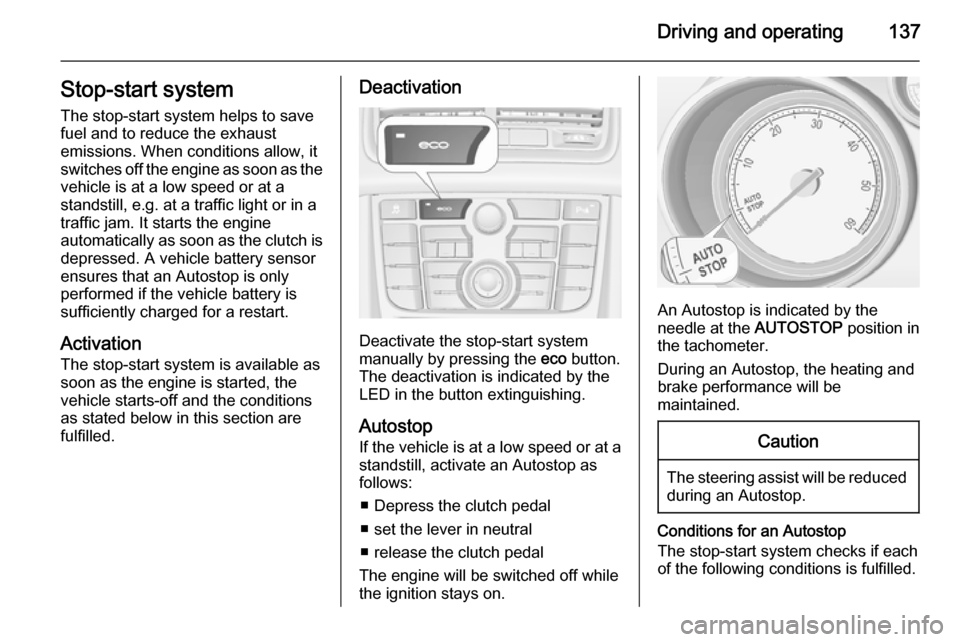
Deactivate the stop-start system
manually by pressing the eco button.
The deactivation is indicated by the
LED in the button extinguishing.
Autostop
If the vehicle is at a low speed or at a standstill, activate an Autostop as
follows:
■ Depress the clutch pedal
■ set the lever in neutral
■ release the clutch pedal
The engine will be switched off while
the ignition stays on.
An Autostop is indicated by the
needle at the AUTOSTOP position in
the tachometer.
During an Autostop, the heating and
brake performance will be
maintained.
Caution
The steering assist will be reduced during an Autostop.
Conditions for an Autostop
The stop-start system checks if each
of the following conditions is fulfilled.
Page 147 of 245
Driving and operating145Caution
It is not advisable to drive with thehand resting on the selector lever.
Brakes
The brake system comprises two independent brake circuits.
If a brake circuit fails, the vehicle can
still be braked using the other brake
circuit. However, braking effect is
achieved only when the brake pedal
is depressed firmly. Considerably
more force is needed for this. The
braking distance is extended. Seek the assistance of a workshop before
continuing your journey.
When the engine is not running, the
support of the brake servo unit
disappears once the brake pedal has been depressed once or twice.
Braking effect is not reduced, but
braking requires significantly greater
force. It is especially important to bear
this in mind when being towed.
Control indicator R 3 95.
Antilock brake system
Antilock brake system (ABS)
prevents the wheels from locking.ABS starts to regulate brake pressure as soon as a wheel shows a tendency to lock. The vehicle remains
steerable, even during hard braking.
ABS control is made apparent
through a pulse in the brake pedal
and the noise of the regulation
process.
For optimum braking, keep the brake
pedal fully depressed throughout the
braking process, despite the fact that
the pedal is pulsating. Do not reduce
the pressure on the pedal.
After starting off, the system performs
a self-test which may be audible.
Control indicator u 3 95.
Adaptive brake light During full braking, all three brakelights flash for the duration of ABS
control.
Page 164 of 245
162Driving and operatingTrailer hitch
General information
Only use towing equipment that has
been approved for your vehicle.
Entrust retrofitting of towing
equipment to a workshop. It may be
necessary to make changes that
affect the cooling system, heat
shields or other equipment.
Fitting of towing equipment could
cover the opening of the towing eye.
If this is the case use the coupling ball
bar for towing. Always keep the
coupling ball bar in the vehicle.
Driving characteristics and
towing tips
Before attaching a trailer, lubricate
the coupling ball. However, do not do
so if a stabiliser, which acts on the coupling ball, is being used to reduce snaking movements.
For trailers with low driving stability
and caravan trailers with a permitted
gross vehicle weight of more than1100 kg the use of a stabiliser is
strongly recommended when driving
above 50 mph.
If the trailer starts snaking, drive more slowly, do not attempt to correct the
steering and brake sharply if
necessary.
When driving downhill, drive in the
same gear as if driving uphill and
drive at a similar speed.
Adjust tyre pressure to the value
specified for full load 3 232.
Trailer towing Trailer loads9 Warning
Vehicles with engine A13DTE:
Use of towing equipment is
permissible for attaching
compatible bicycle carriers only.
Do not use towing equipment for
trailer towing.
The permissible trailer loads are
vehicle and engine-dependent
maximum values which must not be
exceeded. The actual trailer load is
the difference between the actual
gross weight of the trailer and the
actual coupling socket load with the
trailer coupled.
The permissible trailer loads are
specified in the vehicle documents. In general, they are valid for gradients
up to max. 12 %.
The permitted trailer load applies up to the specified incline and up to an
altitude of 1000 metres above sea
level. Since engine power decreases
as altitude increases due to the air becoming thinner, therefore reducing
climbing ability, the permissible gross
train weight also decreases by 10 %
for every 1000 metres of additional
altitude. The gross train weight does
not have to be reduced when driving
on roads with slight inclines (less than
8 %, e.g. motorways).