fuel VAUXHALL MOKKA 2014.5 Owner's Guide
[x] Cancel search | Manufacturer: VAUXHALL, Model Year: 2014.5, Model line: MOKKA, Model: VAUXHALL MOKKA 2014.5Pages: 219, PDF Size: 6 MB
Page 126 of 219

124Driving and operating
% illuminates when diesel particle
filter is full. Start cleaning process as
soon as possible.
% flashes when diesel particle filter
has reached the maximum filling
level. Start cleaning process
immediately to avoid damage to the
engine.
Cleaning process
To activate cleaning process,
continue driving, keep engine speed
above 2000 revolutions per minute.
Shift down if necessary. Diesel
particle filter cleaning is then started.
If control indicator g also
illuminates, cleaning is not possible:
seek the assistance of a workshop.Caution
If the cleaning process is
interrupted, there is a risk of
provoking severe engine damage.
Cleaning takes place quickest at high engine speeds and loads.
The control indicator % extinguishes
as soon as the self-cleaning
operation is complete.
Catalytic converter
The catalytic converter reduces the
amount of harmful substances in the
exhaust gases.Caution
Fuel grades other than those listed on pages 3 145, 3 202 could
damage the catalytic converter or
electronic components.
Unburnt petrol will overheat and
damage the catalytic converter.
Therefore avoid excessive use of the starter, running the fuel tank
dry and starting the engine by
pushing or towing.
In the event of misfiring, uneven
engine running, a reduction in engine performance or other unusual
problems, have the cause of the fault
rectified by a workshop as soon as
possible. In an emergency, driving
can be continued for a short period,
keeping vehicle speed and engine
speed low.
Page 147 of 219

Driving and operating145
When the system recognises an
unintended lane change, the control indicator ) changes to yellow and
flashes. Simultaneously a chime
sound is activated.
Deactivation
The system is deactivated by
pressing ) button, the LED in the
button extinguishes.
At speeds below 35 mph the system
is inoperable.
Fault
The lane departure warning system
may not operate properly when:
■ the windscreen is not clean
■ there are adverse environmental conditions like heavy rain, snow,
direct sunlight or shadows
The system can not operate when no
lane marking is detected.Fuel
Fuel for petrol enginesOnly use unleaded fuel that complies
with European standard EN 228 or
E DIN 51626-1 or equivalent.
Your engine is capable to run with
E10 fuel that fulfills these standards.
E10 fuel contains up to 10 %
bioethanol.
Use fuel with the recommended
octane rating 3 202. Use of fuel with
too low an octane rating can reduce
engine power and torque and slightly increases fuel consumption.Caution
Do not use fuel or fuel additives
that contain metallic compounds
such as manganese-based
additives. This may cause engine
damage.
Page 148 of 219

146Driving and operatingCaution
Use of fuel that does not comply toEN 228 or E DIN 51626-1 or
equivalent can lead to deposits or
engine damage and may affect
your warranty.
Caution
Use of fuel with too low an octane
rating could lead to uncontrolled combustion and engine damage.
Fuel for diesel engines
Only use diesel fuel that complies
with EN 590.
In countries outside the European
Union use Euro-Diesel fuel with a
sulphur concentration below 50 ppm.
Caution
Use of fuel that does not comply to EN 590 or similar can lead to
engine powerloss, increased wear
or engine damage and loss of
warranty.
Do not use marine diesel oils, heating
oils, Aquazole and similar diesel-
water emulsions. Diesel fuels must
not be diluted with fuels for petrol
engines.
Fuel for liquid gas
operation
Liquid gas is known as LPG
(Liquefied Petroleum Gas) or under
its French name GPL (Gaz de Pétrole Liquéfié). LPG is also known as
Autogas.
LPG consists mainly of propane and
butane. The octane rating is between
105 and 115, depending on the
butane proportion. LPG is stored
liquid at around 5 - 10 bar pressure.
The boiling point depends on the
pressure and mixing ratio. At ambient pressure, it is between -42 °C (pure
propane) and -0.5 °C (pure butane).Caution
The system works at an ambient
temperature of approx. -8 °C to
100 °C.
Full function of the LPG system can
only be guaranteed with liquid gas
which complies with the minimum
requirements of DIN EN 589.
Fuel selector
Page 149 of 219

Driving and operating147
Pressing the LPG button switches
between petrol and liquid gas
operation as soon as the required
parameters (coolant temperature,
gas temperature and minimum
engine speed) have been reached.
The requirements are usually fulfilled
after approx. 60 seconds (depending
on exterior temperature) and the first
firm press on the accelerator. The
LED status shows the current
operating mode.LED off=petrol operationLED illu‐
minates=liquid gas operationLED
flashes=no switching is
possible, one type of
fuel is empty
As soon as the liquid gas tanks are empty, petrol operation is
automatically engaged until the
ignition is switched off.
Every six months, run the petrol tank down until control indicator i
illuminates, then refuel. This helps
maintain fuel quality and system
function for petrol operation.
Fill the tank completely at regular
intervals to prevent corrosion in the
tank.
Faults and remedies
If gas mode is not possible, check the following:
■ Is there enough liquid gas present?
■ Is there enough petrol present for starting?
Due to extreme temperatures in
combination with the gas
composition, it may take slightly
longer before the system switches
from petrol to gas mode.
In extreme situations, the system may
also switch back to petrol mode if the
minimum requirements are not
fulfilled.
Seek the assistance of a workshop in the event of all other faults.Caution
Repairs and adjustments may onlybe made by trained specialists in
order to maintain the safety and
warranty on the LPG system.
Liquid gas is given a particular odour
(odorised) so that any leaks can be
detected easily.
9 Warning
If you smell gas in the vehicle or in
the immediate vicinity, switch to petrol mode immediately. No
smoking. No naked flames or
ignition sources.
If the gas odour persists, do not start
the engine. Have the cause of the
fault remedied by a workshop.
When using underground car parks,
follow the instructions of the operator
and local laws.
Notice
In the event of an accident, switch off
the ignition and lights.
Page 150 of 219

148Driving and operatingRefuelling9Danger
Before refuelling, switch off engine
and any external heaters with
combustion chambers. Switch off
any mobile phones.
Follow the operating and safety
instructions of the filling station
when refuelling.
9 Danger
Fuel is flammable and explosive.
No smoking. No naked flames or
sparks.
If you can smell fuel in your
vehicle, have the cause of this
remedied immediately by a
workshop.
Caution
In case of misfuelling, do not
switch on ignition.
Fuel filler flap is located at right rear
side of vehicle.
The fuel filler flap can only be opened
if the vehicle is unlocked. Push flap
and open.
Page 151 of 219

Driving and operating149
Turn the fuel filler cap slowly
anticlockwise to open.
The fuel filler cap can be retained in
the bracket on the fuel filler flap.
For refuelling, fully insert the pump
nozzle and switch it on.
After automatic cut-off, it can be
topped up with max. two doses of fuel.Caution
Wipe off any overflowing fuel
immediately.
To close, turn the fuel filler cap
clockwise until it clicks.
Close the flap and let engage.
Liquid gas refuelling Follow the operating and safety
instructions of the filling station when
refuelling.
The filling valve for the liquid gas is
behind the fuel filler cap.
Unscrew protective cap from the filler
neck.
Screw the required adapter hand-
tight onto the filler neck.
ACME Adapter: Screw the nut of the
filling nozzle onto the adapter. Press
locking lever on filler nozzle down.
DISH (Italy) filler neck: Place the filler
nozzle into the adapter. Press locking lever on filler nozzle down.
Bayonet filler neck: Place filler nozzle
on the adapter and turn to the left or
right through one quarter turn. Pull
locking lever of filler nozzle fully.
EURO filler neck: Press the filler
nozzle onto the adapter until it
engages.
Page 153 of 219

Driving and operating151
DISH (Italy) adapter: Bosnia-
Herzegovina, Bulgaria, Denmark,
Estonia, France, Greece, Italy,
Croatia, Latvia, Lithuania,
Macedonia, Austria, Poland,
Portugal, Romania, Sweden,
Switzerland, Serbia, Slovakia,
Slovenia, Czech Republic, Turkey,
Ukraine, Hungary
Fuel filler cap
Only use genuine fuel filler caps. Diesel-engined vehicles have special fuel filler caps.
Fuel consumption - CO 2-
Emissions
The values for fuel consumption
(combined) of the model Vauxhall
Mokka is within a range of 37 to
63 mpg.
The values for CO 2 emission
(combined) is within a range of 158 to 120 g/km.
For the values specific to your
vehicle, refer to the EEC Certificate of Conformity provided with your vehicle
or other national registration
documents.
General information The official fuel consumption and
specific CO 2 emission figures quoted
relate to the EU base model with
standard equipment.
Fuel consumption data and CO 2
emission data are determined
according to regulation
R (EC) No. 715/2007 (in the latest
applicable version), taking intoconsideration the vehicle weight in
running order, as specified by the
regulation.
The figures are provided only for the
purpose of comparison between
different vehicle variants and must not be taken as a guarantee for the
actual fuel consumption of a
particular vehicle. Additional
equipment may result in slightly
higher results than the stated
consumption and CO 2 figures.
Furthermore, fuel consumption is
dependent on personal driving style as well as road and traffic conditions.
Page 156 of 219

154Vehicle careVehicle careGeneral Information...................154
Vehicle checks ........................... 155
Bulb replacement .......................162
Electrical system ........................168
Vehicle tools .............................. 173
Wheels and tyres .......................174
Jump starting ............................. 187
Towing ....................................... 189
Appearance care .......................191General Information
Accessories and vehicle
modifications
We recommend the use of genuine parts and accessories and factory
approved parts specific for your
vehicle type. We cannot assess or
guarantee reliability of other products
- even if they have a regulatory or
otherwise granted approval.
Do not make any modifications to the electrical system, e.g. changes of
electronic control units (chip tuning).Caution
When transporting the vehicle on
a train or on a recovery vehicle, the
mud flaps might be damaged.
Vehicle storage
Storage for a long period of time
If the vehicle is to be stored for several months:
■ Wash and wax the vehicle.
■ Have the wax in the engine compartment and underbody
checked.
■ Clean and preserve the rubber seals.
■ Fill up fuel tank completely.
■ Change the engine oil.
■ Drain the washer fluid reservoir.
■ Check the coolant antifreeze and corrosion protection.
■ Adjust tyre pressure to the value specified for full load.
■ Park the vehicle in a dry, well ventilated place. Engage first orreverse gear or set selector lever to P . Prevent the vehicle from rolling.
■ Do not apply the parking brake.
Page 163 of 219

Vehicle care161
Charging the vehicle battery9Warning
On vehicles with stop-start
system, ensure that the charging potential does not exceed
14.6 volts when using a battery
charger. Otherwise the vehicle
battery might be damaged.
Jump starting 3 187.
Warning label
Meaning of symbols: ■ No sparks, naked flames or smoking.
■ Always shield eyes. Explosive gases can cause blindness or
injury.
■ Keep the vehicle battery out of reach of children.
■ The vehicle battery contains sulphuric acid which could cause
blindness or serious burn injuries.
■ See the Owner's Manual for further
information.
■ Explosive gas may be present in the vicinity of the vehicle battery.Diesel fuel system
bleeding
If the tank has been run dry, the diesel
fuel system must be bled. Switch on
the ignition three times for
15 seconds at a time. Then crank the
engine for a maximum of
40 seconds. Repeat this process after
no less than 5 seconds. If the engine fails to start, seek the assistance of a
workshop.
Wiper blade replacement
Page 172 of 219
170Vehicle care
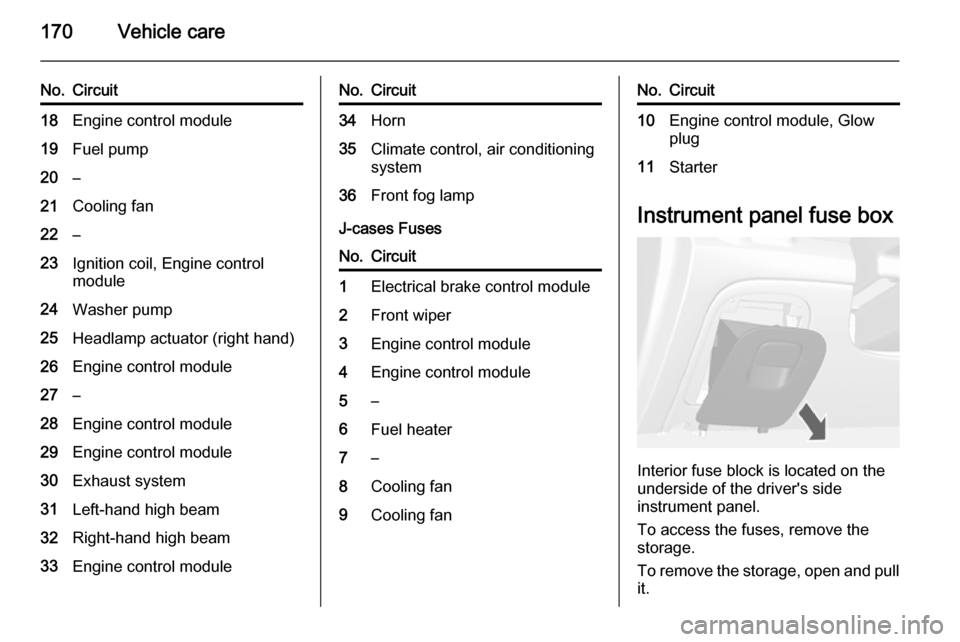
No.Circuit18Engine control module19Fuel pump20–21Cooling fan22–23Ignition coil, Engine control
module24Washer pump25Headlamp actuator (right hand)26Engine control module27–28Engine control module29Engine control module30Exhaust system31Left-hand high beam32Right-hand high beam33Engine control moduleNo.Circuit34Horn35Climate control, air conditioning
system36Front fog lamp
J-cases Fuses
No.Circuit1Electrical brake control module2Front wiper3Engine control module4Engine control module5–6Fuel heater7–8Cooling fan9Cooling fanNo.Circuit10Engine control module, Glow
plug11Starter
Instrument panel fuse box
Interior fuse block is located on the
underside of the driver's side
instrument panel.
To access the fuses, remove the
storage.
To remove the storage, open and pull it.