key VAUXHALL MOKKA 2016 Owner's Guide
[x] Cancel search | Manufacturer: VAUXHALL, Model Year: 2016, Model line: MOKKA, Model: VAUXHALL MOKKA 2016Pages: 231, PDF Size: 6.55 MB
Page 162 of 231

160Driving and operatingTowing equipmentCaution
When operating without a trailer,
remove the coupling ball bar.
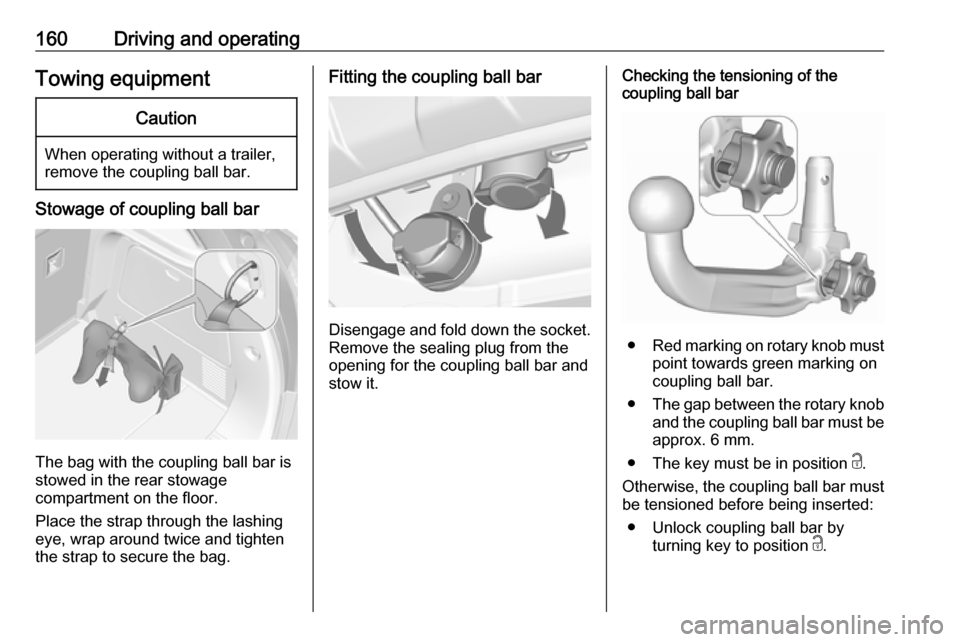
Stowage of coupling ball bar
The bag with the coupling ball bar is
stowed in the rear stowage
compartment on the floor.
Place the strap through the lashing
eye, wrap around twice and tighten
the strap to secure the bag.
Fitting the coupling ball bar
Disengage and fold down the socket. Remove the sealing plug from the
opening for the coupling ball bar and
stow it.
Checking the tensioning of the
coupling ball bar
● Red marking on rotary knob must
point towards green marking on
coupling ball bar.
● The gap between the rotary knob
and the coupling ball bar must be approx. 6 mm.
● The key must be in position c.
Otherwise, the coupling ball bar must be tensioned before being inserted:
● Unlock coupling ball bar by turning key to position c.
Page 163 of 231

Driving and operating161
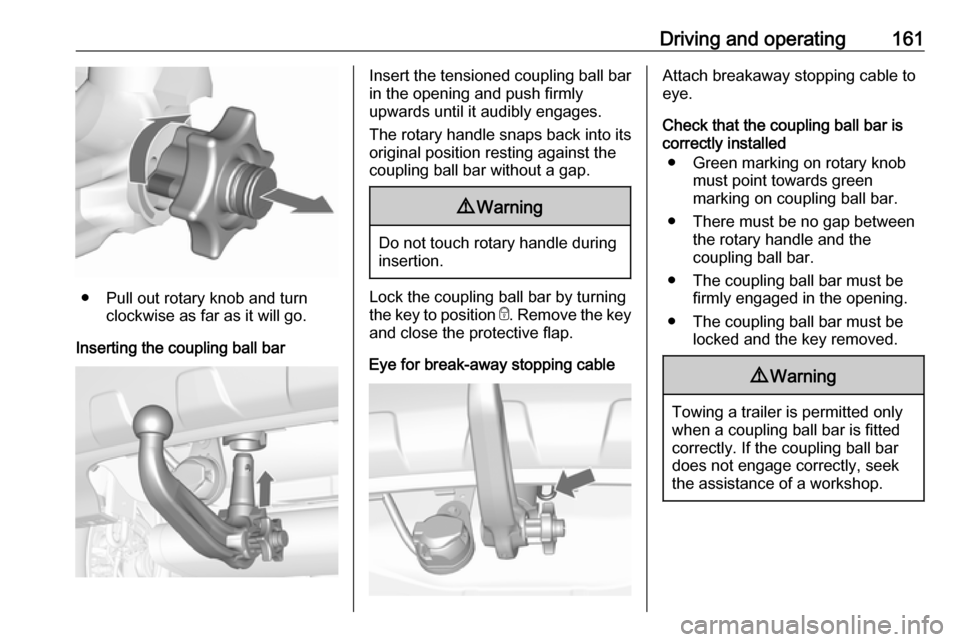
● Pull out rotary knob and turnclockwise as far as it will go.
Inserting the coupling ball bar
Insert the tensioned coupling ball bar
in the opening and push firmly
upwards until it audibly engages.
The rotary handle snaps back into its
original position resting against the
coupling ball bar without a gap.9 Warning
Do not touch rotary handle during
insertion.
Lock the coupling ball bar by turning
the key to position e. Remove the key
and close the protective flap.
Eye for break-away stopping cable
Attach breakaway stopping cable to
eye.
Check that the coupling ball bar is correctly installed
● Green marking on rotary knob must point towards green
marking on coupling ball bar.
● There must be no gap between the rotary handle and the
coupling ball bar.
● The coupling ball bar must be firmly engaged in the opening.
● The coupling ball bar must be locked and the key removed.9Warning
Towing a trailer is permitted only
when a coupling ball bar is fitted correctly. If the coupling ball bardoes not engage correctly, seekthe assistance of a workshop.
Page 164 of 231

162Driving and operatingDismounting the coupling ball bar
Open the protective flap and turn the
key to position c to unlock the
coupling ball bar.
Pull out rotary handle and turn
clockwise as far as it will go. Pull out coupling ball bar downwards.
Insert sealing plug in opening. Fold away socket.
Page 228 of 231

226Heated steering wheel .................71
Heating ........................................ 38
Heating and ventilation system . 117
High beam ........................... 87, 108
Hill start assist ........................... 137
Horn ....................................... 13, 72
I Identification plate .....................208
Ignition switch positions .............126
Immobiliser ............................ 26, 87
Indicators ...................................... 77
Information displays...................... 88
Initial drive information.................... 6
Instrument panel fuse box .........181
Instrument panel illumination control .................................... 114
Instrument panel overview ........... 10
Instrument panel storage ..............54
Interior care ............................... 204
Interior lighting ............................ 114
Interior lights ...................... 114, 178
Interior mirrors .............................. 28
Interruption of power supply ......133
Introduction .................................... 3
ISOFIX child restraint systems ....52
J
Jump starting ............................. 198K
Key, memorised settings ..............21
Keys ............................................. 19
Keys, locks ................................... 19
L
Lane departure warning .......85, 151
Lashing eyes ............................... 68
Lighting features .........................115
Light switch ................................ 107
Load compartment ................24, 65
Load compartment cover .............67
Load compartment fuse box ......182
Loading information .....................69
Low fuel ....................................... 87
M Malfunction indicator light ............84
Manual anti-dazzle ......................28
Manual mode ............................. 133
Manual transmission .................. 134
Manual windows ..........................29
Memorised settings ......................21
Mirror adjustment ........................... 8
Misted light covers .....................114
N
New vehicle running-in ..............125
Number plate light .....................178O
Object detection systems ...........144
Odometer ..................................... 77
Oil, engine .......................... 206, 210
OnStar® system .........................102
Operate pedal ............................... 84
Outside temperature ....................74
Overrun cut-off ........................... 127
P Parking ................................ 17, 129
Parking assist ............................ 144
Parking brake ............................ 136
Particulate filter ........................... 130
Performance .............................. 214
Performing work ........................165
Pollen filter ................................. 122
Power outlets ............................... 76
Power steering.............................. 85
Power steering fluid ....................168
Power windows ............................ 30
Preheating ................................... 86
Puncture ..................................... 194
R Radio Frequency Identification (RFID) ..................................... 223
Radio remote control ...................20
Reading lights ............................ 115
Rear carrier system ......................56
Rear floor storage cover ..............67