VAUXHALL VIVA 2016.5 Owner's Manual
Manufacturer: VAUXHALL, Model Year: 2016.5, Model line: VIVA, Model: VAUXHALL VIVA 2016.5Pages: 197, PDF Size: 5.27 MB
Page 121 of 197

Driving and operating119In the event of a fault in the system,
control indicator c illuminates.
Vehicle messages 3 79.Driver assistance
systems9 Warning
Driver assistance systems are
developed to support the driver
and not to replace the driver's
attention.
The driver accepts full
responsibility when driving the
vehicle.
When using driver assistance
systems, always take care
regarding the current traffic
situation.
Cruise control
The cruise control can store and
maintain speeds of approx. 15 mph to 105 mph. Deviations from the stored
speeds may occur when driving uphill or downhill.
For safety reasons, the cruise control
cannot be activated until the brake
pedal has been operated once.
Activating in first gear is not possible.
Do not use the cruise control if it is not
advisable to maintain a constant
speed.
On vehicles with manual transmission
automated, cruise control can be
activated in automatic mode and
manual mode.
Control indicator m 3 72.
Switching on
Page 122 of 197
120Driving and operatingPress m; control indicator m in
instrument cluster illuminates white.
Activation Accelerate to the desired speed and
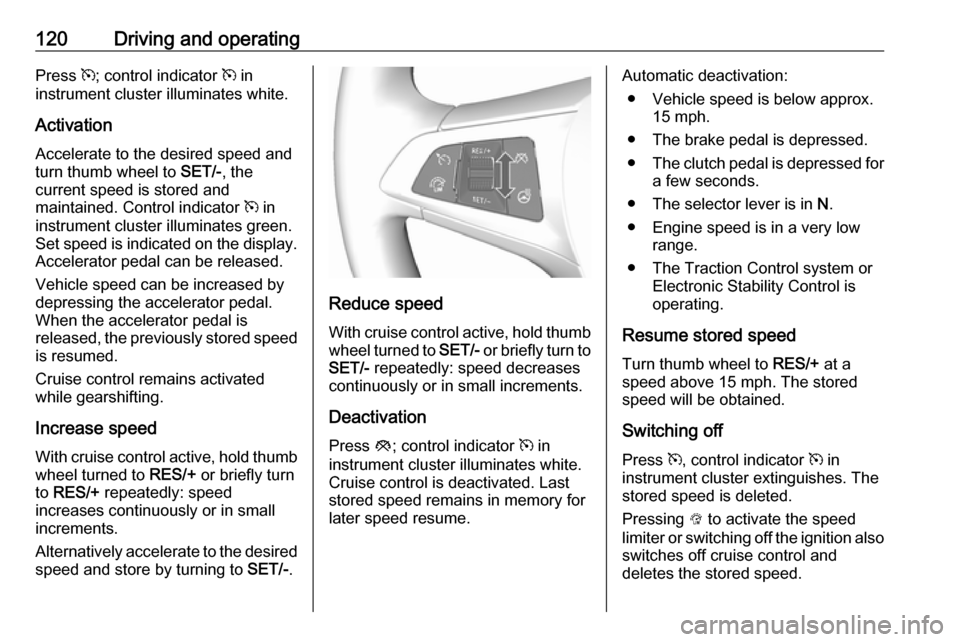
turn thumb wheel to SET/-, the
current speed is stored and
maintained. Control indicator m in
instrument cluster illuminates green. Set speed is indicated on the display.
Accelerator pedal can be released.
Vehicle speed can be increased by
depressing the accelerator pedal. When the accelerator pedal is
released, the previously stored speed is resumed.
Cruise control remains activated
while gearshifting.
Increase speed
With cruise control active, hold thumb
wheel turned to RES/+ or briefly turn
to RES/+ repeatedly: speed
increases continuously or in small
increments.
Alternatively accelerate to the desired speed and store by turning to SET/-.
Reduce speed
With cruise control active, hold thumb wheel turned to SET/- or briefly turn to
SET/- repeatedly: speed decreases
continuously or in small increments.
Deactivation Press y; control indicator m in
instrument cluster illuminates white.
Cruise control is deactivated. Last
stored speed remains in memory for
later speed resume.
Automatic deactivation:
● Vehicle speed is below approx. 15 mph.
● The brake pedal is depressed.
● The clutch pedal is depressed for
a few seconds.
● The selector lever is in N.
● Engine speed is in a very low range.
● The Traction Control system or Electronic Stability Control is
operating.
Resume stored speed
Turn thumb wheel to RES/+ at a
speed above 15 mph. The stored
speed will be obtained.
Switching off
Press m, control indicator m in
instrument cluster extinguishes. The
stored speed is deleted.
Pressing L to activate the speed
limiter or switching off the ignition also switches off cruise control and
deletes the stored speed.
Page 123 of 197

Driving and operating121Speed limiter
The speed limiter prevents exceeding
a preset maximum speed.
The maximum speed can be set at
speeds above 18 mph.
The driver can only accelerate up to
the preset speed. Deviations from the
limited speed may occur when driving downhill.
The preset speed limit is displayed in
the Driver Information Centre when
the system is active.
ActivationPress L. If cruise control has been
activated before, it is switched off when speed limiter is activated and
control indicator m extinguishes.
Set speed limit With speed limiter active, hold thumb
wheel turned to RES/+ or briefly turn
to RES/+ repeatedly until the desired
maximum speed is displayed in the
Driver Information Centre.
Alternatively, accelerate to the
desired speed and briefly turn thumb
wheel to SET/-: the current speed is
stored as maximum speed. Speed
limit is displayed in the Driver
Information Centre.Change speed limit
With speed limiter active, turn thumb
wheel to RES/+ to increase or SET/-
to decrease the desired maximum
speed.
Exceeding the speed limit
When exceeding the limited speed
without driver input, the speed will
flash in the Driver Information Centre
and a chime sounds during this
period.
In the event of an emergency, it is
possible to exceed the speed limit by
depressing the accelerator pedal
firmly nearly to the final point.
Release the accelerator pedal and
the speed limiter function is
reactivated once a speed lower than
the limit speed is obtained.
Deactivation Press y: speed limiter is deactivated
and the vehicle can be driven without speed limit.
Page 124 of 197

122Driving and operatingThe limited speed will be stored and
is indicated in brackets in the Driver
Information Centre. Additionally, a
corresponding message appears.
Resume speed limit
Turn thumb wheel to RES/+. The
stored speed limit will be obtained.
Switching off
Press L, the speed limit indication
extinguishes in the Driver Information Centre. The stored speed is deleted.
By pressing m to activate cruise
control, speed limiter is also
deactivated and the stored speed is
deleted.
By switching off the ignition, speed
limiter is also deactivated, but the
speed limit will be stored for next
speed limiter activation.Parking assist
Rear parking assist9 Warning
It is the driver who bears full
responsibility for the parking
manoeuvre.
Always check the surrounding
area while reversing and using the rear parking assist system.
The rear parking assist makes
parking easier by measuring the
distance between the vehicle and
rear obstacles. It informs and warns
the driver by giving acoustic signals
and display indication.
The system has three ultrasonic
parking sensors in the rear bumper.
Activation
When reverse gear is engaged, the
system is ready to operate
automatically.
Indication
The system warns the driver with
acoustic signals against potentially
hazardous obstacles behind the
vehicle. The interval between the
sounds becomes shorter as the
vehicle gets closer to that obstacle.
When the distance is less than
approx. 40 cm, the sound is
continuous.
Deactivation
The system automatically switches
off when reverse gear is disengaged.
The system might not detect the
obstacle when the vehicle is driven above a 10 km/h.
Page 125 of 197

Driving and operating123Fault
In the event of a fault in the system,
control indicator r illuminates in the
instrument cluster 3 70.
Additionally if the system does not
work due to temporary conditions like
snow covered sensors, r
illuminates.
Basic notes on parking assist
systems9 Warning
Under certain circumstances,
various reflective surfaces on
objects or clothing as well as
external noise sources may cause the system to fail to detect
obstacles.
Special attention must be paid to
low obstacles which can damage
the lower part of the bumper.
Caution
Performance of the system can be reduced when sensors are
covered, e.g. by ice or snow.
Performance of the parking assist
system can be reduced due to
heavy loading.
Special conditions apply if there
are taller vehicles in the vicinity
(e.g. off-road vehicles, mini vans,
vans). Object identification and correct distance indication in the
upper part of these vehicles
cannot be guaranteed.
Objects with a very small reflection
cross-section, e.g. objects of
narrow size or soft materials, may
not be detected by the system.
Parking assist systems do not
detect objects outside the
detection range.
Lane departure warning
The lane departure warning system
observes the lane markings between
which the vehicle is driving via a front camera. The system detects lane
changes and warns the driver in the
event of an unintended lane change
via visual and acoustic signals.
Criteria for the detection of an
unintended lane change are:
● No operation of turn signals.
● No brake pedal operation.
● No active accelerator operation or speeding-up.
● No active steering.
If the driver is performing these
actions, no warning will be issued.
Activation
Page 126 of 197
124Driving and operatingThe lane departure warning system isactivated by pressing ). The
illuminated LED in the button
indicates that the system is switched
on. When control indicator ) in the
instrument cluster illuminates green, the system is ready to operate.
The system is only operable at
vehicle speeds above 35 mph and if lane markings are available.
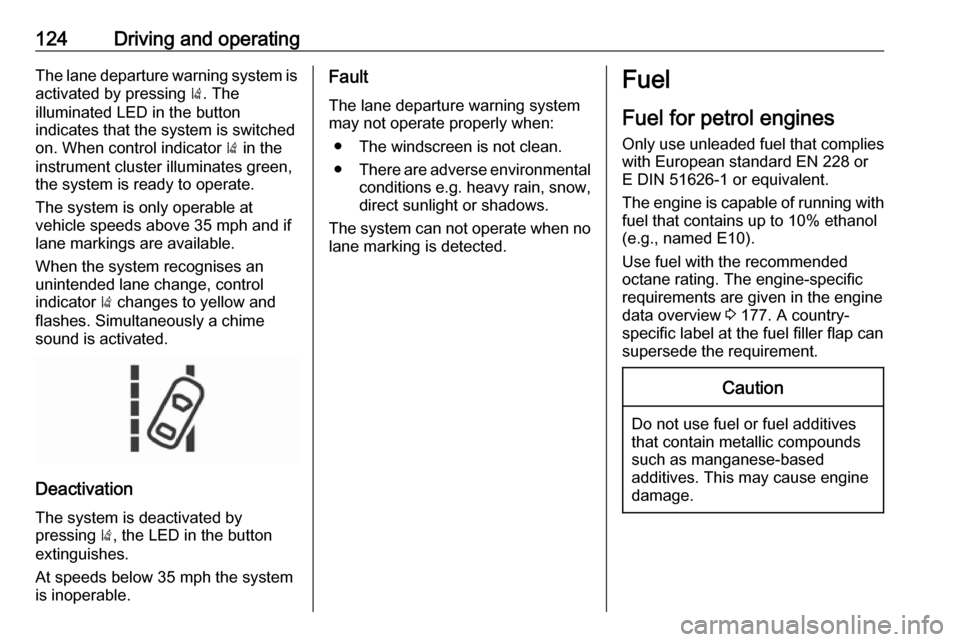
When the system recognises an
unintended lane change, control
indicator ) changes to yellow and
flashes. Simultaneously a chime
sound is activated.
Deactivation
The system is deactivated by
pressing ), the LED in the button
extinguishes.
At speeds below 35 mph the system
is inoperable.
Fault
The lane departure warning system may not operate properly when:
● The windscreen is not clean.
● There are adverse environmental
conditions e.g. heavy rain, snow,
direct sunlight or shadows.
The system can not operate when no lane marking is detected.Fuel
Fuel for petrol engines
Only use unleaded fuel that complies
with European standard EN 228 or
E DIN 51626-1 or equivalent.
The engine is capable of running with fuel that contains up to 10% ethanol
(e.g., named E10).
Use fuel with the recommended
octane rating. The engine-specific
requirements are given in the engine data overview 3 177. A country-
specific label at the fuel filler flap can
supersede the requirement.Caution
Do not use fuel or fuel additives
that contain metallic compounds
such as manganese-based
additives. This may cause engine
damage.
Page 127 of 197
Driving and operating125Caution
Use of fuel that does not comply toEN 228 or E DIN 51626-1 or
equivalent can lead to deposits or
engine damage.
Caution
Use of fuel with too low an octane
rating could lead to uncontrolled combustion and engine damage.
Fuel for liquid gas operation
Liquid gas is known as LPG
(Liquefied Petroleum Gas) or under its French name GPL (Gaz de Pétrole Liquéfié). LPG is also known as
Autogas.
LPG consists mainly of propane and
butane. The octane rating is between
105 and 115, depending on the
butane proportion. LPG is stored
liquid at around five to ten bar
pressure.
The boiling point depends on the
pressure and mixing ratio. At ambient pressure, it is between -42 °C (pure
propane) and -0.5 °C (pure butane).Caution
The system works at an ambient
temperature of approx. -8 °C to
100 °C.
Full function of the LPG system can
only be guaranteed with liquid gas
which complies with the minimum
requirements of DIN EN 589.
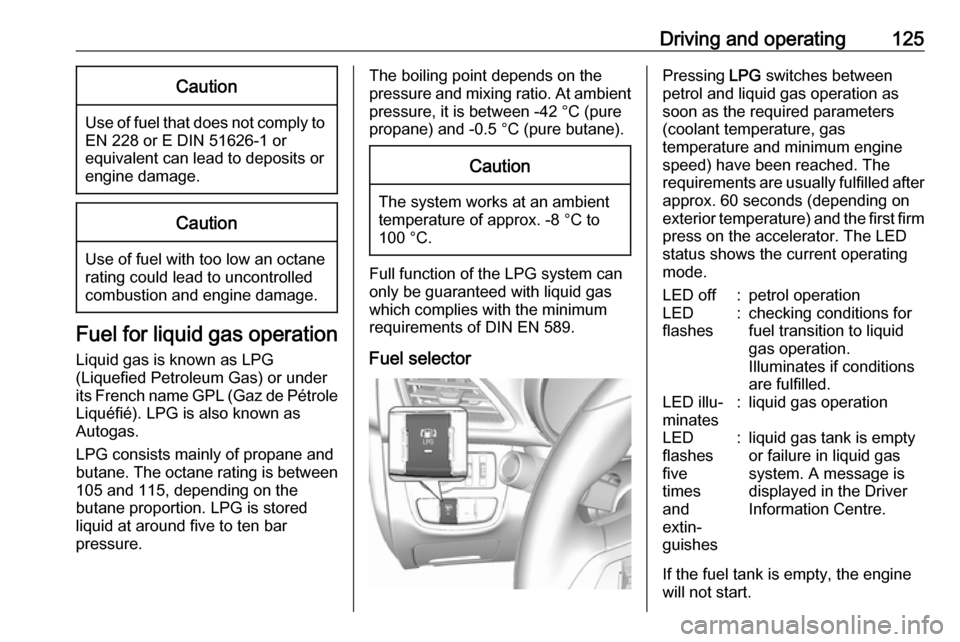
Fuel selector
Pressing LPG switches between
petrol and liquid gas operation as
soon as the required parameters (coolant temperature, gas
temperature and minimum engine
speed) have been reached. The
requirements are usually fulfilled after
approx. 60 seconds (depending on
exterior temperature) and the first firm press on the accelerator. The LED
status shows the current operating
mode.LED off:petrol operationLED
flashes:checking conditions for
fuel transition to liquid
gas operation.
Illuminates if conditions
are fulfilled.LED illu‐
minates:liquid gas operationLED
flashes
five
times
and
extin‐
guishes:liquid gas tank is empty
or failure in liquid gas
system. A message is
displayed in the Driver
Information Centre.
If the fuel tank is empty, the engine
will not start.
Page 128 of 197

126Driving and operatingThe selected fuel mode is stored andreactivated at the next ignition cycle if
conditions allow.
As soon as the liquid gas tanks are
empty, petrol operation is
automatically engaged until the
ignition is switched off.
When switching automatically
between petrol or gas operation, a
brief delay of engine tractive power
may be noticeable.
Every six months, run the petrol tank
down until control indicator Y
illuminates, then refuel. This helps
maintain fuel quality and system
function for petrol operation.
Fill the tank completely at regular
intervals to prevent corrosion in the
tank.
Faults and remedies
If gas mode is not possible, check the following:
● Is there enough liquid gas present?
● Is there enough petrol present for
starting?Due to extreme temperatures in
combination with the gas
composition, it may take slightly
longer before the system switches
from petrol to gas mode.
In extreme situations, the system may
also switch back to petrol mode if the
minimum requirements are not
fulfilled. If conditions allow, it might be
possible to manually switch back to
liquid gas operation.
Seek the assistance of a workshop in the event of all other faults.Caution
Repairs and adjustments may onlybe made by trained specialists in
order to maintain the safety and
warranty on the LPG system.
Liquid gas is given a particular odour
(odorised) so that any leaks can be
detected easily.
9 Warning
If you smell gas in the vehicle or in
the immediate vicinity, switch to petrol mode immediately. No
smoking. No naked flames or
ignition sources.
If the gas odour persists, do not start
the engine. Have the cause of the
fault remedied by a workshop.
When using underground car parks,
follow the instructions of the operator
and local laws.
Notice
In the event of an accident, switch off
the ignition and lights.
Page 129 of 197
Driving and operating127Refuelling9Danger
Before refuelling, switch off
ignition and any external heaters
with combustion chambers.
Follow the operating and safety
instructions of the filling station
when refuelling.
9 Danger
Fuel is flammable and explosive.
No smoking. No naked flames or
sparks.
If you can smell fuel in your
vehicle, have the cause of this
remedied immediately by a
workshop.
Caution
In case of misfuelling, do not
switch on ignition.
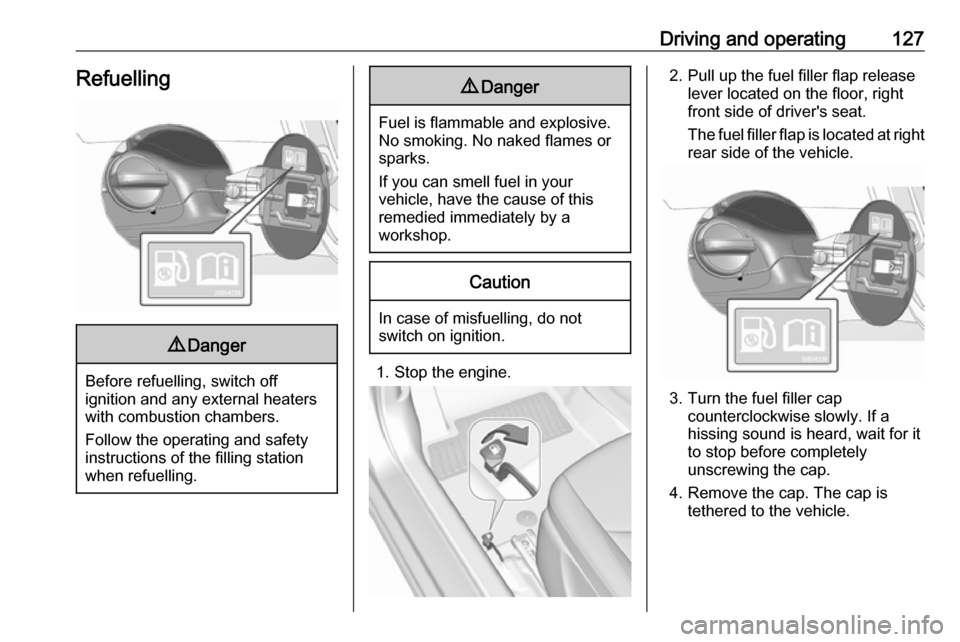
1. Stop the engine.
2. Pull up the fuel filler flap release
lever located on the floor, right
front side of driver's seat.
The fuel filler flap is located at right
rear side of the vehicle.
3. Turn the fuel filler cap counterclockwise slowly. If a
hissing sound is heard, wait for it
to stop before completely
unscrewing the cap.
4. Remove the cap. The cap is tethered to the vehicle.
Page 130 of 197
128Driving and operating5. After refuelling, replace cap. Turnit clockwise until you hear severalclicks.
6. Push the fuel filler flap closed until
it latches.
Notice
If, in cold weather, the fuel filler door
does not open, tap the door lightly.
Then try to open it again.Caution
Wipe off any overflowing fuel
immediately.
Liquid gas refuelling
Follow the operating and safety
instructions of the filling station when
refuelling.
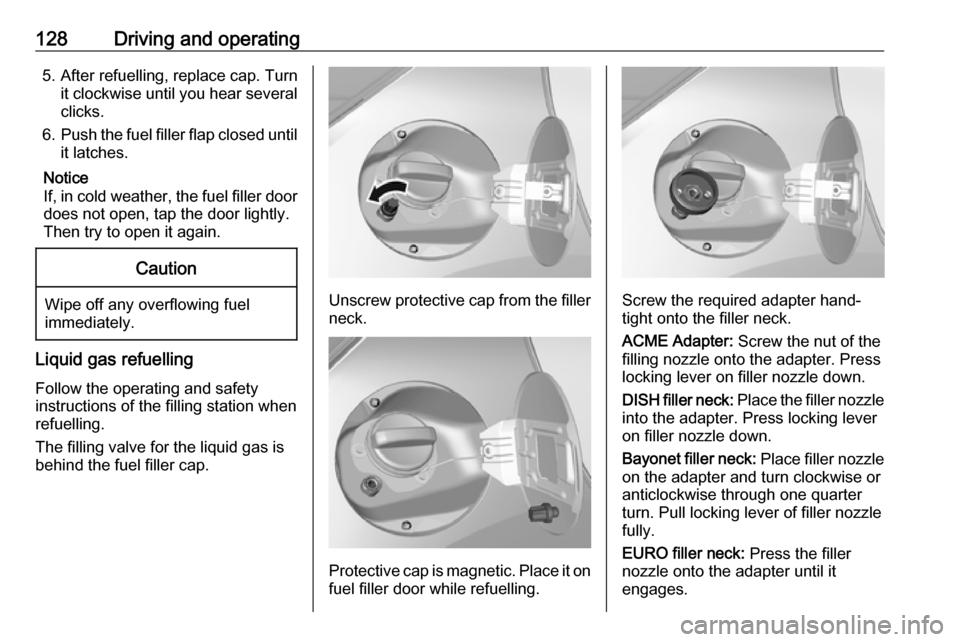
The filling valve for the liquid gas is
behind the fuel filler cap.
Unscrew protective cap from the filler neck.
Protective cap is magnetic. Place it on
fuel filler door while refuelling.
Screw the required adapter hand-
tight onto the filler neck.
ACME Adapter: Screw the nut of the
filling nozzle onto the adapter. Press
locking lever on filler nozzle down.
DISH filler neck: Place the filler nozzle
into the adapter. Press locking lever
on filler nozzle down.
Bayonet filler neck: Place filler nozzle
on the adapter and turn clockwise or anticlockwise through one quarter
turn. Pull locking lever of filler nozzle
fully.
EURO filler neck: Press the filler
nozzle onto the adapter until it
engages.