ECU VAUXHALL VIVA 2016.5 Owner's Manual
[x] Cancel search | Manufacturer: VAUXHALL, Model Year: 2016.5, Model line: VIVA, Model: VAUXHALL VIVA 2016.5Pages: 197, PDF Size: 5.27 MB
Page 21 of 197

Keys, doors and windows19Keys, doors and
windowsKeys, locks ................................... 19
Keys .......................................... 19
Radio remote control .................20
Memorised settings ...................21
Central locking system ..............21
Child locks ................................. 23
Doors ........................................... 24
Load compartment ....................24
Vehicle security ............................ 25
Anti-theft alarm system ..............25
Immobiliser ................................ 25
Exterior mirrors ............................ 26
Mirrors ....................................... 26
Electric adjustment ....................26
Folding mirrors .......................... 26
Heated mirrors ........................... 26
Interior mirrors ............................. 27
Manual anti-dazzle ....................27
Windows ...................................... 27
Windscreen ............................... 27
Manual windows ........................27
Power windows ......................... 28Heated rear window ..................29
Sun visors .................................. 29
Roof ............................................. 29
Sunroof ...................................... 29Keys, locks
KeysCaution
Do not attach heavy or bulky items to the ignition key.
Replacement keys
The key number is specified in the
Car Pass or on a detachable tag.
The key number must be quoted
when ordering replacement keys, as
it is a component of the immobiliser
system.
Locks 3 166.
The code number of the adapter for
the locking wheel bolts is specified on a card. It must be quoted when
ordering a replacement adapter.
Wheel changing 3 159.
Page 27 of 197

Keys, doors and windows25Vehicle security
Anti-theft alarm system
The anti-theft alarm system is
combined with the central locking
system.
It monitors: ● doors, tailgate, bonnet
● ignition
Status LED
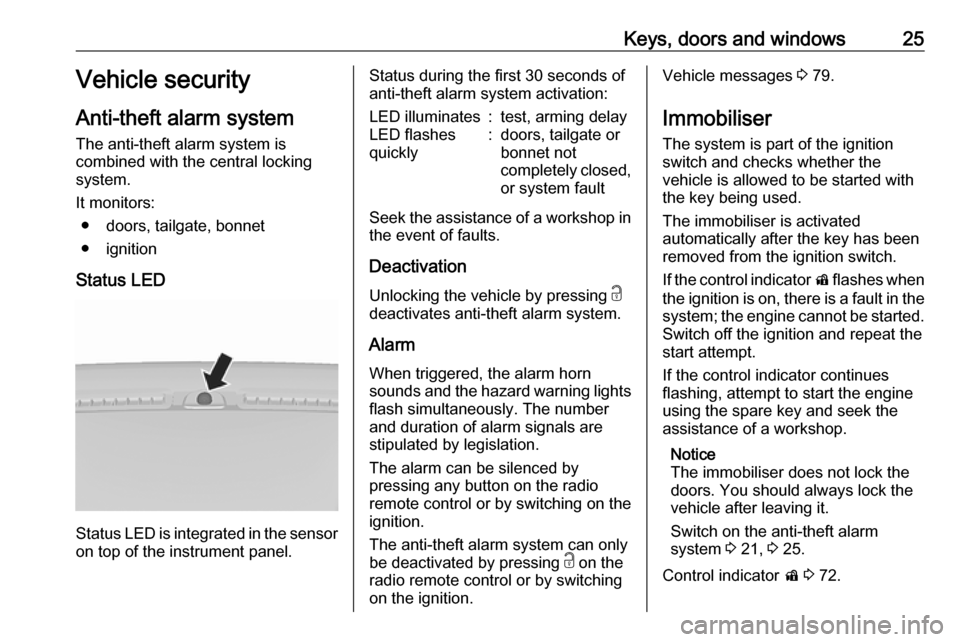
Status LED is integrated in the sensor
on top of the instrument panel.
Status during the first 30 seconds of
anti-theft alarm system activation:LED illuminates:test, arming delayLED flashes
quickly:doors, tailgate or
bonnet not
completely closed,
or system fault
Seek the assistance of a workshop in the event of faults.
Deactivation Unlocking the vehicle by pressing c
deactivates anti-theft alarm system.
Alarm When triggered, the alarm horn
sounds and the hazard warning lights flash simultaneously. The number
and duration of alarm signals are
stipulated by legislation.
The alarm can be silenced by
pressing any button on the radio
remote control or by switching on the
ignition.
The anti-theft alarm system can only
be deactivated by pressing c on the
radio remote control or by switching
on the ignition.
Vehicle messages 3 79.
Immobiliser The system is part of the ignition
switch and checks whether the
vehicle is allowed to be started with
the key being used.
The immobiliser is activated
automatically after the key has been
removed from the ignition switch.
If the control indicator d flashes when
the ignition is on, there is a fault in the
system; the engine cannot be started. Switch off the ignition and repeat the
start attempt.
If the control indicator continues
flashing, attempt to start the engine
using the spare key and seek the
assistance of a workshop.
Notice
The immobiliser does not lock the
doors. You should always lock the
vehicle after leaving it.
Switch on the anti-theft alarm
system 3 21, 3 25.
Control indicator d 3 72.
Page 41 of 197

Seats, restraints39mesmo, poderá ocorrer a PERDA DE
VIDA ou FERIMENTOS GRAVES na
CRIANÇA.
IT: Non usare mai un sistema di
sicurezza per bambini rivolto
all'indietro su un sedile protetto da
AIRBAG ATTIVO di fronte ad esso:
pericolo di MORTE o LESIONI
GRAVI per il BAMBINO!
EL: ΠΟΤΕ μη χρησιμοποιείτε παιδικό
κάθισμα ασφαλείας με φορά προς τα πίσω σε κάθισμα που προστατεύεται
από μετωπικό ΕΝΕΡΓΟ ΑΕΡΟΣΑΚΟ, διότι το παιδί μπορεί να υποστεί
ΘΑΝΑΣΙΜΟ ή ΣΟΒΑΡΟ
ΤΡΑΥΜΑΤΙΣΜΟ.
PL: NIE WOLNO montować fotelika
dziecięcego zwróconego tyłem do
kierunku jazdy na fotelu, przed
którym znajduje się WŁĄCZONA
PODUSZKA POWIETRZNA.
Niezastosowanie się do tego
zalecenia może być przyczyną
ŚMIERCI lub POWAŻNYCH
OBRAŻEŃ u DZIECKA.
TR: Arkaya bakan bir çocuk emniyet
sistemini KESİNLİKLE önünde bir
AKTİF HAVA YASTIĞI ile
korunmakta olan bir koltuktakullanmayınız. ÇOCUK ÖLEBİLİR
veya AĞIR ŞEKİLDE
YARALANABİLİR.
UK: НІКОЛИ не використовуйте
систему безпеки для дітей, що встановлюється обличчям назад,
на сидінні з УВІМКНЕНОЮ
ПОДУШКОЮ БЕЗПЕКИ, інакше це
може призвести до СМЕРТІ чи
СЕРЙОЗНОГО ТРАВМУВАННЯ
ДИТИНИ.
HU: SOHA ne használjon hátrafelé
néző biztonsági gyerekülést előlről
AKTÍV LÉGZSÁKKAL védett ülésen,
mert a GYERMEK HALÁLÁT vagy
KOMOLY SÉRÜLÉSÉT okozhatja.
HR: NIKADA nemojte koristiti sustav
zadržavanja za djecu okrenut prema
natrag na sjedalu s AKTIVNIM
ZRAČNIM JASTUKOM ispred njega,
to bi moglo dovesti do SMRTI ili
OZBILJNJIH OZLJEDA za DIJETE.
SL: NIKOLI ne nameščajte otroškega
varnostnega sedeža, obrnjenega v
nasprotni smeri vožnje, na sedež z
AKTIVNO ČELNO ZRAČNO
BLAZINO, saj pri tem obstaja
nevarnost RESNIH ali SMRTNIH
POŠKODB za OTROKA.SR: NIKADA ne koristiti bezbednosni
sistem za decu u kome su deca
okrenuta unazad na sedištu sa
AKTIVNIM VAZDUŠNIM
JASTUKOM ispred sedišta zato što
DETE može da NASTRADA ili da se
TEŠKO POVREDI.
MK: НИКОГАШ не користете детско
седиште свртено наназад на
седиште заштитено со АКТИВНО
ВОЗДУШНО ПЕРНИЧЕ пред него,
затоа што детето може ДА ЗАГИНЕ или да биде ТЕШКО ПОВРЕДЕНО.
BG: НИКОГА не използвайте
детска седалка, гледаща назад,
върху седалка, която е защитена
чрез АКТИВНА ВЪЗДУШНА
ВЪЗГЛАВНИЦА пред нея - може да
се стигне до СМЪРТ или
СЕРИОЗНО НАРАНЯВАНЕ на
ДЕТЕТО.
RO: Nu utilizaţi NICIODATĂ un scaun
pentru copil îndreptat spre partea din
spate a maşinii pe un scaun protejat
de un AIRBAG ACTIV în faţa sa;
acest lucru poate duce la DECESUL
sau VĂTĂMAREA GRAVĂ a
COPILULUI.
Page 43 of 197

Seats, restraints41Fit the seat belt correctly and
engage securely. Only then is the
airbag able to protect.
Side airbag system
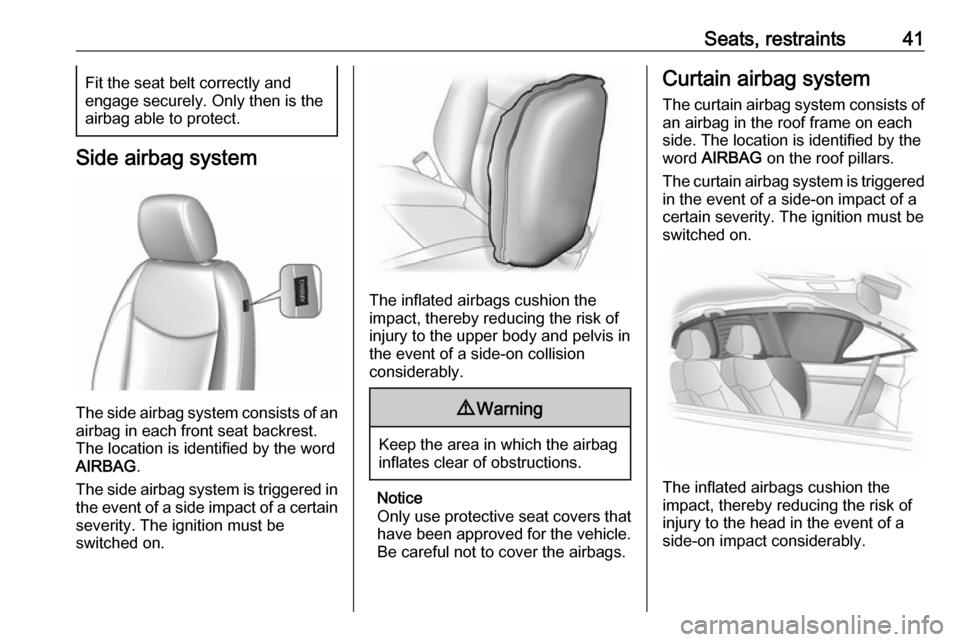
The side airbag system consists of an
airbag in each front seat backrest.
The location is identified by the word
AIRBAG .
The side airbag system is triggered in the event of a side impact of a certain
severity. The ignition must be
switched on.
The inflated airbags cushion the
impact, thereby reducing the risk of
injury to the upper body and pelvis in
the event of a side-on collision
considerably.
9 Warning
Keep the area in which the airbag
inflates clear of obstructions.
Notice
Only use protective seat covers that
have been approved for the vehicle.Be careful not to cover the airbags.
Curtain airbag system
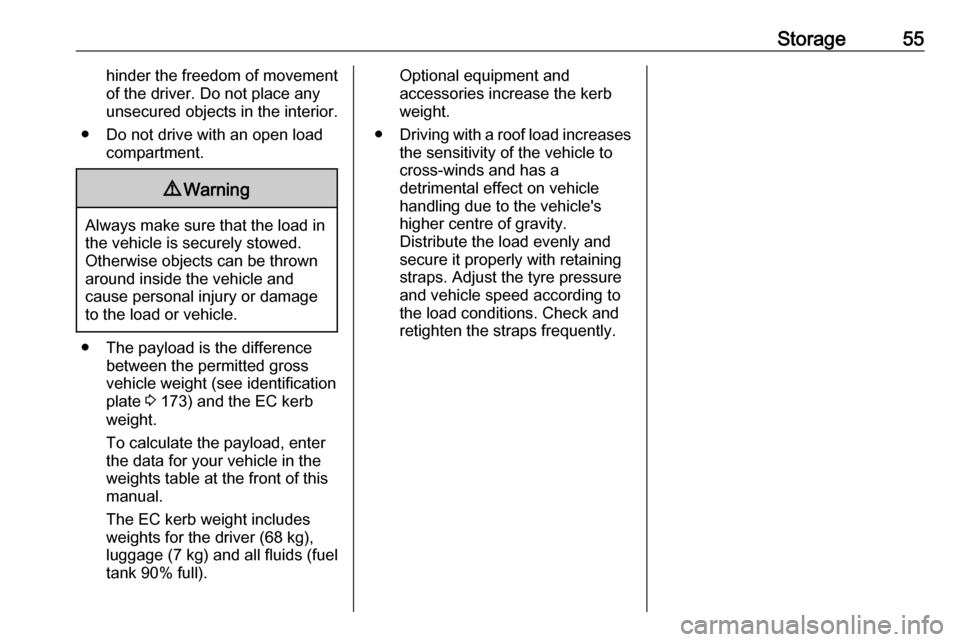
The curtain airbag system consists of an airbag in the roof frame on each
side. The location is identified by the
word AIRBAG on the roof pillars.
The curtain airbag system is triggered
in the event of a side-on impact of a
certain severity. The ignition must be
switched on.
The inflated airbags cushion the
impact, thereby reducing the risk of
injury to the head in the event of a
side-on impact considerably.
Page 46 of 197

44Seats, restraintsOnly use suitable restraint systems,
e.g. those that comply with valid
UN ECE regulations.
Ensure that the child restraint system to be installed is compatible with the
vehicle type. Refer to the tables on
the following pages, the instructions
supplied with the child restraint
system and the vehicle type list of
non-universal child restraint systems.
Ensure that the mounting location of
the child restraint system within the
vehicle is correct, see following
tables.
Remove rear head restraint before
mounting a child restraint system if
required.
Allow children to enter and exit the
vehicle only on the side facing away
from the traffic.
When the child restraint system is not in use, secure the seat with a seat beltor remove it from the vehicle.
Child restraint systems could be
fastened with ISOFIX mounting
brackets, Top-tether if available,
and/or a three-point seat belt. Refer
to the following tables.Notice
Do not affix anything on the child
restraint systems and do not cover
them with any other materials.
A child restraint system which has
been subjected to stress in an
accident must be replaced.
Page 53 of 197

Storage51
4.Pull the release knob on top of the
rear backrest.
5. Fold down the backrest and insert
the rear seat head restraints into
the pockets.
6. Put the seat belts for the outboard
seats into the belt guides.
7. Adjust the front seats to the desired position.
To return the backrest to the original
position:
1. Lift the backrest up and pull out the seat belt from the belt guides.
Push backrest firmly into place.
9 Warning
When folding up, ensure that
backrests are securely engaged in position before driving. Failure to
do so may result in personal injury
or damage to the load or vehicle in the event of hard braking or a
collision.
Ensure the seat belts are not
pinched by the latch.
2. Reinstall the rear head restraints.
3. Place the rear part of the seat cushion in its original position.
Notice
Make sure the seat belts are not twisted or caught under the seatcushion.
4. Push the front part of the seat cushion down firmly until it
latches.
The centre rear seat belt may lock
when you raise the backrest. If this
happens, allow the belt to go back all the way and repeat operation.
If the seat belt is still locked, fold down the seat cushion and try again.
To return the rear seat cushion, put
the rear part of the seat cushion in its original position ensuring that the
seat belt buckle straps are not twisted
Page 56 of 197

54StorageVehicles with tyre repair kit
Stow the warning triangle in the
vehicle tool box below the floor over
in the load compartment.
First aid kit
Stow the first-aid kit in the well in the
load compartment.
Loading information
● Heavy objects in the load compartment should be placedagainst the seat backrests.
Ensure that the backrests are
securely engaged. If objects can
be stacked, heavier objects
should be placed at the bottom.
● Secure loose objects in the load compartment to prevent themfrom sliding.
● When transporting objects in the load compartment, the backrests
of the rear seats must not be angled forward.
● Do not allow the load to protrude above the upper edge of the
backrests.
● Do not place any objects on the load compartment cover or theinstrument panel, and do notcover the sensor on top of the
instrument panel.
● The load must not obstruct the operation of the pedals, parking
brake and gear selector lever, or
Page 57 of 197

Storage55hinder the freedom of movement
of the driver. Do not place any
unsecured objects in the interior.
● Do not drive with an open load compartment.9Warning
Always make sure that the load in
the vehicle is securely stowed.
Otherwise objects can be thrown
around inside the vehicle and
cause personal injury or damage
to the load or vehicle.
● The payload is the difference between the permitted gross
vehicle weight (see identification
plate 3 173) and the EC kerb
weight.
To calculate the payload, enter
the data for your vehicle in the
weights table at the front of this
manual.
The EC kerb weight includes
weights for the driver (68 kg),
luggage (7 kg) and all fluids (fuel
tank 90% full).
Optional equipment and
accessories increase the kerb
weight.
● Driving with a roof load increases
the sensitivity of the vehicle to
cross-winds and has a
detrimental effect on vehicle
handling due to the vehicle's
higher centre of gravity.
Distribute the load evenly and secure it properly with retaining
straps. Adjust the tyre pressure
and vehicle speed according to
the load conditions. Check and
retighten the straps frequently.
Page 83 of 197

Instruments and controls81No.Vehicle message77Service lane departure warning79Top up engine oil81Service transmission82Change engine oil soon84Engine power reduced89Service vehicle soon95Service airbag145Check washer fluid level151Press clutch to start174Low vehicle battery258Parking assist off
Vehicle messages on
Colour-Info-Display
Some important messages appear
additionally in the
Colour-Info-Display. Some
messages only pop-up for a few
seconds.
Warning chimes
When starting the engine or whilst driving
Only one warning chime will sound at a time.
The warning chime regarding
unfastened seat belts has priority
over any other warning chime.
● If seat belt is not fastened.
● If a door or the tailgate is not fully
closed when starting off.
● If a certain speed is exceeded with parking brake applied.
● If a programmed speed is exceeded.
● If a warning message appears in the Driver Information Centre orInfo-Display.
● If the parking assist detects an object.
● If unintended lane change occurs.
● If a fault in the automatic locking system is detected.When the vehicle is parked and/or
the driver's door is opened
● With exterior lights on.
During an Autostop ● If the driver's door is opened.
Battery voltage
When the vehicle battery voltage is
running low, the warning code 174 will
appear in the Driver Information
Centre.
1. Switch off immediately any electrical consumers which are
not required for a safe drive, e.g.
seat heating, heated windscreen
and heated rear window or other
main consumers.
2. Charge the vehicle battery by driving continuously for a while or
by using a charging device.
The warning code will disappear after the engine has been started twice
consecutively without a voltage drop.
If the vehicle battery cannot be
recharged, have the cause of the fault
remedied by a workshop.
Page 89 of 197

Instruments and controls87Destination download
A desired destination can be directly downloaded to the navigation system.
Press Z to call an advisor and
describe the destination or point of
interest.
The advisor can look up any address
or point of interest and directly send
the destination to the built-in
navigation system.
OnStar settings
OnStar PIN
To have full access to all OnStar
services, a four-digit PIN is required. The PIN has to be personalised when first talking to an advisor.
To change the PIN, press Z to call an
advisor.
Account data
An OnStar subscriber has an account
where all the data is stored. To
request a change of the account
information, press Z and talk to an
advisor or log in to your account.If the OnStar service is used on
another vehicle, press Z and request
that the account be transferred to the
new vehicle.
Notice
In any case, if the vehicle is disposed of, sold or otherwise transferred,
immediately inform OnStar about
the changes and terminate the
OnStar service on this vehicle.
Vehicle location
The vehicle location is transmitted to OnStar when service is requested or
triggered. A message on the Info-
Display informs about this
transmission.
To activate or deactivate the
transmission of the vehicle location,
press and hold j until an audio
message is heard.
The deactivation is indicated by the
status light flashing red and green for
a short period of time and each time
the vehicle is started.
Notice
If the transmission of the vehicle
location is deactivated, some
services are no longer available.Notice
The vehicle location always remains accessible to OnStar in the case of
an emergency.
Find the privacy policy in your
account.
Software updates
OnStar may remotely carry out
software updates without further
notice or consent. These updates are
to enhance or maintain safety and
security or the operation of the
vehicle.
These updates may concern privacy
issues. Find the privacy policy in your account.