Window switch VAUXHALL VIVARO 2019 Owner's Guide
[x] Cancel search | Manufacturer: VAUXHALL, Model Year: 2019, Model line: VIVARO, Model: VAUXHALL VIVARO 2019Pages: 231, PDF Size: 5.82 MB
Page 118 of 231
116Climate controlClimate controlClimate control systems.............116
Heating and ventilation system 116
Air conditioning system ...........117
Electronic climate control system .................................... 118
Rear heating system ...............120
Rear air conditioning system ...121
Auxiliary heater ........................122
Air vents ..................................... 127
Adjustable air vents .................127
Fixed air vents ......................... 128
Glovebox cooler ......................128
Maintenance .............................. 128
Air intake ................................. 128
Air conditioning regular operation ................................ 128
Service .................................... 128Climate control systems
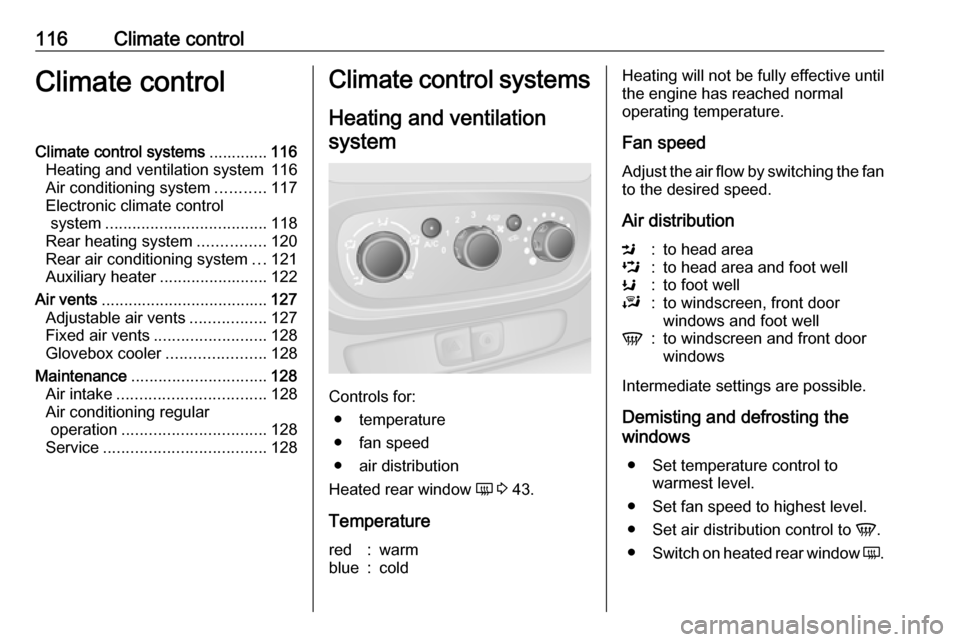
Heating and ventilation system
Controls for: ● temperature
● fan speed
● air distribution
Heated rear window Ü 3 43.
Temperature
red:warmblue:coldHeating will not be fully effective until
the engine has reached normal
operating temperature.
Fan speed
Adjust the air flow by switching the fan
to the desired speed.
Air distributionM:to head areaL:to head area and foot wellK:to foot wellJ:to windscreen, front door
windows and foot wellV:to windscreen and front door
windows
Intermediate settings are possible.
Demisting and defrosting the
windows
● Set temperature control to warmest level.
● Set fan speed to highest level.
● Set air distribution control to V.
● Switch on heated rear window Ü.
Page 119 of 231
Climate control117● Open side air vents as requiredand direct them towards door
windows.
● For simultaneous warming of the
foot well, set air distribution
control to J.
Heated rear window 3 43.
Air conditioning system
In addition to the heating and
ventilation system, the air
conditioning system has controls for:A/C:cooling4:air recirculation
Heated seats 3 48.
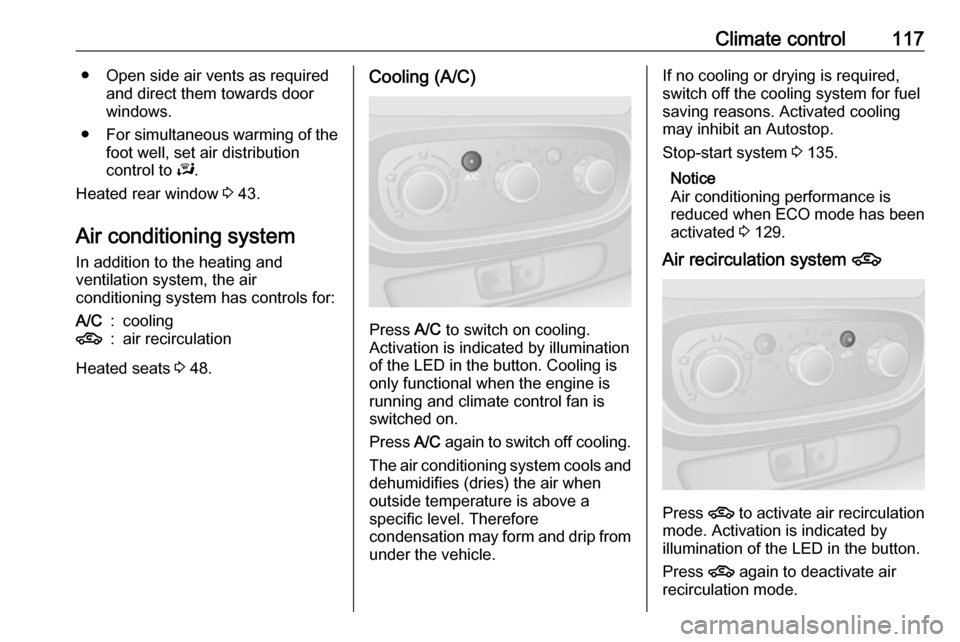
Cooling (A/C)
Press A/C to switch on cooling.
Activation is indicated by illumination
of the LED in the button. Cooling is
only functional when the engine is
running and climate control fan is switched on.
Press A/C again to switch off cooling.
The air conditioning system cools and
dehumidifies (dries) the air when
outside temperature is above a
specific level. Therefore
condensation may form and drip from under the vehicle.
If no cooling or drying is required,
switch off the cooling system for fuel
saving reasons. Activated cooling
may inhibit an Autostop.
Stop-start system 3 135.
Notice
Air conditioning performance is
reduced when ECO mode has been
activated 3 129.
Air recirculation system 4
Press 4
to activate air recirculation
mode. Activation is indicated by
illumination of the LED in the button.
Press 4 again to deactivate air
recirculation mode.
Page 120 of 231
118Climate control9Warning
The exchange of fresh air is
reduced in air recirculation mode.
In operation without cooling, the
air humidity increases, so the
windows may mist up from inside.
The quality of the passenger
compartment air deteriorates,
which may cause the vehicle
occupants to feel drowsy.
In warm and very humid ambient air conditions, the windscreen might mist up from outside when cold air is
directed towards it. If windscreen
mists up from outside, activate
windscreen wiper and avoid the use
of air distribution settings J and V.
Maximum cooling
Briefly open the windows so that hot air can disperse quickly.
● Cooling A/C on.
● Air recirculation system 4 on.
● Set air distribution control to M.
● Set temperature control to coldest level.
● Set fan speed to highest level.
● Open all air vents.
Demisting and defrosting the
windows
● Set temperature control to warmest level.
● Set fan speed to highest level.
● Set air distribution control to V.
● Switch cooling A/C on.
● Switch on heated rear window Ü.
● Open side air vents as required and direct them towards doorwindows.
● For simultaneous warming of the
foot well, set air distribution
control to J.
Heated rear window 3 43.Electronic climate control
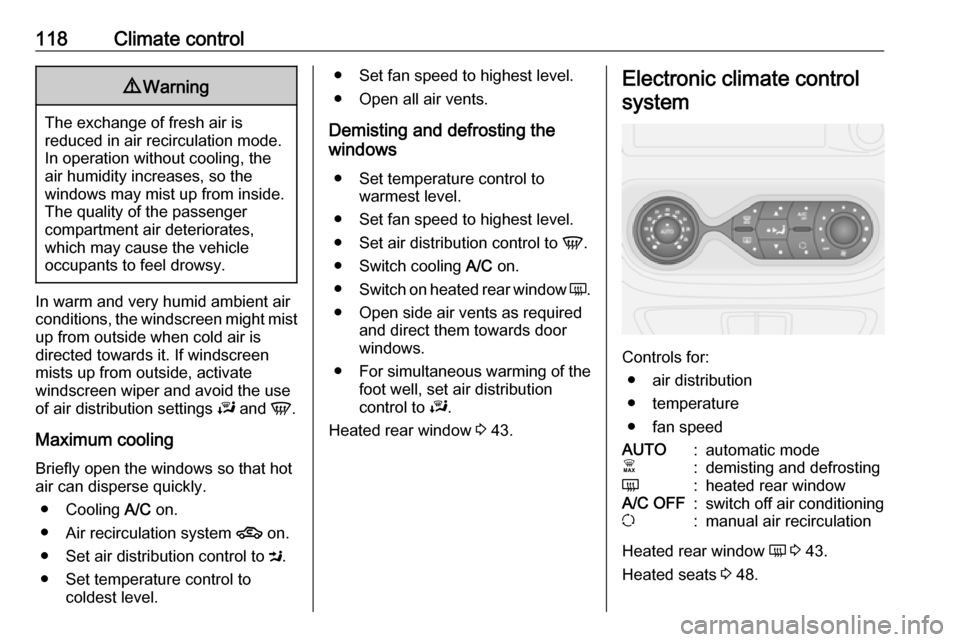
system
Controls for: ● air distribution
● temperature
● fan speed
AUTO:automatic modeÊ:demisting and defrostingÜ:heated rear windowA/C OFF:switch off air conditioningu:manual air recirculation
Heated rear window Ü 3 43.
Heated seats 3 48.
Page 121 of 231

Climate control119The preselected temperature is
automatically regulated. In Automatic
mode, the fan speed and air
distribution automatically regulate the
air flow.
The system can be manually adapted via the use of air distribution and air
flow controls.
Electronic climate control system is only fully operational when the engine is running.
Automatic mode AUTO Basic setting for maximum comfort: ● Switch on the fan.
● Press AUTO: fan speed, air
distribution, cooling and air
recirculation are regulated
automatically.
● Set the desired temperature.
● Open all air vents.
To switch off the electronic climate
control system, switch off the fan.
Temperature preselection Temperatures can be set to the
desired value.If the minimum temperature is set, the
climate control system runs at
maximum cooling.
If the maximum temperature is set,
the climate control system runs at maximum heating.
Demisting and defrosting the
windows
● Press Ê: LED illuminates in the
button when activated.
● Temperature, air distribution and cooling are regulated
automatically and the fan runs at
high speed.
● Switch on heated rear window Ü
3 43.
To return to Automatic mode: press Ê or AUTO .
Notice
If Ê is pressed while the engine is
running, an Autostop will be inhibited until Ê is pressed again.
If Ê is pressed while the engine is in
an Autostop, the engine will restart
automatically.
Stop-start system 3 135.Manual settings
Manually changing any of the
following settings will deactivate
Automatic mode:
Fan speed Z
Adjust the air flow manually by
switching the fan to the desired
speed.
If the fan is switched off, the air
conditioning is also deactivated.
Air distribution M
Press appropriate button for desired
adjustment. LED illuminates in the
button when activated.R:to windscreen and front door
windowsM:to head areaS:to foot well
Combinations of settings are possible
by pressing two buttons until both
LEDs are illuminated.
To return to Automatic mode: Press
AUTO button.
Page 122 of 231
120Climate controlCooling A/C
The air conditioning system cools and
dehumidifies (dries) the air when
outside temperature is above a
specific level. Therefore
condensation may form and drip from under the vehicle.
Notice
Air conditioning performance is
reduced when ECO mode has been
activated 3 129.
If no cooling or drying is required
press A/C OFF to switch the cooling
system off, thus saving fuel. LED
illuminates in the button.
To return to Automatic mode: Press
AUTO button.
Air recirculation mode u
Activate or deactivate manual air recirculation mode with u. LED
illuminates in the button when
activated.9 Warning
The exchange of fresh air is
reduced in air recirculation mode.
In operation without cooling the air humidity increases, so the
windows may mist up from inside.
The quality of the passenger
compartment air deteriorates,
which may cause the vehicle
occupants to feel drowsy.
To return to Automatic mode: Press
AUTO button.
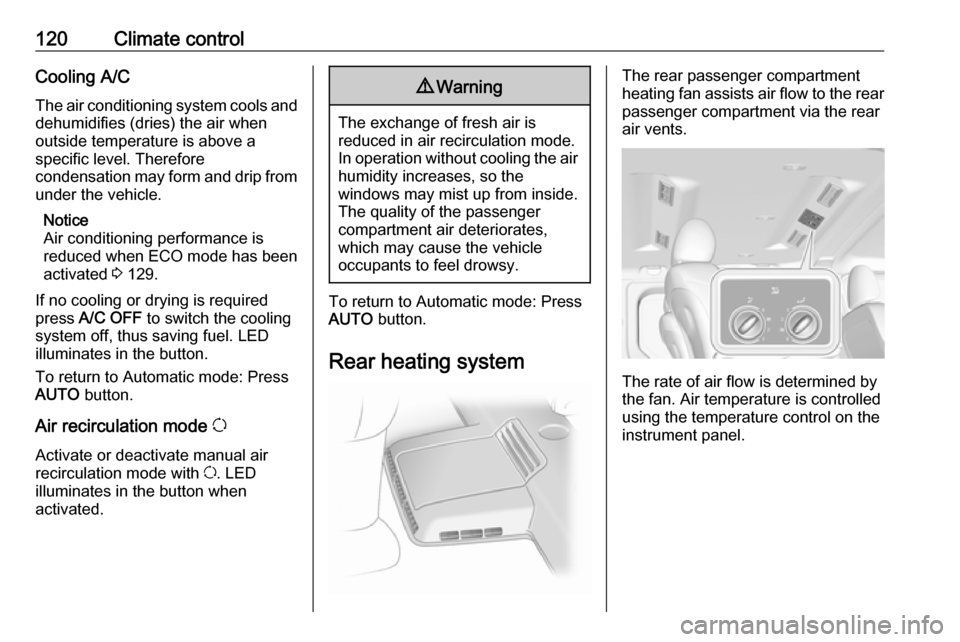
Rear heating system
The rear passenger compartment
heating fan assists air flow to the rear
passenger compartment via the rear
air vents.
The rate of air flow is determined by
the fan. Air temperature is controlled
using the temperature control on the
instrument panel.
Page 135 of 231
Driving and operating133These functions stop working when
the driver's door is opened and the vehicle is locked.
Notice
Always take the electronic key with
you when exiting the vehicle.
The electronic key being left in the
card reader is indicated by a warning
chime 3 103 and a message in the
Driver Information Centre 3 102
when the driver's door is opened.9 Danger
Never leave an electronic key
inside the vehicle when children or animals are left in the vehicle, to
avoid unintended operation of
windows, doors or engine. Risk of
fatal injury.
Fault
If the engine cannot be started, the
cause may be one of the following:
● Fault in electronic key.
● Electronic key out of reception range.
● Battery voltage too low.
● Overload of the central locking system by operating at frequentintervals, the power supply is
interrupted for a short time.
● Interference from higher-power radio waves from other sources.
Battery replacement 3 20.
Central locking system 3 24.
Electronic key system 3 21.
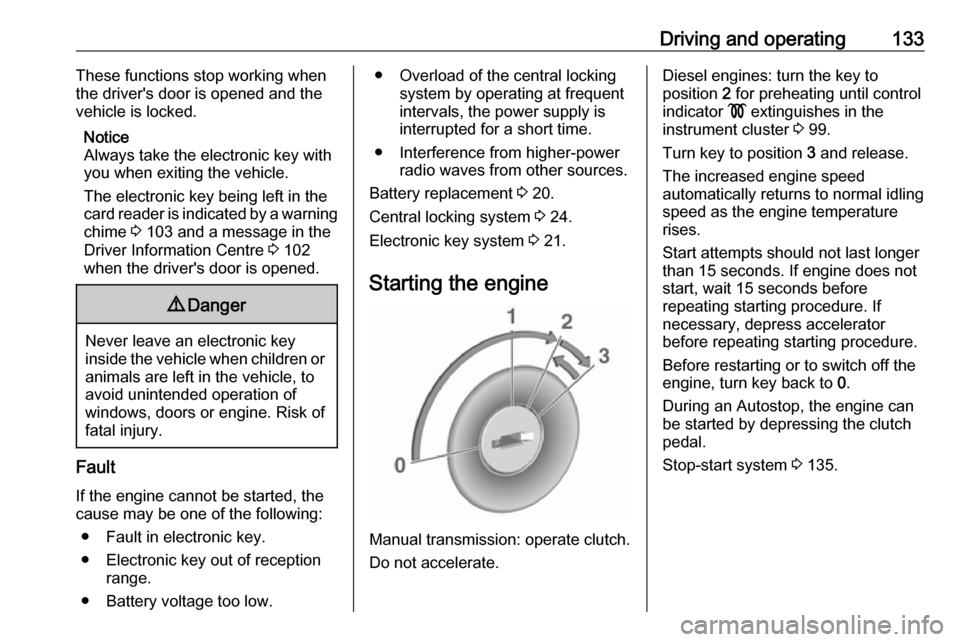
Starting the engine
Manual transmission: operate clutch.
Do not accelerate.
Diesel engines: turn the key to
position 2 for preheating until control
indicator ! extinguishes in the
instrument cluster 3 99.
Turn key to position 3 and release.
The increased engine speed
automatically returns to normal idling
speed as the engine temperature
rises.
Start attempts should not last longer
than 15 seconds. If engine does not
start, wait 15 seconds before
repeating starting procedure. If
necessary, depress accelerator
before repeating starting procedure.
Before restarting or to switch off the
engine, turn key back to 0.
During an Autostop, the engine can
be started by depressing the clutch
pedal.
Stop-start system 3 135.
Page 140 of 231
138Driving and operatingIf the Infotainment system is active,
audio sound may briefly be reduced
or interrupted during the restart.
Fault
If a fault occurs in the stop-start
system, the LED in Î illuminates,
and a corresponding message
appears in the Driver Information
Centre 3 101 . Seek the assistance of
a workshop.
Vehicle messages 3 102.
Warning chimes 3 103.
Parking9 Warning
● Do not park the vehicle on an
easily ignitable surface. The
high temperature of the
exhaust system could ignite the
surface.
● Always apply parking brake without pressing release
button. Apply as firmly as
possible on a downhill slope or
uphill slope. Depress brake
pedal at the same time to
reduce operating force.
● Switch off the engine.
● If the vehicle is on a level surface or uphill slope, engage
first gear. On an uphill slope,
turn the front wheels away from
the kerb.
If the vehicle is on a downhill
slope, engage reverse gear.
Turn the front wheels towards the kerb.
● Close the windows.
● Remove the ignition key from the ignition switch. Turn the
steering wheel until the
steering wheel lock is felt to
engage.
● Lock the vehicle by pressing e on
the remote control 3 24.
Activate the anti-theft alarm
system 3 36.
● The engine cooling fans may run
after the engine has been
switched off 3 166.
Caution
After running at high engine
speeds or with high engine loads,
operate the engine briefly at a low load or run in neutral for approx.30 seconds before switching off, in
order to protect the turbocharger.
Vehicle storage 3 165.
Page 186 of 231

184Vehicle careNo.Circuit1Battery backup (with electronic
key system)2Adaptations3Adaptations4Vehicle battery (with electronic
key system)5Additional heating and ventila‐
tion / Air conditioning system6Supplementary heating and
ventilation system7Electric exterior mirrors / Addi‐
tional adaptations8Heated exterior mirrors9Radio / Multimedia / Electric
exterior mirrors / Diagnostic
socket10Multimedia / Trailer hitch11Courtesy lights / Battery
discharge protectionNo.Circuit12Right-hand high beam / Left-
hand low beam / Sidelights /
Right-hand daytime running
light13Hazard warning flashers / Turn
lights14Central locking15Left-hand high beam / Right-
hand low beam / Tail lights /
Left-hand daytime running light16Front fog lights / Rear fog lights /
Number plate lighting17Alarm / Horn / Lighting / Wiper18Instrument cluster19Heating and ventilation system20Rear window wiper / Wind‐
screen washer pump / Horn21General battery22Reversing lights23Brake switchNo.Circuit24Fuel injection / Starter25Airbag / Steering column lock26Passenger power window27Power steering28Brake lights29Battery backup (with electronic
key system)30Service display31Cigarette lighter / Power outlet32Heating and ventilation system33Brake lights / ABS / Immobiliser34Interior lighting / Air conditioning35Starting with electronic key
system36Rear window wiper37Warning chimes38Load compartment power outlet39Driver power window
Page 200 of 231
198Vehicle care
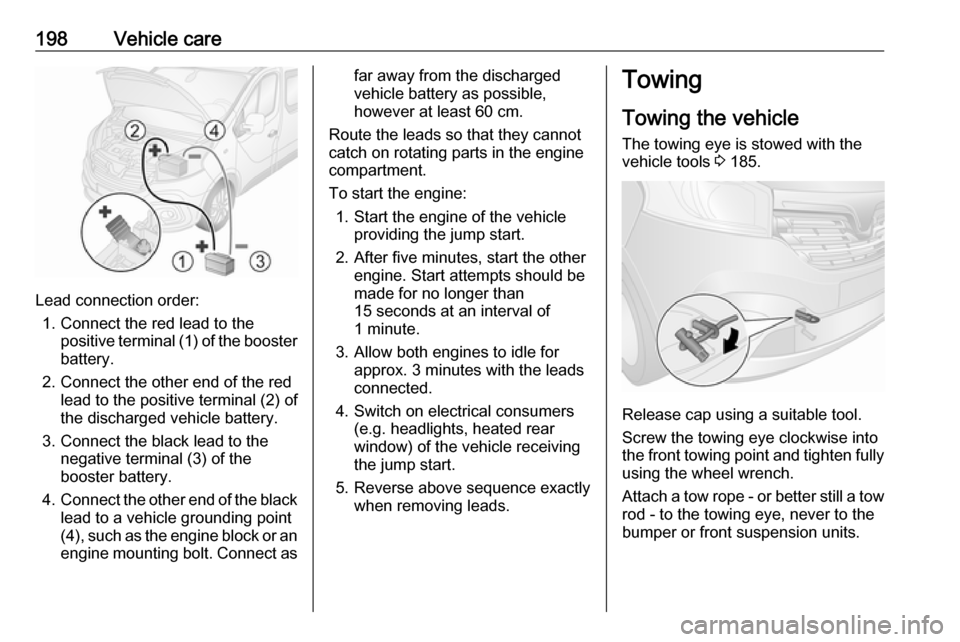
Lead connection order:1. Connect the red lead to the positive terminal (1) of the booster
battery.
2. Connect the other end of the red lead to the positive terminal (2) of
the discharged vehicle battery.
3. Connect the black lead to the negative terminal (3) of the
booster battery.
4. Connect the other end of the black
lead to a vehicle grounding point
(4), such as the engine block or an
engine mounting bolt. Connect as
far away from the discharged
vehicle battery as possible,
however at least 60 cm.
Route the leads so that they cannot
catch on rotating parts in the engine
compartment.
To start the engine: 1. Start the engine of the vehicle providing the jump start.
2. After five minutes, start the other engine. Start attempts should be
made for no longer than
15 seconds at an interval of
1 minute.
3. Allow both engines to idle for approx. 3 minutes with the leads
connected.
4. Switch on electrical consumers (e.g. headlights, heated rear
window) of the vehicle receiving
the jump start.
5. Reverse above sequence exactly when removing leads.Towing
Towing the vehicle The towing eye is stowed with thevehicle tools 3 185.
Release cap using a suitable tool.
Screw the towing eye clockwise into
the front towing point and tighten fully
using the wheel wrench.
Attach a tow rope - or better still a tow rod - to the towing eye, never to the
bumper or front suspension units.
Page 201 of 231
Vehicle care199Caution
Do not tow the vehicle from the
rear. The front towing eye must
only be used for towing and not
recovering a vehicle.
Caution
Activate the child locks in the rear
doors if the rear seats are
occupied.
Child locks 3 30.
Switch on ignition to permit operation
of brake lights, horn and windscreen
wipers, and move the steering wheel
slightly to release the steering wheel
lock.
Notice
Depending on version, it may be
necessary to switch on the engine to
permit operation of brake lights.
Move the selector lever to neutral.
Release the parking brake.
Caution
Drive slowly. Do not drive jerkily.
Excessive tractive force can
damage the vehicle.
When the engine is not running,
considerably more force is needed to
brake and steer.
Switch on hazard warning flashers
3 111.
To prevent the entry of exhaust fumes
from the towing vehicle, switch on the air recirculation system 3 117 and
close the windows.
Seek the assistance of a workshop.
After towing, unscrew the towing eye
and replace cap.
Towing another vehicle
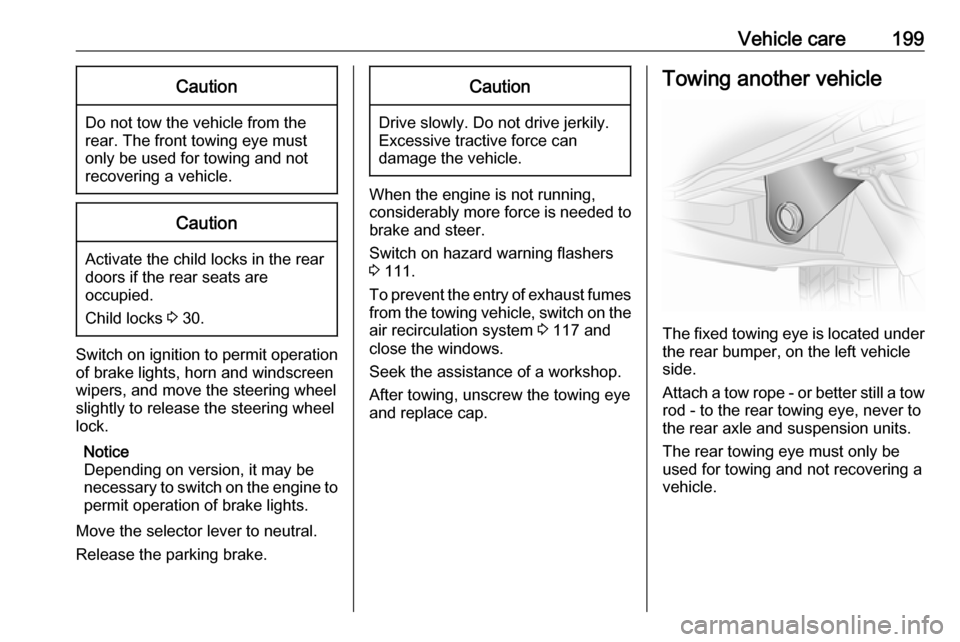
The fixed towing eye is located under the rear bumper, on the left vehicle
side.
Attach a tow rope - or better still a tow
rod - to the rear towing eye, never to
the rear axle and suspension units.
The rear towing eye must only be
used for towing and not recovering a
vehicle.