clock VAUXHALL VIVARO C 2020 User Guide
[x] Cancel search | Manufacturer: VAUXHALL, Model Year: 2020, Model line: VIVARO C, Model: VAUXHALL VIVARO C 2020Pages: 289, PDF Size: 10.16 MB
Page 226 of 289
224Vehicle care3. Detach the bulb from the bulbsocket and replace the bulb.
4. Insert the bulb socket into the reflector housing.
5. Fit the cover.
Front fog lights
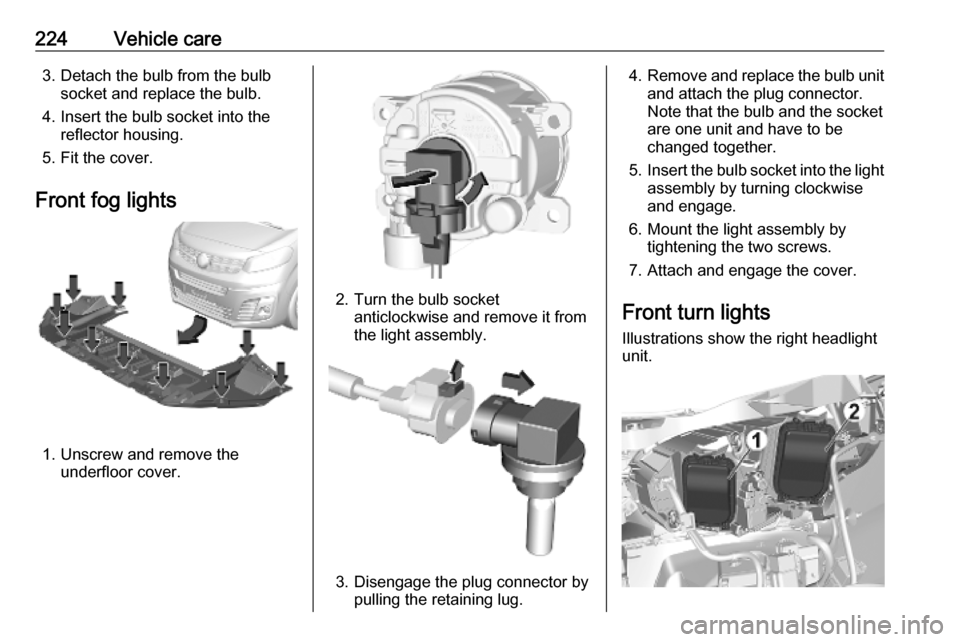
1. Unscrew and remove the underfloor cover.
2. Turn the bulb socketanticlockwise and remove it from
the light assembly.
3. Disengage the plug connector by pulling the retaining lug.
4.Remove and replace the bulb unit
and attach the plug connector.
Note that the bulb and the socket
are one unit and have to be
changed together.
5. Insert the bulb socket into the light
assembly by turning clockwise
and engage.
6. Mount the light assembly by tightening the two screws.
7. Attach and engage the cover.
Front turn lights Illustrations show the right headlight
unit.
Page 227 of 289
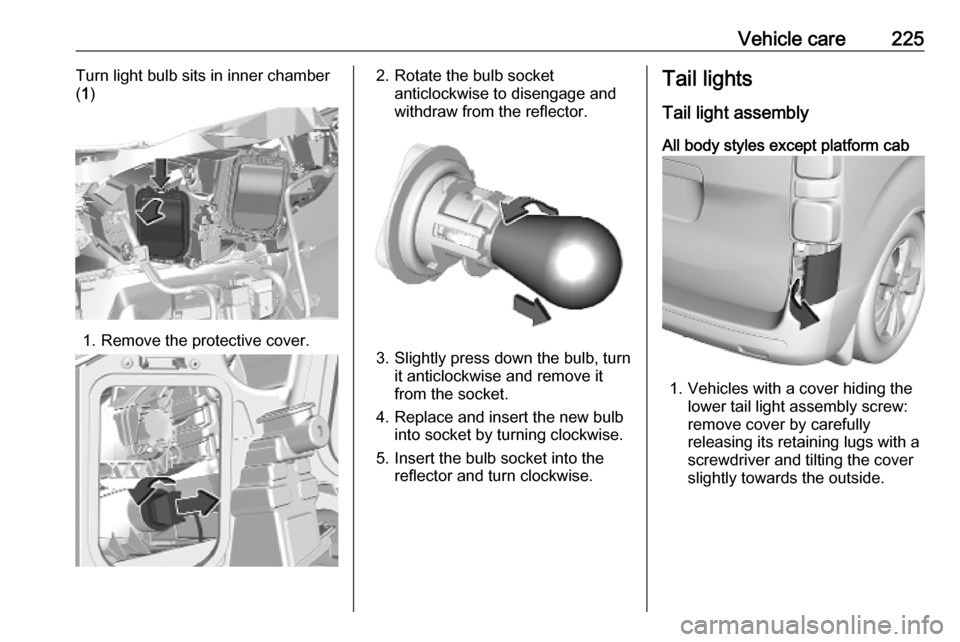
Vehicle care225Turn light bulb sits in inner chamber
( 1 )
1. Remove the protective cover.
2. Rotate the bulb socket
anticlockwise to disengage and
withdraw from the reflector.
3. Slightly press down the bulb, turn it anticlockwise and remove it
from the socket.
4. Replace and insert the new bulb into socket by turning clockwise.
5. Insert the bulb socket into the reflector and turn clockwise.
Tail lights
Tail light assembly All body styles except platform cab
1. Vehicles with a cover hiding the lower tail light assembly screw:
remove cover by carefully
releasing its retaining lugs with a
screwdriver and tilting the cover
slightly towards the outside.
Page 229 of 289
Vehicle care227
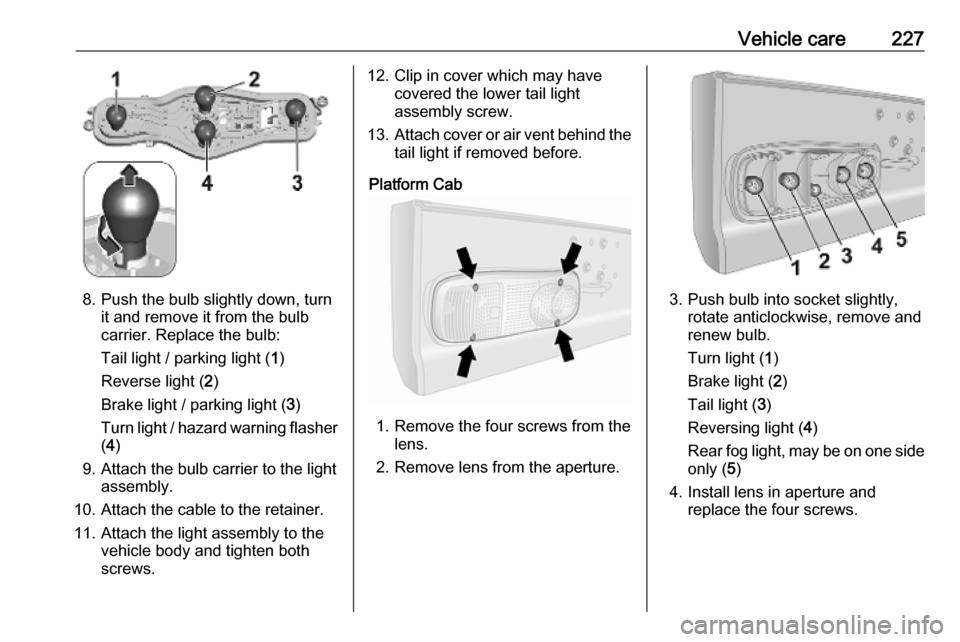
8. Push the bulb slightly down, turnit and remove it from the bulb
carrier. Replace the bulb:
Tail light / parking light ( 1)
Reverse light ( 2)
Brake light / parking light ( 3)
Turn light / hazard warning flasher
( 4 )
9. Attach the bulb carrier to the light assembly.
10. Attach the cable to the retainer.
11. Attach the light assembly to the vehicle body and tighten both
screws.
12. Clip in cover which may have covered the lower tail light
assembly screw.
13. Attach cover or air vent behind the
tail light if removed before.
Platform Cab
1. Remove the four screws from the lens.
2. Remove lens from the aperture.
3. Push bulb into socket slightly, rotate anticlockwise, remove and
renew bulb.
Turn light ( 1)
Brake light ( 2)
Tail light ( 3)
Reversing light ( 4)
Rear fog light, may be on one side
only ( 5)
4. Install lens in aperture and replace the four screws.
Page 231 of 289

Vehicle care229Wrap a cloth around the tip of a
slot screwdriver to prevent paint
damage. Remove the inner cover
or air vent with the screwdriver.
3. Push the brake light assembly carefully out through the recess.
4. Detach the cable from the retainer
in the light assembly.
5. Remove the socket of the defect bulb by turning it a quarter turn
anti-clockwise.
6. Renew bulb.
7. Install brake light assembly like explained above, in reversed
order.
Number plate light
1. a) vehicles with tailgate:
Insert a thin screwdriver, e.g., in
one of the recesses of the cover and push it outwards to unclip it.
Remove the cover.
b) vehicles with hinged doors:
Insert a screwdriver in one of the
recesses of the cover and lever it
out. Remove the cover.
Page 245 of 289

Vehicle care243Repeat the checking procedure
once more after driving further
three miles but no more than ten
minutes to check that there is no
more loss of pressure.
If the tyre pressure has fallen
below 150 kPa (1.5 bar), the
vehicle must not be used. Seek
the assistance of a workshop.
13. Stow away tyre repair kit in load compartment.
Notice
The driving characteristics of the repaired tyre are severely affected,
therefore have this tyre replaced.
If unusual noise is heard or the
compressor becomes hot, turn
compressor off for at least
30 minutes.
Note the expiry date of the kit. After
this date its sealing capability is no
longer guaranteed. Pay attention to
storage information on sealant
bottle.Replace the used sealant cartridge. Dispose of the bottle as prescribed
by applicable laws.
The compressor and sealant can be
used from approx. -30 °C.
Removing the pipe and cartridge
1. Turn pipe assembly to the left until
it contacts the unit.
2. Disconnect the connector from the cartridge by turning it a quarter
turn anti-clockwise.
Page 246 of 289
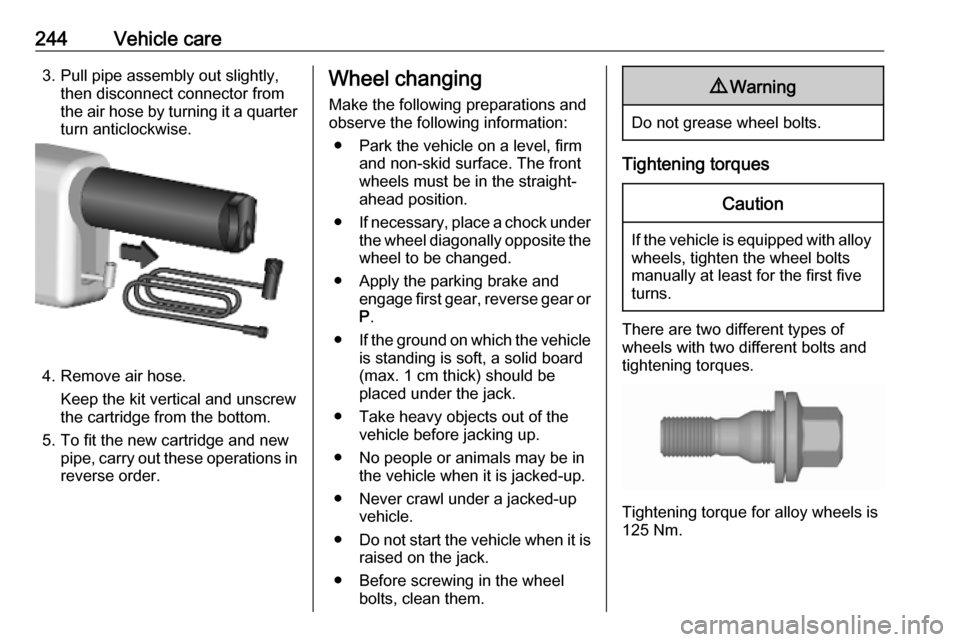
244Vehicle care3. Pull pipe assembly out slightly,then disconnect connector from
the air hose by turning it a quarter
turn anticlockwise.
4. Remove air hose.
Keep the kit vertical and unscrew
the cartridge from the bottom.
5. To fit the new cartridge and new pipe, carry out these operations in
reverse order.
Wheel changing
Make the following preparations and
observe the following information:
● Park the vehicle on a level, firm and non-skid surface. The front
wheels must be in the straight-
ahead position.
● If necessary, place a chock under
the wheel diagonally opposite the
wheel to be changed.
● Apply the parking brake and engage first gear, reverse gear or
P .
● If the ground on which the vehicle
is standing is soft, a solid board
(max. 1 cm thick) should be
placed under the jack.
● Take heavy objects out of the vehicle before jacking up.
● No people or animals may be in the vehicle when it is jacked-up.
● Never crawl under a jacked-up vehicle.
● Do not start the vehicle when it is
raised on the jack.
● Before screwing in the wheel bolts, clean them.9Warning
Do not grease wheel bolts.
Tightening torques
Caution
If the vehicle is equipped with alloy
wheels, tighten the wheel bolts
manually at least for the first five
turns.
There are two different types of
wheels with two different bolts and tightening torques.
Tightening torque for alloy wheels is
125 Nm.
Page 248 of 289

246Vehicle care
2. Remove the cover of the carrierbolt, located on the rear door sill
3. Fit the wheel wrench on thehexagon bolt. Turn it
anticlockwise until the spare wheel holder is low enough to
allow the catch to be unhooked.
4. Lift the spare wheel holder and unhook the catch.
Lower the spare wheel holder.
5. Remove the spare wheel.
6. Change the wheel.
7. Position the damaged wheel with the outside down in the spare
wheel holder.
8. Lift the spare wheel holder and engage in the catch. The open
side of the catch must point in the
direction of travel.
9. Close the spare wheel holder by turning the hexagon bolt
clockwise using the wheel
wrench.
10. Stow wheel wrench in the storage.
11. Close the tailgate or the rear doors.
Page 253 of 289
Vehicle care251Towing
Towing the vehicle
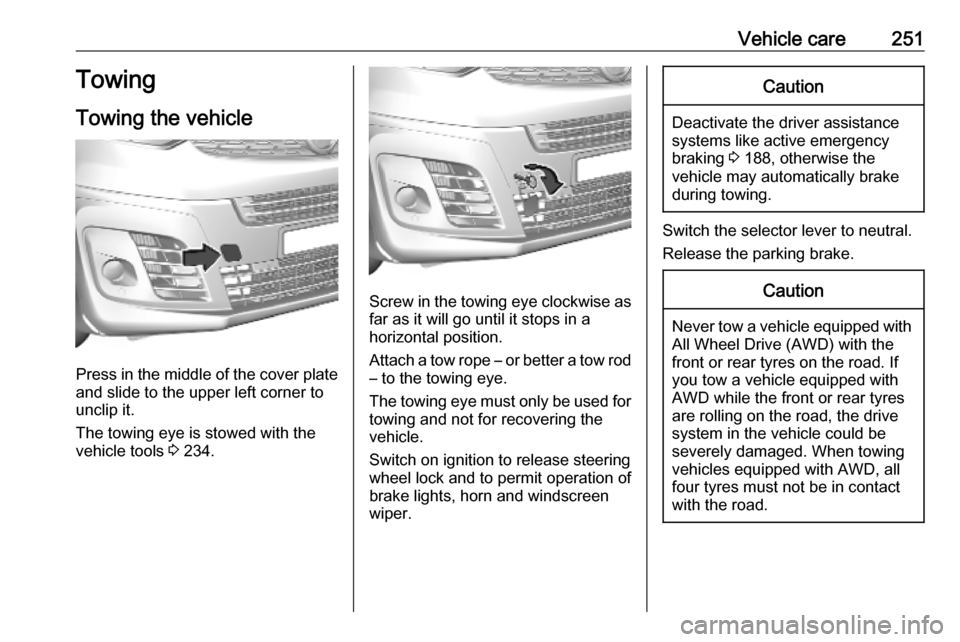
Press in the middle of the cover plate
and slide to the upper left corner to
unclip it.
The towing eye is stowed with the vehicle tools 3 234.
Screw in the towing eye clockwise as
far as it will go until it stops in a
horizontal position.
Attach a tow rope – or better a tow rod
– to the towing eye.
The towing eye must only be used for
towing and not for recovering the
vehicle.
Switch on ignition to release steering
wheel lock and to permit operation of
brake lights, horn and windscreen
wiper.
Caution
Deactivate the driver assistance
systems like active emergency
braking 3 188, otherwise the
vehicle may automatically brake during towing.
Switch the selector lever to neutral.
Release the parking brake.
Caution
Never tow a vehicle equipped with All Wheel Drive (AWD) with the
front or rear tyres on the road. If
you tow a vehicle equipped with
AWD while the front or rear tyres
are rolling on the road, the drive
system in the vehicle could be
severely damaged. When towing
vehicles equipped with AWD, all
four tyres must not be in contact
with the road.
Page 254 of 289
252Vehicle careCaution
Drive slowly. Do not drive jerkily.
Excessive tractive force can
damage the vehicle.
When the engine is not running,
considerably more force is needed to
brake and steer.
To prevent the entry of exhaust gases from the towing vehicle, switch on the
air recirculation and close the
windows.
Vehicles with automatic transmission: The vehicle must be towed facing
forwards, not faster than 50 mph nor further than 60 miles. In all other
cases and when the transmission is
defective, the front axle must be
raised off the ground.
Seek the assistance of a workshop. After towing, unscrew the towing eye.
Insert cap with the flange into the
recess and fix cap by pushing.
Towing another vehicle
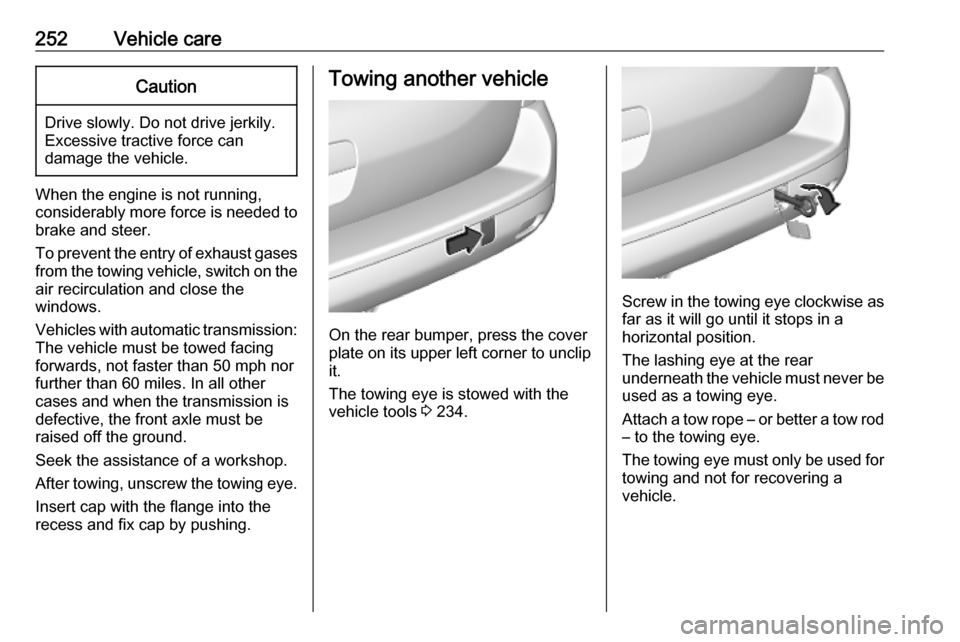
On the rear bumper, press the cover
plate on its upper left corner to unclip it.
The towing eye is stowed with the
vehicle tools 3 234.
Screw in the towing eye clockwise as
far as it will go until it stops in a
horizontal position.
The lashing eye at the rear
underneath the vehicle must never be used as a towing eye.
Attach a tow rope – or better a tow rod
– to the towing eye.
The towing eye must only be used for towing and not for recovering a
vehicle.
Page 258 of 289

256Vehicle carePlastic and rubber parts
Plastic and rubber parts can be
cleaned with the same cleaner as
used to clean the body. Use interior
cleaner if necessary. Do not use any
other agent. Avoid solvents and petrol in particular. Do not use high-
pressure jet cleaners.
Floor mats9 Warning
If a floor mat has the wrong size or
is not properly installed, it can
interfere with the accelerator pedal
and/or brake pedal, what can
cause unintended acceleration
and/or increased stopping
distance which can cause a crash and injury.
Use the following guidelines for
proper floor mat usage.
● The original equipment floor mats
were designed for your vehicle. If the floor mats need replacing, it
is recommended that certified
floor mats be purchased. Always
check that the floor mats do not
interfere with the pedals.
● Use the floor mat with the correct
side up. Do not turn it over.
● Do not place anything on top of the driver side floor mat.
● Use only a single floor mat on the
driver side.
● Do not place one floor mat on top
of another.
Inserting and removing the floor
mats
The driver side floor mat is held in
place by two retainers.
To install the driver's side floor mat: 1. Move the driver's seat backwards
as far as possible.
2. Align slots in the mat with the retainers, as shown.
3. Turn retainers clockwise for aquarter turn.