wheel VAUXHALL VIVARO C 2020 Owner's Guide
[x] Cancel search | Manufacturer: VAUXHALL, Model Year: 2020, Model line: VIVARO C, Model: VAUXHALL VIVARO C 2020Pages: 289, PDF Size: 10.16 MB
Page 133 of 289
Lighting131Activation
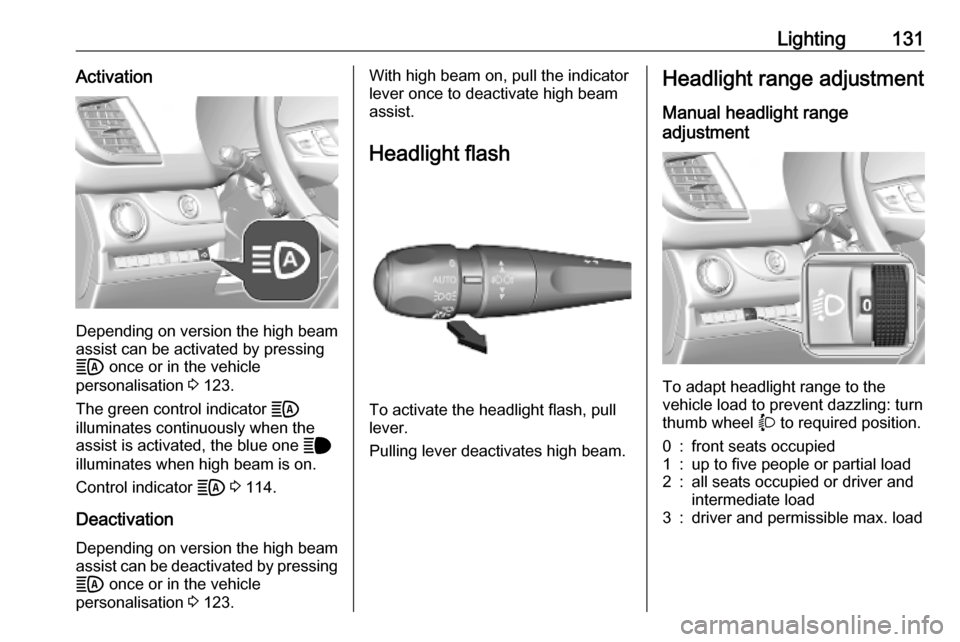
Depending on version the high beam
assist can be activated by pressing B once or in the vehicle
personalisation 3 123.
The green control indicator B
illuminates continuously when the
assist is activated, the blue one C
illuminates when high beam is on.
Control indicator B 3 114.
Deactivation Depending on version the high beamassist can be deactivated by pressing B once or in the vehicle
personalisation 3 123.
With high beam on, pull the indicator
lever once to deactivate high beam
assist.
Headlight flash
To activate the headlight flash, pull
lever.
Pulling lever deactivates high beam.
Headlight range adjustment
Manual headlight range
adjustment
To adapt headlight range to the
vehicle load to prevent dazzling: turn thumb wheel X to required position.
0:front seats occupied1:up to five people or partial load2:all seats occupied or driver and
intermediate load3:driver and permissible max. load
Page 135 of 289
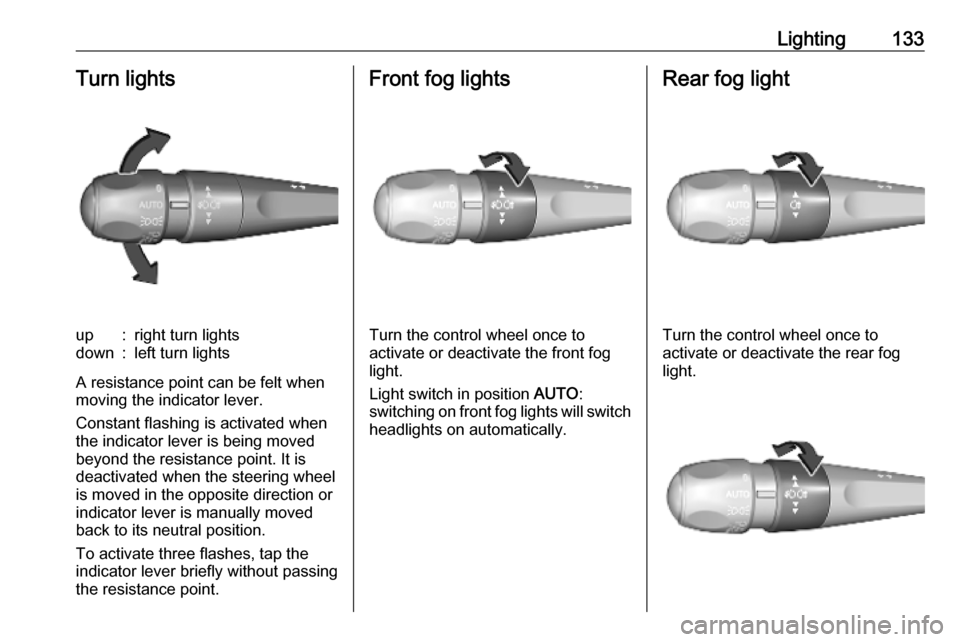
Lighting133Turn lightsup:right turn lightsdown:left turn lights
A resistance point can be felt when
moving the indicator lever.
Constant flashing is activated when
the indicator lever is being moved
beyond the resistance point. It is
deactivated when the steering wheel
is moved in the opposite direction or
indicator lever is manually moved
back to its neutral position.
To activate three flashes, tap the indicator lever briefly without passing
the resistance point.
Front fog lights
Turn the control wheel once to
activate or deactivate the front fog
light.
Light switch in position AUTO:
switching on front fog lights will switch headlights on automatically.
Rear fog light
Turn the control wheel once to
activate or deactivate the rear fog
light.
Page 136 of 289
134LightingTurn the control wheel twice to
activate or deactivate the rear fog
light.
Light switch in position AUTO:
switching on rear fog light will switch
headlights on automatically.
Reversing lights
The reversing light comes on when
the ignition is on and reverse gear is
selected.
Misted light covers
The inside of the light housing may
mist up briefly in poor, wet and cold weather conditions, in heavy rain or
after washing. The mist disappears
quickly by itself. To help, switch on the headlights.Interior lighting
Instrument panel illumination control
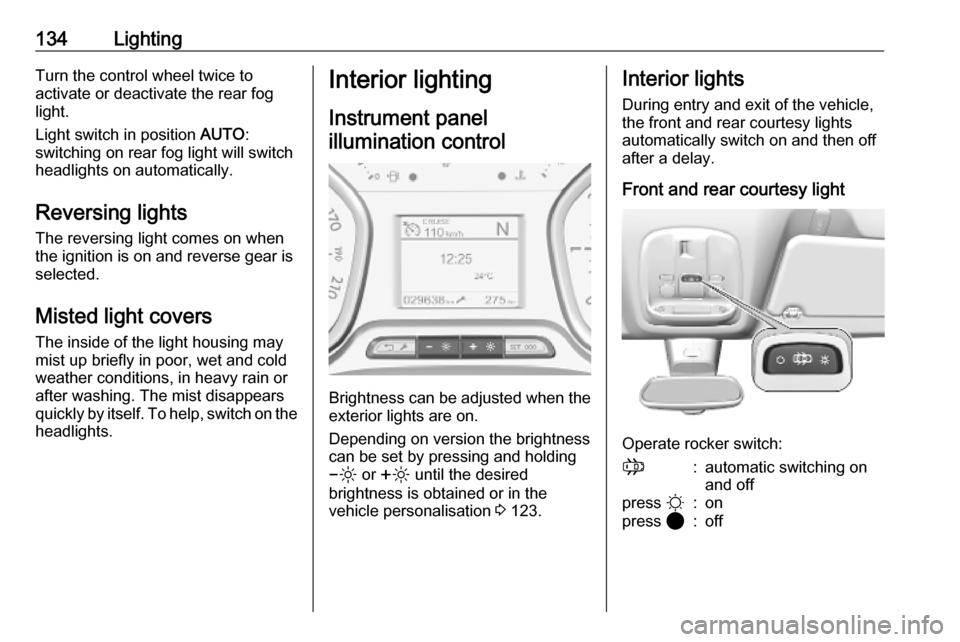
Brightness can be adjusted when the exterior lights are on.
Depending on version the brightness
can be set by pressing and holding
0 or ß until the desired
brightness is obtained or in the
vehicle personalisation 3 123.
Interior lights
During entry and exit of the vehicle,
the front and rear courtesy lights
automatically switch on and then off
after a delay.
Front and rear courtesy light
Operate rocker switch:
;:automatic switching on
and offpress §:onpress 2:off
Page 155 of 289
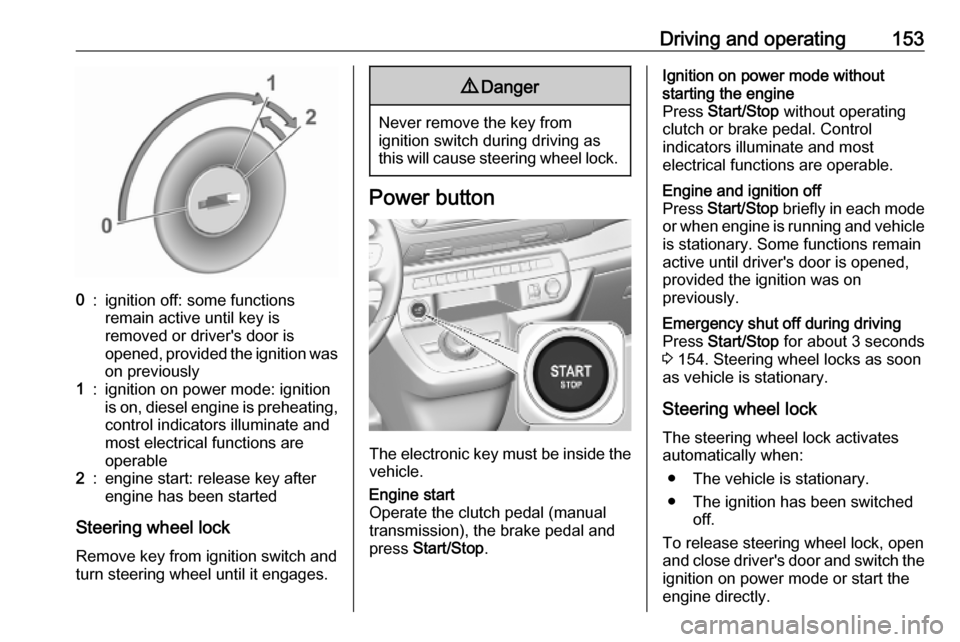
Driving and operating1530:ignition off: some functions
remain active until key is
removed or driver's door is
opened, provided the ignition was
on previously1:ignition on power mode: ignition
is on, diesel engine is preheating, control indicators illuminate and
most electrical functions are
operable2:engine start: release key after
engine has been started
Steering wheel lock
Remove key from ignition switch and
turn steering wheel until it engages.
9 Danger
Never remove the key from
ignition switch during driving as
this will cause steering wheel lock.
Power button
The electronic key must be inside the
vehicle.
Engine start
Operate the clutch pedal (manual
transmission), the brake pedal and
press Start/Stop .Ignition on power mode without
starting the engine
Press Start/Stop without operating
clutch or brake pedal. Control
indicators illuminate and most
electrical functions are operable.Engine and ignition off
Press Start/Stop briefly in each mode
or when engine is running and vehicle
is stationary. Some functions remain
active until driver's door is opened,
provided the ignition was on
previously.Emergency shut off during driving
Press Start/Stop for about 3 seconds
3 154. Steering wheel locks as soon
as vehicle is stationary.
Steering wheel lock
The steering wheel lock activates
automatically when:
● The vehicle is stationary.
● The ignition has been switched off.
To release steering wheel lock, open
and close driver's door and switch the ignition on power mode or start the
engine directly.
Page 156 of 289
154Driving and operating9Warning
If the vehicle battery is discharged,
the vehicle must not be towed,
tow-started or jump-started as the
steering wheel lock cannot be
disengaged.
Operation on vehicles with
electronic key system in case of
failure
If either the electronic key fails or the
battery of the electronic key is weak,
a message may be displayed in the
Driver Information Centre.
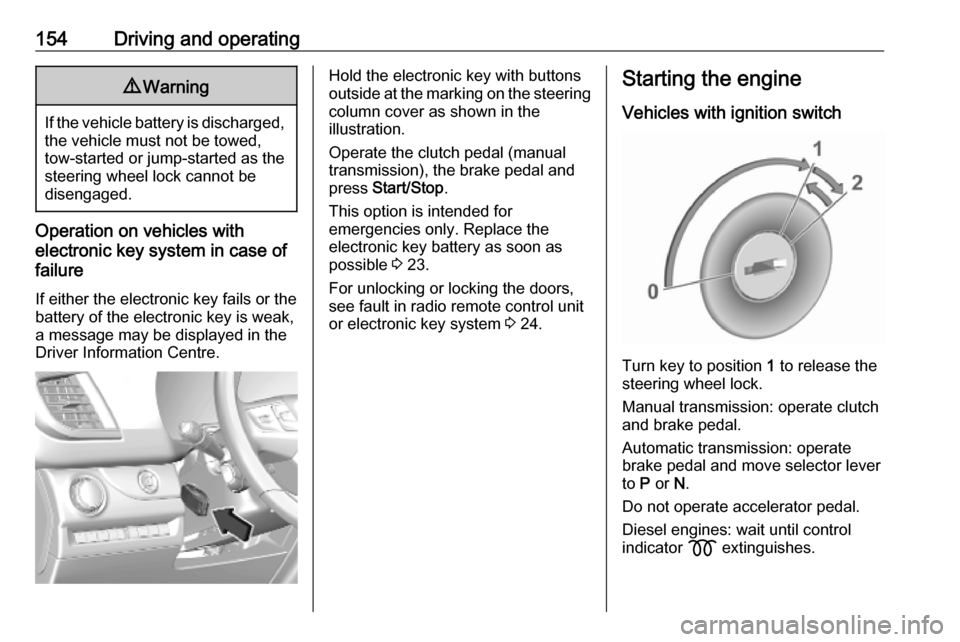
Hold the electronic key with buttons
outside at the marking on the steering column cover as shown in the
illustration.
Operate the clutch pedal (manual
transmission), the brake pedal and
press Start/Stop .
This option is intended for
emergencies only. Replace the
electronic key battery as soon as
possible 3 23.
For unlocking or locking the doors,
see fault in radio remote control unit
or electronic key system 3 24.Starting the engine
Vehicles with ignition switch
Turn key to position 1 to release the
steering wheel lock.
Manual transmission: operate clutch
and brake pedal.
Automatic transmission: operate
brake pedal and move selector lever
to P or N.
Do not operate accelerator pedal.
Diesel engines: wait until control
indicator z extinguishes.
Page 161 of 289
Driving and operating159Parking9Warning
● Do not park the vehicle on an
easily ignitable surface. The
high temperature of the
exhaust system could ignite the
surface.
● Always apply the parking brake.
● If the vehicle is on a level surface or uphill slope, engage
first gear or set the selector
lever to position P (automatic
transmission type A) / N
(automatic transmission type B). On an uphill slope, turn the
front wheels away from the
kerb.
If the vehicle is on a downhill
slope, engage reverse gear or
set the selector lever to position P (automatic transmission type
A) / N (automatic transmission
type B). Turn the front wheels
towards the kerb.
● Close the windows.
● Switch off the engine.
● Remove the ignition key from the ignition switch or switch off
ignition on vehicles with power
button. Turn the steering wheel
until the steering wheel lock is
felt to engage.
● Lock the vehicle.
● Activate the anti-theft alarm system.
● The engine cooling fans may run
after the engine has been
switched off 3 212.
Caution
After running at high engine
speeds or with high engine loads,
operate the engine briefly at a low load or run in neutral for
approx. 30 seconds before
switching off, in order to protect
the turbocharger.
Notice
In the event of an accident with airbag deployment, the engine is
switched off automatically if the
vehicle comes to a standstill within a
certain time.
In countries with extreme low
temperatures it may be necessary to park the vehicle without applied
parking brake. Make sure to park the
vehicle on a level surface.
Page 166 of 289

164Driving and operating
4. Unscrew protective cap from thefiller neck.
5. Open AdBlue canister.
6. Mount one end of the hose on the
canister and screw the other end
on the filler neck.
7. Lift the canister until it is empty, or
until the flow from the canister has stopped. This can take up to 5
minutes.
8. Place the canister on the ground to empty the hose, wait 15 s.
9. Unscrew the hose from the filler neck.
10. Mount the protective cap and turn
clockwise until it engages.
Notice
Dispose of AdBlue canister
according to environmental
requirements. Hose can be reused
after flushing with clear water before
AdBlue dries out.Automatic transmission
The automatic transmission permits
automatic gearshifting (automatic
mode) or manual gearshifting
(manual mode).
Manual shifting is possible in manual
mode.Type A
Move gear selector to position D,
press M next to the selector gear
selector and shift with the steering
wheel paddles + and -.Type B
Move gear selector to M and shift with
the steering wheel paddles + and -.
Manual mode 3 166.
Gear selection 3 165.
Page 167 of 289

Driving and operating165Transmission display
The mode or selected gear is shown
in the Driver Information Centre.
In automatic mode, the driving
programme is indicated by D, A or
AUTO .
In manual mode, M and the number
of the selected gear is indicated.
R indicates reverse gear.
N indicates neutral position.
For automatic transmission type A
only: P indicates park position.
Gear selection 3 165.
Gear selectionType A
Turn the gear selector.
P:park position, front wheels are
locked, engage only when the
vehicle is stationary and the
parking brake is appliedR:reverse gear, engage only when
the vehicle is stationaryN:neutralD:automatic modeM:manual mode
The gear selector is locked in P and
can only be moved when the ignition
is on and the brake pedal is applied.
The engine can only be started with
the gear selector in position P or N.
When position N is selected, press
the brake pedal or apply the parking
brake before starting.
Do not accelerate while engaging a
gear. Never depress the accelerator
pedal and brake pedal at the same
time.
When a gear is engaged, the vehicle
slowly begins to creep when the
brake is released.Type B
Turn the gear selector.
Page 168 of 289

166Driving and operatingR:reverse gear, engage only when
the vehicle is stationaryN:neutralA:automatic modeM:manual mode
The engine can only be started with
the gear selector in position N. When
position N is selected, press the brake
pedal and start the engine.
Do not accelerate while engaging a
gear. Never depress the accelerator
pedal and brake pedal at the same
time.
When a gear is engaged, the vehicle
slowly begins to creep when the
brake is released.
Engine braking To utilise the engine braking effect,select a lower gear when driving
downhill.
Parking
Type A:
Apply the parking brake and select P.Type B
Apply the parking brake and select
N or leave the selected gear selector
position.
Manual mode 1. Activate manual mode a) Automatic transmission type A:Manual mode M can be activated
from position D in each driving
situation and speed.
Press button M.
b) Automatic transmission type B:
Move gear selector to position M
if vehicle is at a standstill.
2. Pull steering wheel paddles to select gears manually.
Pull right steering wheel paddle + to
shift to a higher gear.
Pull left steering wheel paddle - to
shift to a lower gear.
Multiple pulls allow gears to be
skipped.
The selected gear is indicated in the
instrument cluster.
If a higher gear is selected when
vehicle speed is too low, or a lower
gear when vehicle speed is too high,
the shift is not executed. This can
cause a message in the Driver
Information Centre.
Page 170 of 289
168Driving and operating
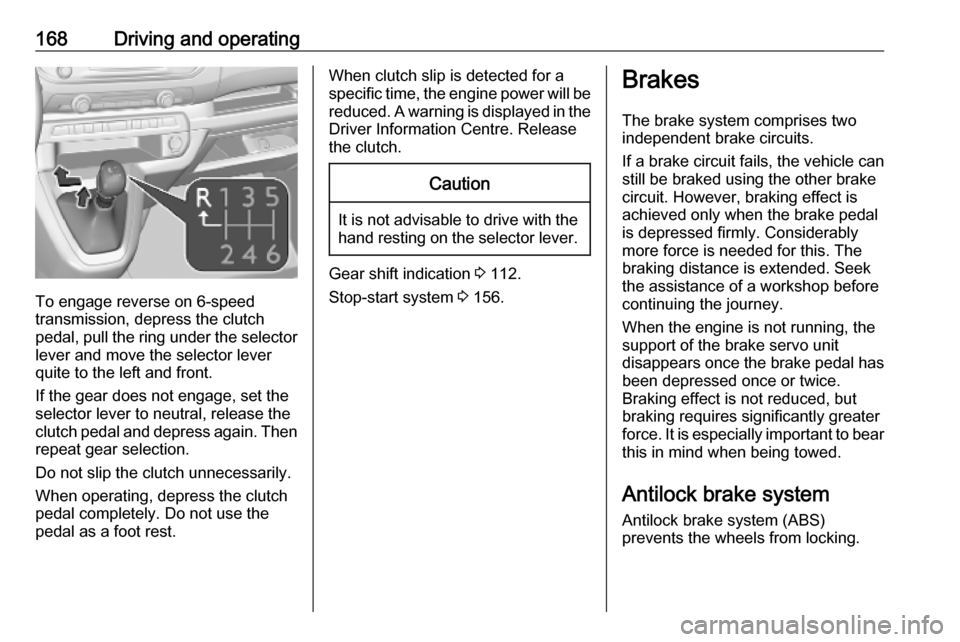
To engage reverse on 6-speed
transmission, depress the clutch
pedal, pull the ring under the selector
lever and move the selector lever
quite to the left and front.
If the gear does not engage, set the
selector lever to neutral, release the
clutch pedal and depress again. Then
repeat gear selection.
Do not slip the clutch unnecessarily.
When operating, depress the clutch
pedal completely. Do not use the
pedal as a foot rest.
When clutch slip is detected for a
specific time, the engine power will be reduced. A warning is displayed in the
Driver Information Centre. Release
the clutch.Caution
It is not advisable to drive with the hand resting on the selector lever.
Gear shift indication 3 112.
Stop-start system 3 156.
Brakes
The brake system comprises two
independent brake circuits.
If a brake circuit fails, the vehicle can
still be braked using the other brake
circuit. However, braking effect is
achieved only when the brake pedal
is depressed firmly. Considerably
more force is needed for this. The
braking distance is extended. Seek
the assistance of a workshop before
continuing the journey.
When the engine is not running, the
support of the brake servo unit
disappears once the brake pedal has been depressed once or twice.
Braking effect is not reduced, but
braking requires significantly greater
force. It is especially important to bear this in mind when being towed.
Antilock brake system
Antilock brake system (ABS)
prevents the wheels from locking.