change wheel VAUXHALL ZAFIRA 2014 Owner's Manual
[x] Cancel search | Manufacturer: VAUXHALL, Model Year: 2014, Model line: ZAFIRA, Model: VAUXHALL ZAFIRA 2014Pages: 217, PDF Size: 7.85 MB
Page 13 of 217

In brief11
1Light switch ........................ 108
Instrument illumination .......113
Rear fog light ....................... 112
Front fog lights ...................111
Headlight range
adjustment ......................... 109
2 Side air vents ...................... 122
3 Turn and lane-change
signals, headlight flash,
low beam and high beam ...111
Exit lighting .......................... 114
Parking lights ...................... 112
Cruise control ....................... 92
4 Steering wheel controls ........77
5 Horn ...................................... 78
Driver airbag ......................... 59
6 Instruments .......................... 83
7 Windscreen wiper,
windscreen washer
system, headlight washer
system .................................. 78
8 Centre air vents ................... 1229Left heated seat ....................49
Deflation detection system ..175
Tyre pressure monitoring
system ................................. 174
Ultrasonic parking assist ......89
Hazard warning flashers .....111
Central locking system ..........31
Sport mode ........................... 89
Right heated seat ..................49
10 Info-Display ........................... 93
Trip computer ...................... 102
Electronic climate control
system ................................. 119
11 Front passenger airbag .........59
12 Glovebox .............................. 67
13 Infotainment system ..............10
14 Climate control system ........ 11615Selector lever, manual
transmission ....................... 133
Manual transmission
automated ........................... 134
Automatic transmission .......128
16 Ashtray .................................. 82
17 Start/Stop button .................. 28
18 Accelerator pedal ................124
19 Ignition switch with
steering wheel lock .............125
Sensor panel for
emergency operation of
Open&Start system ..............28
20 Brake pedal ......................... 138
21 Clutch pedal ........................ 124
22 Steering wheel adjustment ...77
23 Bonnet release lever ...........153
Page 113 of 217
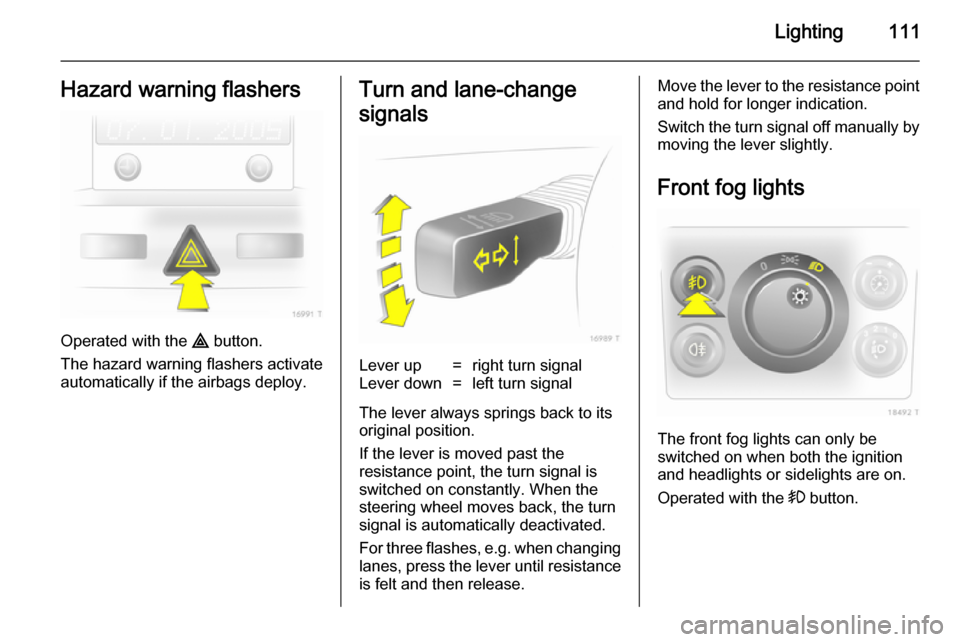
Lighting111Hazard warning flashers
Operated with the ¨ button.
The hazard warning flashers activate
automatically if the airbags deploy.
Turn and lane-change
signalsLever up=right turn signalLever down=left turn signal
The lever always springs back to its
original position.
If the lever is moved past the
resistance point, the turn signal is
switched on constantly. When the
steering wheel moves back, the turn
signal is automatically deactivated.
For three flashes, e.g. when changing lanes, press the lever until resistance
is felt and then release.
Move the lever to the resistance point
and hold for longer indication.
Switch the turn signal off manually by moving the lever slightly.
Front fog lights
The front fog lights can only be
switched on when both the ignition and headlights or sidelights are on.
Operated with the > button.
Page 153 of 217
Vehicle care151Vehicle careGeneral Information...................151
Vehicle checks ........................... 152
Bulb replacement .......................158
Electrical system ........................165
Vehicle tools .............................. 171
Wheels and tyres .......................172
Jump starting ............................. 184
Towing ....................................... 185
Appearance care .......................187General Information
Accessories and vehicle
modifications
We recommend using genuine parts and accessories and factory
approved parts specific for your
vehicle type. We cannot assess or guarantee reliability of other products
- even if they have a regulatory or
otherwise granted approval.
Do not make any modifications to the electrical system, e.g. changes of
electronic control units (chip tuning).Caution
When transporting the vehicle on
a train or on a recovery vehicle, the
mud flaps might be damaged.
Vehicle storage
Storage for a long period of time
Following must be done if the vehicle
should be stored for several months:
■ Wash and wax the vehicle.
■ Have the wax in the engine compartment and underbody
checked.
■ Clean and preserve rubber seals.
■ Fill up fuel tank completely.
■ Change engine oil.
■ Drain washer fluid reservoir.
■ Check coolant antifreeze.
■ Adjust tyre pressure to the value specified for full load.
■ Park vehicle in dry, well ventilated place. Engage first or reverse gear
or set selector lever to P. Prevent
the vehicle from rolling.
■ Do not apply parking brake.
Page 175 of 217
Vehicle care173
Run-flat tyres are only permitted on
vehicles with electronic stability
program and tyre pressure monitoring
system or deflation detection system.Caution
Check tyre pressures regularly
even if run-flat tyres are fitted.
Depending on tyre manufacturer, run-
flat tyres can be identified from a
marking on the tyre wall. E.g.
ROF=RunonFlat for Goodyear orSSR=Self Supporting Runflat Tyre
for Continental.
Use of run-flat tyres is only permitted
in combination with factory approved
alloy wheels.
Do not use a tyre repair kit.
The ECO tyre pressure must not be
used.
Run-flat tyres must not be combined
with standard tyres.
If converting to standard tyres, note
that the vehicle is not equipped with a spare wheel or tyre repair kit.
Driving with a damaged tyre
A loss in tyre pressure is indicated by
the tyre pressure monitoring system
or the deflation detection system.
If a tyre has no pressure, continued
driving is possible
■ at a speed of max. 50 mph
■ up to a distance of 50 miles9 Warning
The vehicle will be more difficult to
steer and handle. Braking
distance will be longer.
Adapt driving style and speed to the changed conditions.
Tyre designations
E.g. 195/65 R 15 91 H
195=Tyre width, mm65=Cross-section ratio (tyre
height to tyre width), %R=Belt type: RadialRF=Type: RunFlat15=Wheel diameter, inches91=Load index e.g. 91 is
equivalent to 618 kgH=Speed code letter
Speed code letter:
Q=up to 100 mphS=up to 112 mphT=up to 118 mphH=up to 130 mphV=up to 150 mphW=up to 168 mph
Tyre pressure
Check the pressure of cold tyres at
least every 14 days and before any
long journey. Do not forget the spare
wheel. This also applies to vehicles
with tyre pressure monitoring.
Page 177 of 217
Vehicle care175
Otherwise, the tyre pressure will be
monitored by the deflation detection
system 3 175.
Notice
In countries where the tyre pressure
monitoring system is legally
required, the use of wheels without
pressure sensors will invalidate the
vehicle type approval.
The current tyre pressures can be
shown in the Info-Display 3 106.
Vehicle messages, tyre pressure
3 101.
Control indicator w 3 90.
If a complete set of wheels without
sensors is mounted (e.g. four winter
tyres), no error message will be
displayed. The tyre pressure
monitoring system is not operational.
Retrofitting of sensors is possible.
The use of commercially available
liquid tyre repair kits can impair the
function of the system. Factory-
approved repair kits can be used.
External high-power radio equipment
could disrupt the tyre pressure
monitoring system.System initialisation
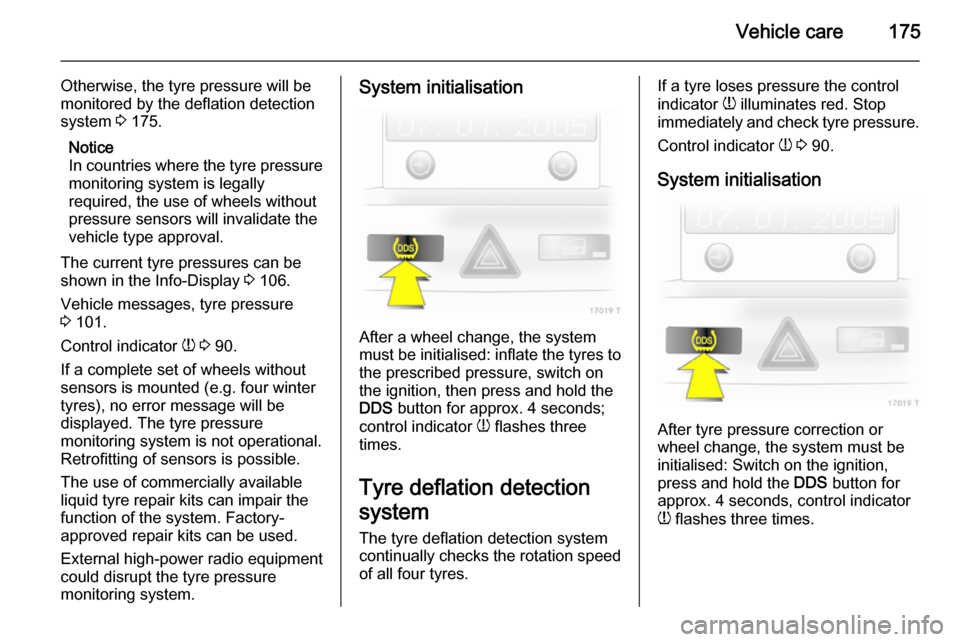
After a wheel change, the system
must be initialised: inflate the tyres to
the prescribed pressure, switch on
the ignition, then press and hold the
DDS button for approx. 4 seconds;
control indicator w flashes three
times.
Tyre deflation detection
system
The tyre deflation detection system
continually checks the rotation speed
of all four tyres.
If a tyre loses pressure the control
indicator w illuminates red. Stop
immediately and check tyre pressure.
Control indicator w 3 90.
System initialisation
After tyre pressure correction or
wheel change, the system must be
initialised: Switch on the ignition,
press and hold the DDS button for
approx. 4 seconds, control indicator
w flashes three times.
Page 182 of 217
180Vehicle care
Notice
The driving characteristics of the repaired tyre is severely affected,
therefore have this tyre replaced.
If unusual noise is heard or the
compressor becomes hot, turn
compressor off for at least 30
minutes.
The built-in safety valve opens at a
pressure of 7 bar.
Note the expiry date of the kit. After
this date its sealing capability is no
longer guaranteed. Pay attention to
storage information on sealant
bottle.
Replace the used sealant bottle. Dispose of the bottle as prescribed
by applicable laws.
The compressor and sealant can be used from approx. -30 °C.
The adapters supplied can be used
to pump up other items e.g.
footballs, air mattresses, inflatable
dinghies etc. They are located on the underside of the compressor. To
remove, screw on compressor air hose and withdraw adapter.Wheel changing
Some vehicles are equipped with a
tyre repair kit instead of a spare wheel
3 177.
Make the following preparations and
observe the following information:
■ Park the vehicle on a level, firm and
non-skid surface. The front wheels
must be in the straight-ahead
position.
■ Apply the parking brake and engage first gear, reverse gear or
P .
■ Remove the spare wheel 3 182.
■ Never change more than one wheel
at once.
■ Use the jack only to change wheels
in case of puncture, not for
seasonal winter or summer tyre
change.
■ If the ground on which the vehicle is standing is soft, a solid board
(max. 1 cm thick) should be placed
under the jack.
■ No people or animals may be in the
vehicle when it is jacked-up.■ Never crawl under a jacked-up vehicle.
■ Do not start the vehicle when it is raised on the jack.
■ Before screwing in the wheel bolts,
clean them and lightly coat the
taper of each wheel bolt with
commercially available grease.
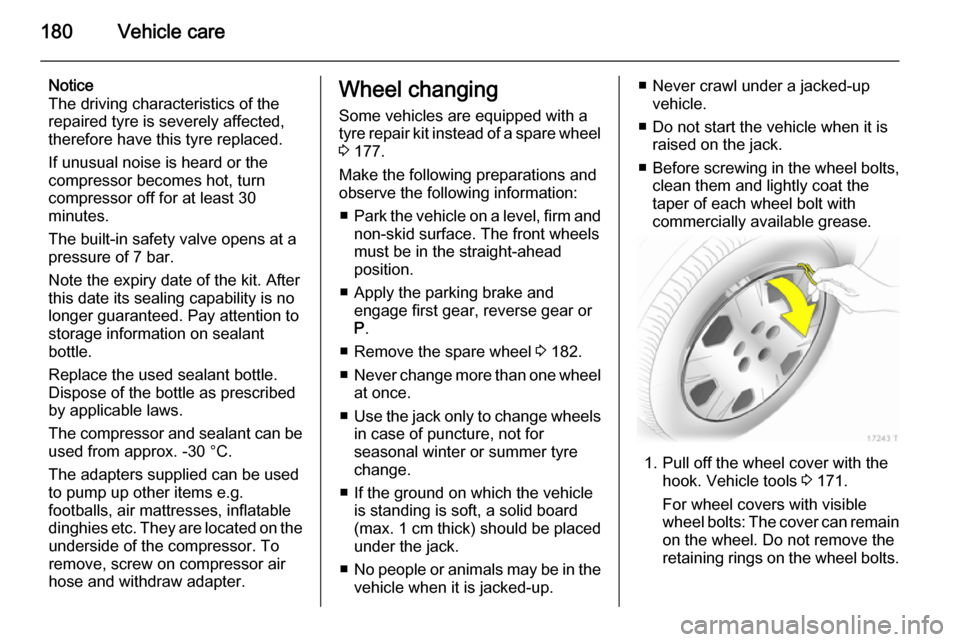
1. Pull off the wheel cover with the hook. Vehicle tools 3 171.
For wheel covers with visible
wheel bolts: The cover can remain
on the wheel. Do not remove the
retaining rings on the wheel bolts.
Page 183 of 217
Vehicle care181
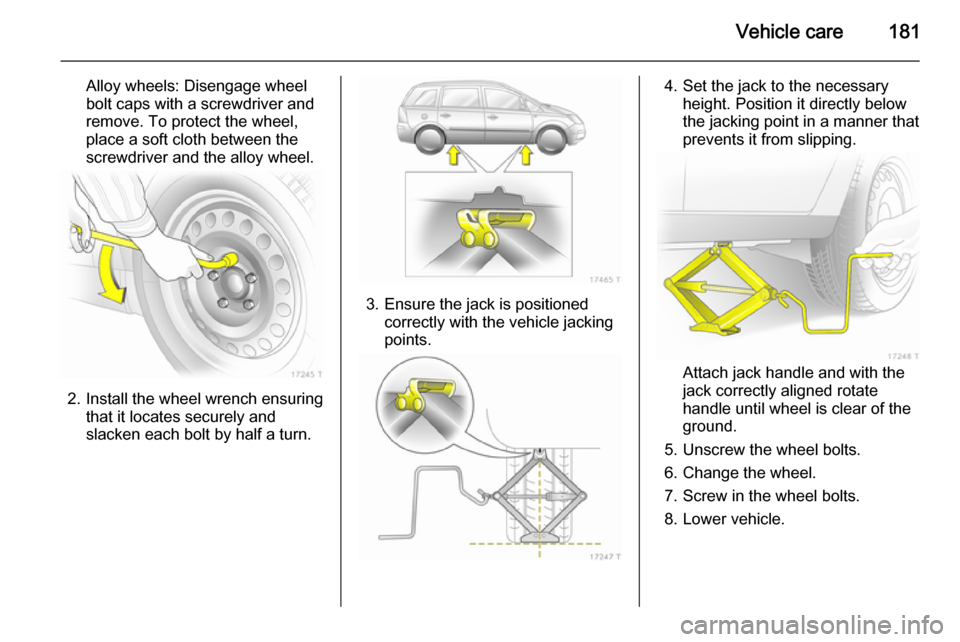
Alloy wheels: Disengage wheel
bolt caps with a screwdriver and
remove. To protect the wheel,
place a soft cloth between the
screwdriver and the alloy wheel.
2. Install the wheel wrench ensuring that it locates securely and
slacken each bolt by half a turn.
3. Ensure the jack is positioned correctly with the vehicle jacking
points.
4. Set the jack to the necessary height. Position it directly below
the jacking point in a manner that
prevents it from slipping.
Attach jack handle and with the
jack correctly aligned rotate handle until wheel is clear of theground.
5. Unscrew the wheel bolts.
6. Change the wheel.
7. Screw in the wheel bolts.
8. Lower vehicle.
Page 184 of 217
182Vehicle care
9. Install the wheel wrench ensuringthat it locates securely and tighten
each bolt in a crosswise
sequence. Tightening torque is
110 Nm.
10. Align the valve hole in the wheel cover with the tyre valve before
installing.
Install wheel bolt caps.
11. Stow the replaced wheel 3 177
and the vehicle tools 3 171.
12. Check the tyre pressure of the installed tyre and also the wheel
bolt torque as soon as possible.
Have the defective tyre renewed or
repaired.
Spare wheel The spare wheel can be classified as
a temporary spare wheel depending
on the size compared to the other
mounted wheels and country
regulations.
The spare wheel has a steel rim.Use of a spare wheel that is smaller
than the other wheels or together with
winter tyres could affect driveability.
Have the defective tyre replaced as
soon as possible.
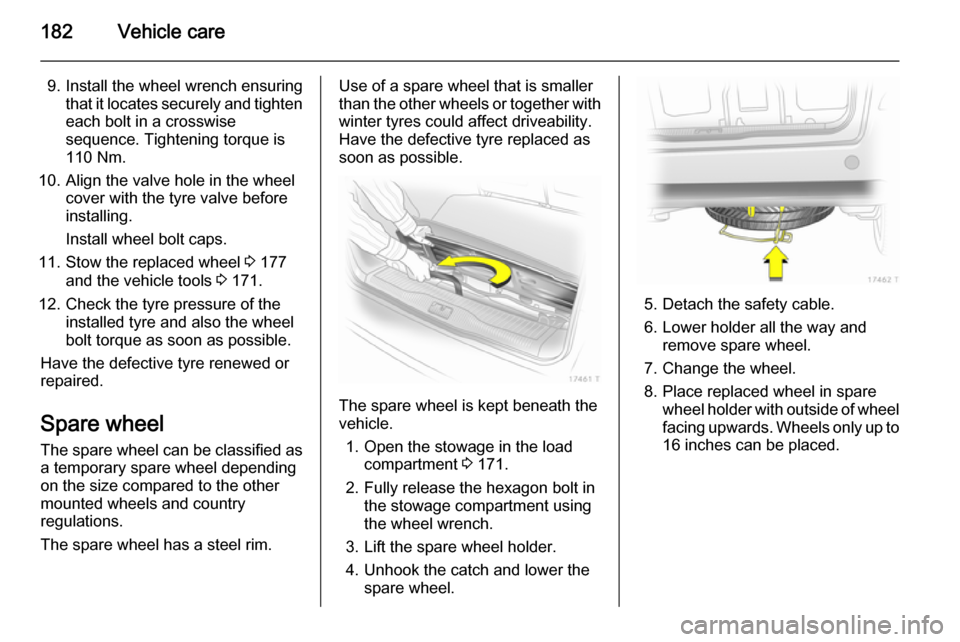
The spare wheel is kept beneath the
vehicle.
1. Open the stowage in the load compartment 3 171.
2. Fully release the hexagon bolt in the stowage compartment using
the wheel wrench.
3. Lift the spare wheel holder.
4. Unhook the catch and lower the spare wheel.
5. Detach the safety cable.
6. Lower holder all the way and remove spare wheel.
7. Change the wheel.
8. Place replaced wheel in spare wheel holder with outside of wheel
facing upwards. Wheels only up to
16 inches can be placed.
Page 216 of 217

214
Trip computer in Board-Info-Display ................................... 102
Trip computer in Graphic-Info- Display or Colour-Info-Display 104
Triple-Info-Display .......................93
Trip odometer .............................. 83
Turn and lane-change signals ...111
Turn signal ................................... 87
Tyre chains ................................ 177
Tyre deflation detection system. .......................................... 23, 175
Tyre designations ......................173
Tyre pressure ....................101, 173
Tyre pressure monitoring system .............................. 24, 174
Tyre pressures ................... 106, 205
Tyre repair kit ............................. 177
Tyres .......................................... 172
U Ultrasonic parking assist .............. 89
Underseat storage .......................68
Upholstery .................................. 189
Upshift .......................................... 89
Using this manual ..........................3
V Vehicle battery ........................... 156
Vehicle checks............................ 152
Vehicle data ................................ 197Vehicle data recording and
privacy ..................................... 208
Vehicle dimensions .................... 204
Vehicle Identification Number ....195
Vehicle jack ................................ 171
Vehicle messages .....................100
Vehicle security ............................ 35
Vehicle specific data ......................3
Vehicle storage ........................... 151
Vehicle tools ............................... 171
Vehicle unlocking ........................... 6 Vehicle weight ........................... 203
Ventilation ................................... 116
W
Warning chimes .........................100
Warning lights ............................... 83
Warning triangle .......................... 74
Washer and wiper systems .........13
Washer fluid ............................... 155
Washer fluid level ......................102
Wheel changing .........................180
Wheel covers ............................. 176
Wheels and tyres .......................172
Windows ....................................... 40
Windscreen................................... 40
Windscreen wiper/washer ...........78
Winter mode ................................ 89
Winter tyres ............................... 172
Wiper blade replacement ..........157X
Xenon headlights .......................161