clock VAUXHALL ZAFIRA TOURER 2016 User Guide
[x] Cancel search | Manufacturer: VAUXHALL, Model Year: 2016, Model line: ZAFIRA TOURER, Model: VAUXHALL ZAFIRA TOURER 2016Pages: 305, PDF Size: 9.15 MB
Page 223 of 305
Driving and operating221Attach breakaway stopping cable to
eye.
Check that the coupling ball bar is
correctly installed
● Green marking on rotary knob must point towards green
marking on coupling ball bar.
● There must be no gap between the rotary handle and the
coupling ball bar.
● The coupling ball bar must be firmly engaged in the opening.
● The coupling ball bar must be locked and the key removed.9Warning
Towing a trailer is permitted only
when a coupling ball bar is fitted correctly. If the coupling ball bardoes not engage correctly, seekthe assistance of a workshop.
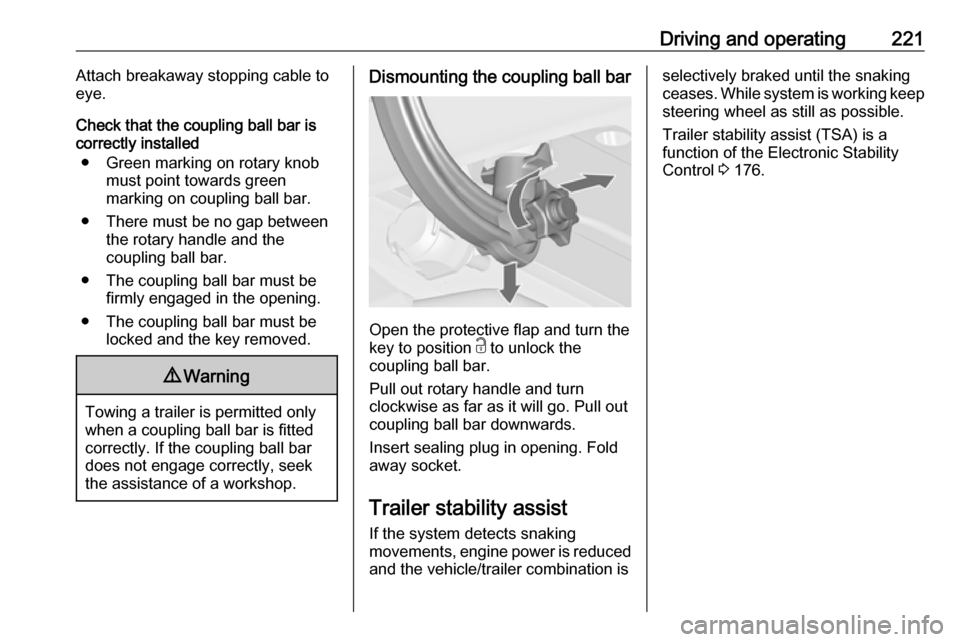
Dismounting the coupling ball bar
Open the protective flap and turn the
key to position c to unlock the
coupling ball bar.
Pull out rotary handle and turn
clockwise as far as it will go. Pull out coupling ball bar downwards.
Insert sealing plug in opening. Fold away socket.
Trailer stability assist
If the system detects snaking
movements, engine power is reduced
and the vehicle/trailer combination is
selectively braked until the snaking ceases. While system is working keep steering wheel as still as possible.
Trailer stability assist (TSA) is a
function of the Electronic Stability
Control 3 176.
Page 233 of 305
Vehicle care231Wiper blade on the rear window
Lift wiper arm. Disengage wiper bladeas shown in illustration and remove.
Attach the wiper blade slightly angled
to the wiper arm and push until it
engages.
Lower wiper arm carefully.
Bulb replacement
Switch off the ignition and switch off
the relevant switch or close the doors.
Only hold a new bulb at the base. Do not touch the bulb glass with bare
hands.
Use only the same bulb type for
replacement.
Replace headlight bulbs from within
the engine compartment.
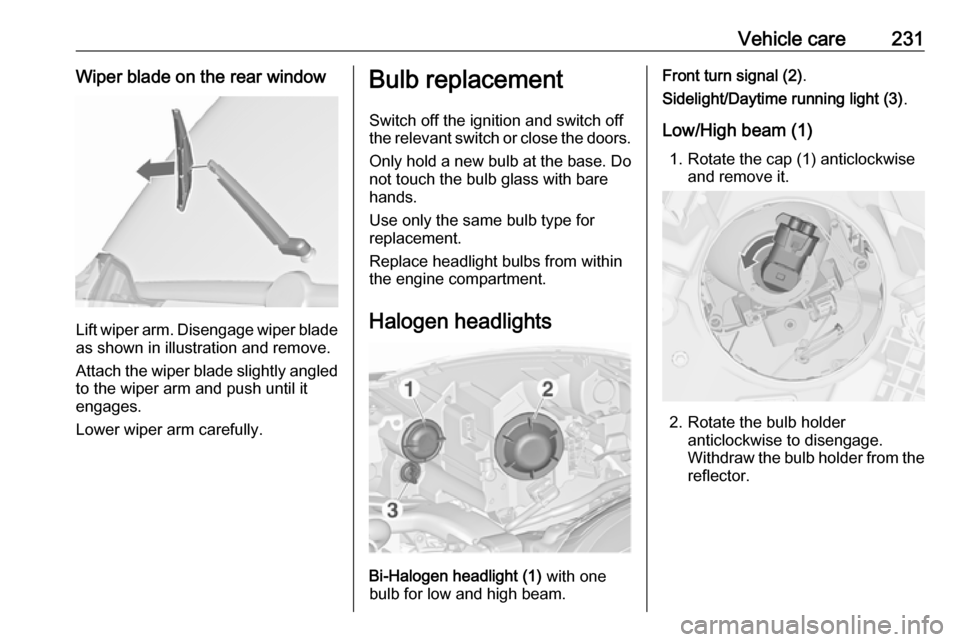
Halogen headlights
Bi-Halogen headlight (1) with one
bulb for low and high beam.
Front turn signal (2) .
Sidelight/Daytime running light (3) .
Low/High beam (1) 1. Rotate the cap (1) anticlockwise and remove it.
2. Rotate the bulb holder anticlockwise to disengage.
Withdraw the bulb holder from the
reflector.
Page 234 of 305
232Vehicle care
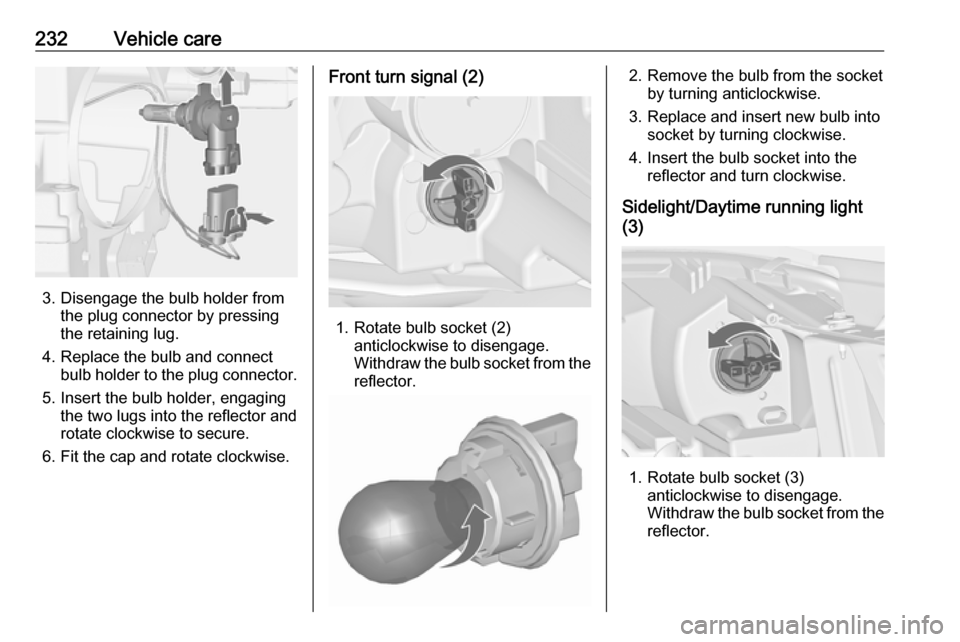
3. Disengage the bulb holder fromthe plug connector by pressing
the retaining lug.
4. Replace the bulb and connect bulb holder to the plug connector.
5. Insert the bulb holder, engaging the two lugs into the reflector and
rotate clockwise to secure.
6. Fit the cap and rotate clockwise.
Front turn signal (2)
1. Rotate bulb socket (2) anticlockwise to disengage.
Withdraw the bulb socket from the
reflector.
2. Remove the bulb from the socket by turning anticlockwise.
3. Replace and insert new bulb into socket by turning clockwise.
4. Insert the bulb socket into the reflector and turn clockwise.
Sidelight/Daytime running light
(3)
1. Rotate bulb socket (3) anticlockwise to disengage.
Withdraw the bulb socket from the
reflector.
Page 235 of 305
Vehicle care233
2. Remove the bulb from the socketby pulling.
3. Replace and insert new bulb into socket.
4. Insert the bulb socket into the reflector and turn clockwise.
Adaptive forward lighting9 Danger
Adaptive forward lighting system
uses Xenon headlights.
Xenon headlights work under
extremely high electrical voltage.
Do not touch. Have bulbs replaced by a workshop.
Bulbs for front turn signal and
corner lighting can be replaced.
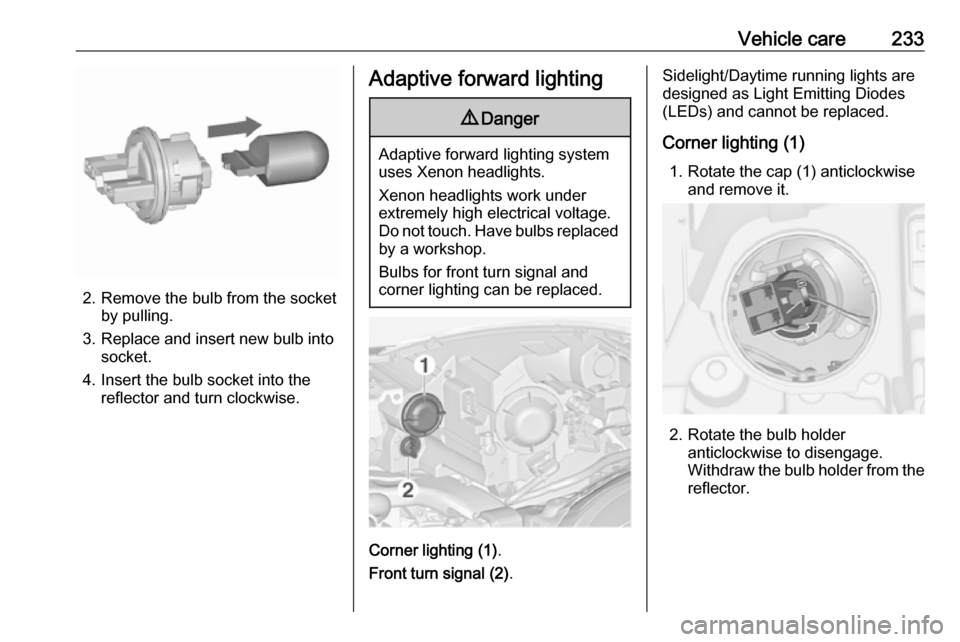
Corner lighting (1) .
Front turn signal (2) .
Sidelight/Daytime running lights are
designed as Light Emitting Diodes
(LEDs) and cannot be replaced.
Corner lighting (1) 1. Rotate the cap (1) anticlockwise and remove it.
2. Rotate the bulb holder anticlockwise to disengage.
Withdraw the bulb holder from the
reflector.
Page 236 of 305
234Vehicle care
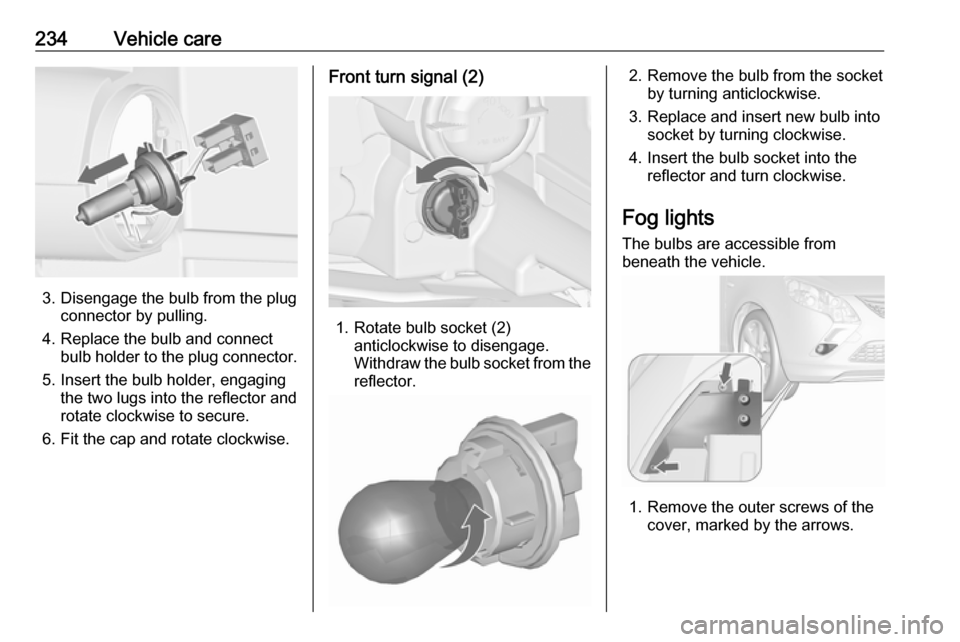
3. Disengage the bulb from the plugconnector by pulling.
4. Replace the bulb and connect bulb holder to the plug connector.
5. Insert the bulb holder, engaging the two lugs into the reflector and
rotate clockwise to secure.
6. Fit the cap and rotate clockwise.
Front turn signal (2)
1. Rotate bulb socket (2) anticlockwise to disengage.
Withdraw the bulb socket from the
reflector.
2. Remove the bulb from the socket by turning anticlockwise.
3. Replace and insert new bulb into socket by turning clockwise.
4. Insert the bulb socket into the reflector and turn clockwise.
Fog lights
The bulbs are accessible from
beneath the vehicle.
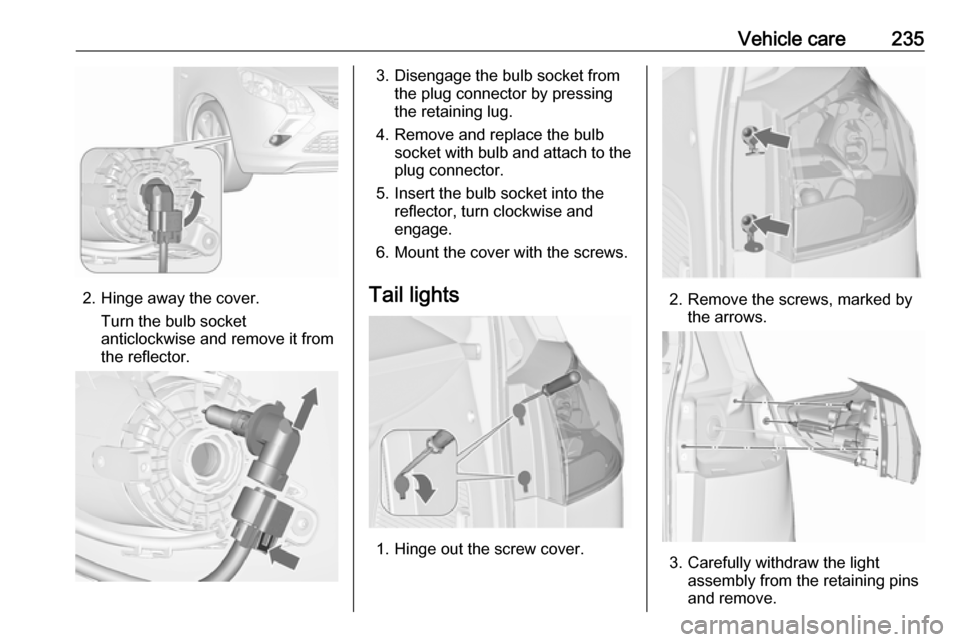
1. Remove the outer screws of the cover, marked by the arrows.
Page 237 of 305
Vehicle care235
2. Hinge away the cover.Turn the bulb socket
anticlockwise and remove it from
the reflector.
3. Disengage the bulb socket from the plug connector by pressing
the retaining lug.
4. Remove and replace the bulb socket with bulb and attach to the
plug connector.
5. Insert the bulb socket into the reflector, turn clockwise and
engage.
6. Mount the cover with the screws.
Tail lights
1. Hinge out the screw cover.
2. Remove the screws, marked by the arrows.
3. Carefully withdraw the light assembly from the retaining pins
and remove.
Page 239 of 305
Vehicle care2372.Turn the bulb holder anticlockwise
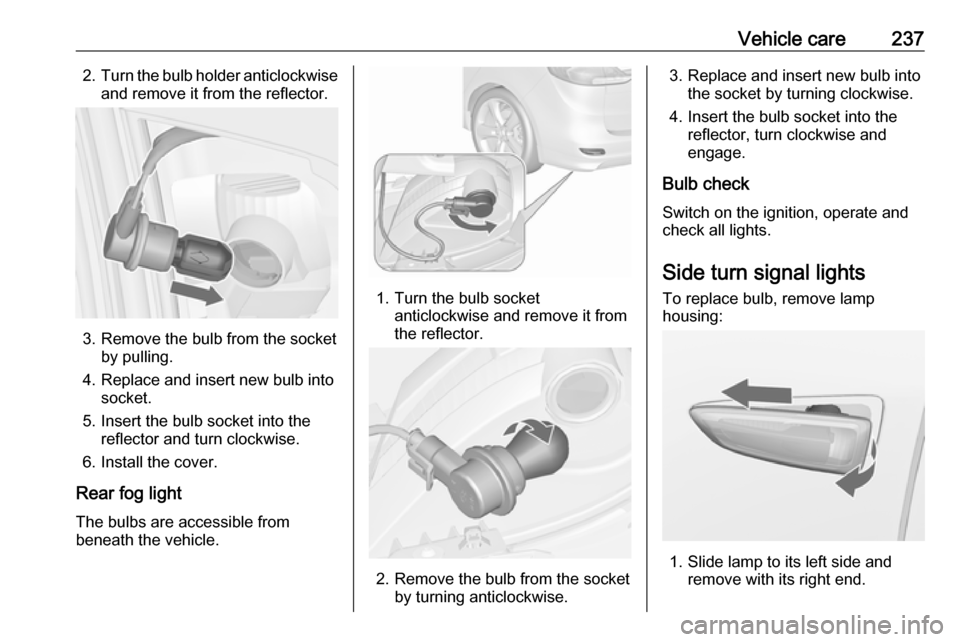
and remove it from the reflector.
3. Remove the bulb from the socket by pulling.
4. Replace and insert new bulb into socket.
5. Insert the bulb socket into the reflector and turn clockwise.
6. Install the cover.
Rear fog light
The bulbs are accessible from
beneath the vehicle.
1. Turn the bulb socket anticlockwise and remove it from
the reflector.
2. Remove the bulb from the socket by turning anticlockwise.
3. Replace and insert new bulb intothe socket by turning clockwise.
4. Insert the bulb socket into the reflector, turn clockwise and
engage.
Bulb check
Switch on the ignition, operate and
check all lights.
Side turn signal lights
To replace bulb, remove lamp
housing:
1. Slide lamp to its left side and remove with its right end.
Page 240 of 305
238Vehicle care
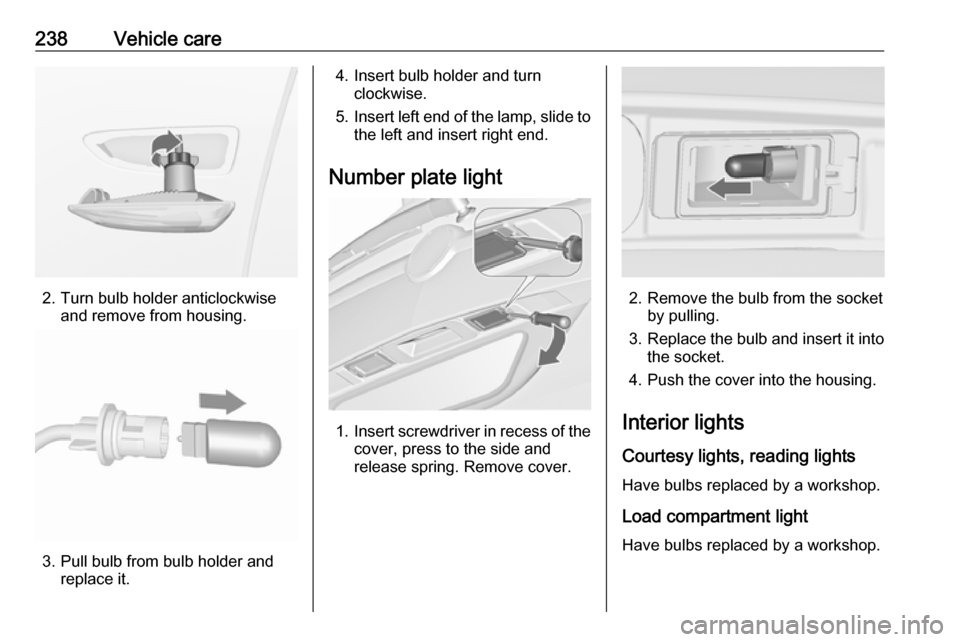
2. Turn bulb holder anticlockwiseand remove from housing.
3. Pull bulb from bulb holder andreplace it.
4. Insert bulb holder and turnclockwise.
5. Insert left end of the lamp, slide to
the left and insert right end.
Number plate light
1. Insert screwdriver in recess of the
cover, press to the side and
release spring. Remove cover.
2. Remove the bulb from the socket by pulling.
3. Replace the bulb and insert it into
the socket.
4. Push the cover into the housing.
Interior lights Courtesy lights, reading lights
Have bulbs replaced by a workshop.
Load compartment light
Have bulbs replaced by a workshop.
Page 260 of 305
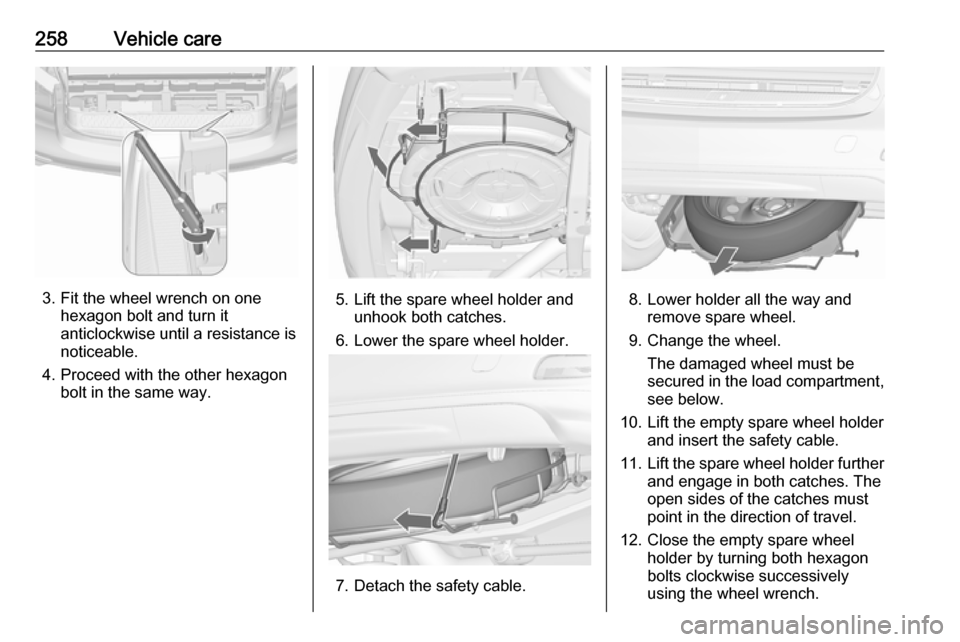
258Vehicle care
3. Fit the wheel wrench on onehexagon bolt and turn it
anticlockwise until a resistance is
noticeable.
4. Proceed with the other hexagon bolt in the same way.5. Lift the spare wheel holder andunhook both catches.
6. Lower the spare wheel holder.
7. Detach the safety cable.
8. Lower holder all the way and remove spare wheel.
9. Change the wheel. The damaged wheel must be
secured in the load compartment,
see below.
10. Lift the empty spare wheel holder and insert the safety cable.
11. Lift the spare wheel holder further
and engage in both catches. The open sides of the catches must
point in the direction of travel.
12. Close the empty spare wheel holder by turning both hexagon
bolts clockwise successively using the wheel wrench.
Page 301 of 305

299Child restraint systems ................60
Cigarette lighter .........................103
Climate control ............................. 15
Climate control systems .............150
Clock........................................... 101
Code ........................................... 122
Control indicators........................ 107
Control of the vehicle .................159
Controls ........................................ 97
Convex shape .............................. 28
Coolant and antifreeze ...............270
Cruise control ....................116, 179
Cupholders .................................. 67
Curtain airbag system .................. 58
Curve lighting.............................. 142
D Danger, Warnings and Cautions ...4
Daytime running lights ...............142
Declaration of conformity ............292
DEF ............................................ 165
Diesel exhaust fluid ....................165
Diesel fuel system bleeding .......230
Diesel particle filter .............114, 164
Door open .................................. 116
Door panel storage .......................68
Doors ............................................ 25
Driver assistance systems ..........179
Driver Information Centre ...........116Driving characteristics and
towing tips .............................. 218
Driving hints ................................ 159
E Electric adjustment ......................28
Electrical system......................... 239
Electric parking brake .........112, 173
Electric parking brake fault .........112
Electronic climate control system 152
Electronic driving programmes ..170
Electronic Stability Control.......... 176
Electronic Stability Control and Traction Control system ..........113
Electronic Stability Control off..... 113
End-of-life vehicle recovery .......223
Engine compartment fuse box ...240
Engine coolant ........................... 226
Engine coolant temperature gauge ..................................... 106
Engine data ............................... 277
Engine exhaust .......................... 164
Engine identification ...................273
Engine oil ................... 225, 270, 274
Engine oil pressure ....................114
Entry lighting .............................. 148
Event data recorders ..................296
Exit lighting ................................ 149
Exterior care .............................. 264
Exterior light ............................... 115Exterior lighting ....................12, 138
Exterior mirrors ............................. 28
F
Fault ........................................... 171
First aid kit ................................... 92
Fixed air vents ........................... 157
Flex-Fix system ............................ 70
Fog light ..................................... 116
Fog lights ................................... 234
Folding mirrors ............................. 29
Folding tray .................................. 92
Following distance indication ......192
Forward collision alert................. 188
Front airbag system .....................57
Front fog lights ........................... 146
Front seats.................................... 38
Front storage ................................ 68
Fuel............................................. 208
Fuel consumption - CO 2-
Emissions ............................... 216
Fuel for diesel engines ..............208
Fuel for liquid gas operation .......209
Fuel for natural gas operation ...209
Fuel for petrol engines ...............208
Fuel gauge ................................. 105
Fuel selector .............................. 105
Fuses ......................................... 239