Button VAUXHALL ZAFIRA TOURER 2017 User Guide
[x] Cancel search | Manufacturer: VAUXHALL, Model Year: 2017, Model line: ZAFIRA TOURER, Model: VAUXHALL ZAFIRA TOURER 2017Pages: 289, PDF Size: 8.91 MB
Page 37 of 289
Seats, restraints35Seats, restraintsHead restraints............................ 35
Active head restraints ................36
Front seats ................................... 37
Seat position .............................. 37
Manual seat adjustment ............38
Power seat adjustment ..............40
Armrest ...................................... 41
Heating ...................................... 42
Rear seats ................................... 43
Second row seats ......................43
Third row seats .......................... 47
Seat belts ..................................... 49
Three-point seat belt .................50
Airbag system .............................. 53
Front airbag system ...................56
Side airbag system ....................56
Curtain airbag system ...............57
Airbag deactivation ....................57
Child restraints ............................. 59
Child restraint systems ..............59
Child restraint installation locations ................................... 62Head restraints
Position9 Warning
Only drive with the head restraint
set to the proper position.
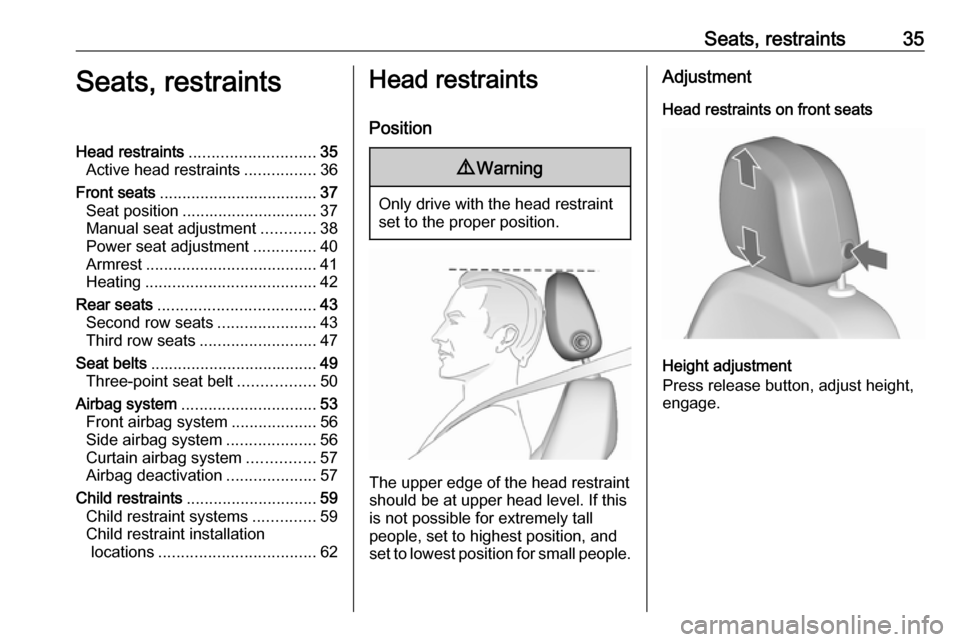
The upper edge of the head restraint
should be at upper head level. If this
is not possible for extremely tall
people, set to highest position, and
set to lowest position for small people.
Adjustment
Head restraints on front seats
Height adjustment
Press release button, adjust height,
engage.
Page 44 of 289
42Seats, restraintsFlexConsole armrest
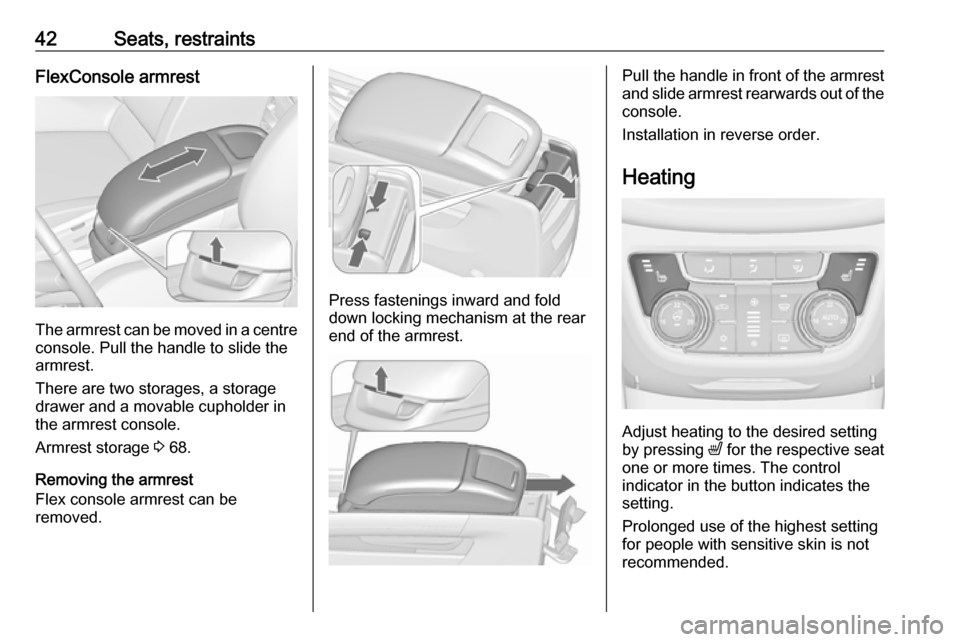
The armrest can be moved in a centre
console. Pull the handle to slide the
armrest.
There are two storages, a storage
drawer and a movable cupholder in
the armrest console.
Armrest storage 3 68.
Removing the armrest
Flex console armrest can be
removed.
Press fastenings inward and fold down locking mechanism at the rear
end of the armrest.
Pull the handle in front of the armrest
and slide armrest rearwards out of the
console.
Installation in reverse order.
Heating
Adjust heating to the desired setting
by pressing ß for the respective seat
one or more times. The control
indicator in the button indicates the
setting.
Prolonged use of the highest setting
for people with sensitive skin is not
recommended.
Page 47 of 289
Seats, restraints45
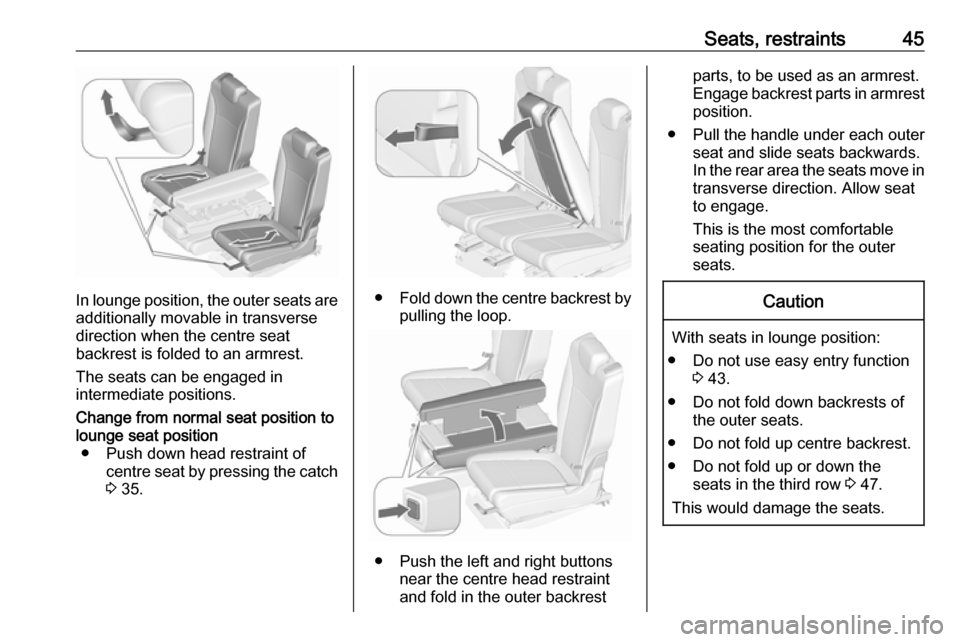
In lounge position, the outer seats are
additionally movable in transverse
direction when the centre seat
backrest is folded to an armrest.
The seats can be engaged in
intermediate positions.
Change from normal seat position to
lounge seat position ● Push down head restraint of centre seat by pressing the catch3 35.
● Fold down the centre backrest by
pulling the loop.
● Push the left and right buttons near the centre head restraint
and fold in the outer backrest
parts, to be used as an armrest.
Engage backrest parts in armrest position.
● Pull the handle under each outer seat and slide seats backwards.
In the rear area the seats move in
transverse direction. Allow seat
to engage.
This is the most comfortable seating position for the outer
seats.Caution
With seats in lounge position:
● Do not use easy entry function 3 43.
● Do not fold down backrests of the outer seats.
● Do not fold up centre backrest.
● Do not fold up or down the seats in the third row 3 47.
This would damage the seats.
Page 48 of 289
46Seats, restraints9Warning
Move seats only to lounge position
if seats in the third row are not
occupied.
Change from lounge seat position to normal seat position
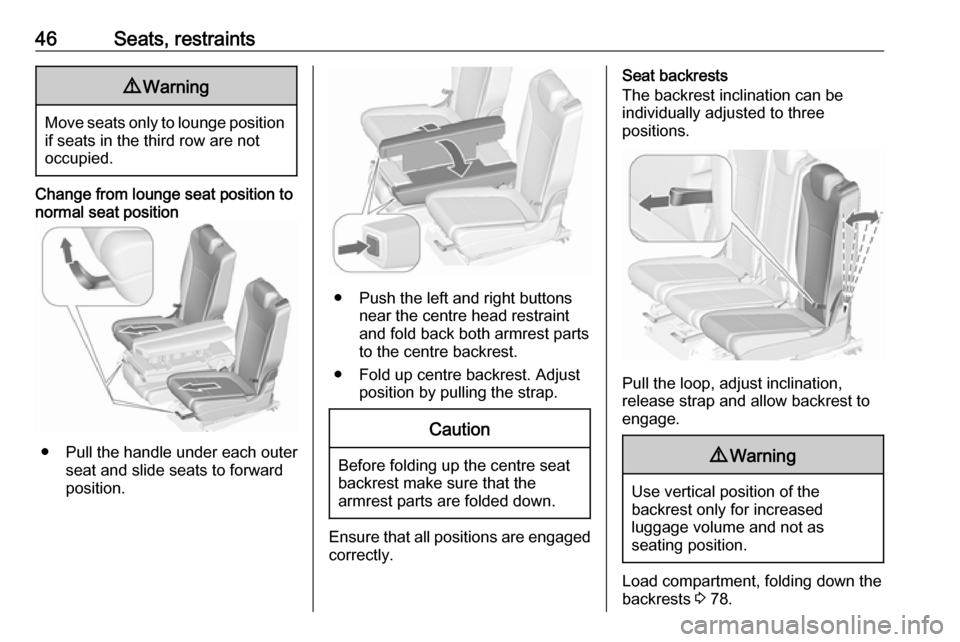
● Pull the handle under each outer seat and slide seats to forward
position.
● Push the left and right buttons near the centre head restraint
and fold back both armrest parts
to the centre backrest.
● Fold up centre backrest. Adjust position by pulling the strap.
Caution
Before folding up the centre seat
backrest make sure that the
armrest parts are folded down.
Ensure that all positions are engaged
correctly.
Seat backrests
The backrest inclination can be
individually adjusted to three
positions.
Pull the loop, adjust inclination,
release strap and allow backrest to
engage.
9 Warning
Use vertical position of the
backrest only for increased
luggage volume and not as
seating position.
Load compartment, folding down the
backrests 3 78.
Page 52 of 289
50Seats, restraintsThree-point seat beltFasten
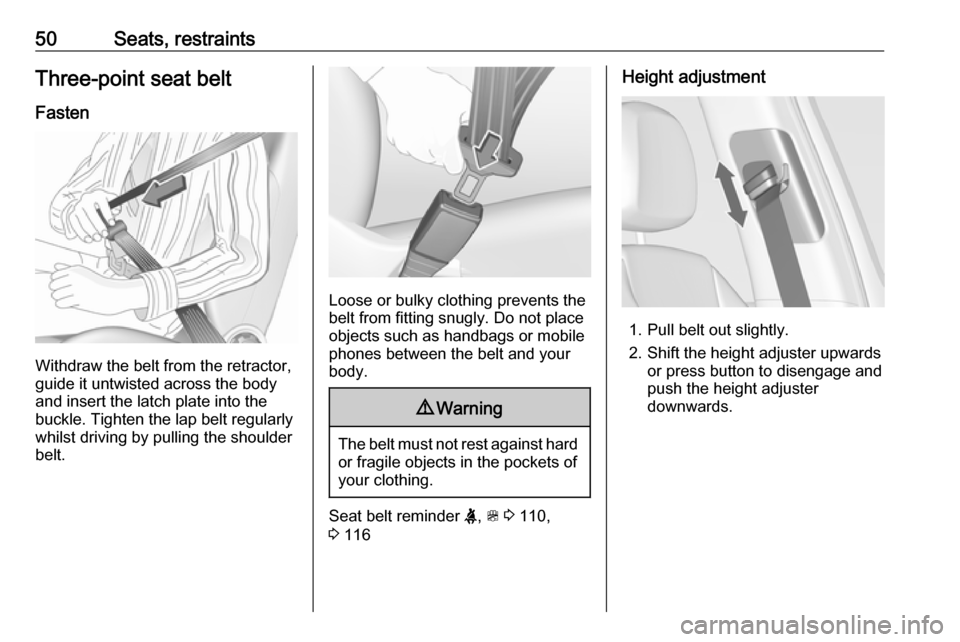
Withdraw the belt from the retractor,
guide it untwisted across the body
and insert the latch plate into the
buckle. Tighten the lap belt regularly
whilst driving by pulling the shoulder
belt.
Loose or bulky clothing prevents the
belt from fitting snugly. Do not place
objects such as handbags or mobile
phones between the belt and your body.
9 Warning
The belt must not rest against hard
or fragile objects in the pockets of
your clothing.
Seat belt reminder X, > 3 110,
3 116
Height adjustment
1. Pull belt out slightly.
2. Shift the height adjuster upwards or press button to disengage and
push the height adjuster
downwards.
Page 53 of 289
Seats, restraints51
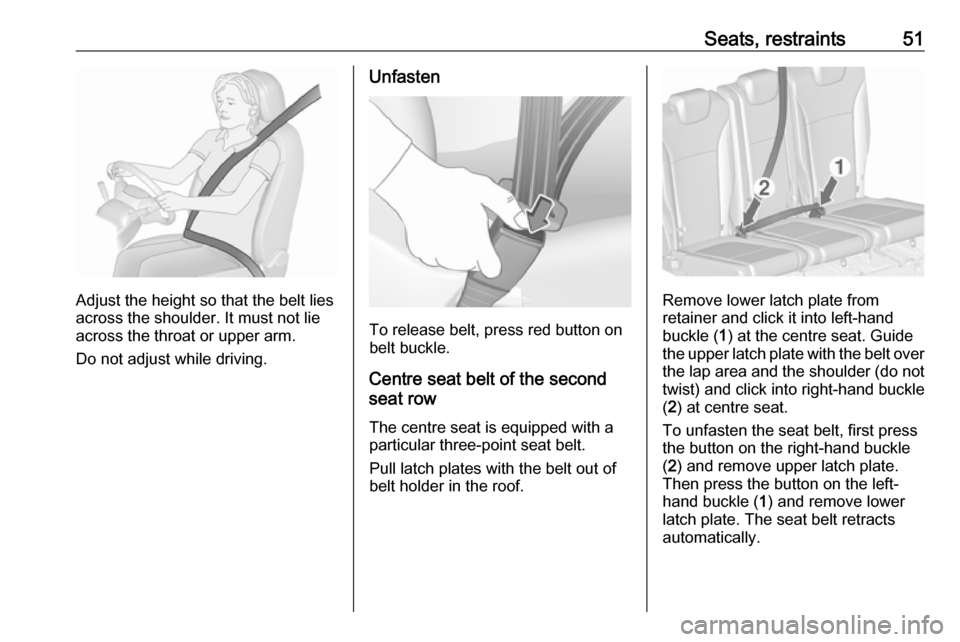
Adjust the height so that the belt lies
across the shoulder. It must not lie across the throat or upper arm.
Do not adjust while driving.
Unfasten
To release belt, press red button on
belt buckle.
Centre seat belt of the secondseat row
The centre seat is equipped with a particular three-point seat belt.
Pull latch plates with the belt out of
belt holder in the roof.
Remove lower latch plate from
retainer and click it into left-hand
buckle ( 1) at the centre seat. Guide
the upper latch plate with the belt over
the lap area and the shoulder (do not twist) and click into right-hand buckle
( 2 ) at centre seat.
To unfasten the seat belt, first press
the button on the right-hand buckle
( 2 ) and remove upper latch plate.
Then press the button on the left-
hand buckle ( 1) and remove lower
latch plate. The seat belt retracts
automatically.
Page 69 of 289
Storage67Front storage
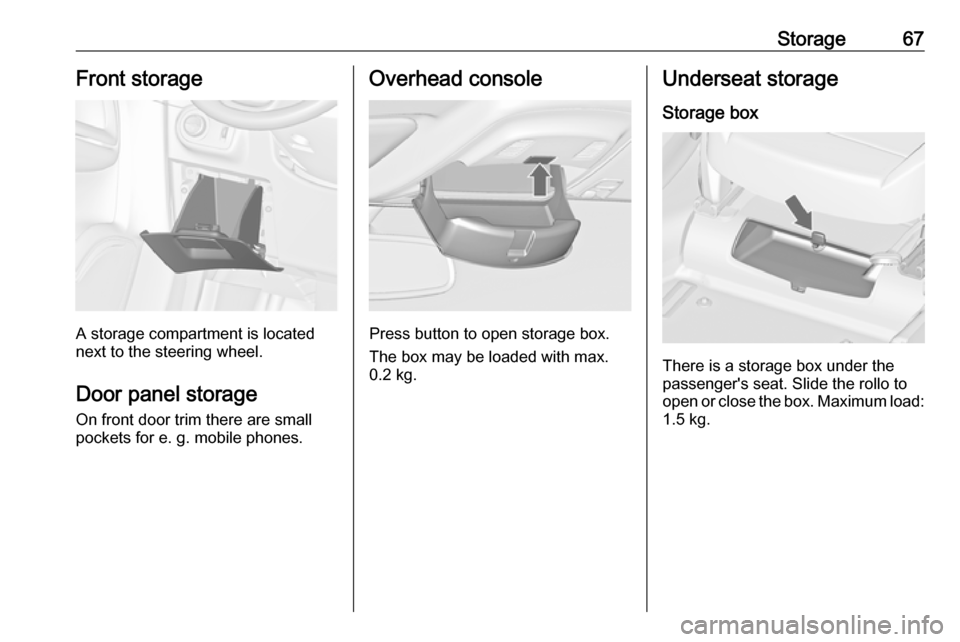
A storage compartment is located
next to the steering wheel.
Door panel storage On front door trim there are small
pockets for e. g. mobile phones.
Overhead console
Press button to open storage box.
The box may be loaded with max.
0.2 kg.
Underseat storage
Storage box
There is a storage box under the
passenger's seat. Slide the rollo to
open or close the box. Maximum load: 1.5 kg.
Page 70 of 289
68StorageUnderseat drawer
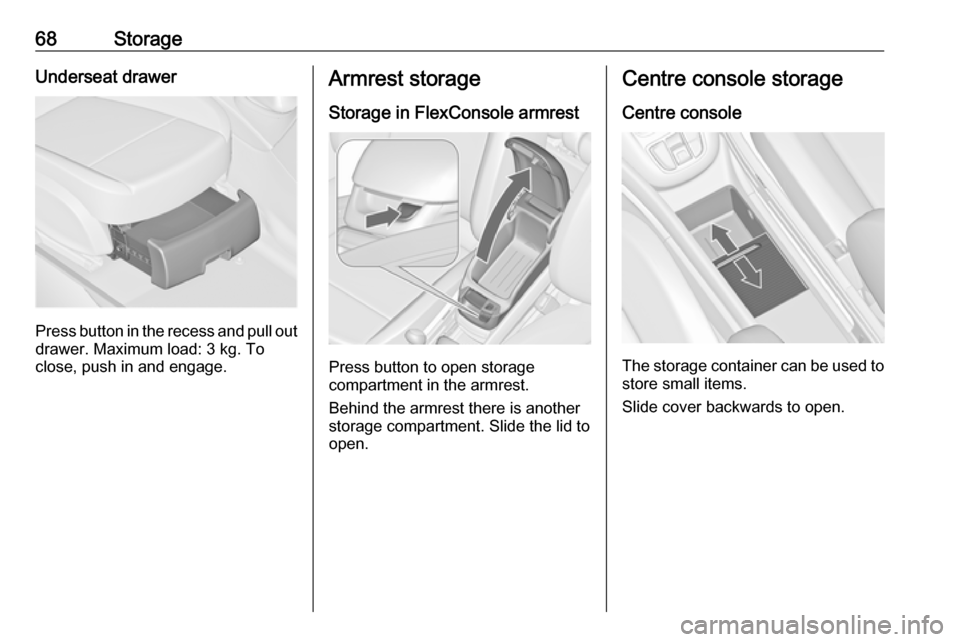
Press button in the recess and pull out
drawer. Maximum load: 3 kg. To
close, push in and engage.
Armrest storage
Storage in FlexConsole armrest
Press button to open storage
compartment in the armrest.
Behind the armrest there is another
storage compartment. Slide the lid to
open.
Centre console storage
Centre console
The storage container can be used to
store small items.
Slide cover backwards to open.
Page 77 of 289
Storage75● Without attached adapter:
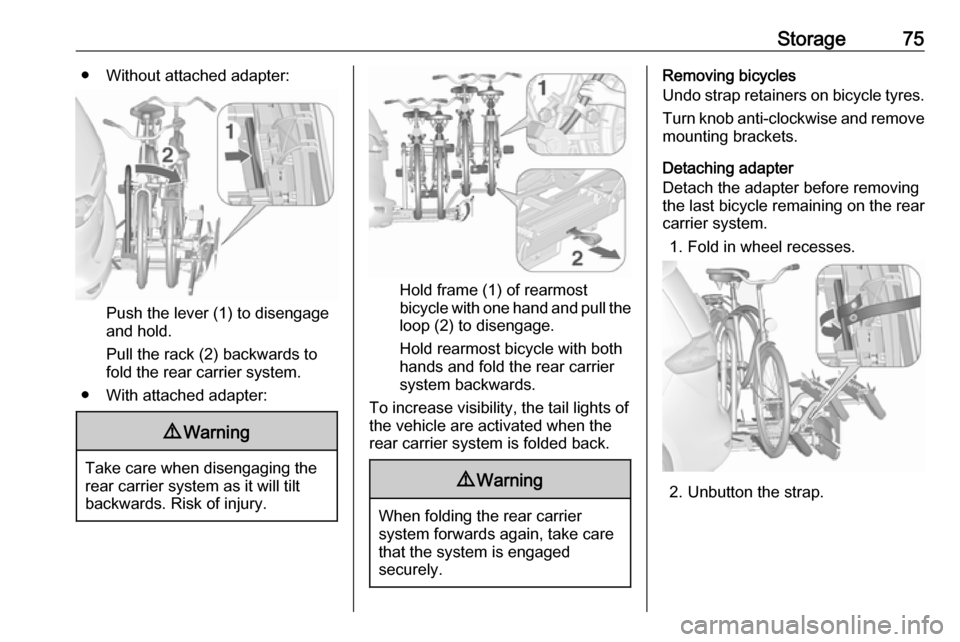
Push the lever (1) to disengage
and hold.
Pull the rack (2) backwards to
fold the rear carrier system.
● With attached adapter:
9 Warning
Take care when disengaging the
rear carrier system as it will tilt
backwards. Risk of injury.
Hold frame (1) of rearmost
bicycle with one hand and pull the
loop (2) to disengage.
Hold rearmost bicycle with both
hands and fold the rear carrier
system backwards.
To increase visibility, the tail lights of
the vehicle are activated when the
rear carrier system is folded back.
9 Warning
When folding the rear carrier
system forwards again, take care
that the system is engaged
securely.
Removing bicycles
Undo strap retainers on bicycle tyres.
Turn knob anti-clockwise and remove
mounting brackets.
Detaching adapter
Detach the adapter before removing
the last bicycle remaining on the rear
carrier system.
1. Fold in wheel recesses.
2. Unbutton the strap.
Page 92 of 289
90StorageInstallation behind front seats
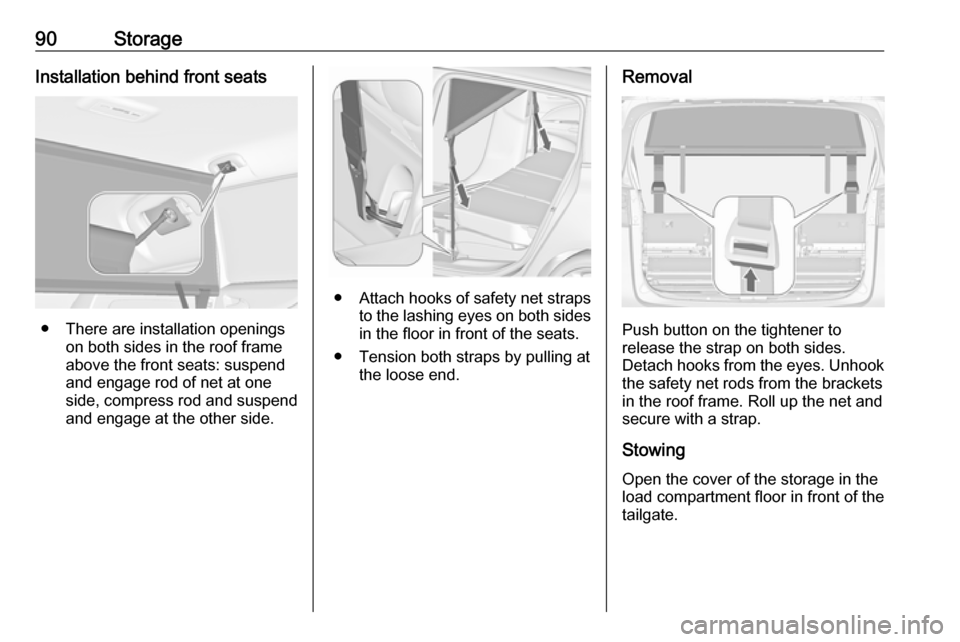
● There are installation openingson both sides in the roof frame
above the front seats: suspend
and engage rod of net at one
side, compress rod and suspend and engage at the other side.
● Attach hooks of safety net straps
to the lashing eyes on both sides in the floor in front of the seats.
● Tension both straps by pulling at the loose end.
Removal
Push button on the tightener to
release the strap on both sides.
Detach hooks from the eyes. Unhook
the safety net rods from the brackets in the roof frame. Roll up the net and
secure with a strap.
Stowing Open the cover of the storage in the
load compartment floor in front of the
tailgate.