buttons VOLKSWAGEN BEETLE 2010 Owner's Manual
[x] Cancel search | Manufacturer: VOLKSWAGEN, Model Year: 2010, Model line: BEETLE, Model: VOLKSWAGEN BEETLE 2010Pages: 138, PDF Size: 48.59 MB
Page 70 of 138
Downloaded from www.Manualslib.com manuals search engine Place the windscreen wiper arms back onto the
winds creen before driving away. With the ignition
swit ched on, briefly press the windscreen wiper
lever
down to bring the windscreen wiper arms
ba ck
to the original position.
Lifting the windscreen wiper blades
• Move the wiper arms to the service position be
fore lifting ~CD.
• When lifting a wiper arm hold it only by the wip
er blade mounting .
Rain sensor
1}®
c®
85K ·0419
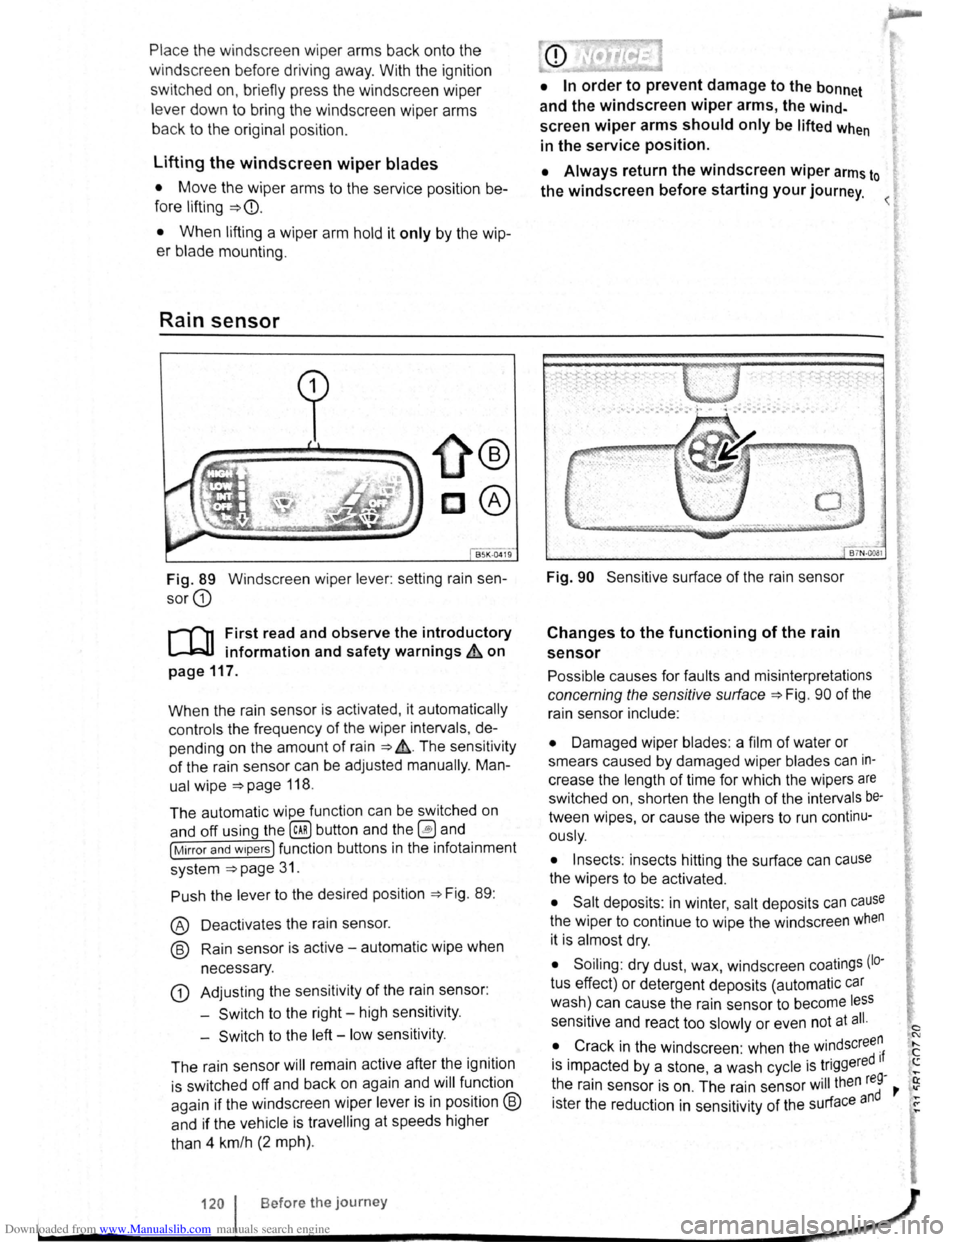
Fig. 89 Windscreen wiper lever: setting rain sen
sor G)
r-('n First read and observe the introductory
L-J,::JJ information and safety warnings & on
page
117.
When the rain sensor is activated , it automatically
controls the frequency
of the wiper intervals, de
pending on the amount of rain ~ ,&. The sensitivity
of the rain sensor can be adjusted manually. Man
ual
wipe ~page 118 .
The automatic wipe function can be switched on
and off using the
(ill) button and the 0 and
[Mirror and wipers ] function buttons in the infotainment
system
~page 31.
Push the lever to the desired position ~Fig. 89:
® Deactivat es the rain sensor.
@ Rain sensor is active -automatic wipe when
necessary .
G) Adjusting the sensitivity of the rain sensor :
-
Switch to the right -high sensitivity.
-
Switch to the left -low sensitivity .
The rain sensor
will remain active after the ignition
is switched off and back on again and
will function
again
if the windscreen wiper lever is in position @
and if the vehicle is travelling at speeds higher
than 4 km/h
(2 mph).
• In order to prevent damage to the bonnet
and the windscreen
wiper arms, the wind
screen wiper arms should only be lifted when
in the service position.
• Always return the windscreen wiper arms to
the windscreen before starting your journey.
Fig. 90 Sensitive surface of the rain sensor
Changes to the functioning of the rain
sensor
Possible causes for faults and misinterpretations
concerning the sensitive surface~ Fig. 90 of the
rain sensor include:
• Damaged wiper blades: a film of water or
smears caused by damaged wiper blades
can in
crease the length of time for which the wipers are
switched on, shorten the length of the intervals be
tween wipes, or cause the wipers to run continu
ously.
• Insects: insects hitting the surface can cause
the wipers to be activated.
• Salt deposits : in winter, salt deposits can cause
the wiper to continue to wipe the windscreen when
it is almost dry.
• Soiling : dry dust, wax, windscreen coatings (lo·
tus effect) or detergent deposits (automatic car
wash) can cause the rain sensor to become less
sensitive and react too slowly or even not at all.
• Crack
in the windscreen : when the windscree~
is impacted by a stone, a wash cycle is triggered If ....
~he rain sensor is on . The rain sensor will then reg-,. ~
1ster the reduction in sensitivity of the surface and ~
120 I Before the journey _,}
~----~------------------~~
Page 91 of 138
Downloaded from www.Manualslib.com manuals search engine • When a vehi cle doo r is opened .
• When the TCS or ESC systems are taking cor
rective action.
• If the vehicle is sta tionary for longe r than ap
proximately
3 minutes .
~ ~~ .....
A WARNING
'"
Do not allow the images shown on the screen
to distract you from the traffic around you.
ParkPilot menu
r-('n First read and observe the i~troductory
l.-.l.:JJ information and safety warnmgs on
page 201.
ParkPilot settings in the infotainment
system menu
Switch on the ignition .
If necessary , switch on the infota inment system .
Function button: action
CD
Failure to observe thhe.ill
1
umbi~ated text messag.
es can lead to the ve tc e emg damaged .
1:1 lt can take a fe w seconds be for e the area
L!J scanned by the sensors ls displayed on the
screen
of the factory- fitted infot ainm ent system .
Press the@) button .
Touch the
G fu n ction button .
Touch the
(Parkmg and mAnoeuverin g) fun ction button.
Select the required settings in the ParkPilot
menu .
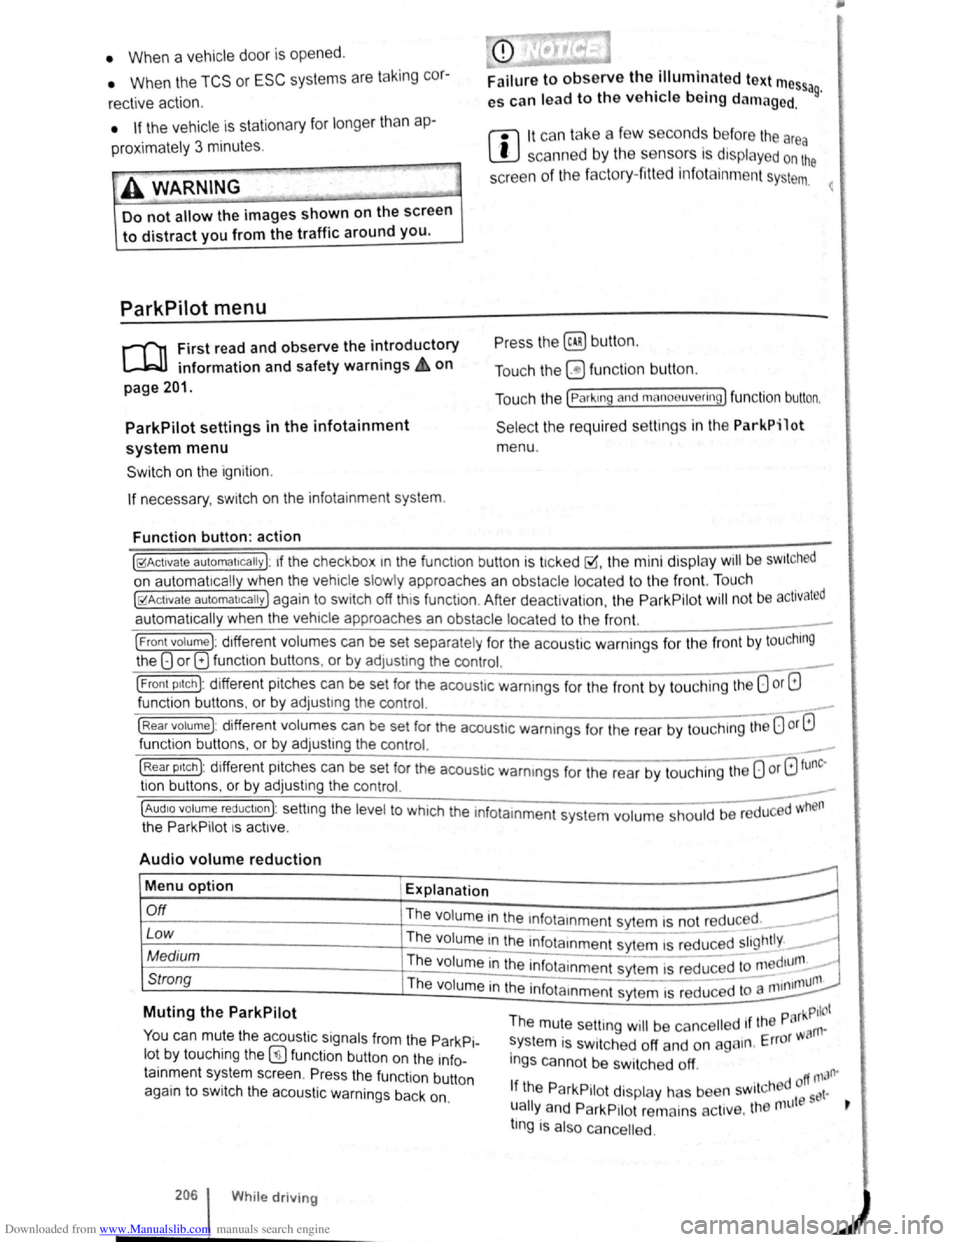
[10Act1vate automatically ): 1f the checkbox 1n the functio n button is t1cked ~.the mini display will be SWitched
on automat ically when the vehicle slowly approaches an obstacle located to the front. Touc h .
[10Act1vate automat1ca lly) again to switch off this function . After deactiva tion, the ParkPilot will no t be activated
automatically when the veh1cle approa ches an obstacle located to the front.
(Front volume): d1fferent volumes can be set separately fo r the acoustic warnings for the fron t by touching
the 8 or 8 funct ion butt ons , or by adJusting the control. ___
(Front p1tch): different pit ches can be set for the acoustic warnings for the front by touching the 0 or G
fun ction buttons , o r by adjust1ng the control.
(Rear volume) : different volumes can be set for the acoustic warnings for the rear by touchtng the 0 or G
function buttons. o r by adjusting the control. _
(Rear p1tc h ): different pitches can be set for the acoust ic warmngs for the rear by tou ch ing the 0 or 8 tunc·
tio n buttons . o r by adjusting the control. _
~~==~==~~~~-=~~--~~~-----------------------------~---(AudiO volume reduct1on): settmg the level to which the infota inment system volume should be reduced when
the ParkPilot 1s act1ve.
Audio volume reduction
Menu option Explanation
r.O:-ff ___________________ -+-=T~he::.._ . ..:.v.:..ol:.:u::.m.:..:e~i~n:,:th~e~~n~fotamment sytem is not reduced. __ ----
Low Th e volume in the infota1nmen t sytem IS red~c;;d ~~~~tly. _..
Medium The volume in the infota inment syt e m is red uced to ~~~d1unl. -
Strong Th e 1 . - -11111un1. vo ume m the infota1nmen t sytem is reduced to a 11111
Muting the ParkPilot
You can mute the acoustic signals from the ParkPi
lot by touching the (!) fun ction button on the info
tainment system screen. Pr ess the functio n button
again to switch the acoustic warnings back on.
206 While driving
park Pilot The mute setting will be ca ncelled 1f the rn·
system is switched off and on again . Error w a
ings canno t be swi tc h ed off.
. d off ntJfl'
If the ParkPilot display has been sw1tcl'~9 et·
ually
and ParkP1Iot remains act1ve. the nnlt s t
tlng is also cance lled .
Page 103 of 138
Downloaded from www.Manualslib.com manuals search engine ~ ·, ~ )
' { q
Indicator lamp
Ut up Possible cause
CCS or the speed limiter is controll ing the speed.
several warning and indicato r l amps will light up
briefly as a fun cti o nal check whe n the ig nitio n is
switc h e d on . Th ey will switch off after a few sec
onds.
'
A WARNING .
Failure to observe illuminated warning lamps
and text messages can lead to your vehicle
breaking down in traffic, and can cause acci
dent and serious injury.
• Never ignore any illuminated warning
lamps or text messages.
Failure
to observe illuminated indicator lamps
and text messages can lead to your vehicle be
ing damaged.
m If the CCS, ACC or speed limite r were
W switched on when the ignition was switc h e d
off, the
CCS or ACC will be switched on autom ati
cally the nex t tim e th e ignition is switc hed on. How
ever, no speed is stor ed. The speed limiter's las t
set speed remains stored.
r:i Displays can vary as different ve rsions of th e
W instrument cluster are availab le .
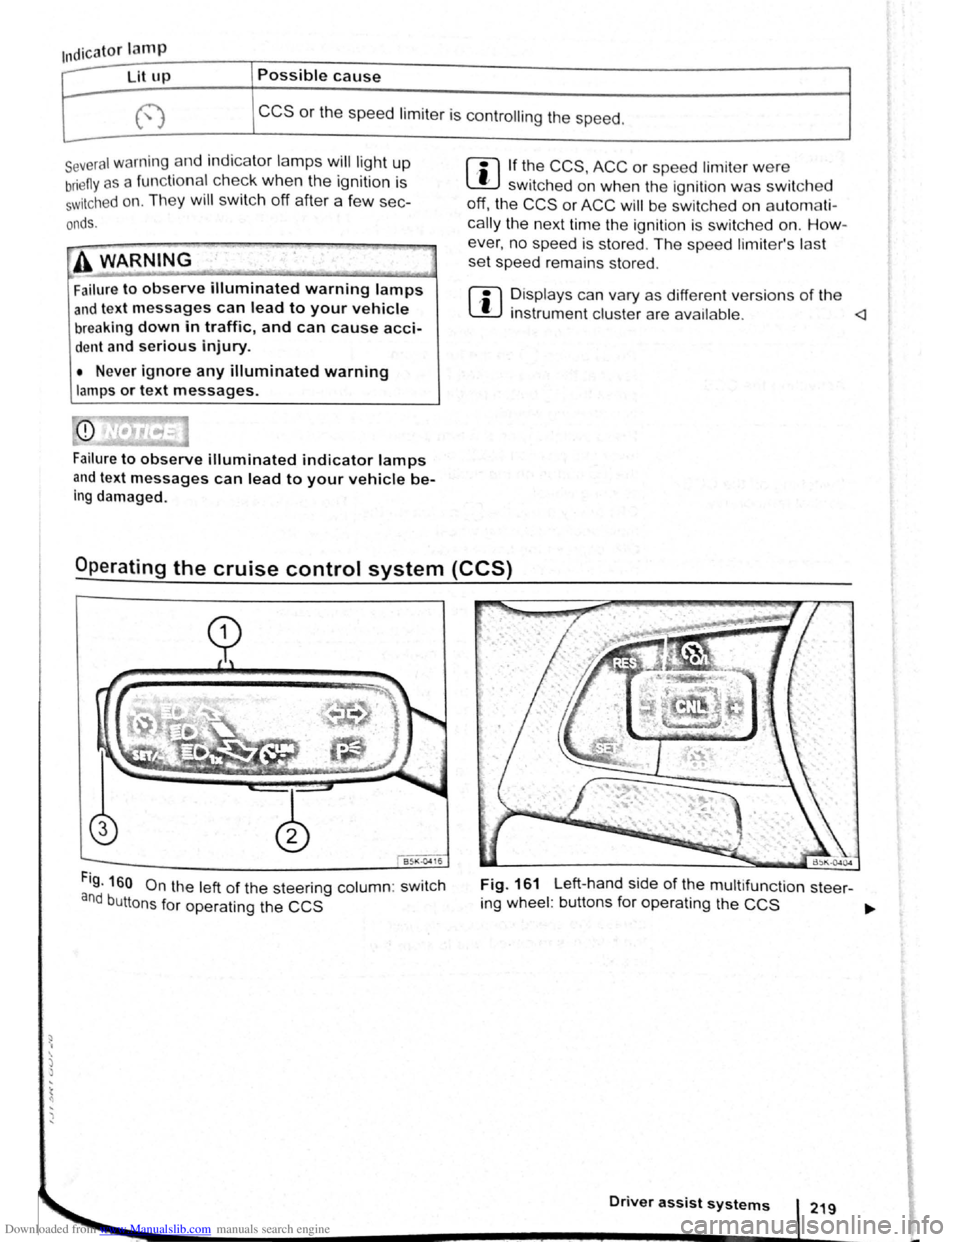
Fig. 160 On the left of the steering column: swit c h
and buttons for operating the CCS
Fig. 161 Left-hand side of the multifunct ion steer-
ing wheel : buttons for operating the
CCS ~
Driver assist systems
Page 107 of 138
Downloaded from www.Manualslib.com manuals search engine ~
A WARNING ...
~re to observe illuminated w~rning lan1ps
d text messages can lead to your vehicle
an tt· d breaking down in tra 1C, a n can cause acci-
dent and serious injury.
• Never ignore any Illuminated w arning
lamps or text messages,
CD I'. [
Failure to observe illuminated indicator lamps
and text messages can lead to your vehicle be-
ing damaged.
Operating the speed limiter
B~l\·04 16
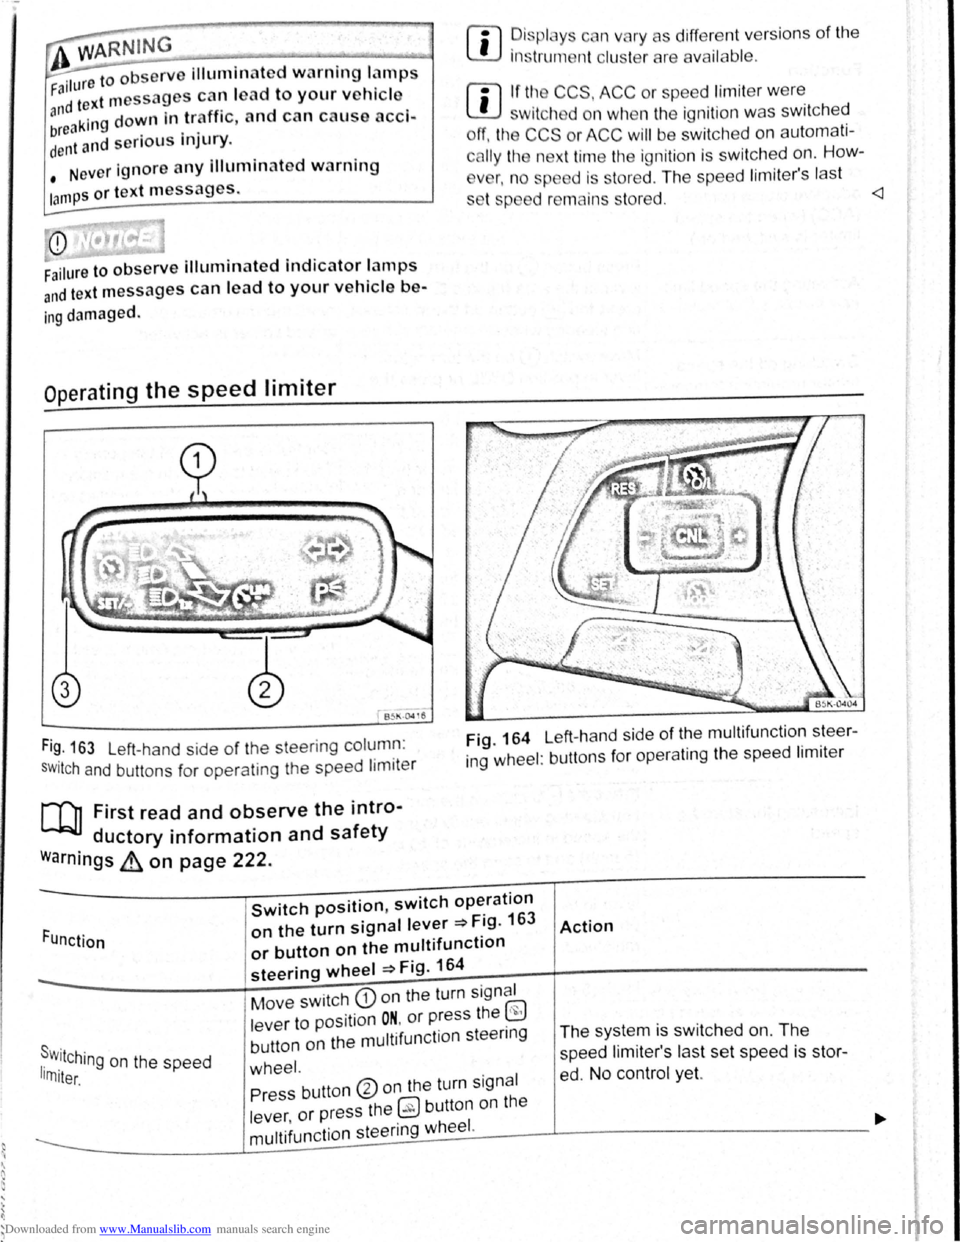
Fi~. 163 Left-hand side of the steering column :
SWitch and buttons for operating the speed limiter
[Q] First read and observe the intro-
ductory information and safety
warnings ~ on page 222.
rn
• ~is plc y c n vary as different vers ions of the
1ns trum nt clu t rare availab le .
rn
• If tl~ CCS, ACC or spe ed limit er w ere
w1tch d on wh n the ignition was switched
ff, the CCS or ACC will be switched on automati
c
lly the n xt time the ignition is switched on. How-
v
r, n o sp d is stored . The speed lim iter's last
s t p d r mains s tored.
ing wheel : buttons for operating the speed limiter
Function
Switch position, switch operation
on the turn signal lever ~Fig. 163
or button on the multifunction
steering wheel ~Fig. 164
Action
s . r w.11Ching on the speed 1rn1ter.
Move switch CD on the turn signal
lever to position
ON. or press the ~
button on the multifunction steenng
wheel.
The system is switched on. The
speed li miter's las t set speed is st or
ed. No control yet. Press button ®on the turn signal
lever ,
or press the 0 button on the
----------------~m~u~lti~fu~n~c~ti~o~n~s~te~e~r~in~g~w~he~e~I~·------J----------------------------~
Page 113 of 138
Downloaded from www.Manualslib.com manuals search engine . ,~~t ral dification s to the vehicle , e .g .
~ :·.
9 t o e i le or making alteration s to the
~.': d tri , can impair the function of the ACC.
~ ·· ra~ od ifict ton s s hould therefore only be
t y a qualified workshop . Vo lkswage n
e s using a Vo lkswagen dealership for
, ec y erformed repair s to the front end of the
·~"· •e can a lter t h e posit ion of the radar sensor ~I
. e re r e im pair the funct ion of the ACC . R e-
.. ~i , should there fore only be carried out by a
,__a11 ed wo shop . Volk swagen recommends us-
1 sv agen dealersh ip for this purpose .
Switch off the ACC if you suspect that the radar
sensor has been damaged or its position has
been altered. This can help to prevent further
damage. Have the radar sensor realigned.
• The radar sensor could be moved if it is hit,
for example in parking manoeuvres. Readjust
ing the sensor could impair the performance of
the system or cause it to be switched off .
• Repair work on the radar sensor will require
special knowledge and tools. Volkswagen rec
ommends using a Volkswagen dealership for
this purpose.
• Remove snow with a brush, and remove ice
preferably with a solvent-free de-icer spray. <1
Operat ing adaptive cruise control (ACC)
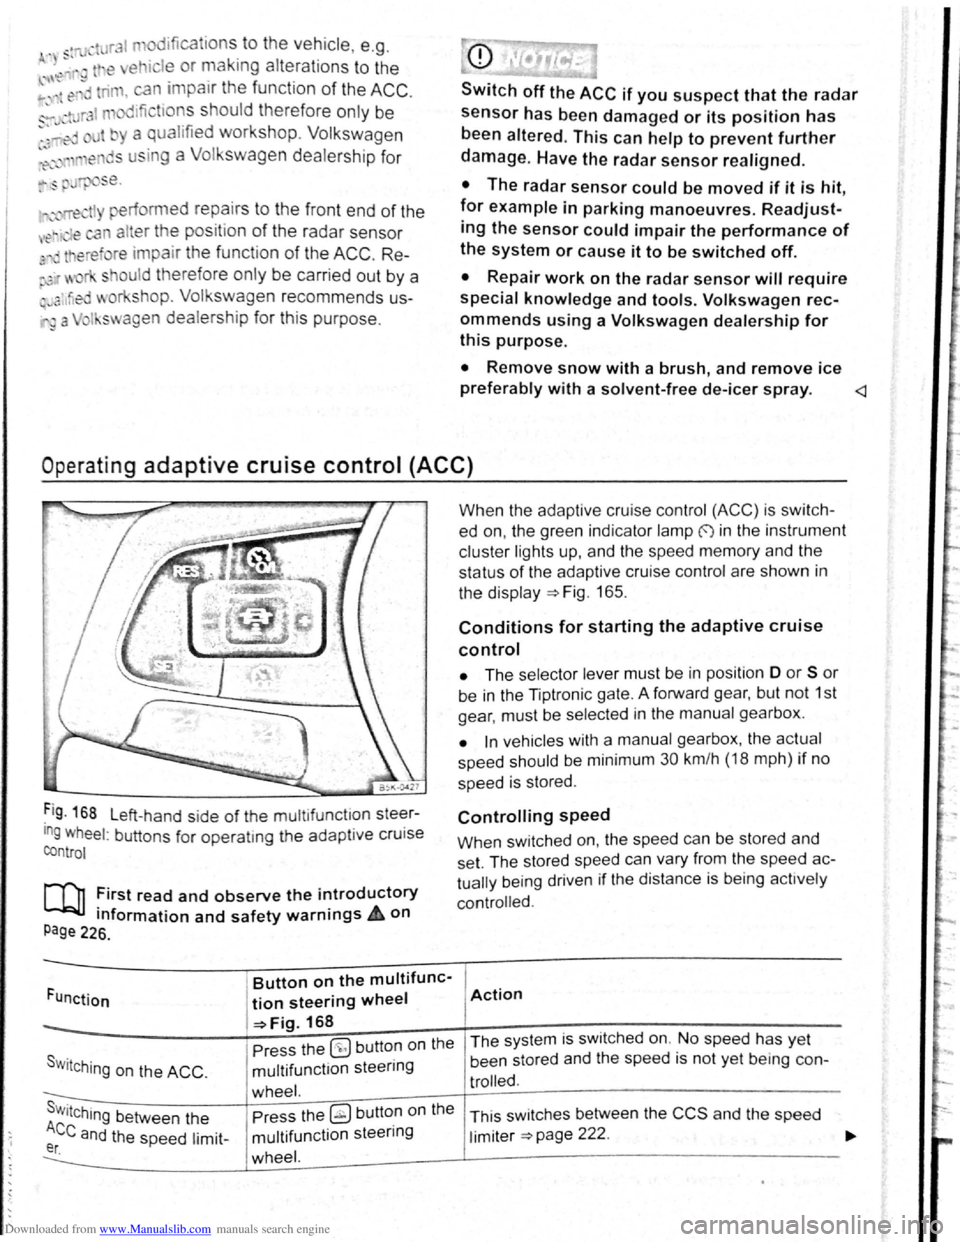
Fig . 168 L eft-hand side of the mu ltifunctlon steer
ing wheel: buttons for operatmg the adaptive cruise
control
[Q] :irst read and observe the i~troductory
tnformation and safety warnrngs 4 on
Page 226.
Funct ion
Button on the multifunc-
tion steering wheel
-=>Fig. 168
Pre ss the
(9 but ton on the
S w i
tching on the ACC . multifunction steering
wheel. s . Press the ~ button on the Wttching between the
Ace and the speed limit-multifunction steering er. wheel.
When the adapt ive cruise control (ACC) is switch
ed on, the green indicator lamp f) in the instrument
c
luste r lights up, and the speed memory and the
status
of the adaptive cruise contro l are shown in
the disp la y ~Fig. 165.
Conditions for starting the adaptive cruise
control
• The selector lever must be in position D or S or
be in the Tiptron ic gate. A forward gear, but not 1st
gear , must be selected
in the manu al gearbox .
• In vehicles with a manual gearbox , the actual
speed should be minimum 30 km /h (18 mph) if no
speed is stored .
Controlling speed
When switched on, the speed can be stored and
set. The stored speed can vary from the speed
ac
tually
being driven if the distance is b ein g act ively
controlled.
Action
The system is switched on. No speed has yet
been stored and the speed is not yet being con-
trolled.
This sw itches between the CCS and the speed
limiter ~page 222 .
Page 115 of 138
Downloaded from www.Manualslib.com manuals search engine ,,nti pttllinfl W• y I not wnllniJI for tdl vo h l-
fltllOI · and cOtllltJJ(' ciOS ·
. g th o clist::tnco lo vo l sett Ill
P d -d O I nclt nt dl st:1n
lhe s t t o n of 5 I v front can b -
vo hl cl In
lnfot in-
n,ent sy stem ,.-;. Pt g 3 1 .
w et road con d ill n , y u llo uld alw y s s t a
:~rger distn nce lh c n wl 1 n drivl11g In dry road con-
ditions.
lt1e following di sta nc s c n b pre-s I cle d :
• very sm 11
• Small
• Medium
• Large
• V ery large
The dis ta nce le ve l to the ve hi cle ahead is se t u sing
the© button on the multifun ction stee ring wheel
~Fig. 168 . The ACC disp la y appears whe n the
button is pressed ~page 227. To se t th e dis ta nce
level, press the (1) button .
When the hig hes t lev el is reached, the distance re
turns to the low est level when th e butt on is press
ed again.
The distance level can also be set usi ng the Q or
8 buttons on the mult ifun ction stee ring wheel im
mediately after the (1) button on the mult ifunction
steering whee l ~Fig. 168 has been pressed .
The~ button and the G and (Dnver ass1stance )
function buttons in the infotainment system can be
used to set the dista nce level that should be selec
ted when the ACC is sw itched on ~page 31 .
Setting the driving programme
In vehicles with Driving Mode Selection , the selec
t~d driving mode can affect the vehicle 's accelera
tion response ~page 248.
The following driving modes can be selected :
• Normal
• Sport
• Eco
In v h' . e lcles Without Driving Mode Selection , the ac-
Celeration response can be affected by the driving
rnode s I IT.Dl ~a e ected by pressing the ~ butto.n and _ the
I . nd @nver assistance ) function buttons 1n the 1nfoa1nrne t n system ~page 31 .
The following conditions can prevent the
adaptive cruise control from reacting:
• If the the acce le rator is depressed.
• If no g ear is selected .
• If the ESC is taking corre ctive action .
• If the driv er h as no t f astened seat belt.
• If there is a fau lt in seve ral brake lights on the
v e hicle or on a traile r with an electrical
connection
to the vehic le .
• If the vehicle is reve rsing .
• If the vehicle is travelling faster than approxi
mately 160 km/h (100 mph).
A WARNING
If you close the gap to a vehicle in front and
the difference in speed between the two vehi
cles is so great that the braking action of the
ACC is insufficient, you are in danger of col
liding with the vehicle in front. You should re
duce the vehicle speed immediately with the
foot brake.
• The ACC may not be able to recognise all
driving situations correctly.
• Leaving your foot on the accelerator will
mean that the ACC will not brake automatical
ly. This is because manual acceleration over
rides the system.
• You should always be prepared to brake
the vehicle yourself.
• Observe country-specific regulations re
garding the minimum distance.
rn
The set speed will be deleted if the ig nition or
the ACC is switched off.
rn
The ACC is automatically deactivated when
the tract ion control system (T CS ) is deactiva-
ted .
rn
In vehicles with a start/stop system, the e n
g ine is switched off automatical ly during the
stat ionary phase of ACC and is then restarted for
moving off.
Page 122 of 138
Downloaded from www.Manualslib.com manuals search engine Activating and deactlv ting th ' r ,
monitoring sy stcn1
Front Assis t can be active t d o r ciE, cllv to d L fnl ..
lo w s when th e igniti on Is witcl1 d on :
• U sing the butt on f or drlv r c , sl." l y.._ \c 1n~~, " n ..
lect the corresp o ndin g m nu opti on ~ pr a ·
• OR : activate or d Clctlv ate tho • s tc n1 ll! I no
the (c AR ) button and the G a nd Drlvtll ,:,: l: ' '"''c ., fun , ..
t ion buttons in the
fo la inm nt sy s t( 111 • png 3 1.
Activating and deactivating advanced
warning
The adv a nced w arning ca n be ocllv nto d or dO;"lCti
va te d using the (tAR) butto n and the G and
(Driver a ss istf m ce ) function buttons in the lnf ot._ lnrn Jlll
syst en1 ~pag e 31.
IIHJ y: lrH ll tl: n ru t:iln· lt1n fH J(Jnnr1111,J tl .
I , •,lltw~
wiH 11 tiH lq11ltlnn "' x t wltt,h n d rJt ':f
V n il . w : t(JOfl r fH,Oir IItH HId ttu d tt HJ ; 1dvqw 1 • '
J W·Hrt
In n yt 1t '"I wlt<.IHJd on tl tlllllrw,·,,
A c
tlvntln J or do a tlv atlnu th <.JI itt"tnc;o
w. r u in g
1 ho <11 tn nc< wru nlno (11 pi:Jy c :u1 b o tu ,llv;''' 'd r1r
d< \cllvnl( cl I If lrl(J ttll ( tARj tHJliCJt ' Hlfj lhtJ f "J ~Httj
Q >rlvnt ru1 iJ ,I,.r~e:t, fune11on t) IJlt CHl In U1 irlfCJ!:Jir tt n rsnt
y~torn >pno 3 1.
h l y! torn nit o r lHir H lho proor:srnrnnrJ (,lt1n g
wi H n l11 lunlll or I noxl witch od or,
V olk . w . oon ror,ornrnf nd UHtl Ulo tJI tnrtt,(j W~rrt·
lng 1:1 'w lt c t lO d on Ht oil tlm' ( .
Temporarily switch off the area monitoring system (Front Assist) in the
following situations
r-f'n First read and observe the introductory
L-Wl information and safety warnings £ on
page 235.
The area monitoring system (Front Assist) s h o uld
b e switched off
in the following situations due to
syst em limit
ations ~ £ .:
• If the ve hicl e is being towed.
• If the ve hicl e is on a rolling road test be d .
• If the radar senso r is faulty.
• On exter na l force on the radar sensor, e .g . afte r
a
rea r-end collision . •
In
the ev nt of mu ltip le unwanted intorventioM
• If tt1e ra d or se nso r Is co ve red tornpo rarily by
a ny a uxili nry equipm ent , e.g . a uxiliury headlights.
• If the vehic le i s being loaded onto a lorry, car
f e rry or m oto rail tr ain.
Failure to switch off Front Assist In the
named situations can cause accident s and
serious injuries.
't ' 1 situa· • Switch off Front Assist In en tea <
tions.
System limits ~
---------------------------------------------------
[Q] ~irst rea~ and observe the introductory
anformatton and safety warnings & on
page 235.
The ~rea monitoring system (Front Assist) has
phys1cal and syste~-relate.d limit s. The driv er m ay
there for e feel that, 1n certa m circums tances s
F
t A . t
. , ome
r o n
ssls react ions occur unexpec te dly or with a
de la y. You should the re fore alw ays be prepare d t
take full control of the vehicle if necessar y. 0
The .following conditions can prevent Front
Assast from reacting, or cause a dela . .
reaction: Y 1
" Its
• In tig ht bends .
• If the acce lerato r is fully depressed .
. a fault
• If Front Ass is t i s s wit c h e d off or there 15
• If TCS is m anu ally swit ch ed off .
• If the ESC is ta king corrective action. tne
• If there is a fa ult in se vera l brake lightsnonnectioO
. · al eo vehtcle or on a traile r with an electnc
to the ve hi cle .
• If the ra d ar senso r is dirty or cove red.
• If the vehicle is re ve rsing .
• Under hard acce le ra tion .
• In snow or hea vy ra in . bikeS·
motor
• In case of n a rrow ve hicl es, e.g . left or
• If ve hicl es are tr ave lling slightly to the
right
of y o ur ve hicl e. vehicle·
• If vehic les are crossing in front of your
Page 126 of 138
Downloaded from www.Manualslib.com manuals search engine 'Vhen traffic sign recognition is switched on, traffic
;igns in fron t of the vehicl~ are. regi~tered by a
:amera in the base of the mtenor m1rror. After in
spection a nd evaluation of the information from the
camera, the navigation system and the current ve
hicle data , up to 3 valid traffic signs ~Fig. 175 B
w ill be disp layed with the accompanying addit ional
s i
gns:
1st posit ion : the traffic sign that currently applies
for the driver is shown on the left-hand side
of the display. For example, a speed limit of
130 km/h ~Fig. 175 A.
2nd position : traffic signs that do not always apply
(e.g . 100 km/h "In wet" ) are shown in sec
ond place.
Additional sign: If the vehicle ra in sensor detects
rain while the vehicle is in motion , the traffic
sign with the addit ional
" In wet" sign that
now applies will be moved left to the first po
sition .
3rd position : an additional traffic sign that does not
always apply will be displayed in the third
position , e .g . overtaking temporarily
not per
mitted
~Fig. 175 C .
Town or village boundary signs trigger the display
of the standard speed limit for urban or country
roads in the relevant country. If the town or village
boundary signs have an add itional sign showing a
speed limit, this sign will appear in the display . S
ig ns ind icating the
end of a speed limit or over
taking restriction will not be displaye d .
There is no warning when you exceed the dis
played
speed limits . The legal regulations apply.
Switching the traffic sign display on and off
in the instrument cluster
The continuous display of traffic signs in the instru
ment cluster can be switched on and off using the
(ili) button and the G and (Driver assista nce) function
buttons .
Trailer mode
In vehicles with a factory-fitted towing bracket and
an electrical connection to the vehicle , the display
of traffic signs that may apply to the vehicle when
towing a trailer, e.g. applicable speed limits and
no-overtaking signs, can be switched on or off us
ing the~ button and the G!) and (Driv er a ssist ance}
function buttons in the infotainment system
~page 31. <1
Driver assist systems I 245
Page 137 of 138
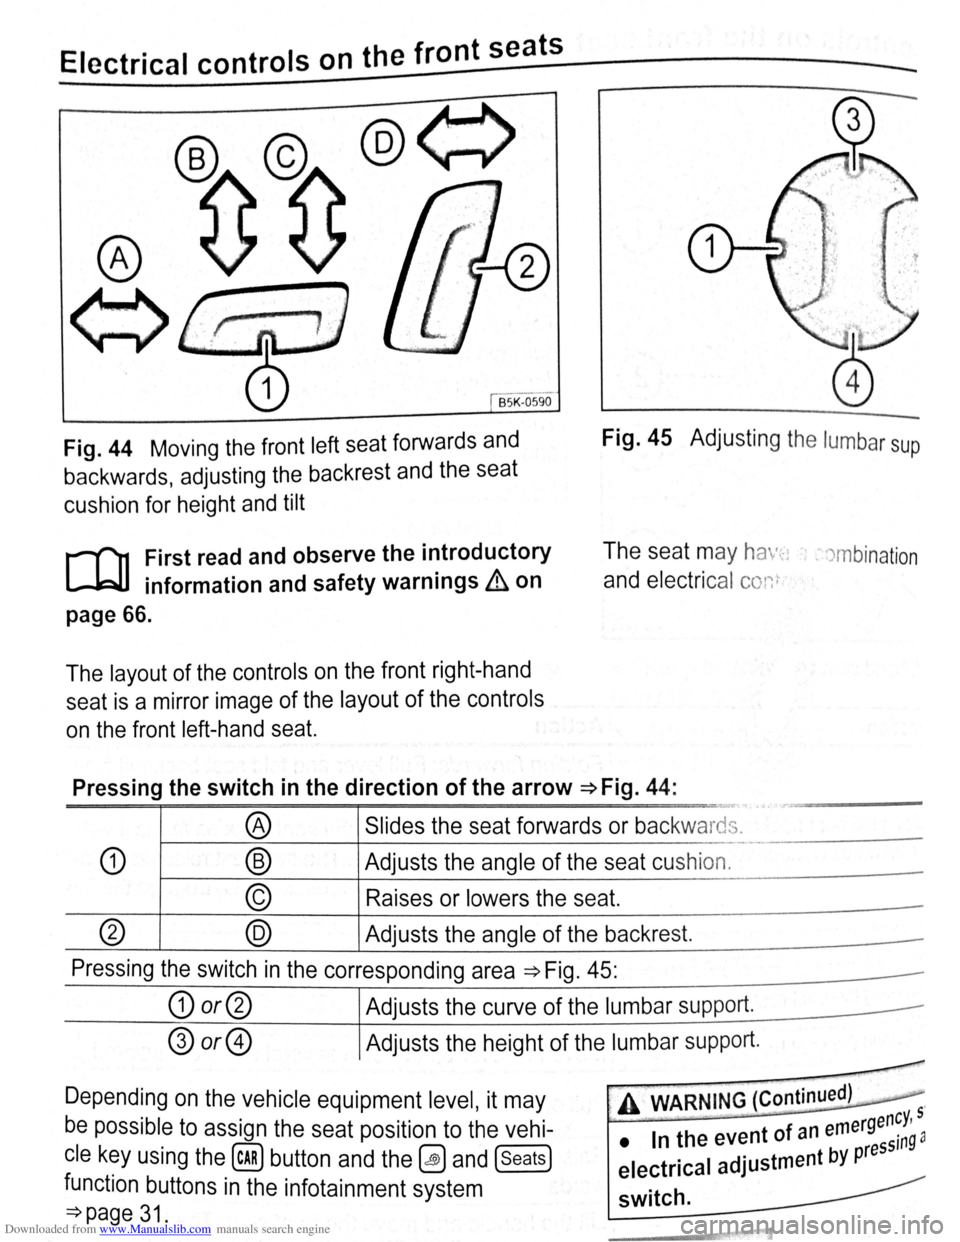
Downloaded from www.Manualslib.com manuals search engine ~E~Ie~c~tr~ic~a~l~c~o~n~tr~o~ls~o~n~th~e~f~r~o~n~t~se~a~t~s--~==========~---
BSK -0590
Fig. 44 Moving the front left seat forwards and
backwards, adjusting the backrest and the seat
cushion for height and tilt
Fig. 45 Adjusting the lumbar sup
r-f'n First read and observe the i~troductory
lJ=JJ information and safety warn1ngs & on
The seat may ha ·-~: , . )mbination
and electrical conr
page 66.
The layout of the controls on the front right-hand
seat is a mirror image of the layout of the controls
on the front left-hand seat.
Pressing the switch in the direction of the arrow ~Fig. 44:
··-
® Slides the seat forwards or backwards.
L.
-· -·--
CD ® Adjusts the angle of the seat cushion.
© Raises or lowers the seat.
(?) @ Adjusts the angle of the backrest.
Pressing the switch in the corresponding area ~Fig. 45:
G) or@ Adjusts the curve of the lumbar supp ort.
® or@ Adjusts the height of the lumbar support.
-
Depending on the vehicle equipment level, it may
be possible to assign the seat position to the vehi
cle key using the (cAR) button and the~ and (seats)
function buttons in the infotainment system
=:}page 31.
, A WARNING (Continued) .
-rgency, 5
• In the event of an eme ssin9 a
electrical adjustment by pre
switch.