torque VOLKSWAGEN CORRADO 1990 Owner's Manual
[x] Cancel search | Manufacturer: VOLKSWAGEN, Model Year: 1990, Model line: CORRADO, Model: VOLKSWAGEN CORRADO 1990Pages: 906, PDF Size: 6.56 MB
Page 675 of 906
N - REMOVE/INSTALL/OVERHAUL
Article Text (p. 2)
1990 Volkswagen Corrado
For Volkswagen Technical Site: http://vw.belcom.ru
Copyright © 1998 Mitchell Repair Information Company, LLC
Thursday, March 23, 2000 09:49PM
distributor housing and install distributor hold-down clamp and bolt.
Install distributor cap. Check timing. Tighten hold-down bolt to
specification. See TORQUE SPECIFICATIONS.
AIRFLOW SENSOR PLATE
Removal & Installation
1) Remove air filter and unscrew stop bracket. Using heat
gun, heat locking compound on fastening bolt. Remove bolt slowly. DO
NOT damage threads. Clean locking compound from bolt hole threads.
2) Install airflow sensor plate. Ensure 5 dimple marks are
up. Lightly tighten self-locking screw. Ensure sensor plate is
centered and rest position is correct. To complete installation,
reverse removal procedure. See TORQUE SPECIFICATIONS.
AIRFLOW SENSOR POTENTIOMETER
Removal & Installation
Remove differential pressure regulator. Remove insulating
compound covering mounting screws. Remove potentiometer. DO NOT touch
or damage slide contact and conductor. To install, reverse removal
procedure. See TORQUE SPECIFICATIONS. Adjust potentiometer. See D -
ADJUSTMENTS article.
FUEL DISTRIBUTOR (1.8L ONLY)
CAUTION: Fuel system pressure must be relieved before removing or
disconnecting any fuel lines. Wipe up all spilled fuel
BEFORE continuing service.
Removal
1) Disconnect battery and remove air cleaner. Disconnect all
fuel and injector lines from fuel distributor. Plug fuel supply and
return lines. Catch any spilled fuel.
2) Disconnect wiring from differential pressure regulator.
Remove screws holding fuel distributor to airflow sensor housing.
Remove fuel distributor by turning back and forth while lifting up.
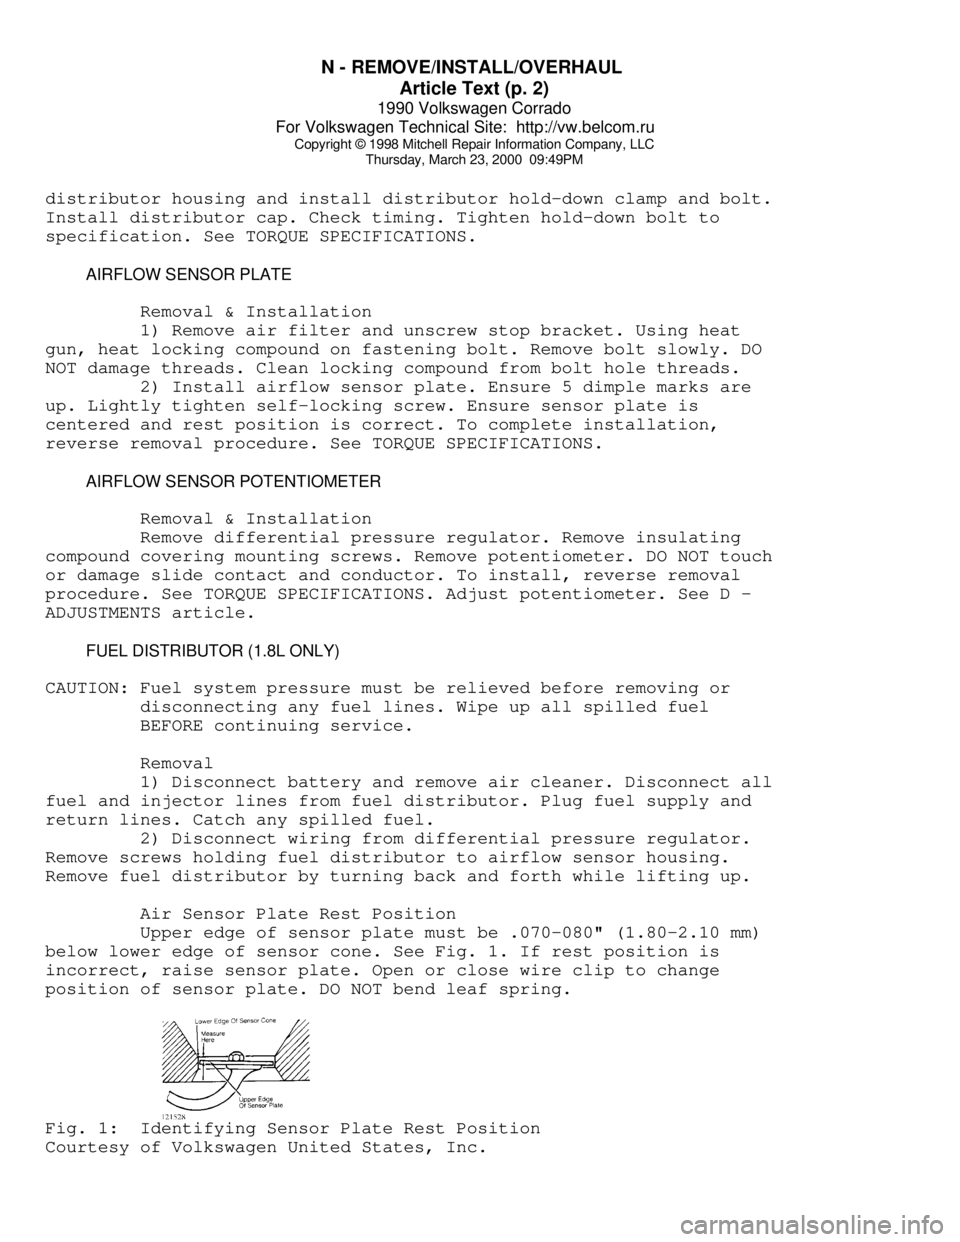
Air Sensor Plate Rest Position
Upper edge of sensor plate must be .070-080" (1.80-2.10 mm)
below lower edge of sensor cone. See Fig. 1. If rest position is
incorrect, raise sensor plate. Open or close wire clip to change
position of sensor plate. DO NOT bend leaf spring.Fig. 1: Identifying Sensor Plate Rest Position
Courtesy of Volkswagen United States, Inc.
Page 678 of 906
N - REMOVE/INSTALL/OVERHAUL
Article Text (p. 5)
1990 Volkswagen Corrado
For Volkswagen Technical Site: http://vw.belcom.ru
Copyright © 1998 Mitchell Repair Information Company, LLC
Thursday, March 23, 2000 09:49PM
distributor. Install fuel distributor. See TORQUE SPECIFICATIONS for
tightening specifications. Connect all fuel lines except those to fuel
injectors. Check sensor plate adjusting lever and fuel distributor
control piston for smooth operation.
2) Remove fuel pump relay and bridge fuel pump circuit. Use
Jumper Switch (US 4480/3) in place of fuel pump relay. When pressure
has built up, turn off fuel pump. Move sensor plate from rest position
to end of travel.
3) Uniform resistance should be felt during entire movement.
No resistance should be felt during entire movement. No resistance
should be felt on quick return to rest position. Connect injector
lines. Install fuel pump relay. Start engine and check for leaks.
INJECTORS (DIGIFANT)
CAUTION: Fuel system pressure must be relieved before removing
injectors. Wipe up all spilled fuel BEFORE continuing
service.
Removal (AFC-Digifant II)
Disconnect negative battery cable. Disconnect main electrical
connector from fuel rail. Remove idle stabilizer valve. Loosen and
remove both hoses on each end of fuel rail. Remove fuel pressure
regulator and mounting bracket. Remove fuel rail mounting bolts. Pry
off injector mounting clips. Disconnect injector electrical
connectors. Remove fuel rail. Remove each injector from its insert.
Installation
To install injectors, reverse removal procedures. Use new "O"
rings when installing injectors. Replace hose clamps if necessary. See
TORQUE SPECIFICATIONS table at end of this article. Check for fuel
leaks.
INJECTORS (CIS SYSTEMS)
Removal (CIS-E & CIS-E Motronic)
Remove injectors from inserts in cylinder head with fuel
lines attached. Using 12-mm or 13-mm hex wrench, remove inserts from
head. Use 2 wrenches to remove injectors from fuel lines.
Installation
To install, reverse removal procedures. Use 2 wrenches when
tightening injector lines to injectors. Use new "O" rings lightly
lubricated. On models with 2-piece inserts, replace insert sealing
washer (against head) and use sealing compound on upper insert
threaded portion. See TORQUE SPECIFICATIONS.
OXYGEN (O2) SENSOR
Removal & Installation
Oxygen (O2) sensor is mounted in the exhaust pipe in front of
catalytic converter. Disconnect permanent pigtail from sensor. Ensure
Page 679 of 906
N - REMOVE/INSTALL/OVERHAUL
Article Text (p. 6)
1990 Volkswagen Corrado
For Volkswagen Technical Site: http://vw.belcom.ru
Copyright © 1998 Mitchell Repair Information Company, LLC
Thursday, March 23, 2000 09:49PM
sensor is free of contaminants, avoid using any cleaning solvents.
Sensor may be difficult to remove when engine temperature is less than
118øF (48øC). Always use anti-seize compound on threads before
installation. Tighten sensor to specification. See
TORQUE SPECIFICATIONS.
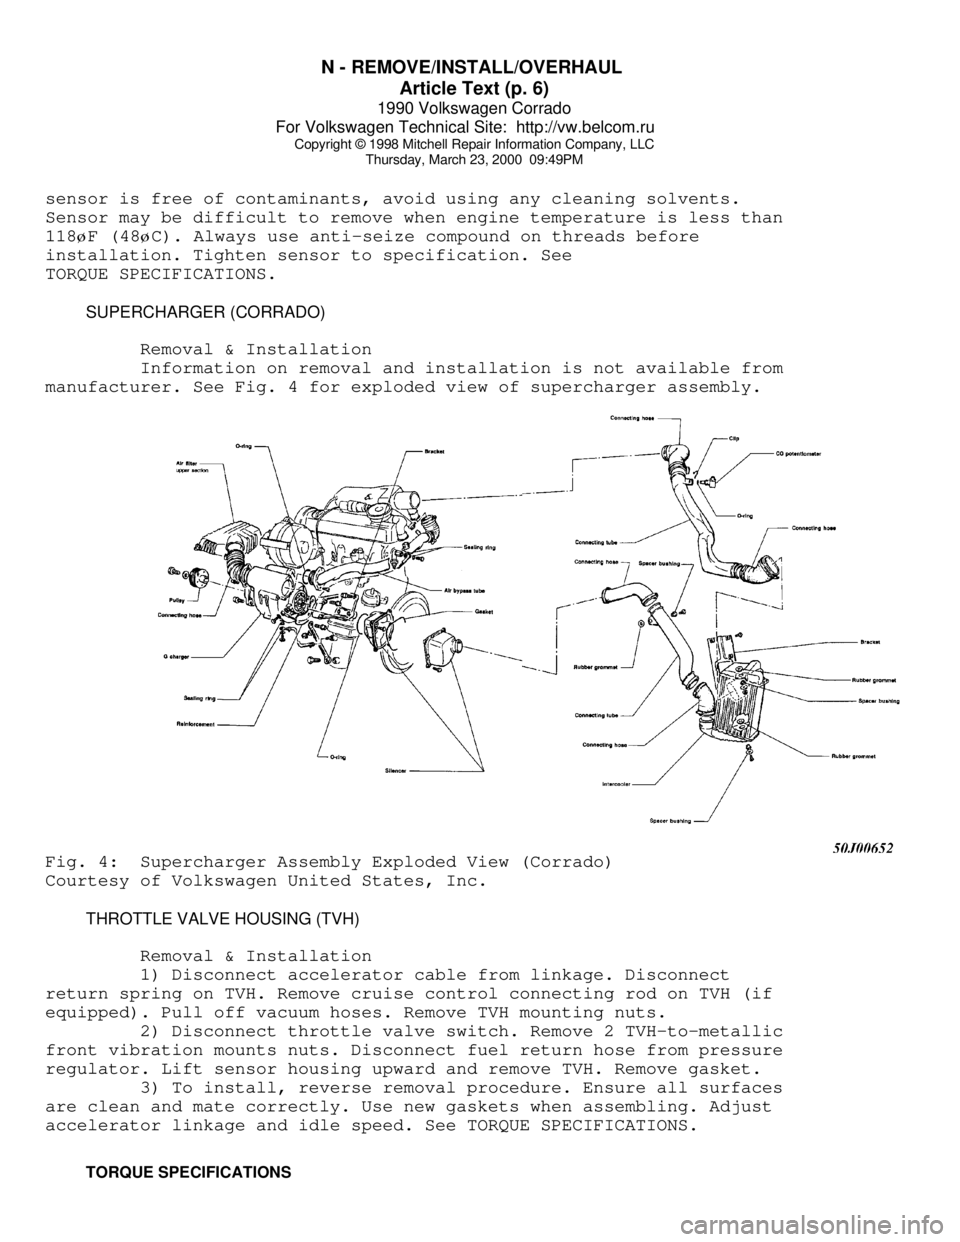
SUPERCHARGER (CORRADO)
Removal & Installation
Information on removal and installation is not available from
manufacturer. See Fig. 4 for exploded view of supercharger assembly.Fig. 4: Supercharger Assembly Exploded View (Corrado)
Courtesy of Volkswagen United States, Inc.
THROTTLE VALVE HOUSING (TVH)
Removal & Installation
1) Disconnect accelerator cable from linkage. Disconnect
return spring on TVH. Remove cruise control connecting rod on TVH (if
equipped). Pull off vacuum hoses. Remove TVH mounting nuts.
2) Disconnect throttle valve switch. Remove 2 TVH-to-metallic
front vibration mounts nuts. Disconnect fuel return hose from pressure
regulator. Lift sensor housing upward and remove TVH. Remove gasket.
3) To install, reverse removal procedure. Ensure all surfaces
are clean and mate correctly. Use new gaskets when assembling. Adjust
accelerator linkage and idle speed. See TORQUE SPECIFICATIONS.
TORQUE SPECIFICATIONS
Page 680 of 906
N - REMOVE/INSTALL/OVERHAUL
Article Text (p. 7)
1990 Volkswagen Corrado
For Volkswagen Technical Site: http://vw.belcom.ru
Copyright © 1998 Mitchell Repair Information Company, LLC
Thursday, March 23, 2000 09:49PM
TORQUE SPECIFICATIONSÄÄÄÄÄÄÄÄÄÄÄÄÄÄÄÄÄÄÄÄÄÄÄÄÄÄÄÄÄÄÄÄÄÄÄÄÄÄÄÄÄÄÄÄÄÄÄÄÄÄÄÄÄÄÄÄÄÄÄÄÄÄÄÄÄÄÄÄÄÄApplication Ft. Lbs. (N.m)
AFC-Digifant II
Fuel Injector Inserts .................................... 15 (20)
Fuel Pressure Regulator Mounting Bolt .................... 11 (15)
Intercooler Bracket Mounting Bolts (Corrado) ............. 15 (20)
Knock Sensor ............................................. 15 (20)
Oxygen Sensor ............................................ 37 (50)
Supercharger Mounting Bolts (Corrado) .................... 18 (24)
Supercharger Pulley Bolt (Corrado) ....................... 33 (45)
Supercharger To Silencer Assembly Bolts (Corrado) ........ 18 (24)
Throttle Valve Body Mounting Bolts ....................... 15 (20)
CIS-E & CIS-E Motronic
Distributor Hold-Down Bolt (Fox) ......................... 18 (24)
Fuel Injection Valve Fuel Line Nut ....................... 18 (24)
Fuel Return Line Fitting ................................. 15 (20)
Fuel Supply Line Union Bolts ............................. 15 (20)
Intake Manifold Temperature Sensor (Jetta GLi 2.0L) ...... 15 (20)
Oxygen Sensor ............................................ 37 (50)
Thermo Time Switch (CIS-E) ............................... 22 (30)
Throttle Valve Housing Mounting Bolts .................... 15 (20)
INCH Lbs. (N.m)
AFC-Digifant II
Fuel Rail Mounting Bolts ................................. 87 (10)
Idle Stabilizer Valve Mounting Nuts ...................... 87 (10)
Intercooler Mounting Bolts (Corrado) ..................... 87 (10)
Supercharger Air Hose Mounting Bolts (Corrado) ........... 87 (10)
CIS-E & CIS-E Motronic
Auxiliary Air Regulator Mounting Bolts ................... 87 (10)
Cold Start Valve Mounting Bolts .......................... 87 (10)
Coolant Temperature Sensor ............................... 87 (10)
Distributor Hold-Down Bolt (Jetta GLi) ................... 87 (10)
EGR Valve Mounting Bolts ................................. 87 (10)
Fuel Distributor Mounting Bolts ......................... 30 (3.4)
Fuel Line Fittings ....................................... 87 (10)
Test Port Plug ........................................... 87 (10)
ÄÄÄÄÄÄÄÄÄÄÄÄÄÄÄÄÄÄÄÄÄÄÄÄÄÄÄÄÄÄÄÄÄÄÄÄÄÄÄÄÄÄÄÄÄÄÄÄÄÄÄÄÄÄÄÄÄÄÄÄÄÄÄÄÄÄÄÄÄÄEND OF ARTICLE
Page 683 of 906
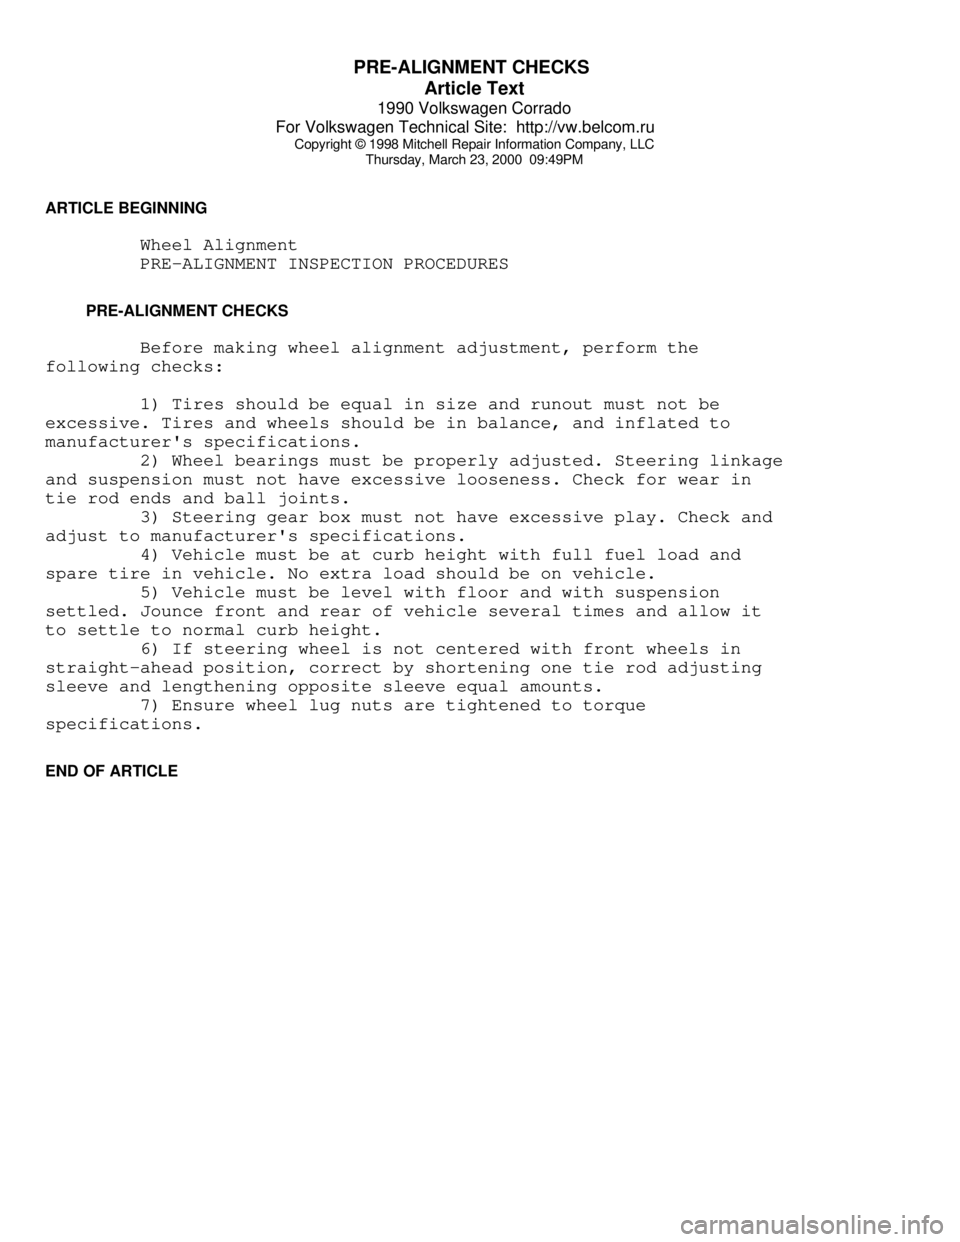
PRE-ALIGNMENT CHECKS
Article Text
1990 Volkswagen Corrado
For Volkswagen Technical Site: http://vw.belcom.ru
Copyright © 1998 Mitchell Repair Information Company, LLC
Thursday, March 23, 2000 09:49PM
ARTICLE BEGINNING
Wheel Alignment
PRE-ALIGNMENT INSPECTION PROCEDURES
PRE-ALIGNMENT CHECKS
Before making wheel alignment adjustment, perform the
following checks:
1) Tires should be equal in size and runout must not be
excessive. Tires and wheels should be in balance, and inflated to
manufacturer's specifications.
2) Wheel bearings must be properly adjusted. Steering linkage
and suspension must not have excessive looseness. Check for wear in
tie rod ends and ball joints.
3) Steering gear box must not have excessive play. Check and
adjust to manufacturer's specifications.
4) Vehicle must be at curb height with full fuel load and
spare tire in vehicle. No extra load should be on vehicle.
5) Vehicle must be level with floor and with suspension
settled. Jounce front and rear of vehicle several times and allow it
to settle to normal curb height.
6) If steering wheel is not centered with front wheels in
straight-ahead position, correct by shortening one tie rod adjusting
sleeve and lengthening opposite sleeve equal amounts.
7) Ensure wheel lug nuts are tightened to torque
specifications.
END OF ARTICLE
Page 734 of 906
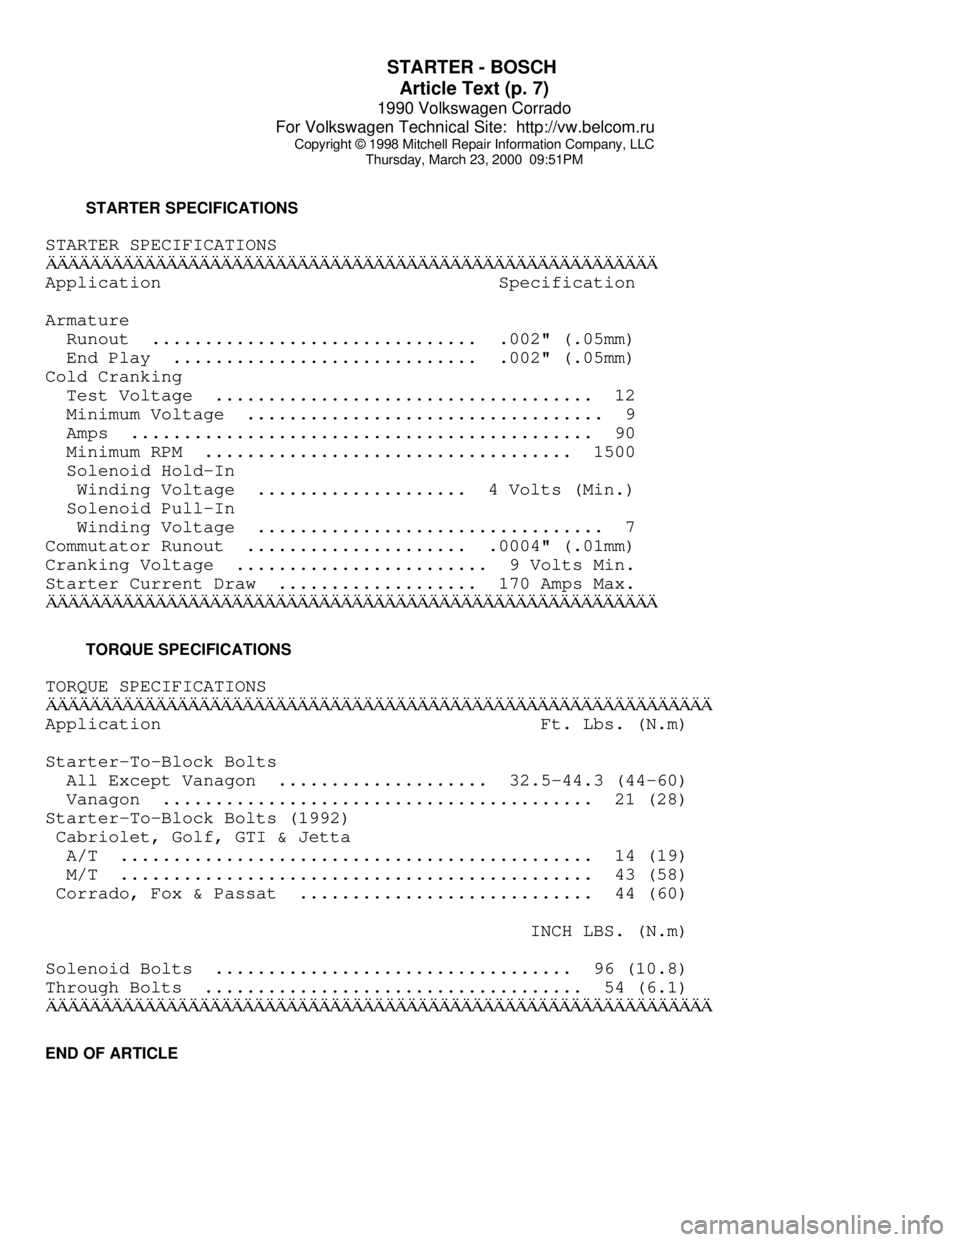
STARTER - BOSCH
Article Text (p. 7)
1990 Volkswagen Corrado
For Volkswagen Technical Site: http://vw.belcom.ru
Copyright © 1998 Mitchell Repair Information Company, LLC
Thursday, March 23, 2000 09:51PM
STARTER SPECIFICATIONS
STARTER SPECIFICATIONSÄÄÄÄÄÄÄÄÄÄÄÄÄÄÄÄÄÄÄÄÄÄÄÄÄÄÄÄÄÄÄÄÄÄÄÄÄÄÄÄÄÄÄÄÄÄÄÄÄÄÄÄÄÄÄÄApplication Specification
Armature
Runout ............................... .002" (.05mm)
End Play ............................. .002" (.05mm)
Cold Cranking
Test Voltage .................................... 12
Minimum Voltage .................................. 9
Amps ............................................ 90
Minimum RPM ................................... 1500
Solenoid Hold-In
Winding Voltage .................... 4 Volts (Min.)
Solenoid Pull-In
Winding Voltage ................................. 7
Commutator Runout ..................... .0004" (.01mm)
Cranking Voltage ........................ 9 Volts Min.
Starter Current Draw ................... 170 Amps Max.
ÄÄÄÄÄÄÄÄÄÄÄÄÄÄÄÄÄÄÄÄÄÄÄÄÄÄÄÄÄÄÄÄÄÄÄÄÄÄÄÄÄÄÄÄÄÄÄÄÄÄÄÄÄÄÄÄ TORQUE SPECIFICATIONS
TORQUE SPECIFICATIONS
ÄÄÄÄÄÄÄÄÄÄÄÄÄÄÄÄÄÄÄÄÄÄÄÄÄÄÄÄÄÄÄÄÄÄÄÄÄÄÄÄÄÄÄÄÄÄÄÄÄÄÄÄÄÄÄÄÄÄÄÄÄApplication Ft. Lbs. (N.m)
Starter-To-Block Bolts
All Except Vanagon .................... 32.5-44.3 (44-60)
Vanagon ......................................... 21 (28)
Starter-To-Block Bolts (1992)
Cabriolet, Golf, GTI & Jetta
A/T ............................................. 14 (19)
M/T ............................................. 43 (58)
Corrado, Fox & Passat ............................ 44 (60)
INCH LBS. (N.m)
Solenoid Bolts .................................. 96 (10.8)
Through Bolts .................................... 54 (6.1)
ÄÄÄÄÄÄÄÄÄÄÄÄÄÄÄÄÄÄÄÄÄÄÄÄÄÄÄÄÄÄÄÄÄÄÄÄÄÄÄÄÄÄÄÄÄÄÄÄÄÄÄÄÄÄÄÄÄÄÄÄÄEND OF ARTICLE
Page 739 of 906
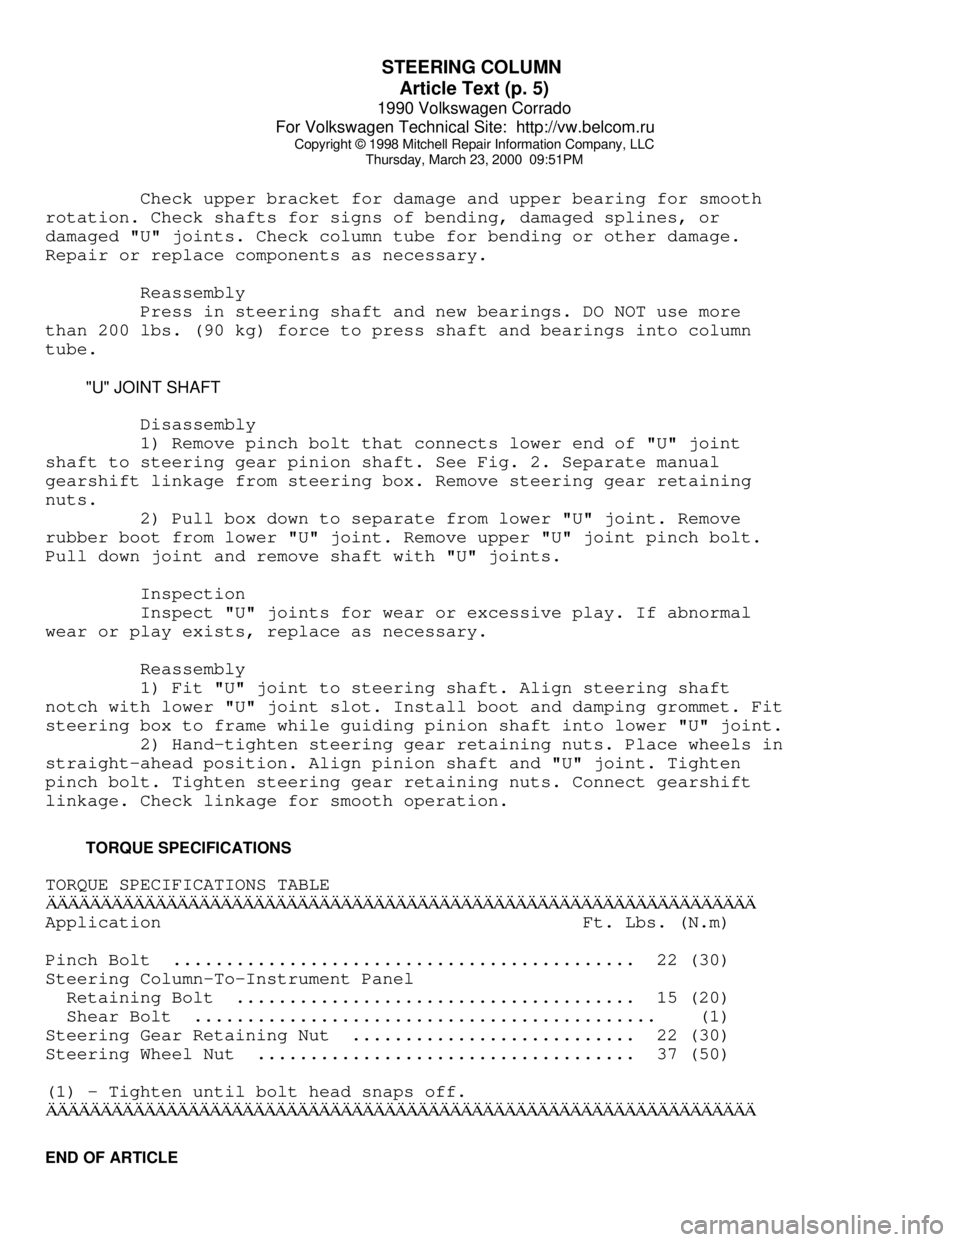
STEERING COLUMN
Article Text (p. 5)
1990 Volkswagen Corrado
For Volkswagen Technical Site: http://vw.belcom.ru
Copyright © 1998 Mitchell Repair Information Company, LLC
Thursday, March 23, 2000 09:51PM
Check upper bracket for damage and upper bearing for smooth
rotation. Check shafts for signs of bending, damaged splines, or
damaged "U" joints. Check column tube for bending or other damage.
Repair or replace components as necessary.
Reassembly
Press in steering shaft and new bearings. DO NOT use more
than 200 lbs. (90 kg) force to press shaft and bearings into column
tube.
"U" JOINT SHAFT
Disassembly
1) Remove pinch bolt that connects lower end of "U" joint
shaft to steering gear pinion shaft. See Fig. 2. Separate manual
gearshift linkage from steering box. Remove steering gear retaining
nuts.
2) Pull box down to separate from lower "U" joint. Remove
rubber boot from lower "U" joint. Remove upper "U" joint pinch bolt.
Pull down joint and remove shaft with "U" joints.
Inspection
Inspect "U" joints for wear or excessive play. If abnormal
wear or play exists, replace as necessary.
Reassembly
1) Fit "U" joint to steering shaft. Align steering shaft
notch with lower "U" joint slot. Install boot and damping grommet. Fit
steering box to frame while guiding pinion shaft into lower "U" joint.
2) Hand-tighten steering gear retaining nuts. Place wheels in
straight-ahead position. Align pinion shaft and "U" joint. Tighten
pinch bolt. Tighten steering gear retaining nuts. Connect gearshift
linkage. Check linkage for smooth operation.
TORQUE SPECIFICATIONS
TORQUE SPECIFICATIONS TABLEÄÄÄÄÄÄÄÄÄÄÄÄÄÄÄÄÄÄÄÄÄÄÄÄÄÄÄÄÄÄÄÄÄÄÄÄÄÄÄÄÄÄÄÄÄÄÄÄÄÄÄÄÄÄÄÄÄÄÄÄÄÄÄÄÄApplication Ft. Lbs. (N.m)
Pinch Bolt ............................................ 22 (30)
Steering Column-To-Instrument Panel
Retaining Bolt ...................................... 15 (20)
Shear Bolt ............................................ (1)
Steering Gear Retaining Nut ........................... 22 (30)
Steering Wheel Nut .................................... 37 (50)
(1) - Tighten until bolt head snaps off.
ÄÄÄÄÄÄÄÄÄÄÄÄÄÄÄÄÄÄÄÄÄÄÄÄÄÄÄÄÄÄÄÄÄÄÄÄÄÄÄÄÄÄÄÄÄÄÄÄÄÄÄÄÄÄÄÄÄÄÄÄÄÄÄÄÄEND OF ARTICLE
Page 742 of 906

STEERING COLUMN SWITCHES
Article Text (p. 3)
1990 Volkswagen Corrado
For Volkswagen Technical Site: http://vw.belcom.ru
Copyright © 1998 Mitchell Repair Information Company, LLC
Thursday, March 23, 2000 09:51PM
follow air bag service precautions may result in air bag
deployment and personal injury. See SERVICE PRECAUTIONS.
After component replacement, perform a system operational
check to ensure proper system operation. See SYSTEM
OPERATION CHECK.
Removal
1) Before proceeding, follow air bag service precautions. See
SERVICE PRECAUTIONS. Disable air bag system. See DISABLING &
ACTIVATING AIR BAG SYSTEM.
2) Air bag unit is located on steering wheel hub. Remove Torx
head retaining screws on rear of steering wheel. See Fig. 2. Lift air
bag unit from steering wheel, and tilt air bag unit downward.
Disconnect wiring connector from air bag unit.Fig. 2: Removing Air Bag Unit
Courtesy of Volkswagen United States, Inc.
Installation
To install, reverse removal procedure. Tighten air bag unit
retaining screws to specification. See TORQUE SPECIFICATIONS table.
Reactivate air bag system. See DISABLING & ACTIVATING AIR BAG SYSTEM.
Check air bag indicator lights to ensure system is functioning
properly. See SYSTEM OPERATION CHECK.
SPIRAL SPRING REMOVAL & INSTALLATION
Removal
1) Before proceeding, follow air bag service precautions. See
SERVICE PRECAUTIONS. Disable air bag system. See DISABLING &
ACTIVATING AIR BAG SYSTEM.
2) Remove air bag unit. See AIR BAG UNIT. Remove steering
wheel. See STEERING WHEEL. Remove knee bar panel and steering column
lower trim. Disconnect 2-pin wiring connector (Green/Black and
Green/Red wires) at base of steering column. Remove 3 spiral spring
retaining screws, and remove spiral spring. See Fig. 3.
Page 743 of 906

STEERING COLUMN SWITCHES
Article Text (p. 4)
1990 Volkswagen Corrado
For Volkswagen Technical Site: http://vw.belcom.ru
Copyright © 1998 Mitchell Repair Information Company, LLC
Thursday, March 23, 2000 09:51PMFig. 3: Removing Spiral Spring Assembly
Courtesy of Volkswagen United States, Inc.
Installation
1) To install spiral spring assembly, reverse removal
procedure. NEW spiral spring assemblies have a locking tab which locks
assembly in its centered position. Locking tab must be removed before
installing new spring assembly.
2) If a spiral spring assembly is reinstalled, it must be
centered. To center, turn spring assembly 4 turns from stop, in either
direction.
3) Reactivate air bag system. See DISABLING & ACTIVATING AIR
BAG SYSTEM. Check air bag indicator lights to ensure system is
functioning properly. See SYSTEM OPERATION CHECK.
STEERING WHEEL REMOVAL & INSTALLATION
Removal (Cabriolet)
1) Before proceeding, follow air bag service precautions. See
SERVICE PRECAUTIONS. Disable air bag system. See DISABLING &
ACTIVATING AIR BAG SYSTEM.
2) Turn front wheels to straight-ahead position. Remove air
bag unit. See AIR BAG UNIT under REMOVAL & INSTALLATION. Remove
steering wheel nut and spring washer. Mark steering wheel and shaft
for reassembly reference. Remove steering wheel.
Installation
To install, reverse removal procedure. Tighten steering wheel
nut to specification. See TORQUE SPECIFICATIONS table. Reactivate air
bag system. See DISABLING & ACTIVATING AIR BAG SYSTEM. Check air bag
indicator lights to ensure system is functioning properly. See SYSTEM
OPERATION CHECK.
STEERING WHEEL & HORN PAD REMOVAL & INSTALLATION
Page 745 of 906

STEERING COLUMN SWITCHES
Article Text (p. 6)
1990 Volkswagen Corrado
For Volkswagen Technical Site: http://vw.belcom.ru
Copyright © 1998 Mitchell Repair Information Company, LLC
Thursday, March 23, 2000 09:51PMFig. 5: Removing Steering Wheel (Typical)
Courtesy of Volkswagen United States, Inc.
Installation
1) Coat slip ring contact surfaces with a light electrical
grease. Assemble horn button assembly (if disassembled). Ensure wheels
are in a straight-ahead position.
2) Aligning marks made during removal, place slip ring,
springs, canceling cams, steering wheel, washer and steering wheel
retaining nut on shaft.
3) Tighten steering wheel nut to specification. See TORQUE
SPECIFICATIONS table. To complete installation, reverse removal
procedure.
COMBINATION SWITCH REMOVAL & INSTALLATION
Removal
Remove steering wheel. Remove upper and lower steering column
covers. Disconnect combination switch harness connectors. Remove snap
ring and washer from steering shaft (if equipped). Remove combination
switch attaching screws. Remove combination switch.
Installation
To install, reverse removal procedure. Ensure all electrical
connections are tight. Check canceling operation of turn signal
switch.
STEERING LOCK & IGNITION SWITCH REMOVAL & INSTALLATION
Removal
1) Remove steering wheel, upper and lower steering column
covers and combination switch. Disconnect ignition switch harness
connectors.
2) Remove clamping washers, spring and contact ring from
steering column. Remove steering lock housing mounting bolt. Remove
steering lock housing from steering column.
Installation
1) To install, reverse removal procedure. Slide steering lock
housing onto steering column. Install contact ring, spring and