torque VOLKSWAGEN CORRADO 1990 Service Manual
[x] Cancel search | Manufacturer: VOLKSWAGEN, Model Year: 1990, Model line: CORRADO, Model: VOLKSWAGEN CORRADO 1990Pages: 906, PDF Size: 6.56 MB
Page 765 of 906
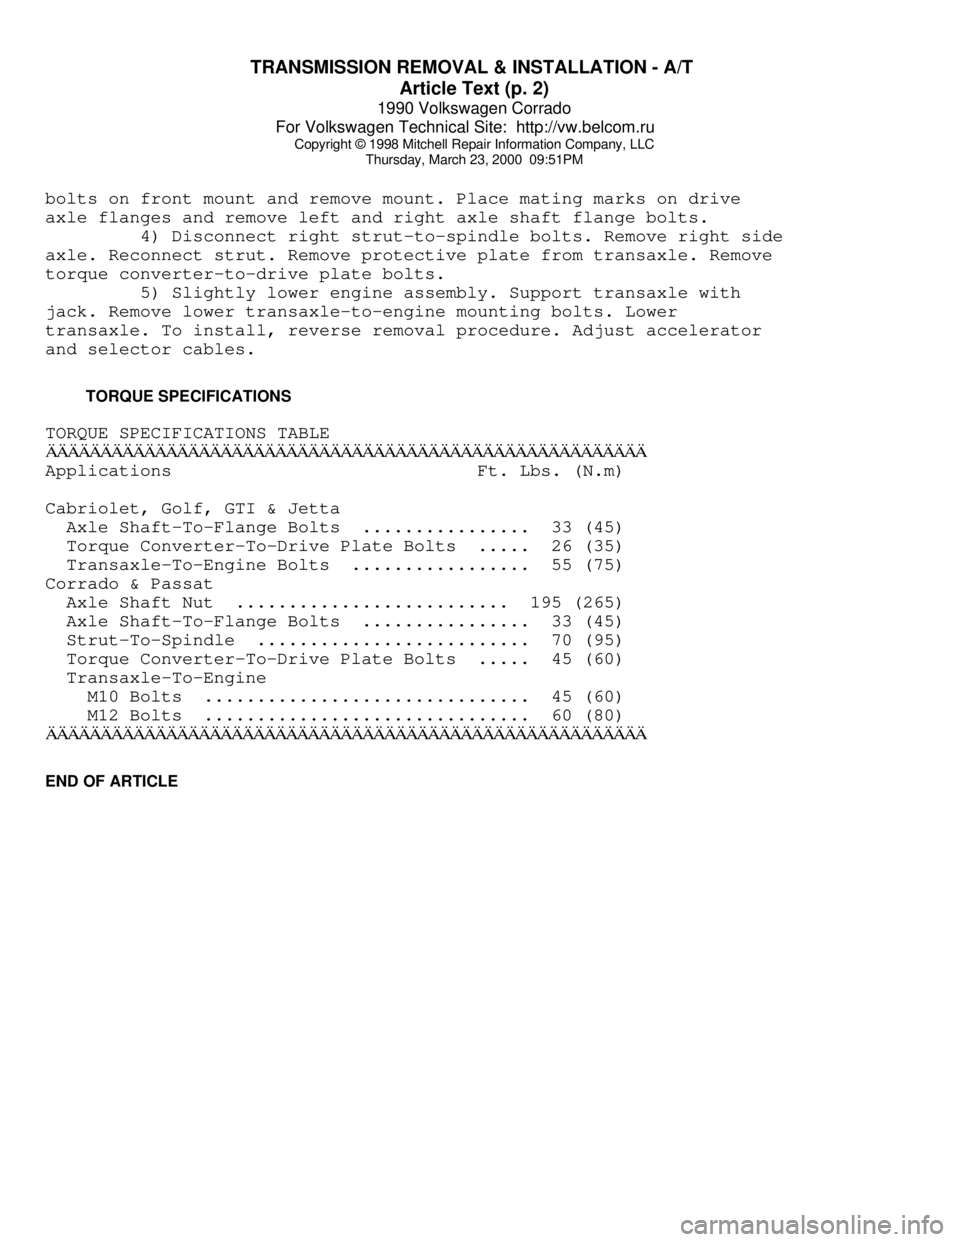
TRANSMISSION REMOVAL & INSTALLATION - A/T
Article Text (p. 2)
1990 Volkswagen Corrado
For Volkswagen Technical Site: http://vw.belcom.ru
Copyright © 1998 Mitchell Repair Information Company, LLC
Thursday, March 23, 2000 09:51PM
bolts on front mount and remove mount. Place mating marks on drive
axle flanges and remove left and right axle shaft flange bolts.
4) Disconnect right strut-to-spindle bolts. Remove right side
axle. Reconnect strut. Remove protective plate from transaxle. Remove
torque converter-to-drive plate bolts.
5) Slightly lower engine assembly. Support transaxle with
jack. Remove lower transaxle-to-engine mounting bolts. Lower
transaxle. To install, reverse removal procedure. Adjust accelerator
and selector cables.
TORQUE SPECIFICATIONS
TORQUE SPECIFICATIONS TABLEÄÄÄÄÄÄÄÄÄÄÄÄÄÄÄÄÄÄÄÄÄÄÄÄÄÄÄÄÄÄÄÄÄÄÄÄÄÄÄÄÄÄÄÄÄÄÄÄÄÄÄÄÄÄÄApplications Ft. Lbs. (N.m)
Cabriolet, Golf, GTI & Jetta
Axle Shaft-To-Flange Bolts ................ 33 (45)
Torque Converter-To-Drive Plate Bolts ..... 26 (35)
Transaxle-To-Engine Bolts ................. 55 (75)
Corrado & Passat
Axle Shaft Nut .......................... 195 (265)
Axle Shaft-To-Flange Bolts ................ 33 (45)
Strut-To-Spindle .......................... 70 (95)
Torque Converter-To-Drive Plate Bolts ..... 45 (60)
Transaxle-To-Engine
M10 Bolts ............................... 45 (60)
M12 Bolts ............................... 60 (80)
ÄÄÄÄÄÄÄÄÄÄÄÄÄÄÄÄÄÄÄÄÄÄÄÄÄÄÄÄÄÄÄÄÄÄÄÄÄÄÄÄÄÄÄÄÄÄÄÄÄÄÄÄÄÄÄEND OF ARTICLE
Page 807 of 906

TROUBLE SHOOTING - BASIC PROCEDURES
Article Text (p. 31)
1990 Volkswagen Corrado
For Volkswagen Technical Site: http://vw.belcom.ru
Copyright © 1998 Mitchell Repair Information Company, LLC
Thursday, March 23, 2000 09:52PMÄÄÄÄÄÄÄÄÄÄÄÄÄÄÄÄÄÄÄÄÄÄÄÄÄÄÄÄÄÄÄÄÄÄÄÄÄÄÄÄÄÄÄÄÄÄÄÄÄÄÄÄÄÄÄÄÄÄÄÄÄÄÄÄÄÄÄÄÄÄNoisy Main Inadequate oil supply Check oil delivery to
Bearings main bearings
Excessive main bearing Replace main bearings,
clearance See ENGINES
Excessive crankshaft end Replace crankshaft, See
play ENGINES
Loose flywheel or torque Tighten attaching bolts
converter
Loose or damaged vibration Tighten or replace
damper vibration damper
Crankshaft journals Re-grind crankshaft
out-of-round journals
Excessive belt tension Loosen belt tension
ÄÄÄÄÄÄÄÄÄÄÄÄÄÄÄÄÄÄÄÄÄÄÄÄÄÄÄÄÄÄÄÄÄÄÄÄÄÄÄÄÄÄÄÄÄÄÄÄÄÄÄÄÄÄÄÄÄÄÄÄÄÄÄÄÄÄÄÄÄÄNoisy Connecting Excessive bearing clearance Replace bearing, See
Rods or missing bearing ENGINES
Crankshaft rod journal Re-grind crankshaft
out-of-round journal
Misaligned connecting rod Remove rod or cap and
or cap realign
Incorrectly tightened rod Remove and re-tighten
bolts rod bolts
ÄÄÄÄÄÄÄÄÄÄÄÄÄÄÄÄÄÄÄÄÄÄÄÄÄÄÄÄÄÄÄÄÄÄÄÄÄÄÄÄÄÄÄÄÄÄÄÄÄÄÄÄÄÄÄÄÄÄÄÄÄÄÄÄÄÄÄÄÄÄNoisy Pistons Excessive piston-to-bore Install larger pistons,
and Rings clearance See ENGINES
Bore tapered or out-of-round Rebore block
Piston ring broken Replace piston rings,
See ENGINES
Piston pin loose or seized Replace piston pin, See
ENGINES
Connecting rods misaligned Realign connecting rods
Ring side clearance too Replace with larger or
loose or tight smaller rings
Carbon build-up on piston Remove carbon
ÄÄÄÄÄÄÄÄÄÄÄÄÄÄÄÄÄÄÄÄÄÄÄÄÄÄÄÄÄÄÄÄÄÄÄÄÄÄÄÄÄÄÄÄÄÄÄÄÄÄÄÄÄÄÄÄÄÄÄÄÄÄÄÄÄÄÄÄÄÄNoisy Valve Worn or bent push rods Replace push rods, See
Train ENGINES
Worn rocker arms or bridged Replace push rods, See
pivots ENGINES
Dirt or chips in valve Remove lifters and
lifters remove dirt/chips
Excessive valve lifter Replace valve lifters,
leak-down See ENGINES
Valve lifter face worn Replace valve lifters,
See ENGINES
Broken or cocked valve replace or reposition
springs springs
Too much valve stem-to-guide Replace valve guides,
clearance See ENGINES
Valve bent Replace valve, See
ENGINES