weight VOLKSWAGEN CORRADO 1993 Repair Manual
[x] Cancel search | Manufacturer: VOLKSWAGEN, Model Year: 1993, Model line: CORRADO, Model: VOLKSWAGEN CORRADO 1993Pages: 920, PDF Size: 6.92 MB
Page 46 of 920

* BRAKE SYSTEM UNIFORM INSPECTION GUIDELINES *
Article Text (p. 14)
1993 Volkswagen Corrado
For Volkswagen Technical Site: http://vw.belcom.ru
Copyright © 1998 Mitchell Repair Information Company, LLC
Wednesday, March 22, 2000 08:30PM
(4) If all other causes have been eliminated, suggest repair or
replacement of the caliper(s).ÄÄÄÄÄÄÄÄÄÄÄÄÄÄÄÄÄÄÄÄÄÄÄÄÄÄÄÄÄÄÄÄÄÄÄÄÄÄÄÄÄÄÄÄÄÄÄÄÄÄÄÄÄÄÄÄÄÄÄÄÄÄÄÄÄÄÄÄÄÄ DIGITAL RATIO AXLE CONTROLLERS & BUFFERS (DRAC & DRAB)
DIGITAL RATIO AXLE CONTROLLERS & BUFFERS (DRAC & DRAB)
ÄÄÄÄÄÄÄÄÄÄÄÄÄÄÄÄÄÄÄÄÄÄÄÄÄÄÄÂÄÄÄÄÄÄÂÄÄÄÄÄÄÄÄÄÄÄÄÄÄÄÄÄÄÄÄÄÄÄÄÄÄÄÄÄÄÄÄÄÄÄCondition
³ Code ³ Procedure
ÄÄÄÄÄÄÄÄÄÄÄÄÄÄÄÄÄÄÄÄÄÄÄÄÄÄÄÅÄÄÄÄÄÄÅÄÄÄÄÄÄÄÄÄÄÄÄÄÄÄÄÄÄÄÄÄÄÄÄÄÄÄÄÄÄÄÄÄÄÄMissing
³ A ³ Require replacement.
ÄÄÄÄÄÄÄÄÄÄÄÄÄÄÄÄÄÄÄÄÄÄÄÄÄÄÄÅÄÄÄÄÄÄÅÄÄÄÄÄÄÄÄÄÄÄÄÄÄÄÄÄÄÄÄÄÄÄÄÄÄÄÄÄÄÄÄÄÄÄOutput signal incorrect
³ A ³ Require repair or replacement.
ÄÄÄÄÄÄÄÄÄÄÄÄÄÄÄÄÄÄÄÄÄÄÄÄÄÄÄÁÄÄÄÄÄÄÁÄÄÄÄÄÄÄÄÄÄÄÄÄÄÄÄÄÄÄÄÄÄÄÄÄÄÄÄÄÄÄÄÄÄÄ DRUMS
Determine the need to recondition based upon individual drum
conditions that follow. Friction material replacement does not require
drum reconditioning unless other justifications exist. DO NOT
recondition new drums unless they are being pressed or bolted onto an
existing hub. It is not necessary to replace drums in axle sets.
However, when replacing or reconditioning a drum due to the conditions
that follow, you may suggest reconditioning of the other drum on the
same axle to eliminate uneven braking behavior. Determine the need to
replace based upon the individual drum conditions that follow. Always
wash drums after servicing or before installing.
DRUMS
ÄÄÄÄÄÄÄÄÄÄÄÄÄÄÄÄÄÄÄÄÄÄÄÄÄÄÄÂÄÄÄÄÄÄÂÄÄÄÄÄÄÄÄÄÄÄÄÄÄÄÄÄÄÄÄÄÄÄÄÄÄÄÄÄÄÄÄÄÄÄCondition
³ Code ³ Procedure
ÄÄÄÄÄÄÄÄÄÄÄÄÄÄÄÄÄÄÄÄÄÄÄÄÄÄÄÅÄÄÄÄÄÄÅÄÄÄÄÄÄÄÄÄÄÄÄÄÄÄÄÄÄÄÄÄÄÄÄÄÄÄÄÄÄÄÄÄÄÄBalance weight missing
³ ³ No service suggested or required.
ÄÄÄÄÄÄÄÄÄÄÄÄÄÄÄÄÄÄÄÄÄÄÄÄÄÄÄÅÄÄÄÄÄÄÅÄÄÄÄÄÄÄÄÄÄÄÄÄÄÄÄÄÄÄÄÄÄÄÄÄÄÄÄÄÄÄÄÄÄÄBell-mouthed
³ B,2 ³ Suggest reconditioning or
³ ³ replacement.
ÄÄÄÄÄÄÄÄÄÄÄÄÄÄÄÄÄÄÄÄÄÄÄÄÄÄÄÅÄÄÄÄÄÄÅÄÄÄÄÄÄÄÄÄÄÄÄÄÄÄÄÄÄÄÄÄÄÄÄÄÄÄÄÄÄÄÄÄÄÄCooling fin broken
³ ³ No service suggested or required.
ÄÄÄÄÄÄÄÄÄÄÄÄÄÄÄÄÄÄÄÄÄÄÄÄÄÄÄÅÄÄÄÄÄÄÅÄÄÄÄÄÄÄÄÄÄÄÄÄÄÄÄÄÄÄÄÄÄÄÄÄÄÄÄÄÄÄÄÄÄÄCracked
³ A ³ Require replacement.
ÄÄÄÄÄÄÄÄÄÄÄÄÄÄÄÄÄÄÄÄÄÄÄÄÄÄÄÅÄÄÄÄÄÄÅÄÄÄÄÄÄÄÄÄÄÄÄÄÄÄÄÄÄÄÄÄÄÄÄÄÄÄÄÄÄÄÄÄÄÄDrum diameter will exceed
³ A ³ Require replacement.
OEM "machine to" specs
³ ³ See note (1) below.
after required
³ ³ reconditioning
³ ³
ÄÄÄÄÄÄÄÄÄÄÄÄÄÄÄÄÄÄÄÄÄÄÄÄÄÄÄÅÄÄÄÄÄÄÅÄÄÄÄÄÄÄÄÄÄÄÄÄÄÄÄÄÄÄÄÄÄÄÄÄÄÄÄÄÄÄÄÄÄÄHard-spotted
³ A ³ Suggest reconditioning or
³ ³ replacement.
ÄÄÄÄÄÄÄÄÄÄÄÄÄÄÄÄÄÄÄÄÄÄÄÄÄÄÄÅÄÄÄÄÄÄÅÄÄÄÄÄÄÄÄÄÄÄÄÄÄÄÄÄÄÄÄÄÄÄÄÄÄÄÄÄÄÄÄÄÄÄMeasured diameter is
³ A ³ Require replacement.
greater than OEM discard
³ ³ specifications
³ ³
Page 210 of 920

* STEERING UNIFORM INSPECTION GUIDELINES *
Article Text (p. 65)
1993 Volkswagen Corrado
For Volkswagen Technical Site: http://vw.belcom.ru
Copyright © 1998 Mitchell Repair Information Company, LLC
Wednesday, March 22, 2000 08:43PMÄÄÄÄÄÄÄÄÄÄÄÄÄÄÄÄÄÄÄÄÄÄÄÄÄÄÄÄÄÅÄÄÄÄÄÄÅÄÄÄÄÄÄÄÄÄÄÄÄÄÄÄÄÄÄÄÄÄÄÄÄÄÄÄÄÄÄÄÄÄThreads stripped (threads
³ A ³ Require replacement of
missing)
³ ³ component with stripped threads.
ÄÄÄÄÄÄÄÄÄÄÄÄÄÄÄÄÄÄÄÄÄÄÄÄÄÄÄÄÄÁÄÄÄÄÄÄÁÄÄÄÄÄÄÄÄÄÄÄÄÄÄÄÄÄÄÄÄÄÄÄÄÄÄÄÄÄÄÄÄÄNOTE: (1) Some manufacturers require replacement of all studs on that
wheel if two or more studs or nuts on the same wheel are
broken or missing.
(2) Only required if removing wheel.
ÄÄÄÄÄÄÄÄÄÄÄÄÄÄÄÄÄÄÄÄÄÄÄÄÄÄÄÄÄÄÄÄÄÄÄÄÄÄÄÄÄÄÄÄÄÄÄÄÄÄÄÄÄÄÄÄÄÄÄÄÄÄÄÄÄÄÄÄÄÄ WHEELS
WARNING: Mounting a regular tire on a high-pressure compact spare
wheel is not permitted. Attempting to mount a tire of one
diameter on a wheel of a different diameter or flange type
may result in serious injury or death. If the wheel
identification stamp is not legible, or cannot be found,
DO NOT use the wheel until the size and type have been
properly identified. Wheels of different diameter, offset,
or width cannot be mixed on the same axle. Bead seat tapers
cannot be interchanged.
WHEELS
ÄÄÄÄÄÄÄÄÄÄÄÄÄÄÄÄÄÄÄÄÄÄÄÄÄÄÄÂÄÄÄÄÄÄÂÄÄÄÄÄÄÄÄÄÄÄÄÄÄÄÄÄÄÄÄÄÄÄÄÄÄÄÄÄÄÄÄÄÄÄCondition
³ Code ³ Procedure
ÄÄÄÄÄÄÄÄÄÄÄÄÄÄÄÄÄÄÄÄÄÄÄÄÄÄÄÅÄÄÄÄÄÄÅÄÄÄÄÄÄÄÄÄÄÄÄÄÄÄÄÄÄÄÄÄÄÄÄÄÄÄÄÄÄÄÄÄÄÄBead leaking, caused by
³ A ³ Require repair or replacement.
wheel rim flange
³ ³ See caution below.
ÄÄÄÄÄÄÄÄÄÄÄÄÄÄÄÄÄÄÄÄÄÄÄÄÄÄÄÁÄÄÄÄÄÄÁÄÄÄÄÄÄÄÄÄÄÄÄÄÄÄÄÄÄÄÄÄÄÄÄÄÄÄÄÄÄÄÄÄÄÄCAUTION: DO NOT attempt to correct a bent wheel rim.
ÄÄÄÄÄÄÄÄÄÄÄÄÄÄÄÄÄÄÄÄÄÄÄÄÄÄÄÂÄÄÄÄÄÄÂÄÄÄÄÄÄÄÄÄÄÄÄÄÄÄÄÄÄÄÄÄÄÄÄÄÄÄÄÄÄÄÄÄÄÄBent wheel hub mounting
³ A ³ Require replacement.
surface
³ ³
ÄÄÄÄÄÄÄÄÄÄÄÄÄÄÄÄÄÄÄÄÄÄÄÄÄÄÄÅÄÄÄÄÄÄÅÄÄÄÄÄÄÄÄÄÄÄÄÄÄÄÄÄÄÄÄÄÄÄÄÄÄÄÄÄÄÄÄÄÄÄBent wheel rim, causing
³ B,2 ³ Suggest replacement.
vibration
³ ³ See caution above.
ÄÄÄÄÄÄÄÄÄÄÄÄÄÄÄÄÄÄÄÄÄÄÄÄÄÄÄÅÄÄÄÄÄÄÅÄÄÄÄÄÄÄÄÄÄÄÄÄÄÄÄÄÄÄÄÄÄÄÄÄÄÄÄÄÄÄÄÄÄÄBroken
³ A ³ Require replacement.
ÄÄÄÄÄÄÄÄÄÄÄÄÄÄÄÄÄÄÄÄÄÄÄÄÄÄÄÅÄÄÄÄÄÄÅÄÄÄÄÄÄÄÄÄÄÄÄÄÄÄÄÄÄÄÄÄÄÄÄÄÄÄÄÄÄÄÄÄÄÄCast wheel porous, causing
³ A ³ Require repair or replacement.
a leak
³ ³
ÄÄÄÄÄÄÄÄÄÄÄÄÄÄÄÄÄÄÄÄÄÄÄÄÄÄÄÅÄÄÄÄÄÄÅÄÄÄÄÄÄÄÄÄÄÄÄÄÄÄÄÄÄÄÄÄÄÄÄÄÄÄÄÄÄÄÄÄÄÄClip-on balance weight is
³ B,2 ³ Suggest replacement.
incorrect type for wheel
³ ³ rim flange
³ ³
ÄÄÄÄÄÄÄÄÄÄÄÄÄÄÄÄÄÄÄÄÄÄÄÄÄÄÄÅÄÄÄÄÄÄÅÄÄÄÄÄÄÄÄÄÄÄÄÄÄÄÄÄÄÄÄÄÄÄÄÄÄÄÄÄÄÄÄÄÄÄCorrosion, affecting
³ A ³ Require replacement.
structural integrity
³ ³
ÄÄÄÄÄÄÄÄÄÄÄÄÄÄÄÄÄÄÄÄÄÄÄÄÄÄÄÅÄÄÄÄÄÄÅÄÄÄÄÄÄÄÄÄÄÄÄÄÄÄÄÄÄÄÄÄÄÄÄÄÄÄÄÄÄÄÄÄÄÄCorrosion build-up on wheel
³ A ³ Require repair.
hub mounting surface
³ ³
ÄÄÄÄÄÄÄÄÄÄÄÄÄÄÄÄÄÄÄÄÄÄÄÄÄÄÄÅÄÄÄÄÄÄÅÄÄÄÄÄÄÄÄÄÄÄÄÄÄÄÄÄÄÄÄÄÄÄÄÄÄÄÄÄÄÄÄÄÄÄ
Page 276 of 920
* SUSPENSION UNIFORM INSPECTION GUIDELINES *
Article Text (p. 65)
1993 Volkswagen Corrado
For Volkswagen Technical Site: http://vw.belcom.ru
Copyright © 1998 Mitchell Repair Information Company, LLC
Wednesday, March 22, 2000 08:45PMÄÄÄÄÄÄÄÄÄÄÄÄÄÄÄÄÄÄÄÄÄÄÄÄÄÄÄÄÄÅÄÄÄÄÄÄÅÄÄÄÄÄÄÄÄÄÄÄÄÄÄÄÄÄÄÄÄÄÄÄÄÄÄÄÄÄÄÄÄÄThreads stripped (threads
³ A ³ Require replacement of
missing)
³ ³ component with stripped threads.
ÄÄÄÄÄÄÄÄÄÄÄÄÄÄÄÄÄÄÄÄÄÄÄÄÄÄÄÄÄÁÄÄÄÄÄÄÁÄÄÄÄÄÄÄÄÄÄÄÄÄÄÄÄÄÄÄÄÄÄÄÄÄÄÄÄÄÄÄÄÄNOTE: (1) Some manufacturers require replacement of all studs on that
wheel if two or more studs or nuts on the same wheel are
broken or missing.
(2) Only required if removing wheel.
ÄÄÄÄÄÄÄÄÄÄÄÄÄÄÄÄÄÄÄÄÄÄÄÄÄÄÄÄÄÄÄÄÄÄÄÄÄÄÄÄÄÄÄÄÄÄÄÄÄÄÄÄÄÄÄÄÄÄÄÄÄÄÄÄÄÄÄÄÄÄ WHEELS
WARNING: Mounting a regular tire on a high-pressure compact spare
wheel is not permitted. Attempting to mount a tire of one
diameter on a wheel of a different diameter or flange type
may result in serious injury or death. If the wheel
identification stamp is not legible, or cannot be found,
DO NOT use the wheel until the size and type have been
properly identified. Wheels of different diameter, offset,
or width cannot be mixed on the same axle. Bead seat tapers
cannot be interchanged.
WHEELS
ÄÄÄÄÄÄÄÄÄÄÄÄÄÄÄÄÄÄÄÄÄÄÄÄÄÄÄÂÄÄÄÄÄÄÂÄÄÄÄÄÄÄÄÄÄÄÄÄÄÄÄÄÄÄÄÄÄÄÄÄÄÄÄÄÄÄÄÄÄÄCondition
³ Code ³ Procedure
ÄÄÄÄÄÄÄÄÄÄÄÄÄÄÄÄÄÄÄÄÄÄÄÄÄÄÄÅÄÄÄÄÄÄÅÄÄÄÄÄÄÄÄÄÄÄÄÄÄÄÄÄÄÄÄÄÄÄÄÄÄÄÄÄÄÄÄÄÄÄBead leaking, caused by
³ A ³ Require repair or replacement.
wheel rim flange
³ ³ See caution below.
ÄÄÄÄÄÄÄÄÄÄÄÄÄÄÄÄÄÄÄÄÄÄÄÄÄÄÄÁÄÄÄÄÄÄÁÄÄÄÄÄÄÄÄÄÄÄÄÄÄÄÄÄÄÄÄÄÄÄÄÄÄÄÄÄÄÄÄÄÄÄCAUTION: DO NOT attempt to correct a bent wheel rim.
ÄÄÄÄÄÄÄÄÄÄÄÄÄÄÄÄÄÄÄÄÄÄÄÄÄÄÄÂÄÄÄÄÄÄÂÄÄÄÄÄÄÄÄÄÄÄÄÄÄÄÄÄÄÄÄÄÄÄÄÄÄÄÄÄÄÄÄÄÄÄBent wheel hub mounting
³ A ³ Require replacement.
surface
³ ³
ÄÄÄÄÄÄÄÄÄÄÄÄÄÄÄÄÄÄÄÄÄÄÄÄÄÄÄÅÄÄÄÄÄÄÅÄÄÄÄÄÄÄÄÄÄÄÄÄÄÄÄÄÄÄÄÄÄÄÄÄÄÄÄÄÄÄÄÄÄÄBent wheel rim, causing
³ B,2 ³ Suggest replacement.
vibration
³ ³ See caution above.
ÄÄÄÄÄÄÄÄÄÄÄÄÄÄÄÄÄÄÄÄÄÄÄÄÄÄÄÅÄÄÄÄÄÄÅÄÄÄÄÄÄÄÄÄÄÄÄÄÄÄÄÄÄÄÄÄÄÄÄÄÄÄÄÄÄÄÄÄÄÄBroken
³ A ³ Require replacement.
ÄÄÄÄÄÄÄÄÄÄÄÄÄÄÄÄÄÄÄÄÄÄÄÄÄÄÄÅÄÄÄÄÄÄÅÄÄÄÄÄÄÄÄÄÄÄÄÄÄÄÄÄÄÄÄÄÄÄÄÄÄÄÄÄÄÄÄÄÄÄCast wheel porous, causing
³ A ³ Require repair or replacement.
a leak
³ ³
ÄÄÄÄÄÄÄÄÄÄÄÄÄÄÄÄÄÄÄÄÄÄÄÄÄÄÄÅÄÄÄÄÄÄÅÄÄÄÄÄÄÄÄÄÄÄÄÄÄÄÄÄÄÄÄÄÄÄÄÄÄÄÄÄÄÄÄÄÄÄClip-on balance weight is
³ B,2 ³ Suggest replacement.
incorrect type for wheel
³ ³ rim flange
³ ³
ÄÄÄÄÄÄÄÄÄÄÄÄÄÄÄÄÄÄÄÄÄÄÄÄÄÄÄÅÄÄÄÄÄÄÅÄÄÄÄÄÄÄÄÄÄÄÄÄÄÄÄÄÄÄÄÄÄÄÄÄÄÄÄÄÄÄÄÄÄÄCorrosion, affecting
³ A ³ Require replacement.
structural integrity
³ ³
ÄÄÄÄÄÄÄÄÄÄÄÄÄÄÄÄÄÄÄÄÄÄÄÄÄÄÄÅÄÄÄÄÄÄÅÄÄÄÄÄÄÄÄÄÄÄÄÄÄÄÄÄÄÄÄÄÄÄÄÄÄÄÄÄÄÄÄÄÄÄCorrosion build-up on wheel
³ A ³ Require repair.
hub mounting surface
³ ³
ÄÄÄÄÄÄÄÄÄÄÄÄÄÄÄÄÄÄÄÄÄÄÄÄÄÄÄÅÄÄÄÄÄÄÅÄÄÄÄÄÄÄÄÄÄÄÄÄÄÄÄÄÄÄÄÄÄÄÄÄÄÄÄÄÄÄÄÄÄÄ
Page 369 of 920

A/C SYSTEM GENERAL SERVICING
Article Text
1993 Volkswagen Corrado
For Volkswagen Technical Site: http://vw.belcom.ru
Copyright © 1998 Mitchell Repair Information Company, LLC
Wednesday, March 22, 2000 08:48PM
ARTICLE BEGINNING
1993 GENERAL SERVICING
General Servicing Procedures
USING R-12 & R-134a REFRIGERANT
HANDLING/SAFETY PRECAUTIONS
1) Always work in a well-ventilated, clean area. Refrigerant
R-134a is colorless and is invisible as a gas. Refrigerant (R-12 or R-
134a) is heavier than oxygen and will displace oxygen in a confined
area. Avoid breathing refrigerant vapors. Exposure may irritate eyes,
nose and throat.
2) The system's high pressure can cause severe injury to eyes
and skin if a hose were to burst. Always wear eye protection when
working around A/C system and refrigerant. If necessary, wear rubber
gloves or other protective clothing.
3) Refrigerant evaporates quickly when exposed to atmosphere,
freezing anything it contacts. If liquid refrigerant contacts eyes or
skin, DO NOT rub eyes or skin. Immediately flush affected area with
cool water for 15 minutes and consult a doctor or hospital.
4) Never use R-134a in combination with compressed air for
leak testing. Pressurized R-134a in the presence of oxygen (air
concentrations greater than 60% by volume) may form a combustible
mixture. DO NOT introduce compressed air into R-134a containers (full
or empty), A/C system components or service equipment.
5) DO NOT expose A/C system components to high temperatures,
steam cleaning for example, as excessive heat will cause
refrigerant/system pressure to increase. Never expose refrigerant
directly to open flame. If refrigerant needs to be warmed, place
bottom of refrigerant tank in warm water. Water temperature MUST NOT
exceed 125øF (52øC).
6) Use care when handling refrigerant containers. DO NOT
drop, strike, puncture or incinerate containers. Use Department Of
Transportation (DOT) approved, DOT 4BW or DOT 4BA, refrigerant
containers.
7) Never overfill refrigerant containers. The safe filling
level of a refrigerant container MUST NOT exceed 60% of the
container's gross weight rating. Store refrigerant containers at
temperature less than 125
øF (52øC).
8) R-12 refrigerant (Freon) will be sold and stored in White
containers, while R-134a refrigerant will be sold and stored in 30 or
50-pound Light Blue containers.
9) R-12 and R-134a refrigerants must never be mixed, as their
desiccants and lubricants are not compatible. If the refrigerants are
mixed, system cross-contamination or A/C system component failure may
occur. Always use separate servicing and refrigerant
recovery/recycling equipment.
10) Follow equipment manufacturer instructions of all service
equipment to be used. The Material Safety Data Sheet (MSDS), provided
by refrigerant manufacturer/suppliers, contains valuable information
Page 372 of 920

A/C SYSTEM GENERAL SERVICING
Article Text (p. 4)
1993 Volkswagen Corrado
For Volkswagen Technical Site: http://vw.belcom.ru
Copyright © 1998 Mitchell Repair Information Company, LLC
Wednesday, March 22, 2000 08:48PMFig. 3: Identifying R-134a Hose & Line Connectors (Lexus)
Courtesy of Toyota Motor Sales, U.S.A., Inc.
REFRIGERANT OILS
Refrigerant R-12 based systems use mineral oil, while R-134a
systems use synthetic/Polyalkylene Glycol (PAG) oils. Using a mineral
oil based lubricant with R-134a will result in A/C compressor failure
due to lack of proper lubrication.
Use ONLY specified oil for the appropriate system and A/C
compressor. Always check the underhood A/C specification label or A/C
compressor label before adding refrigerant oil to A/C
compressor/system. See Fig. 2. The following R-134a refrigerant oils
are currently available.
Lexus
PAG Refrigerant Oil (ND-OIL 8) with 10P/10PA swashplate
(piston) compressor. Synthetic Refrigerant Oil (ND-OIL 9) with
through-vane (rotary vane) compressor.
Mercedes-Benz
PAG Refrigerant Oil (001 989 08 03).
Nissan
PAG Refrigerant Oil (KLH00-PAGR0) with rotary vane
compressor. PAG Refrigerant Oil (KLH00-PAGS0) with piston (swashplate)
compressor.
Saab
PAG Refrigerant Oil (40 74 787).
NOTE: Synthetic/PAG oils absorb moisture very rapidly, 2.3-5.6% by
weight, as compared to a mineral oil absorption rate of
.005% by weight.
SERVICE EQUIPMENT
Page 399 of 920

ABBREVIATIONS
Article Text (p. 7)
1993 Volkswagen Corrado
For Volkswagen Technical Site: http://vw.belcom.ru
Copyright © 1998 Mitchell Repair Information Company, LLC
Wednesday, March 22, 2000 08:49PM³Inj. ³Injector ³
ÀÄÄÄÄÄÄÄÄÄÄÄÄÄÄÄÄÄÁÄÄÄÄÄÄÄÄÄÄÄÄÄÄÄÄÄÄÄÄÄÄÄÄÄÄÄÄÄÄÄÄÄÄÄÄÄÄÄÄÄÄÄÄÄÄÄÄÄÄÙ "J" ABBREVIATION TABLE
"J" ABBREVIATION TABLE
ÚÄÄÄÄÄÄÄÄÄÄÄÄÄÄÄÄÄÂÄÄÄÄÄÄÄÄÄÄÄÄÄÄÄÄÄÄÄÄÄÄÄÄÄÄÄÄÄÄÄÄÄÄÄÄÄÄÄÄÄÄÄÄÄÄÄÄÄÄ¿
³ABBREVIATION
³DEFINITION ³
ÃÄÄÄÄÄÄÄÄÄÄÄÄÄÄÄÄÄÅÄÄÄÄÄÄÄÄÄÄÄÄÄÄÄÄÄÄÄÄÄÄÄÄÄÄÄÄÄÄÄÄÄÄÄÄÄÄÄÄÄÄÄÄÄÄÄÄÄÄ´
³J/B
³Junction Block ³
ÀÄÄÄÄÄÄÄÄÄÄÄÄÄÄÄÄÄÁÄÄÄÄÄÄÄÄÄÄÄÄÄÄÄÄÄÄÄÄÄÄÄÄÄÄÄÄÄÄÄÄÄÄÄÄÄÄÄÄÄÄÄÄÄÄÄÄÄÄÙ "K" ABBREVIATION TABLE
"K" ABBREVIATION TABLE
ÚÄÄÄÄÄÄÄÄÄÄÄÄÄÄÄÄÄÂÄÄÄÄÄÄÄÄÄÄÄÄÄÄÄÄÄÄÄÄÄÄÄÄÄÄÄÄÄÄÄÄÄÄÄÄÄÄÄÄÄÄÄÄÄÄÄÄÄÄ¿
³ABBREVIATION
³DEFINITION ³
ÃÄÄÄÄÄÄÄÄÄÄÄÄÄÄÄÄÄÅÄÄÄÄÄÄÄÄÄÄÄÄÄÄÄÄÄÄÄÄÄÄÄÄÄÄÄÄÄÄÄÄÄÄÄÄÄÄÄÄÄÄÄÄÄÄÄÄÄÄ´
³k/ohms
³1000 ohms (kilo as in k/ohms) ³
³kg
³Kilograms (weight) ³
³kg/cm
ý ³Kilograms Per Square Centimeter ³
³KAM
³Keep Alive Memory ³
³KAPWR
³Keep Alive Power ³
³KM/H
³Kilometers Per Hour ³
³KOEO
³Key On Engine Off ³
³KOER
³Key On Engine Running ³
³KS
³Knock Sensor ³
ÀÄÄÄÄÄÄÄÄÄÄÄÄÄÄÄÄÄÁÄÄÄÄÄÄÄÄÄÄÄÄÄÄÄÄÄÄÄÄÄÄÄÄÄÄÄÄÄÄÄÄÄÄÄÄÄÄÄÄÄÄÄÄÄÄÄÄÄÄÙ "L" ABBREVIATION TABLE
"L" ABBREVIATION TABLE
ÚÄÄÄÄÄÄÄÄÄÄÄÄÄÄÄÄÄÂÄÄÄÄÄÄÄÄÄÄÄÄÄÄÄÄÄÄÄÄÄÄÄÄÄÄÄÄÄÄÄÄÄÄÄÄÄÄÄÄÄÄÄÄÄÄÄÄÄÄ¿
³ABBREVIATION
³DEFINITION ³
ÃÄÄÄÄÄÄÄÄÄÄÄÄÄÄÄÄÄÅÄÄÄÄÄÄÄÄÄÄÄÄÄÄÄÄÄÄÄÄÄÄÄÄÄÄÄÄÄÄÄÄÄÄÄÄÄÄÄÄÄÄÄÄÄÄÄÄÄÄ´
³L
³Liter(s) ³
³L/D
³Light Duty ³
³LCD
³Liquid Crystal Display ³
³LED
³Light Emitting Diode ³
³LH
³Left Hand ³
³LOS
³Limited Operation Strategy ³
³LT BLU
³Light Blue ³
³LT GRN
³Light Green ³
³LUS
³Lock-Up Solenoid ³
³Lbs.
³Pounds ³
³Lt(s).
³Light(s) ³
³Lugg.
³Luggage ³
ÀÄÄÄÄÄÄÄÄÄÄÄÄÄÄÄÄÄÁÄÄÄÄÄÄÄÄÄÄÄÄÄÄÄÄÄÄÄÄÄÄÄÄÄÄÄÄÄÄÄÄÄÄÄÄÄÄÄÄÄÄÄÄÄÄÄÄÄÄÙ "M" ABBREVIATION TABLE
Page 448 of 920
CLUTCH
Article Text (p. 3)
1993 Volkswagen Corrado
For Volkswagen Technical Site: http://vw.belcom.ru
Copyright © 1998 Mitchell Repair Information Company, LLC
Wednesday, March 22, 2000 08:58PM
front transmission mount. Attach Engine Support (10-222A) with Bases
(10-222A/1) to engine. Slightly tighten engine support and remove
starter. Remove left transaxle mount bracket.
5) Remove long left side transmission support bracket. Remove
balance weight from mount. Remove heat shield for right side inner CV
(constant velocity) joint.
6) Disconnect axle shafts at flanges and wire aside. Remove
left side transaxle mount from transaxle. It will be necessary to push
rearward on mount for clearance to remove long transaxle mount bolt.
7) Push transaxle mount to right and pull down to remove from
vehicle. Remove small gear carrier housing cover. Support transaxle
with floor jack. Remove rear transaxle mount. Remove lower transaxle-
to-engine bolts. Carefully pry transaxle from engine and lower.
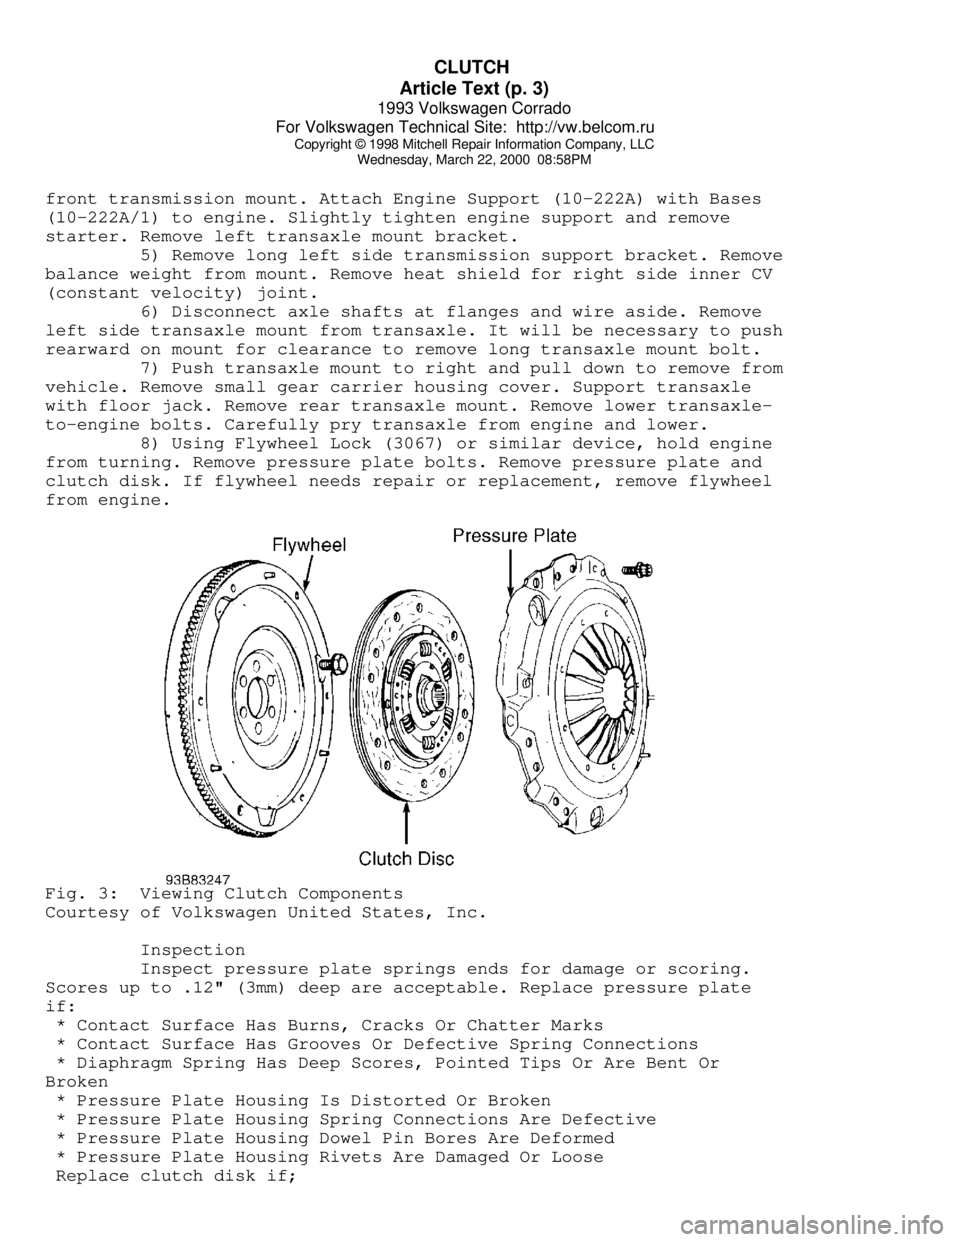
8) Using Flywheel Lock (3067) or similar device, hold engine
from turning. Remove pressure plate bolts. Remove pressure plate and
clutch disk. If flywheel needs repair or replacement, remove flywheel
from engine.Fig. 3: Viewing Clutch Components
Courtesy of Volkswagen United States, Inc.
Inspection
Inspect pressure plate springs ends for damage or scoring.
Scores up to .12" (3mm) deep are acceptable. Replace pressure plate
if:
* Contact Surface Has Burns, Cracks Or Chatter Marks
* Contact Surface Has Grooves Or Defective Spring Connections
* Diaphragm Spring Has Deep Scores, Pointed Tips Or Are Bent Or
Broken
* Pressure Plate Housing Is Distorted Or Broken
* Pressure Plate Housing Spring Connections Are Defective
* Pressure Plate Housing Dowel Pin Bores Are Deformed
* Pressure Plate Housing Rivets Are Damaged Or Loose
Replace clutch disk if;
Page 450 of 920
CLUTCH
Article Text (p. 5)
1993 Volkswagen Corrado
For Volkswagen Technical Site: http://vw.belcom.ru
Copyright © 1998 Mitchell Repair Information Company, LLC
Wednesday, March 22, 2000 08:58PM
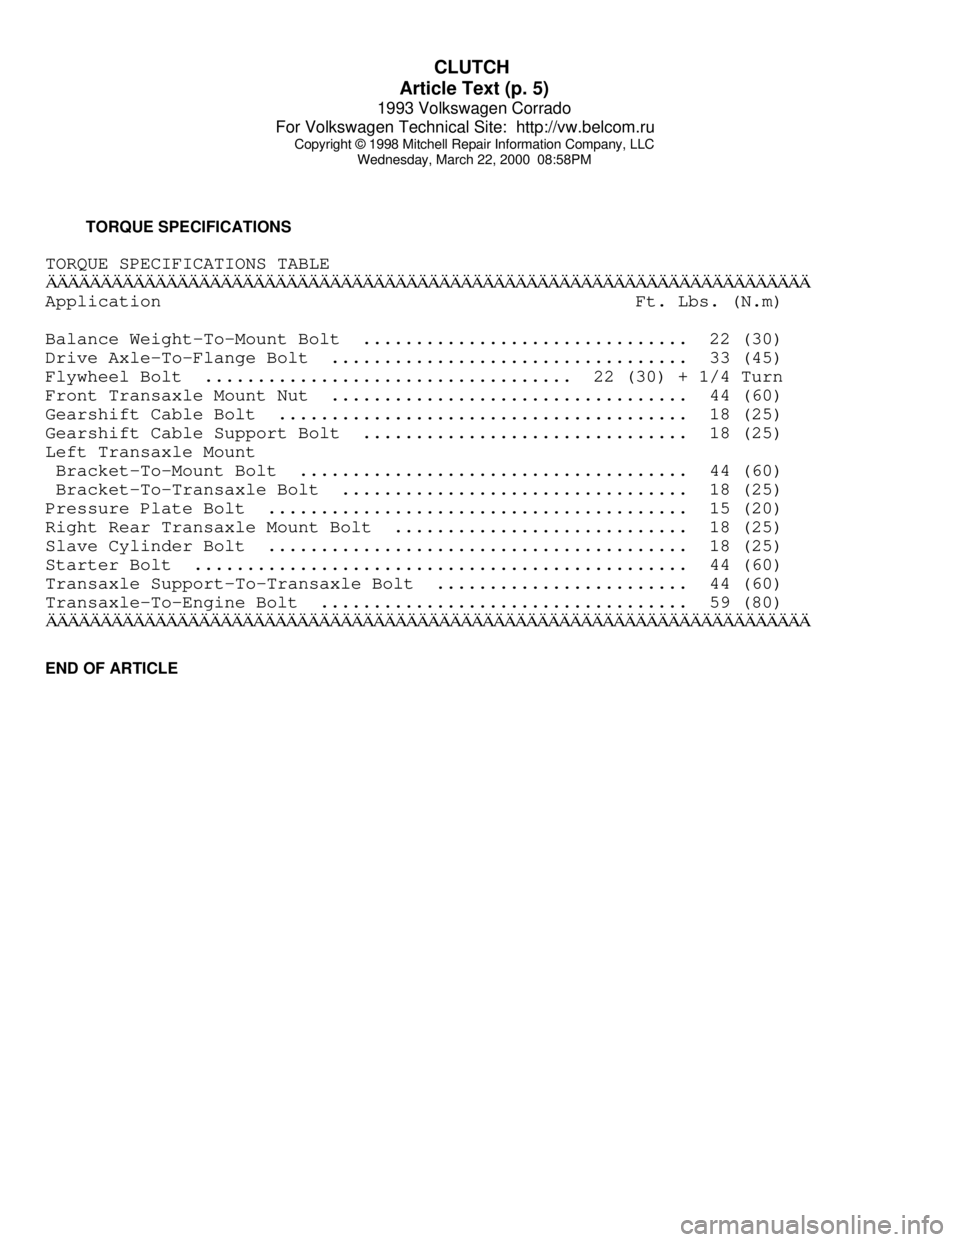
TORQUE SPECIFICATIONS
TORQUE SPECIFICATIONS TABLEÄÄÄÄÄÄÄÄÄÄÄÄÄÄÄÄÄÄÄÄÄÄÄÄÄÄÄÄÄÄÄÄÄÄÄÄÄÄÄÄÄÄÄÄÄÄÄÄÄÄÄÄÄÄÄÄÄÄÄÄÄÄÄÄÄÄÄÄÄÄApplication Ft. Lbs. (N.m)
Balance Weight-To-Mount Bolt ............................... 22 (30)
Drive Axle-To-Flange Bolt .................................. 33 (45)
Flywheel Bolt ................................... 22 (30) + 1/4 Turn
Front Transaxle Mount Nut .................................. 44 (60)
Gearshift Cable Bolt ....................................... 18 (25)
Gearshift Cable Support Bolt ............................... 18 (25)
Left Transaxle Mount
Bracket-To-Mount Bolt ..................................... 44 (60)
Bracket-To-Transaxle Bolt ................................. 18 (25)
Pressure Plate Bolt ........................................ 15 (20)
Right Rear Transaxle Mount Bolt ............................ 18 (25)
Slave Cylinder Bolt ........................................ 18 (25)
Starter Bolt ............................................... 44 (60)
Transaxle Support-To-Transaxle Bolt ........................ 44 (60)
Transaxle-To-Engine Bolt ................................... 59 (80)
ÄÄÄÄÄÄÄÄÄÄÄÄÄÄÄÄÄÄÄÄÄÄÄÄÄÄÄÄÄÄÄÄÄÄÄÄÄÄÄÄÄÄÄÄÄÄÄÄÄÄÄÄÄÄÄÄÄÄÄÄÄÄÄÄÄÄÄÄÄÄEND OF ARTICLE
Page 544 of 920
ENGINE OVERHAUL PROCEDURES - GENERAL INFORMATION
Article Text (p. 15)
1993 Volkswagen Corrado
For Volkswagen Technical Site: http://vw.belcom.ru
Copyright © 1998 Mitchell Repair Information Company, LLC
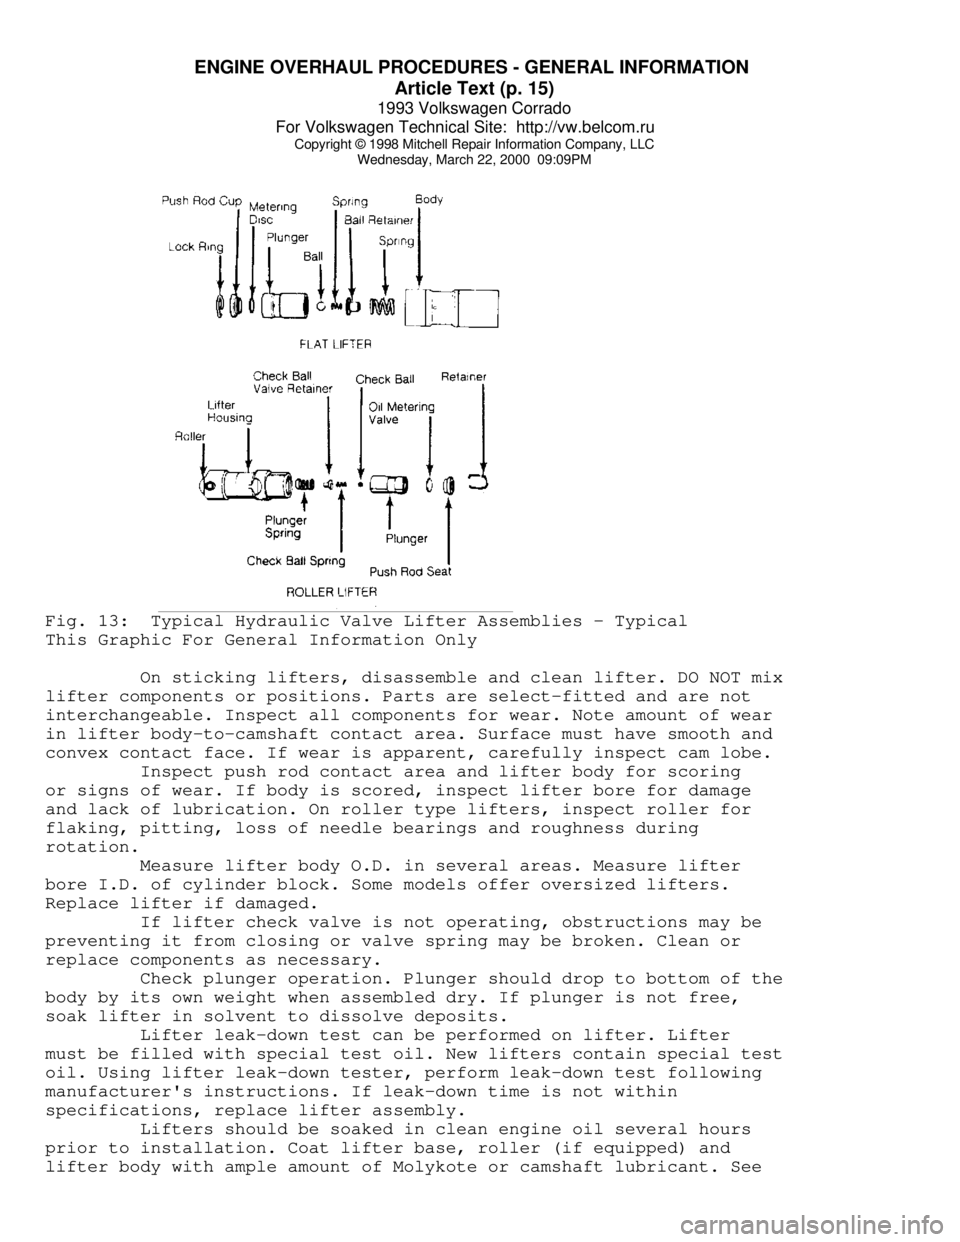
Wednesday, March 22, 2000 09:09PMFig. 13: Typical Hydraulic Valve Lifter Assemblies - Typical
This Graphic For General Information Only
On sticking lifters, disassemble and clean lifter. DO NOT mix
lifter components or positions. Parts are select-fitted and are not
interchangeable. Inspect all components for wear. Note amount of wear
in lifter body-to-camshaft contact area. Surface must have smooth and
convex contact face. If wear is apparent, carefully inspect cam lobe.
Inspect push rod contact area and lifter body for scoring
or signs of wear. If body is scored, inspect lifter bore for damage
and lack of lubrication. On roller type lifters, inspect roller for
flaking, pitting, loss of needle bearings and roughness during
rotation.
Measure lifter body O.D. in several areas. Measure lifter
bore I.D. of cylinder block. Some models offer oversized lifters.
Replace lifter if damaged.
If lifter check valve is not operating, obstructions may be
preventing it from closing or valve spring may be broken. Clean or
replace components as necessary.
Check plunger operation. Plunger should drop to bottom of the
body by its own weight when assembled dry. If plunger is not free,
soak lifter in solvent to dissolve deposits.
Lifter leak-down test can be performed on lifter. Lifter
must be filled with special test oil. New lifters contain special test
oil. Using lifter leak-down tester, perform leak-down test following
manufacturer's instructions. If leak-down time is not within
specifications, replace lifter assembly.
Lifters should be soaked in clean engine oil several hours
prior to installation. Coat lifter base, roller (if equipped) and
lifter body with ample amount of Molykote or camshaft lubricant. See
Page 671 of 920
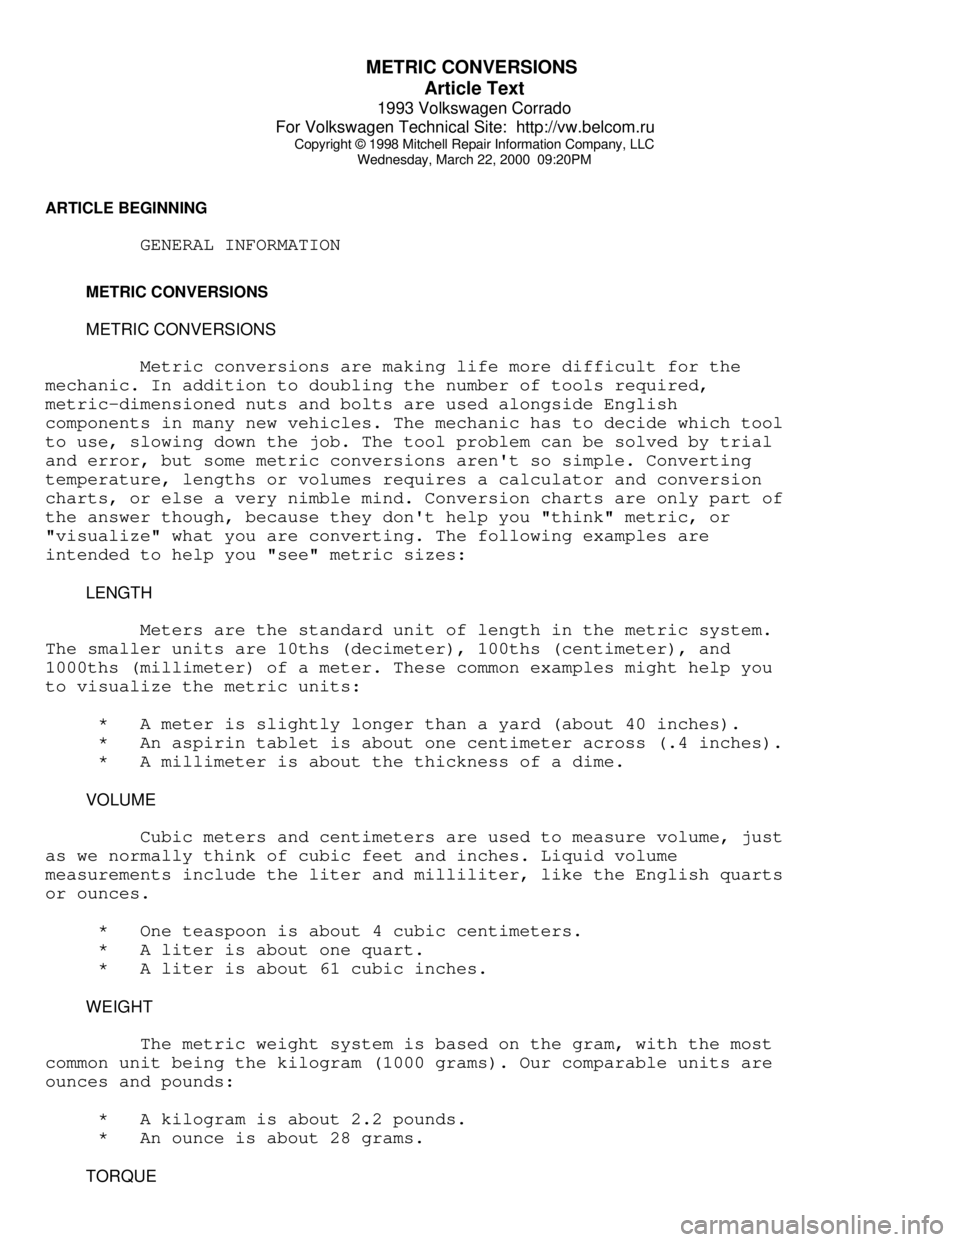
METRIC CONVERSIONS
Article Text
1993 Volkswagen Corrado
For Volkswagen Technical Site: http://vw.belcom.ru
Copyright © 1998 Mitchell Repair Information Company, LLC
Wednesday, March 22, 2000 09:20PM
ARTICLE BEGINNING
GENERAL INFORMATION
METRIC CONVERSIONS
METRIC CONVERSIONS
Metric conversions are making life more difficult for the
mechanic. In addition to doubling the number of tools required,
metric-dimensioned nuts and bolts are used alongside English
components in many new vehicles. The mechanic has to decide which tool
to use, slowing down the job. The tool problem can be solved by trial
and error, but some metric conversions aren't so simple. Converting
temperature, lengths or volumes requires a calculator and conversion
charts, or else a very nimble mind. Conversion charts are only part of
the answer though, because they don't help you "think" metric, or
"visualize" what you are converting. The following examples are
intended to help you "see" metric sizes:
LENGTH
Meters are the standard unit of length in the metric system.
The smaller units are 10ths (decimeter), 100ths (centimeter), and
1000ths (millimeter) of a meter. These common examples might help you
to visualize the metric units:
* A meter is slightly longer than a yard (about 40 inches).
* An aspirin tablet is about one centimeter across (.4 inches).
* A millimeter is about the thickness of a dime.
VOLUME
Cubic meters and centimeters are used to measure volume, just
as we normally think of cubic feet and inches. Liquid volume
measurements include the liter and milliliter, like the English quarts
or ounces.
* One teaspoon is about 4 cubic centimeters.
* A liter is about one quart.
* A liter is about 61 cubic inches.
WEIGHT
The metric weight system is based on the gram, with the most
common unit being the kilogram (1000 grams). Our comparable units are
ounces and pounds:
* A kilogram is about 2.2 pounds.
* An ounce is about 28 grams.
TORQUE