spare wheel VOLKSWAGEN GOLF 1993 1H / 3.G Owners Manual
[x] Cancel search | Manufacturer: VOLKSWAGEN, Model Year: 1993, Model line: GOLF, Model: VOLKSWAGEN GOLF 1993 1H / 3.GPages: 156, PDF Size: 6.36 MB
Page 5 of 156
Downloaded from www.Manualslib.com manuals search engine CONTROLS AND EQUIPMENT
Dashboard and Controls ..... 4
. ey s, Cen tral locking . . .... 6, 7
::"tl-thef t warning system .... 8
Joors .......................... .... 9
oot lid .... ........... . . . . . 10
::Iectric windows .. . .. 10
• ~Irrors . . ..... . ... 12
Seal belts 13
"" rbag System . . . . . 18
Safe ty for children .. ... 21
ead restraints . . . . . .. 24
= ro nt seats . . . . . . . . . . . .. 25
Rear seat . . . 27
L u ggage compartment ... . ... . ...... 28
M esh partition (Estate) ...... 29
L u ggage compartment cover /
F olding/sliding cover
... 30
Pedals, Hand brake .. 31
Manual gearbox .... ... .... 31
Automati c gearbox . . . .. .......... 32
H eig ht-adjustable steering wheel ..... 35
I gnition lock. . . . . .. 35
Starting/stopp ing engine 36, 38
\lIstrumellts .. .... 39
Warning lamps ....... 46
Switches . . . . . . . . . . . . . . 50
Turn signal and dip lever ............. 53
Cruise control system ........... 54
Wi ndscreen wipe r and washer system 55
Heating an d ventilation .. . ...... 56
Air cond itioner ......' 59
Sliding/ti ltin g roof. . . . . . . . . . . . ... 65
Sun visors / Interior lights 66,67
Cigarette lighter, Ash tray ..... 68
Shelves and boxes . . . . . . . . . . . ... 69
Roof rack / Roof ra ilings ... 70
DRIVING TIPS
The firs t 1500 km -and after wards .... 71
Driving economically and ecologically .. 72
Brakes. . . . . . . . . . . . . . . . 75
Tra iler tow ing . .. ..... . .... ... ...... 77
Driving a four- wheel drive vehicle .. 79
GENERAL MAINTENANCE
Filling the tan k, Fuel. 81, 82
Care of vehicle ........ .. . . 85
Bonnet . . ... 90
Engine compartment .. ...... .... .... 91
Engine oil ..... .......... ........... 92
Automatic transmission fluid (ATF)* ... 96
Power-assisted steering .. 96
Cooling system . . . . . . . . . . .. . 97
B rake fluid ...... 99
Battery . . . . .. 100
Spark plugs. V-belts . . . . . . . . . 102
Washer system
... . .. 103
Windscreen w iper blades . . . 104
Dust a
nd pollen filter * . 104
Wheel s . 105
D riving abroad ..... ............... 110
Accessories, modifications and
renewa l ot parts .............. III
Mobile telephones and tw o-way rad ios 111
DO -lT-YOURSELF
First -aid kit, Warn ing triangle ........ 112
Storage of vehicle tools, spare wheel
a n d ball coupling trailer bracket ...... 113
Vehicle tools, Spare wheel 114
CONTENTS
Changing w heels . 116
F uses . ........ .. .. . . . ... . .... 119
Changing bulbs. . .... .. . 121
Installing radio . . . . .. 127
E mergency starting .. .. 128
Tow starting / to wing . . .. 129
L ift ing vehicle ......... 131
SPECIAL INFORMATION
Body ..... .... . .......... 132
Environmental compatibility ... 133
TECHNICAL DATA
Engine data . .. , .... .... . 134
P er forman ce .. ... ... ... . .. 136
Fuel consump tion .. 137
Wh eels
. . 139
T yre pressures
.. .. ... .. . . .. ... 1 4 1
Weights ... 143
Trailer weights .. 144
Dimensions. ...... .. ... 145
Capacities " ..... 146
Vehicle identification data ... 147
ALPHABETICAL INDEX
Alph abetical index ... 148
3
Page 79 of 156
Downloaded from www.Manualslib.com manuals search engine DRIVING TIPS
Trailer towing
The vehicle is intended main ly for the trans
portation of persons and luggage but it can, with the appropriate technical equipment,
also be used to tow a trailer.
Technical requirements
• If the vehicle is suppl ied with a factoryfi tted towing bracket, all that is technically
a nd legally necessary for trailer towing wil l
have been taken into account.
• If the trailer to be towed
has a 7 pin plug, an adapte r cable can be used whi ch IS ob
tained from a Volkswagen dealer.
• Volkswagen dealers have
all the necessary information on the In stallation of towing
brackets and the fitti ng of a heavy-duty cooling system. The installation should there
f ore be done by them .
Operations instructions
• On the Golf saloon with a factory
fitted towing bracket* the removable ball
coupling will
be fitted. Fitting/remo ving in
struc tions and instructions on correct stowage of the ball coupling in the spare wheel
well can be found in a linen bag in the ve
hicle luggage compartment.
•
On the Golf estate with a factory fitted
towing bracket* the remova ble ball coupl
ing is stored inside the vehicle next to the
spare wheel, together w ith instructions on
fitting.
• Pitching movements between towing
vehicle
and trailer can be reduced by hea vy
duty springs and shock absorbers on the
rear axle. If these springs and shock absorbers have not alread y been fitted at the
factory, they can, in many cases, be service
installed by a Volkswagen dealer.
• The permissible trailer weight -see
page 144 -m ust not
be exceeded on any account.
• If the the trailer weight
is below the
permissible maximum, a correspondingly
steeper gradient
can be climbed. •
The given trailer weights
are only appli
cable for altitudes up to 1000 m above sea level. As the engine output and thus the
climbing ability drops due to the decreasing
air density , the weight of vehic le and trailer
must also be reduced by 10 % for each
further 1000 m or part thereof.
• Where possible make full use of the
maximum permissible drawbar weight
on ball of the towing bracket -see page 144
but do not exceed it.
• While observing the permissible trailer
and drawbar weight, distribute the load in the trailer so that heavy objects are as nea r as possible to the axle. The objects must
also be secured so that they cannot slip
about.
• Check the ty
re pressures on the towing
v ehicle, and adjust for full load conditions,
and also check the pressures on the trailer
• T he headlight settings, should
be checked w ith trailer attached before mov
ing off and adjusted as necessary. On vehicles with headlight beam control it is on ly necessary to turn the knurled disc in dash in the appropriate directIOn .
77
Page 107 of 156
Downloaded from www.Manualslib.com manuals search engine GENERAL MAINTENANCE
Wheels
General notes
• New tyres do not give maximum grip
str aight away and should therefore be run in
a moderate speeds and a careful style of
driving for about the first 100 km . This will
"Ielp to make the tyres last longer.
• The tread depth of
new tyres can vary
du e to constructi on and design features,
and depending on version and manufac
:u res.
• Check tyres for damage from
time to
-lin e (cuts, splits, cracks and lumps) and re
m ove any foreign bodies embedded in the
- r eads.
•
To a v oid damage to tyres and wheels
drive over curbs and similar obst acles very
slowly and as nearly at right angles as poss
Ible .
Damage to w he els and tyres is not always
e asy to see, so if you think that a wheel is
d a maged, It must be checked by a Volks
w agen dealer.
• Keep grease,
011 and fuel off the tyres.
• Replace missing dust caps as soon as possib le.
• Mark wheels before taking them off so
that they rotate in the same direction when put back on again
•
When taken off, the tyres should be
stored in a cool, dry and preferably dark
place
T y res
which are not on wheels shou ld be
stored In a vertical position.
Tyre life
Tyre life depends to a considerable extent
on the following factors:
Inflation pressure ..-
Tyre pressures can be found on page 141
and on a sticker on the inside of of the tank
filler flap -see page 81.
The inflation pressure
is very important par
ticularly at high speeds . Therefore, the pres
sures should be che cked at least once a
month and before every long Journey.
At this opportunity do not
forget the spare
w heel
• On the temporary spare the pressure is shown on the side wall.
• The spare
wheel w ith normal tyre shou ld alw ays be inflated to the highest pressure required on the veh icle. •
Always check the pressures
when the
ty res are cold. When warm, the pressure is higher but do not reduce. If the load changes a great deal the pressure must be altered to suit.
Pressures
which are too high or too low short en tyre life -quite apart from the detrimental influence on vehicle handling .
Attention
At continuous high speeds a tyre
in which the pressure is too low
flexes more and heats up excess
ively. This can cause tread separ
ation and tyre blowout.
dit-. A pressure which is too low in~creases the fuel consumption and this burdens the environment unnecessarily.
Mode of driving
Fast cornering, hard acceleration and Viol
ent braking also increase tyre wear.
105
Page 109 of 156
Downloaded from www.Manualslib.com manuals search engine GENERAL MAINTENANCE
I S1H-053 I
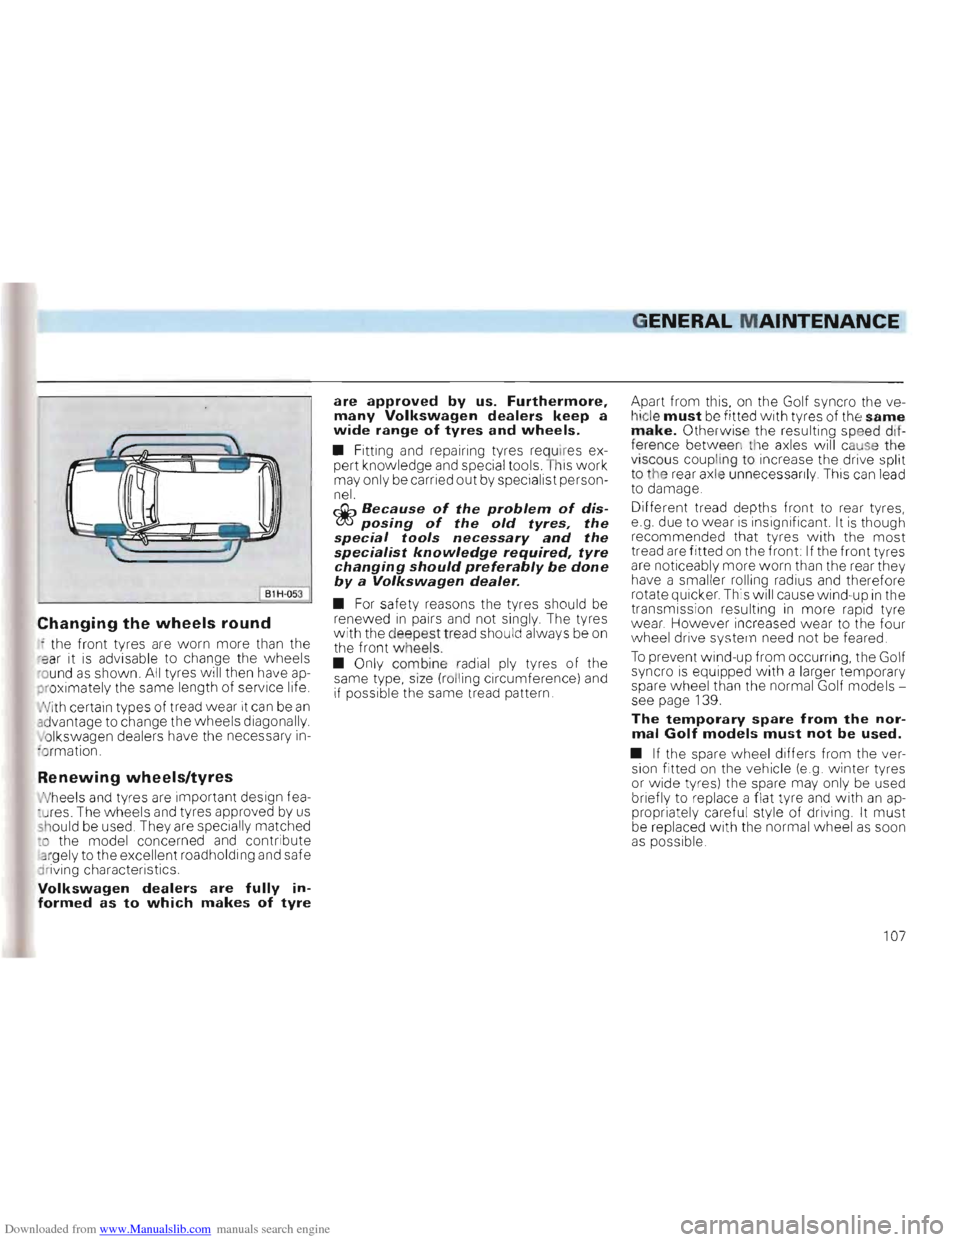
Changing the wheels round
, the front tyres are worn more than the
r ear it is advi sable to change the wheels
r o und as shown . All tyres wi ll then have ap
proximately the same length of servic e life.
N ith certain types of tread wear it
can be an advantag e to change the wheels diagonally. Jo lkswagen dealers have the necessa ry in
:or mation.
Renewing wheels/tyres
N heels and ty res are important design fea
. u res. The w heels and tyres approved by us sh ou ld be used. They are special ly matched ~o the model concerned and contribute argely to the excellent roadhold ing and safe
driving characteri stics.
Volkswagen dealers are fully informed as to which makes of tyre
are approved by us. Furthermore, many Volkswagen dealers keep a wide range of tyres and wheels.
• Fitting and repairing tyres requires ex
pert knowledge and specia l tools. This work may only be carried out by spec ialist person
nel.
r.Q:., Because of the problem of dis'{!J!J posing of the old tyres, the special tools necessary and the specialist knowledge required, tyre changing should preferably be done by a Vo/kswagen dealer.
• For saf ety reasons the tyres shou ld be renewed in pairs and not singly. The tyres with the dee pest tread should always be on the front w heels.
• Only combin e r
adial ply tyres of the
same type, size (rolling circumference) and
if possible the same tread pattern . Apart
from th
is, on the Golf syncro the ve
h icl e m ust be fitted with tyres of th e same mak e. Other w ise the resulting speed dif
ference between th e axles wil l cause the
viscous coupling to increase the drive sp lit
to t he rear axle unnece ssa rily Thi s can lead
to damage.
D i
fferent tread depths front to rear tyres,
e.g. due to wear is insignif icant. It is though
recommended that tyres with the most
tread are fitted on the front If the front tyres
are noticeably more worn than the rear they
have a smal ler ro lli ng radius and therefore
rotate quicker. This wi ll cause wind-up in the
transmission resulti ng in more rapid tyre wear. However increased wear to the four
wheel drive system need not be feared .
To pre vent wind-u p from occurring , the Golf
syncro is equ ipped with a larger temporar y
spare wheel than the normal
Golf models
see page 1 39.
The temporary spare from the normal Golf m odels must not be used.
• If the spare wheel differs from the ver
sion fitted on the vehicle (e.g. winter tyres
or wide tyres) the spare may only be used
briefly to replace a flat tyre and with an ap
propriately careful style of drivi ng . It mus t be replaced with the normal w heel as soon as possib le
107
Page 111 of 156
Downloaded from www.Manualslib.com manuals search engine GENERAL MAINTENANCE
Winter tyres
winter conditions win ter tyres w ill dis
- n ctly improve the vehicle's handling even
th e case of four
wheel drive ve hicles. This
ap plies In particular to veh icles that are
eq uipped with wide/high -speed tyres (Code
e
tters H or V in the tyre designation on the
: r e wall). Because of their construction
,lIdth, rubber mixture, tread formation etc) :n se tyres provide less traction on ice and
sn ow.
h
en fitting winter tyres note the follow
n g:
• Onl y radial ply winter tyres may
be fitted.
h e factory recommended tyre sizes are given on page 139.
•
To obtain the best possible handling ch aracteristics, wint er tyres must be fitted o n all fou r wheels.
• The pressures for
winter tyres must be
0.2 bar higher than with summer tyres
s e e Technical Data on page 142.
•
Winter tyres are no longe r fully effec tive
h en the tread has worn down to a depth
o f 4 mm.
The following speed limits are valid for winter tyres:
Code letter
Q max. 160 km/h
Code letter T max. 190 km/h
Code letter H ma
x. 210 km/h
In Germany, vehicles w hich can exceed this
speed must have an appropriate sticker in the driver's field of view. Suitable stickers
are available from Volkswagen dealers.
Please note regulations to this effect
in your
cou ntry .
• All-weath er t yres
can also be used in
stead of winter ty res .
• If you have a flat tyre the remarks on
using the spare wheel on page 114 should
be noted .
•
Do not leave winter tyres fitted for an un
necessary long period because w hen the
roads are free of
snow and ice the handling with summer tyres is better.
r:lil:.-. For environmental reasons (!Jtf summer tyres should be fitted again as soon as possible because normally they are quieterin running, tyre wear is reduced and the fuel consumption is lower_
Snow chains
Snow chains can be used on all tyre sizes
listed on page 139. The chains may only be fitted on the front wheels -this applies also to the syncro.
The use of sno w chains on the temporary
spare wheel is not permitted for technical
reasons. Further details are given on page
114 .
Only use thin chains w hich do not stand
clea r
more than 15 mm (including ten
sioner).
When using snow chains wheel trim plates
and trim rings must be ta ken off . For sa fety
reasons the w heel bolts must then be fitted with caps w hich are available from Volks
wagen dealers.
When driving over roads whic h are free of snow you must remo ve the chains. On such
road s they are detrimental to vehic le handl
ing, damage
the tyres and wear out Quickly .
In Germany , the maximum permissible
speed w ith snow chains is 50 m/h
109
Page 115 of 156
Downloaded from www.Manualslib.com manuals search engine DO-lT-YOURSELF
Storage of vehicle tools, spare wheel and
ball coupling* of trailer bracket
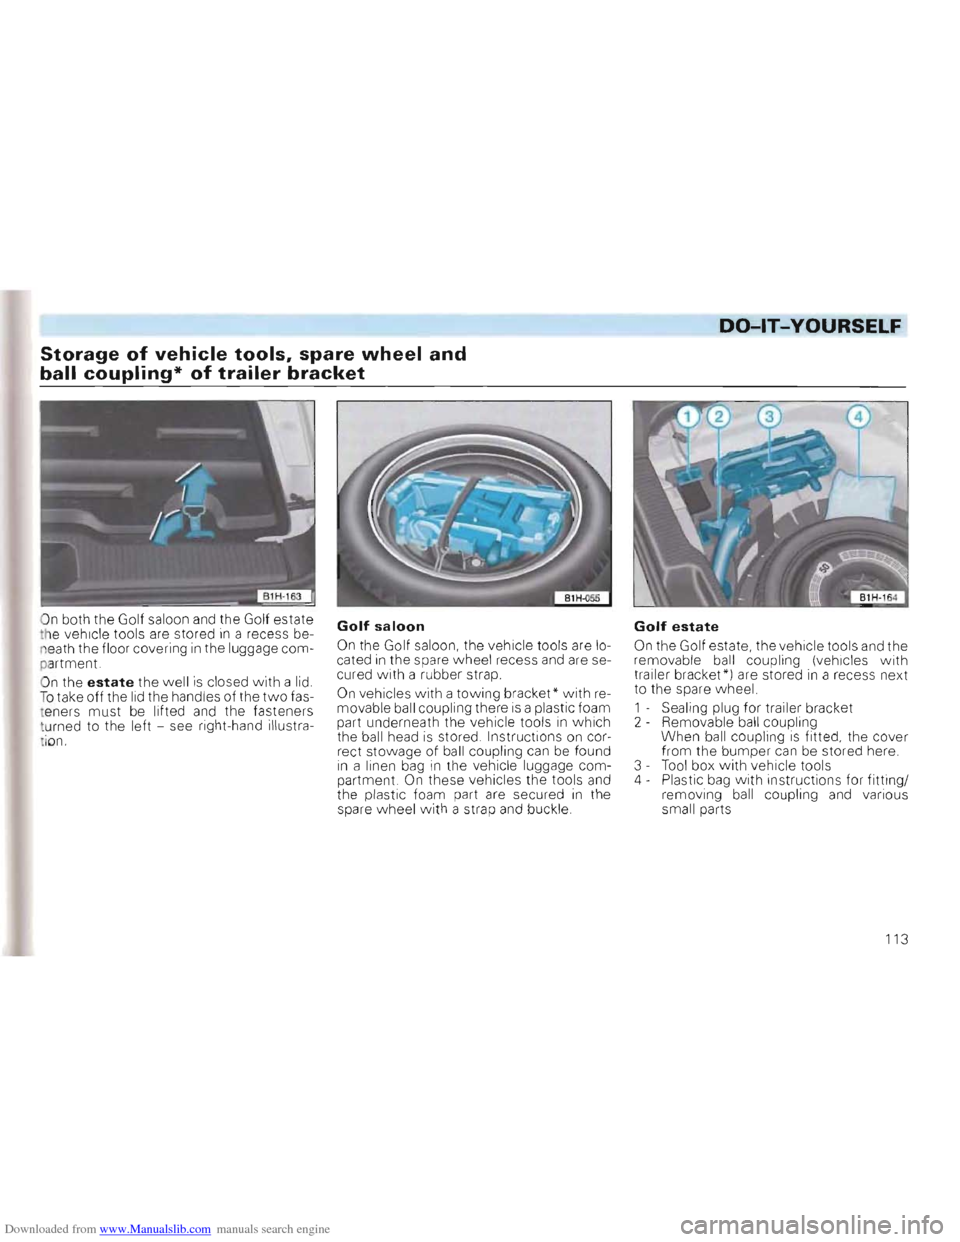
On both the Golf saloon and the Golf estate
t h e vehicle tools are stored in a rece ss be
n e ath the floor covering in the luggage com
p a rtment.
O n the
estate the w ell is closed with a lid. To take off the lid the handles of the two fas
t ener s must be lifted and the fasteners
t u rned to the left -see right-hand illustra
i
on.
Golf saloon
On the Golf saloon, the vehicle tools are lo
cated in the spare wheel recess and are se
cured with a rubber strap.
On vehicles with a to wing bracket* with removable ball coupling there is a plastic foam
part underneath the vehicle tools in w hich
the ball head is stored . Instructions on cor
rect stowage of ball coupling can be found in a linen bag in the vehicle luggage com
partment. On these vehicles the tools and the plastic foam part are secured in the
spare wheel with a stra p and buckle .
Golf estate
On the Golf estate, the vehicle tools and the
remo vable ball coupling (vehicles with trailer bracket*) are stored in a recess next
to the spare w heel.
1 - Sealing plug for trailer bracket
2 - Remo vable ball coupling
When ball coupling
is fitted , the cover
from the bumper can be stored here.
3 -Tool box with vehicle tools
4 - Plastic bag with instructions for fitting/
removing ball coupling and various
small parts
113
Page 116 of 156
Downloaded from www.Manualslib.com manuals search engine -----------------------DO-lT-YOURSELF
Vehicle tools Spare wheel
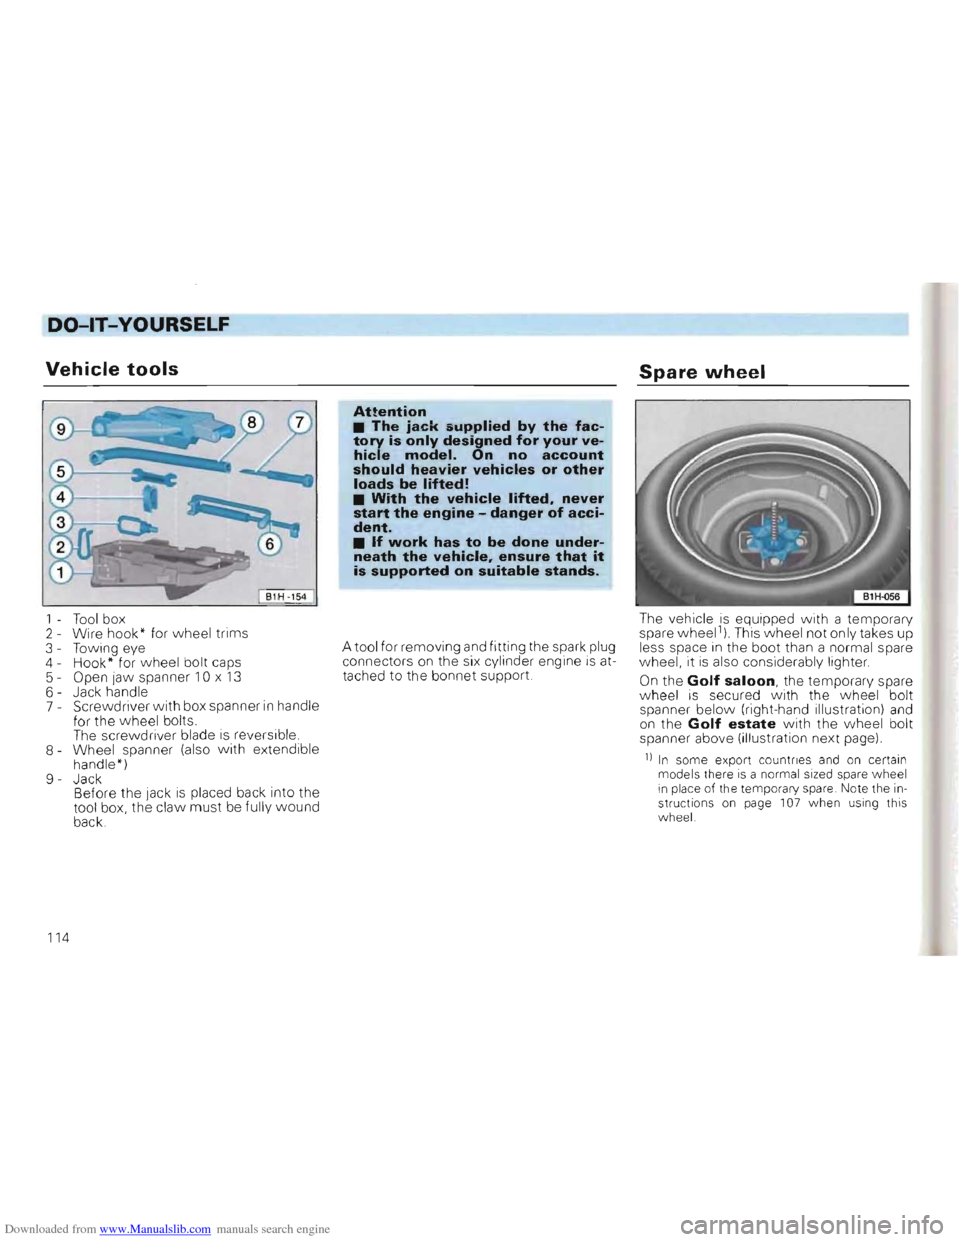
1 - Too l box
2 - Wire hook" for wheel trim s
3 - Towing eye
4 - Hook* for w heel bolt caps
5 - Open
Jaw spanner 10 x 13 6 -Jack handle
7 -Screwdriver with box spanner in handle
for the wheel bolts.
The scre
wdriver blade is reversible.
8 Wheel spanner (a lso with extendible
handle ")
9 Jack
Bef ore the
Jack is place d back into the
tool box, the claw must be fully wound
back.
Attention • The jack supplied by the factory is only designed for your vehicle model. On no account should heavier vehicles or other loads be lifted! • With the vehicle lifted. never start the engine -danger of accident. • If work has to be done underneath the vehicle. ensure that it is supported on suitable stands.
A tool for removing and fitting the spark plug
co nne ctors on the six cy linder engine is attac hed to the bonnet support. The
vehicle is
equippe d with a temporary spare wheel1
) This wheel not only takes up
less space in the boot than a norm al spare
w heel , it is a l
so considerabl y lighter .
On the Golf saloon, the temporary spare wheel is secured with the wheel bolt spanner below (right-hand illustration) and on the Golf estate with the vvheel bolt
spanner above (illustration next page).
11 In some export countries and on certain mod els there is a norma l sized spare wheel in place of the temporary spare. Note the in
structio ns o n page 107 when USing this
w heel.
114
Page 117 of 156
Downloaded from www.Manualslib.com manuals search engine DO-lT-YOURSELF
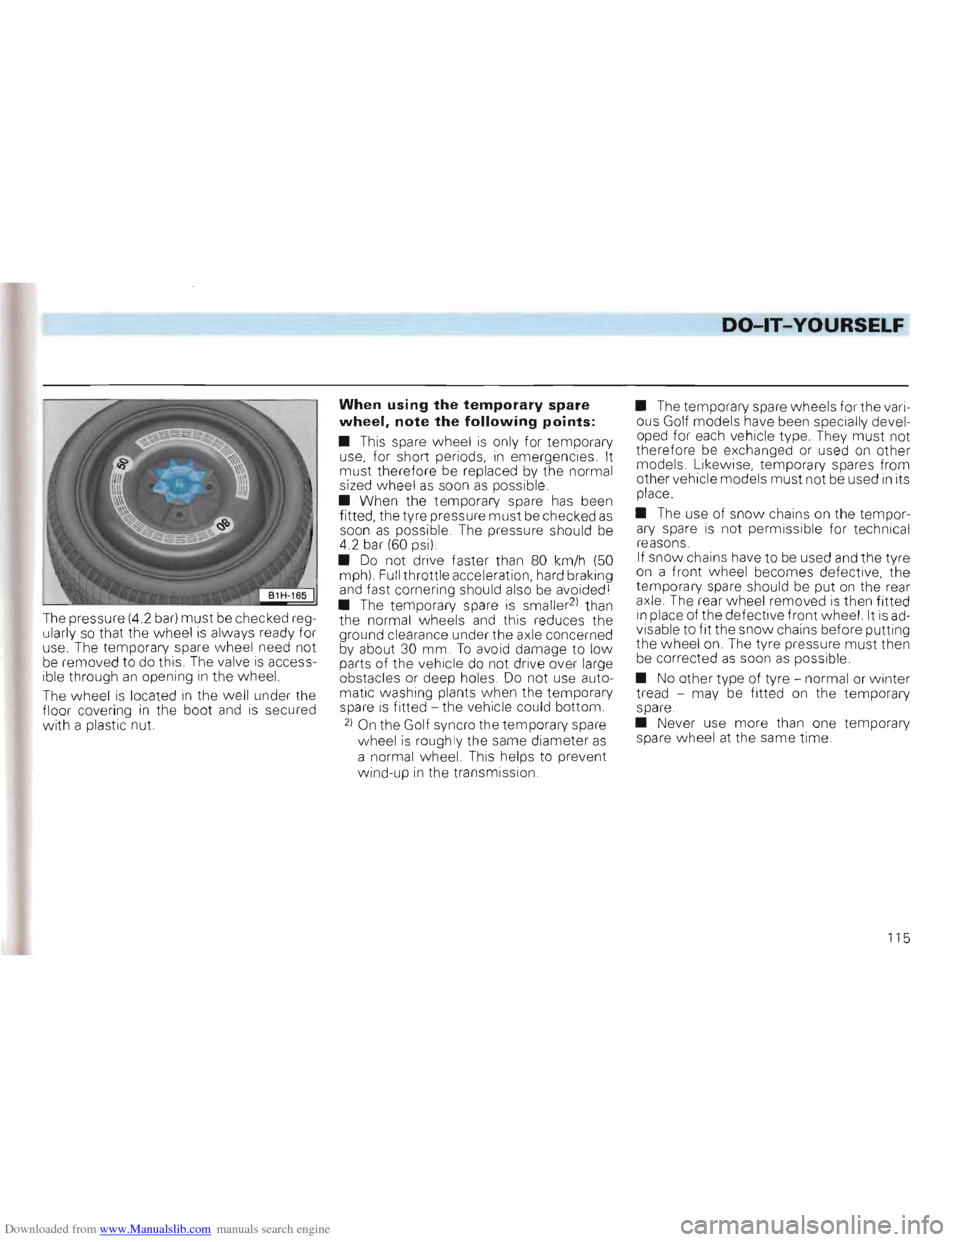
The pressure (4.2 bar) must be checked reg
u larly so that the wheel is always ready for
use. The temporary spare w heel need not
be removed to do this. The valve is access
ible through an opening in the wheel.
The w heel
is located in the well under the
floor covering in the boot and is secured
with a plastic nut
When using the temporary spare
wheel. note the following points:
• This spare wheel is only for temporary
use, for short periods, in emergencies. It
must therefore be replaced by the normal
sized wheel as soon as possible .
• When the temporary spare
has been
fitted , the tyre pressure must be checked as soon as possible. The pressure should be
4.2 bar (60 psi) .
•
Do not drive faster than 80 km/h (50 mph). Full throttle acceleration, hard braking and fast cornering should also be avoided I
• The temporary spare is smaller2
) than
the normal w heels and this reduces the
ground clearance under the axle concerned
by about 30 mm.
To avoid damage to low
parts of the vehicle do not drive over large
obstacles or deep holes. Do not use auto
matic washing plants when the temporary
spare
is fitted -the vehicle could bottom.
2) On the Golf syncro the temporary spare
vvheel is roughly the same diameter as a normal wheel. This helps to prevent
wind-up in the transmission . •
The temporary spare
wheels for the vari
ous Golf models have been specially devel
oped for each vehicle type. They must not
therefore be exchanged or used on other
models. Likewise, temporary spares from
other vehicle models must not
be used in its
place
• The use of
snow chains on the temporary spare is not permissible for technical
reasons. If snow chains have to be used
and the tyre on a front wheel becomes defective, the
temporary spare should be put on the rear
axle. The rear wheel removed is then fitted in place of the defecti ve front wheel. It is advisable to fit the snow chains before putting
the wheel on. The tyre pressure must then be corrected as soon as possible .
•
No other type of tyre - normal or winter
tread -may be fitted on the temporary
spare.
• Never use more than one temporary
spare wheel
at the same time.
115
Page 118 of 156
Downloaded from www.Manualslib.com manuals search engine DO-lT-YOURSELF
Changing wheels
Park the vehicle as far as possible away
from the traffic flow. If necessary switch on
emergency warning lights
and place the
warning triangle in position -note legal reQuirements,
• A
ll veh icles occupa nts shou ld leave the
vehicle and move to a safe area (e,g, behind
the barrier),
• App ly handbrake firml
y, If the car is on a
slope, block one of the wheels on the oppo
site side with a stone or some similar ob
ject.
•
Take too ls and spare wheel out of lug
gage compartment.
• Remove wheel bolt caps:
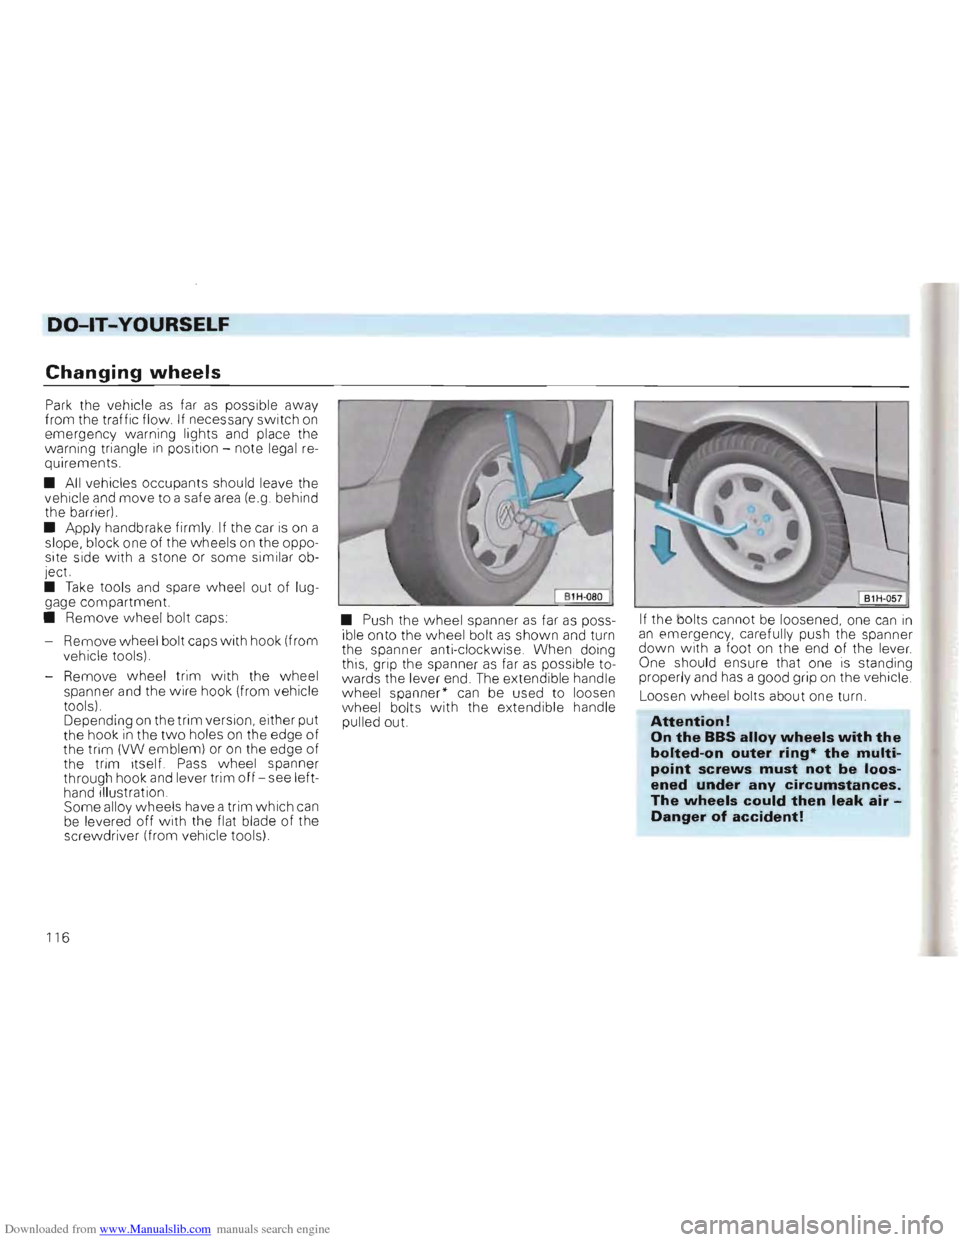
- Remove wheel bolt caps
with hook (from
vehicle tools),
- Remove wheel trim with the
wheel
spanner and the wire hook (from vehicle
tools) ,
Depending
on the trim version , either put
the hook in the two holes on the edge of the trim (VW emblem) or on the edge of
the trim itself, Pass wheel spanner
through hook and lever trim off -see left
hand illustration ,
Some alloy wheels have a trim which can be levered off with the flat blade of the
screwdriver (from vehicle tools) •
Push the wheel spanner
as far as poss
ible onto the wheel bolt as shown and turn
the spanner anti-clockwise, When doing
this, grip the spanner
as far as possib le to
wards the lever end, The extend ib le handle
wheel spanner"
can be used to loosen wheel bolts with the extendible handle
pulled out. If
the bolts cannot be loosened, one can
in an emergency, carefully push the spanner down wi th a foot on the end of the lever.
One should ensure that one is standing
proper ly and has a good grip on the vehic le ,
Loosen
wheel bolts about one turn,
Attention!
On the BBS alloy wheels with the
bolted-on outer ring· the multi
point screws must not be loos
ened under any circumstances.
The wheels could then leak air Danger of accident!
116
Page 120 of 156
Downloaded from www.Manualslib.com manuals search engine DO-lT-YOURSELF
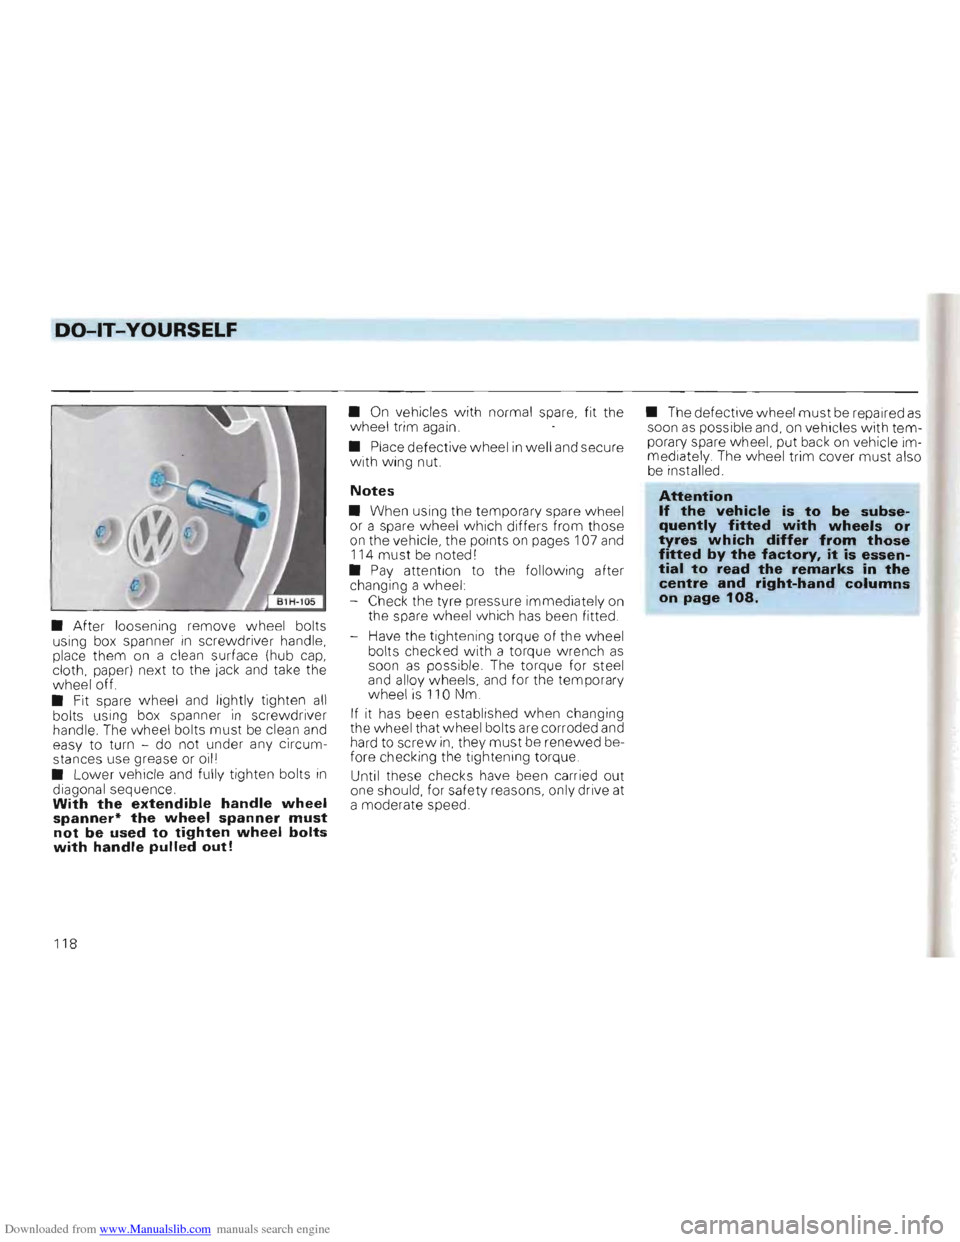
• After loosening remove wheel bolts
using box spanner in screwdriver handle,
place them on a clean surface (hub cap, cloth, paper) next to the jack and take the
wheel off.
• Fit spare w heel
and lightly tighten all bolts using box spanner in screwdriver
handle. The wheel bolts must be clean and
easy to turn -do not under any circum
stances use grease or oill
• L o
wer vehicle and fully tighten bolts in diagonal sequence. With the extendible handle wheel spanner* the wheel spanner must not be used to tighten wheel bolts with handle pulled out!
• On vehicles w ith normal spare, fit the
wheel trim again.
• Place defective wheel
in well and secure
with wing nut.
Notes
• When using the temporary spare wheel
or a spare wheel wh ich differs from those
on the vehicle, the points on pages 107 and
114 must be noted I
• Pay attention to the following after
changing a wheel:
- Check the tyre pressure immediatel y on
the spare wheel which has been fitted .
-
Have the tightening torque of the wheel
bolts checked with a torque wrench as soon as possible. The torque for steel and alloy wheels, and for the temporary
wheel is 110 Nm .
If it has been established when changing
the wheel that wheel bolts are corroded and
hard to screw
in, they must be renewed be
fore checking the tightening torque.
Until these checks have been carried out
one should, for safe ty reasons, only drive at
a moderate speed. •
The defective wheel
must be repaired as soon as possible and, on vehicles with tem
porary spare wheel, put back on vehicle im
mediately. The wheel trim cover must also be installed.
Attention If the vehicle is to be subsequently fitted with wheels or tyres which differ from those fitted by the factory. it is essential to read the remarks in the centre and right-hand columns on page 108.
118